manuals.online logo
Brands
  1. Home
  2. •
  3. Brands
  4. •
  5. Victoria M
  6. •
  7. Window Blind
  8. •
  9. Victoria M RAFFROLLO User manual

Victoria M RAFFROLLO User manual

ALLGEMEINE SICHERHEITSHINWEISE
general safety notes ~ Algemene veiligheidsaanwijzingen
Indicaciones generales de seguridad ~ Informations sur la sécurité
Indicazioni di sicurezza ~ Ogólne instrukcje bezpieczeństwa
Genel güvenlik uyarıları
VERPACKUNGSINHALT
package content ~ Verpakkingsinhoud ~ Contenido del embalaje
Contenu de l’emballage ~ Contenuto della confezione
Zawartość opakowania ~ Paket içeriği
MONTAGE
installation ~ Montage ~ Montaje ~ Montage ~ Montaggio
Montaż ~ Montaj
KONTAKTINFORMATIONEN
contact information ~ Contactinformatie ~ Contacto
Coordonnées de contact ~ Informazioni di contatto
Informacje kontaktowe ~ İletişim bilgileri
1
ist eine eingetragene Marke der SCHÖNBERGER Rolladenfabrik GmbH & Co. KG, Münchner Straße 49-51, 82069 Hohenschäftlarn
MONTAGEANLEITUNG
installation instructions
Montage handleiding
Instrucciones de montaje
Instructions de montage
Istruzioni di montaggio
Instrukcja montażu
Montaj talimatı
RAFFROLLO
Roman blind
Rarollo
Cortina romana
Store bateau
Tenda a pacchetto
Roleta zwijana
Katlamalı perde
1
2
3
DEN NL ES FR IT PL TR
SEILHALTERUNG
cord holder ~ Snoerhouder ~ Soporte de la cuerda
porte-câble ~ Supporto per corda ~ Uchwyt boczny ~ Halat tutucu
12 (3)*
4 (6)* 4 (6)*
Seitenansicht
Side view
Zij aanzicht
Vista lateral
Vue de côté
Vista laterale
Widok z boku
Yandan görünüm
Vorderansicht
Front view
Voor aanzicht
Vista frontal
Vue de face
Vista frontale
Widok z przodu
Önden görünüm
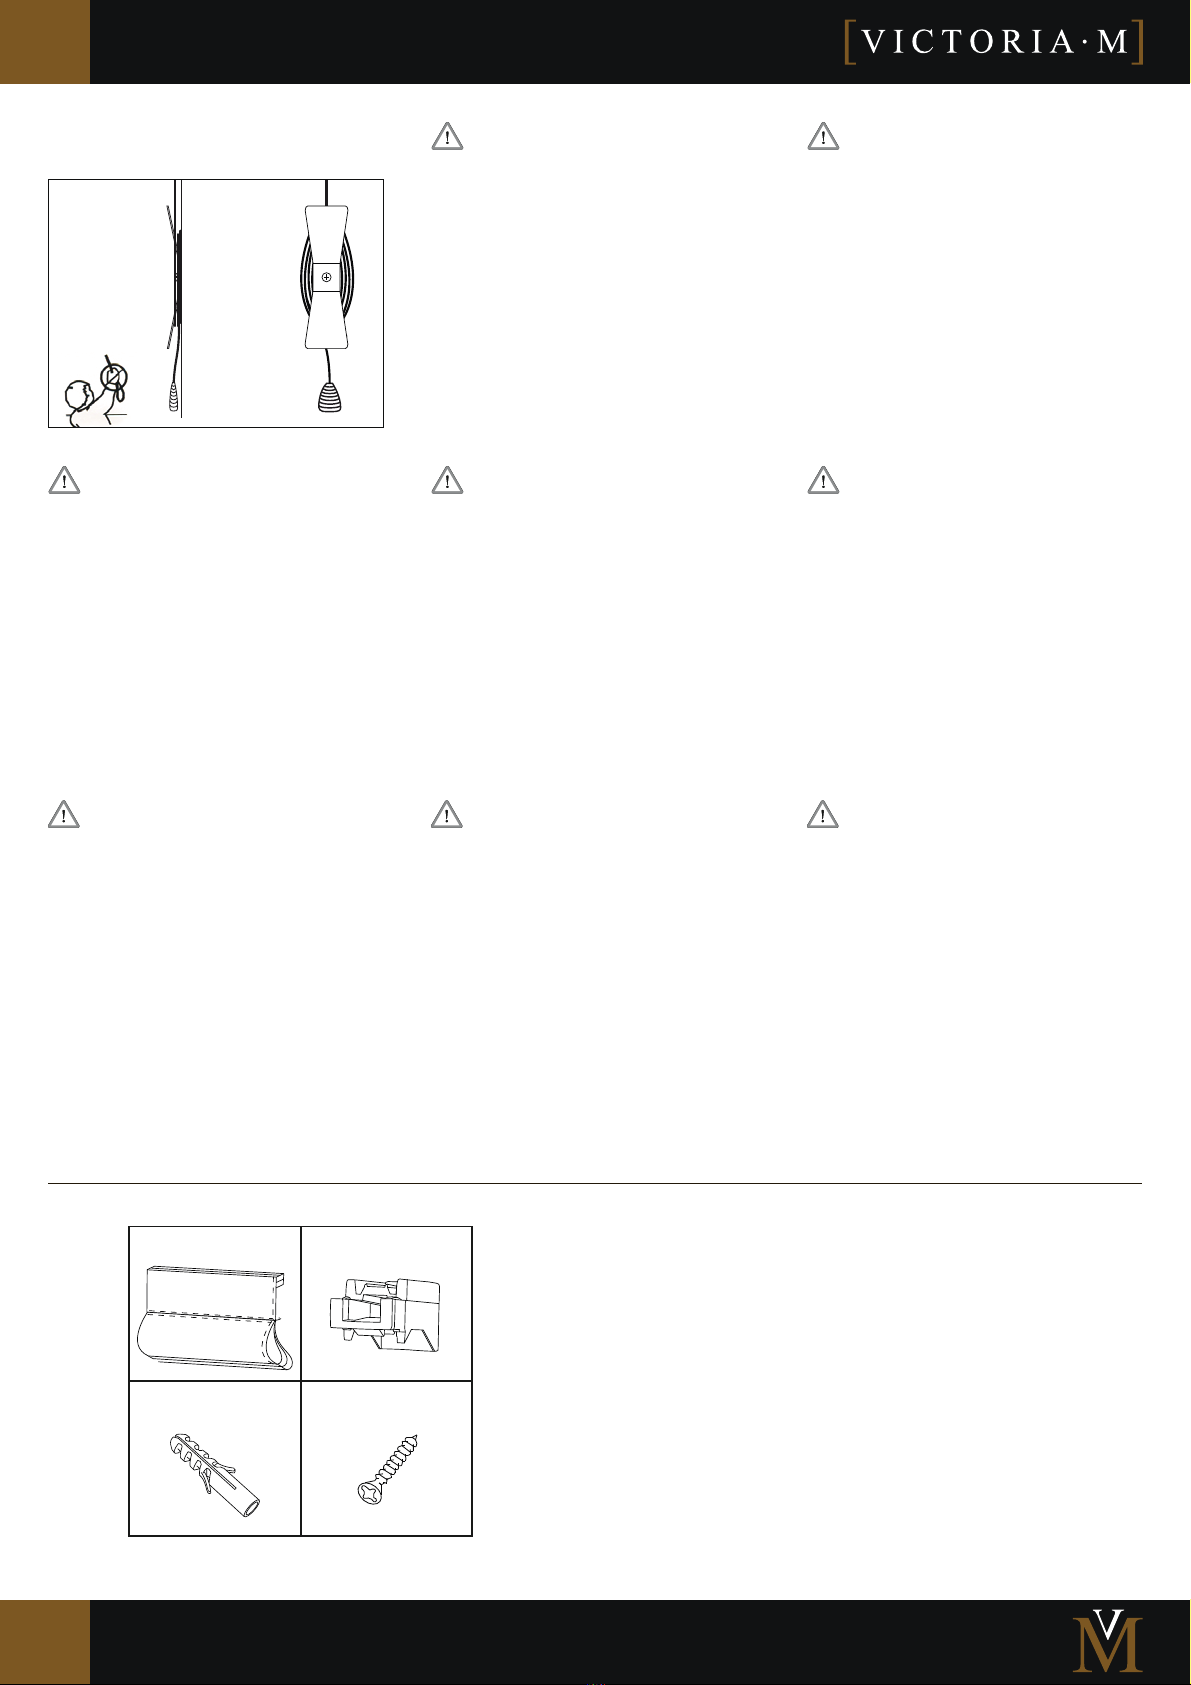
Kleinkinder können sich im Zugseil verfangen und schlimmstenfalls
strangulieren. Platzieren Sie das Zugseil daher immer außerhalb der
Reichweite von kleinen Kindern. Das untere Ende des Seils sollte sich
nicht weniger als 160cm über dem Boden benden.
Sollte das Zugseil unterhalb von 160cm über dem Boden angebracht
sein:
1. Installieren Sie die Seilhalterung an einem geeigneten Ort in der
Nähe der Zugseils.
2. Schrauben Sie die Seilhalterung mittels eines Dübels und einer
Schraube an die Wand und wickeln Sie das Zugseil mehrmals um die
Seilhalterung, um ein Herausrutschen des Seils zu verhindern.
WARNUNG
1
1
Toddlers and small children can get caught in the cord and, at worst,
be strangled. For this reason, always place the cord out of reach of
small children. The lower end of the cord should not be less than
160cm above the ground.
If the cord is to be mounted less than 160cm above the ground:
1. Mount the cord holder in a suitable position close to the cord.
2. Screw the cord holder to the wall using a wall plug/screw anchor
and a screw, and wind the cord several times around the cord holder,
to prevent the cord from slipping out.
WARNING
Los niños pequeños pueden quedar atrapados en la cuerda, y
eventualmente estrangularse. Por consiguiente, siempre coloque la
cuerda fuera del alcance de los niños pequeños. El extremo inferior
de la cuerda debe estar como mínimo 160 cm por encima del suelo.
En el caso de que la cuerda esté colocada a menos de 160 cm sobre el
suelo:
1. Instale el soporte de seguridad en un lugar apropiado próximo a la
cadena de bolas.
2. Atornille el soporte de la cuerda a la pared mediante un tarugo y
un tornillo, y enrolle la cuerda varias veces alrededor del soporte,
para impedir que la cuerda pueda soltarse.
ADVERTENCIA
Les petits enfants peuvent s’emmêler dans le câble tracteur et au
pire s’étrangler. Placez donc le câble tracteur toujours hors de portée
des petits enfants. L’extrémité inférieure du câble tracteur ne doit
pas se trouver en dessous de 160 cm au-dessus du sol.
Si le câble tracteur est xé en dessous de 160 cm au-dessus du sol:
1. Installez le porte-câble à un endroit approprié près du câble
tracteur.
2. Vissez le porte-câble tracteur au mur au moyen d’une cheville et
d’une vis et enroulez le câble tracteur plusieurs fois autour du
porte-câble pour éviter qu’il ne glisse.
AVERTISSEMENT
Kleine kinderen kunnen verstrikt raken in het treksnoer en er is een
duidelijk gevaar voor verstikking. Houdt het treksnoer daarom
steeds buiten het bereik van kleine kinderen. Het onderste gedeelte
van het snoer moet tenminste 160 cm van de grond verwijderd zijn.
Mocht het onderste gedeelte van het snoer meer dan 160 cm van de
grond verwijderd zijn:
1. Installeer de snoerhouder op een geschikte plaats in de buurt van
het treksnoer.
2. Schroef de snoerhouder met een treknagel en een schroef aan de
muur en wikkel het treksnoer meerdere keren om de snoerhouder
opdat het snoer goed en strak vast zit.
WAARSCHUWING
Małe dzieci mogą się zaplątać w linkę i w najgorszym przypadku
mogą się udusić. Dlatego linkę należy zawsze trzymać poza
zasięgiem dzieci. Dolny koniec linki nie powinien znajdować się
niżej, niż 160 cm od podłogi.
Jeśli linka będzie znajdować się niżej niż 160 cm od podłogi:
1. Zamontować uchwyt linki w odpowiednim miejscu w jej pobliżu.
2. Przykręcić uchwyt linki za pomocą śruby z kołkiem do ściany i
kilkakrotnie owinąć linkę wokół uchwytu tak, by nie mogła się z
niego wyślizgnąć.
OSTRZEŻENIE
Küçük çocuklar çekme halatına dolanabilir ve en kötü olasılıkla
boğulabilirler. Bu nedenle çekme halatını daima küçük çocukların
ulaşamayacağı bir yere yerleştirin. Halatın alt ucu yerden en az 160
cm yukarıda olmalıdır.
Çekme halatı yerden 160 cm yukarıya konumlandırılmalıdır:
1. Halat tutucusunu çekme halatının yakınında uygun bir yere
yerleştirin.
2. Halat tutucusunu bir dübel ve cıvata yardımıyla duvara cıvatalayın
ve halatın dışarıya kaymasını önlem için, çekme halatını asla halat
tutucusuna dolamayın.
UYARI
I bambini piccoli possono restare intrappolati nella corda e, nella
peggiore delle ipotesi, persino strangolarsi. Collocare quindi la
corda sempre fuori dalla portata di bambini piccoli. L’estremità
inferiore della corda non deve trovarsi a meno di 160 cm dal
pavimento.
Qualora la corda venga applicata ad una distanza dal pavimento
inferiore a 160 cm:
1. Installare il supporto per la corda in una posizione idonea nelle
vicinanze della corda stessa.
2. Avvitare il supporto della corda mediante tasselli e una vite alla
parete e avvolgere la corda più volte attorno al supporto per evitare
che possa scivolare fuori.
AVVERTIMENTO
ALLGEMEINE SICHERHEITSHINWEISE
general safety notes ~ Algemene veiligheidsaanwijzingen ~ Indicaciones generales de seguridad
Informations sur la sécurité ~ Indicazioni di sicurezza ~ Ogólne instrukcje bezpieczeństwa ~ Genel güvenlik uyarıları
VERPACKUNGSINHALT
package content ~ Verpakkingsinhoud ~ Contenido del embalaje ~ Contenu de l’emballage ~ Contenuto della confezione ~ Zawartość opakowania ~ Paket içeriği
* Menge in Klammern nur bei bestimmten Größen im Lieferumfang enthalten.
* Volumes in clamps are only included in the delivery scope for certain sizes.
* Hoeveelheid klemmen alleen bij bepaalde maten meegeleverd.
* Las cantidades entre paréntesis indican que está solamente disponible en determinados tamaños.
* La quantité en crochets est incluse dans le volume de livraison que pour certaines tailles.
* Le quantità tra parentesi sono comprese solo nella fornitura di determinate misure.
* Liczba klamer w zestawie tylko przy określonych wielkościach.
* içindeki miktarlar sadece belirli boyutlarda teslimat kapsamına dahildir.
2
2
MONTAGE
installation ~ Montage ~ Montaje
Montage ~ Montaggio ~ Montaż ~ Montaj
Befestigen Sie die Kunststohalter in der Fensterönung bzw. in der Fensterlai-
bung.
Mount the plastic bracket in the window opening/window recess.
Bevestig de plastic houder in de raamopening of het raamkozijn.
Atornille el soporte de plástico frontalmente a la pared.
Vissez le support en plastique dans l’intrados de la fenêtre.
Fissare il supporto in plastica nell’apertura o intradosso della nestra.
Zamocować uchwyt z tworzywa sztucznego w otworze okna lub na ościeżnicy.
Plastik tutucuyu pencere açıklığına veya pencere üst girintisine sabitleyin.
Schrauben Sie die Kunststohalter frontal auf das Mauerwerk.
Screw the plastic bracket front-on to the wall.
Schroef de plastic houder frontaal op de muur.
Fije el soporte de plástico en la abertura de la ventana o en la supercie inferior de la ventana.
Vissez le support en plastique frontalement au mur.
Avvitare il supporto in plastica frontalmente alla muratura.
Przykręcić uchwyt z tworzywa sztucznego z przodu do ściany.
Plastik tutucuyu duvarın ön cephesine cıvatalayın.
Variante A
Variant ~ Variant ~Variante ~ Variante ~ Variante ~ Wariant ~ Varvant
Drücken Sie das Rarollo von vorne auf die vorher befestigten Halterungen, bis diese einrasten.
Press the blind onto the mounted brackets from the front until it clicks into place.
Druk de Rarollo vooraan op de voordien bevestigde houders, tot ze inklikken.
Presione la cortina romana desde adelante sobre los soportes anteriormente jados, hasta que encajen.
Insérez le store bateau par l’avant dans les supports préalablement xés et appuyez-y jusqu’à ce qu’il s’enclenche.
Premere la tenda da davanti sui supporti ssati in precedenza, nché questi non s’innestano.
Wcisnąć roletę od przodu do zamocowanych wczesniej uchwytów aż do zatrzaśnięcia.
Katlamalı perdeyi önden daha önce sabitlenen tutucularına, bunlar kilitlenene dek bastırın.
Variante B
Variant ~ Variant ~Variante ~ Variante ~ Variante ~ Wariant ~ Varvant
3
3
KONTAKTINFORMATIONEN
contact information ~ Contactinformatie ~ Contacto ~ Coordonnées de contact
Informazioni di contatto ~ Informacje kontaktowe ~ İletişim bilgileri
Sollten Sie probleme mit unserem Produkt oder ein defektes Gerät erhalten haben, wenden Sie sich bitte schriftlich oder per Email an folgende Adresse:
Should you experience problems with our product and nd that the device received is faulty, please contact us in writing or by email at the following address:
Als u problemen heeft met ons product of een defect toestel hebt ontvangen, neem dan schriftelijk contact op of e-mail naar:
En el caso de que tenga un problema con nuestro producto, o que lo haya recibido con un defecto, póngase en contacto por escrito o por e-mail a la siguiente dirección.
Si vous rencontrez des problèmes avec notre produit ou un appareil défectueux, veuillez nous contacter par lettre ou par e-mail à l’adresse suivante:
Qualora sorgano dei problemi con il nostro prodotto o si riscontrino difetti nell'apparecchio, rivolgersi per iscritto o via e-mail al seguente indirizzo:
W razie problemów z naszym produktem lub w przypadku otrzymania wadliwego produktu, prosimy zwrócić się pisemnie lub pocztą e-mail na następujący adres:
Ürünlerimizle sorun yaşıyorsanız veya arızalı bir ürün aldıysanız lütfen yazılı olarak veya e-posta ile aşağıdaki adrese başvurunuz:
ist eine eingetragene Marke der
SCHÖNBERGER Rolladenfabrik GmbH & Co. KG
Münchner Straße 49-51
82069 Hohenschäftlarn
Tel.: 08178 / 932 932
Fax.: 08178 / 932 939
[email protected]
Technische Änderungen, Druckfehler und Irrtümer behalten wir uns vor.
Technical changes, printing and other errors excepted.
Technische wijzigingen, drukfouten en vergissingen zijn voorbehouden.
Sujeto a modicaciones técnicas, errores de impresión y equivocaciones.
Sous réserve d'erreurs, de modications techniques, ainsi que de changements de modèle ou de gamme.
Ci riserviamo il diritto di modiche tecniche, errori di stampa e sbagli.
Zastrzegamy zmiany techniczne, błędy drukarskie i pomyłki.
Teknik değişiklik, baskı hataları ve yanılma hakkını saklı tutmaktayız.

Other Victoria M Window Blind manuals

Victoria M SYSTEM VS 1 User manual

Victoria M

Victoria M SYSTEM VS 1 User manual

Victoria M Bamboo Roller Blind User manual

Victoria M

Victoria M Bamboo Roller Blind User manual

Victoria M Zevra Doppelrollo User manual

Victoria M

Victoria M Zevra Doppelrollo User manual

Victoria M MINI ROLLO User manual

Victoria M

Victoria M MINI ROLLO User manual

Victoria M Praktica Plisse User manual

Victoria M

Victoria M Praktica Plisse User manual

Victoria M 20000852 User manual

Victoria M

Victoria M 20000852 User manual

Victoria M SYSTEM VS 1 User manual

Victoria M

Victoria M SYSTEM VS 1 User manual

Victoria M Tenebra User manual

Victoria M

Victoria M Tenebra User manual

Victoria M Holz User manual

Victoria M

Victoria M Holz User manual

Victoria M Plissee nach mass User manual

Victoria M

Victoria M Plissee nach mass User manual

Victoria M Kantrea User manual

Victoria M

Victoria M Kantrea User manual

Victoria M PLISSEE User manual

Victoria M

Victoria M PLISSEE User manual

Victoria M SYSTEM VS 2 User manual

Victoria M

Victoria M SYSTEM VS 2 User manual

Victoria M ECO Rollo Series User manual

Victoria M

Victoria M ECO Rollo Series User manual

Victoria M Roller Blind Duo User manual

Victoria M

Victoria M Roller Blind Duo User manual

Victoria M F1 User manual

Victoria M

Victoria M F1 User manual

Victoria M KLEMMFIX ROLLO User manual

Victoria M

Victoria M KLEMMFIX ROLLO User manual

Victoria M Indiva Plissee User manual

Victoria M

Victoria M Indiva Plissee User manual

Popular Window Blind manuals by other brands

Velux Z0V Series manual

Velux

Velux Z0V Series manual

Isotra VS 4 Assembly manual

Isotra

Isotra VS 4 Assembly manual

Rollo Rieper F1 Mounting instructions

Rollo Rieper

Rollo Rieper F1 Mounting instructions

Betta CHAIN & CORD ROMAN BLINDS installation guide

Betta

Betta CHAIN & CORD ROMAN BLINDS installation guide

Artens WZR-G8-25 instruction manual

Artens

Artens WZR-G8-25 instruction manual

MHZ Solix Adjustment instructions

MHZ

MHZ Solix Adjustment instructions

Isotra SD 3 Assembly manual

Isotra

Isotra SD 3 Assembly manual

Graywind 58449 instruction manual

Graywind

Graywind 58449 instruction manual

Home Decorators Collection Smart Roller Shade Use and care guide

Home Decorators Collection

Home Decorators Collection Smart Roller Shade Use and care guide

Louvolite R1705 Setup and operation

Louvolite

Louvolite R1705 Setup and operation

Bali Horizontal Blinds How to install

Bali

Bali Horizontal Blinds How to install

Windoware Shade Cloth Roll Up Blind installation instructions

Windoware

Windoware Shade Cloth Roll Up Blind installation instructions

JAROLIFT TDRC01/04 Original instructions

JAROLIFT

JAROLIFT TDRC01/04 Original instructions

Creation Baumann PLITRIC PLE 12 Assembly instruction

Creation Baumann

Creation Baumann PLITRIC PLE 12 Assembly instruction

Draper LightBloc FlexShade installation instructions

Draper

Draper LightBloc FlexShade installation instructions

LUCOMA WSG-50 Series Installation, operation and maintenance instructions

LUCOMA

LUCOMA WSG-50 Series Installation, operation and maintenance instructions

Vista Simplicity Rechargeable Motorization quick start guide

Vista

Vista Simplicity Rechargeable Motorization quick start guide

Andersen E Series Replacement

Andersen

Andersen E Series Replacement

manuals.online logo
manuals.online logoBrands
  • About & Mission
  • Contact us
  • Privacy Policy
  • Terms and Conditions

Copyright 2025 Manuals.Online. All Rights Reserved.