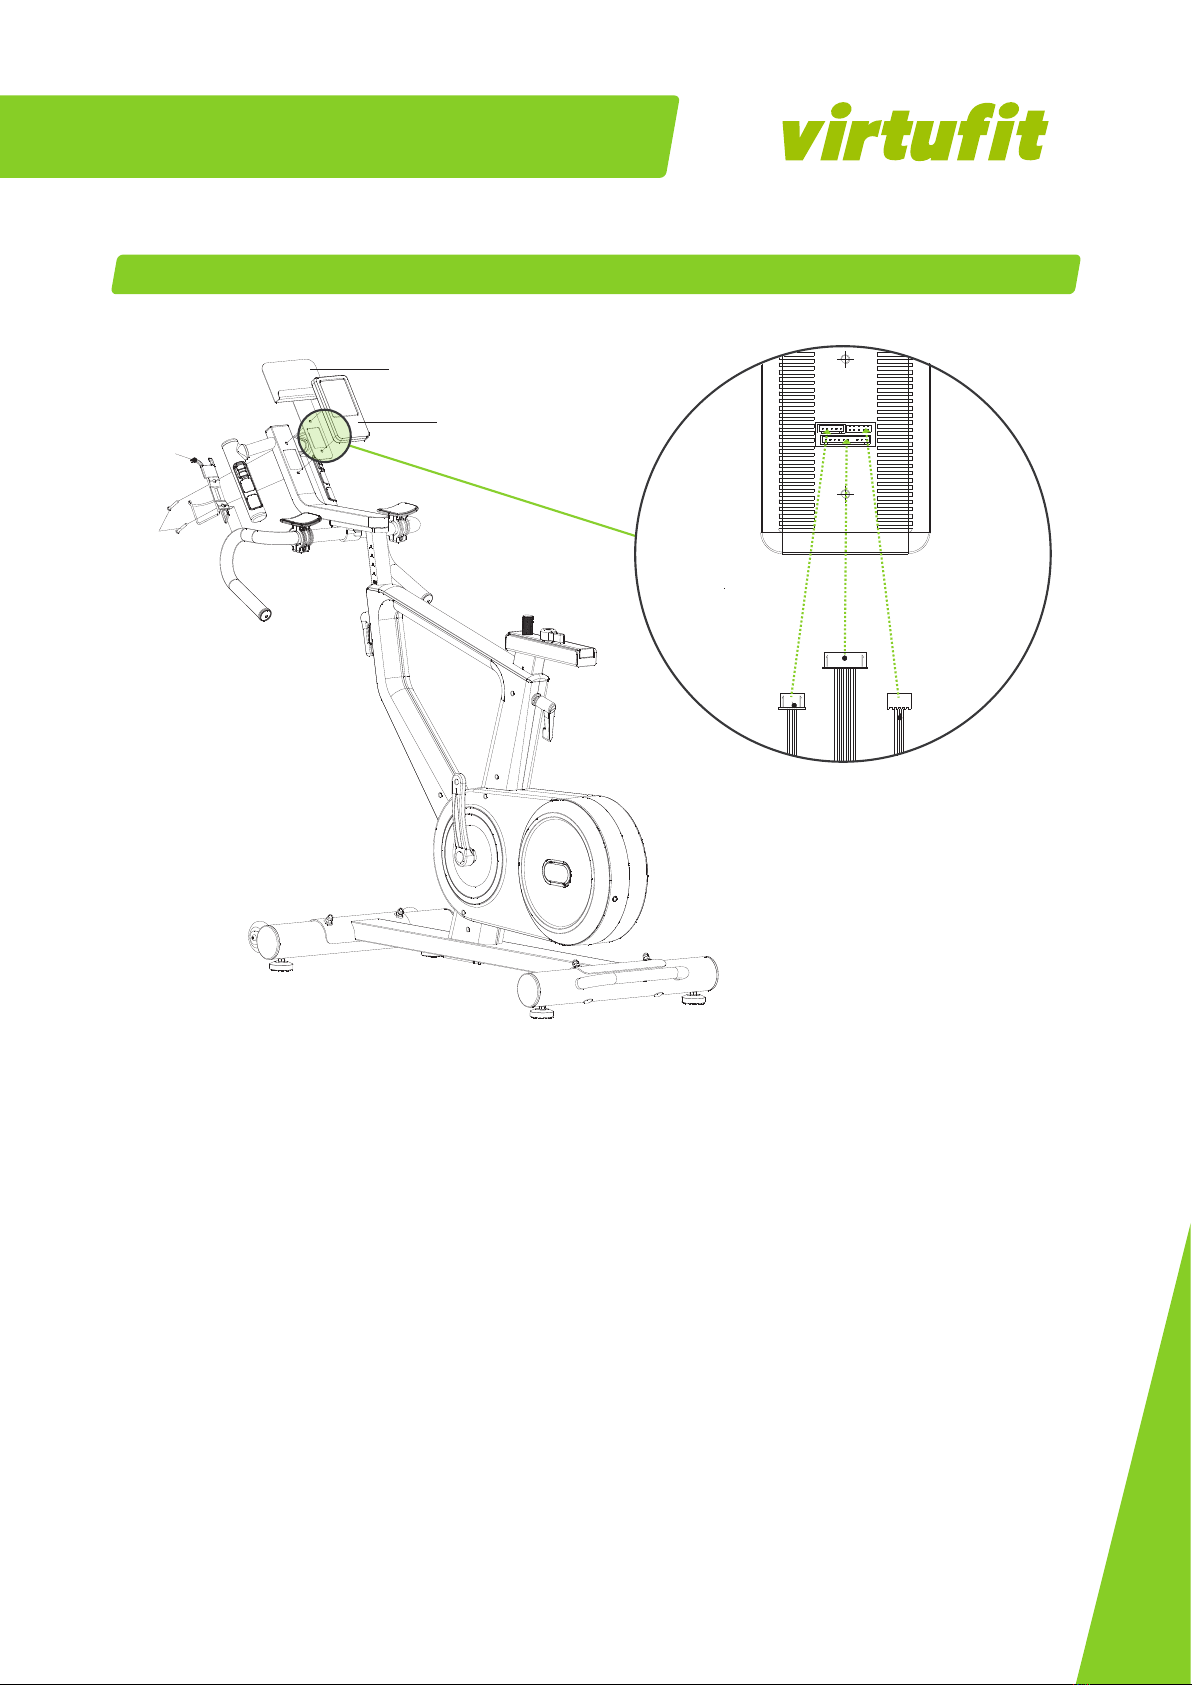
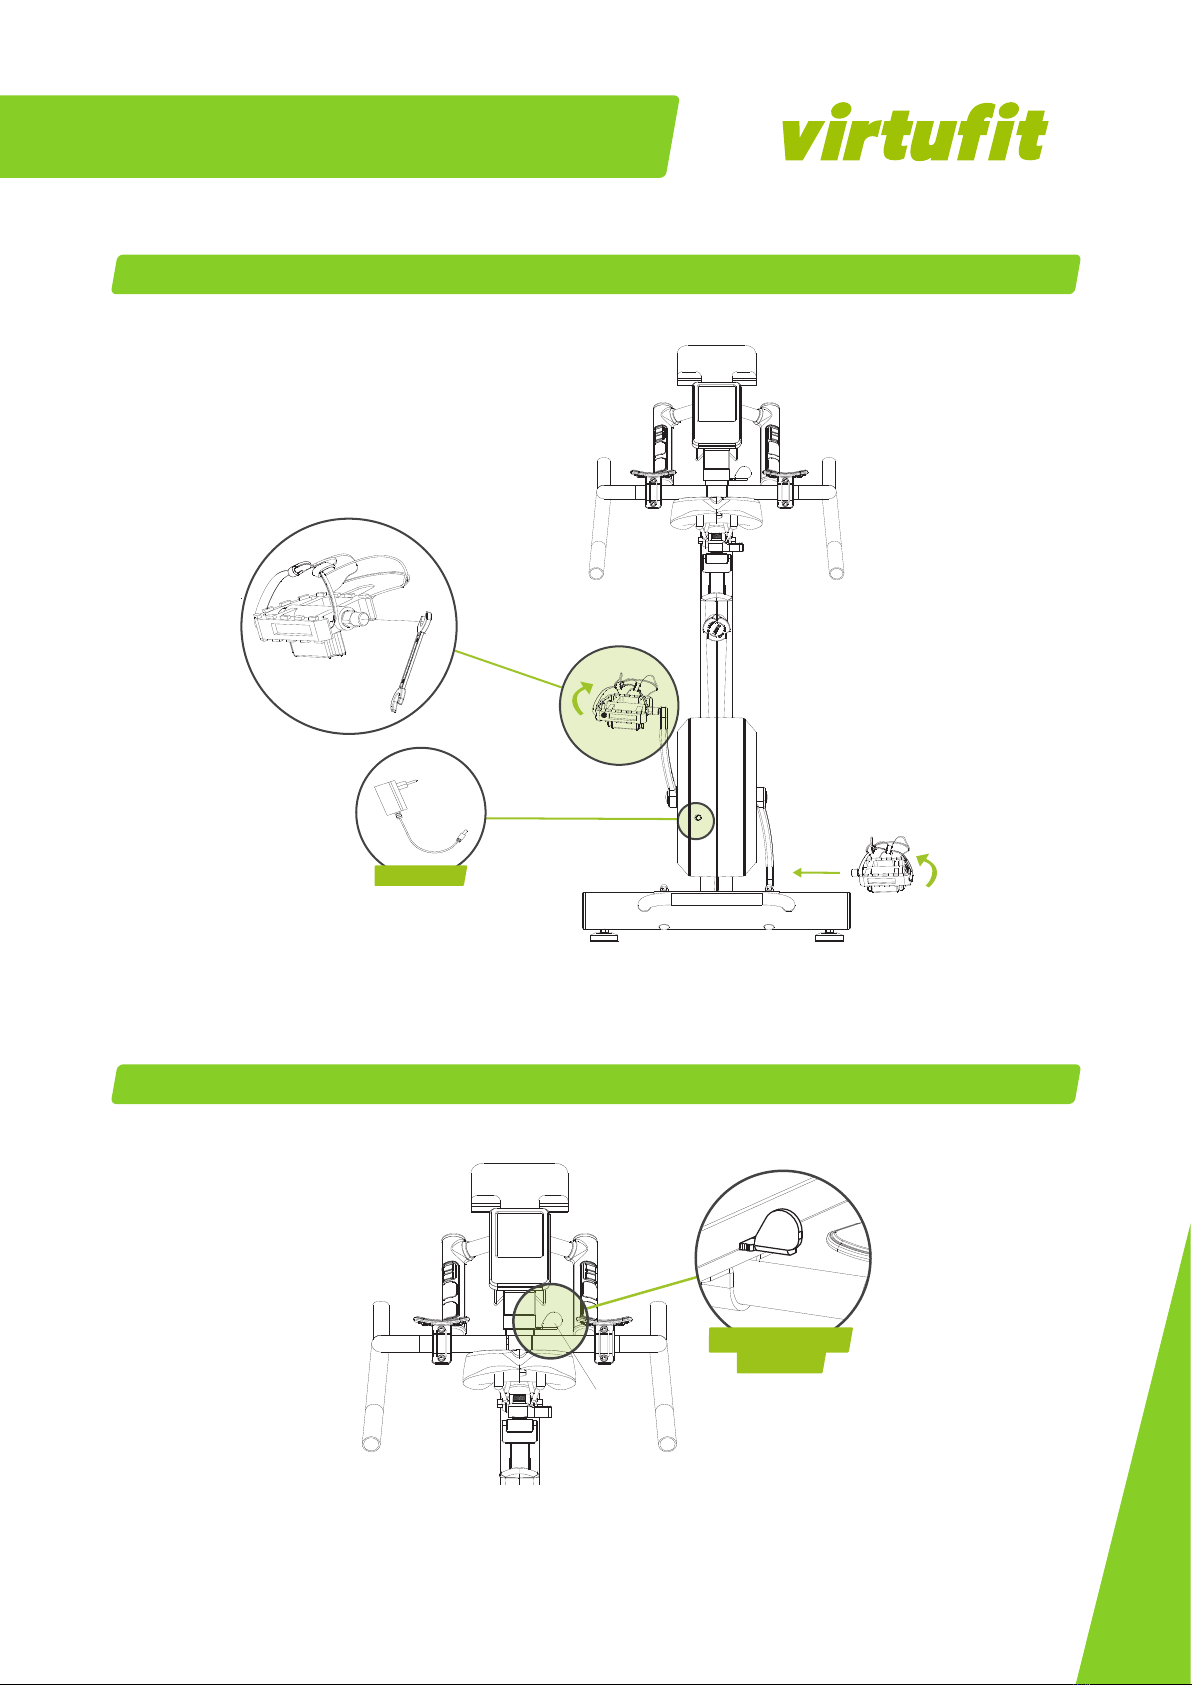
VIRTUFIT Etappe 2.0i Spinbike User manual

@virtufit_fitness
VirtuFit
www.virtufit.com
ASSEMBLY
VIDEO
USER MANUAL
Etappe 2.0i
VFSPINBIKE-E2.0i
Table of Contents
TRAINING CYCLE
OWER`S MANUAL
IMPORTANT! Please read all instructions carefully before using this product. Retain this manual for future reference. The specifications
of this product may vary slightly from the illustrations and are subject to change without notice.
SERIAL NUMBER
SERIENNUMMER
SERIENUMMER
NUMERO DE SERIE

USER MANUAL
02
TOOLKIT
1CONSOLE 7CONSOLE POST 10 HANDLE BAR 15 PEDAL PAIR
25 FRONT STABILIZER 30 REAR STABILIZER 34 SADDLE
102 ADAPTER 108 BOTTLE HOLDER
37 TABLET HOLDER
28 MAIN FRAME
AS13 - 14 - 15
CS5
BS8
11 12 14
M10x30 - 2 PCS
107
M8X20
STEP 2
3M5X35 - 2PCS
STEP 3

USER MANUAL
03
STEP 01
NOTE!
Before attaching the front and rear stabiliser, remove the steel tube and fixing parts from the main frame. Make sure the
transport wheels of the front stabiliser point forward.
LET OP!
Verwijder de stalen buis en de bevestigingsdelen van het hoofdframe voordat de voor- en achterstabilisator worden
bevestigt. Zorg ervoor dat de transportwielen van de voorste stabilisator naar voren wijzen.
HINWEIS!
Bevor Sie den vorderen und hinteren Stabilisator anbringen, entfernen Sie das Stahlrohr und die Befestigungsteile vom
Hauptrahmen. Stellen Sie sicher, dass die Transporträder des vorderen Stabilisators nach vorne zeigen.
REMARQUE!
Avant de fixer les stabilisateurs avant et arrière, retirez le tube d'acier et les pièces de fixation du cadre principal.
Assurez-vous que les roues de transport du stabilisateur avant sont orientées vers l'avant.
transport wheels on the front stabilizer point forward.
17
18
19
29
29
19
17
18
Install handlebar and display backrest.
cable.

USER MANUAL
04
STEP 02
NOTE!
First attach the steering post (7) and then the handlebars (10). Make sure the direction of the handlebar (10) is correct.
LET OP!
Bevestig eerst de stuurpost (7) en dan het stuur (10). Zorg ervoor dat de richting van het stuur (10) correct is.
HINWEIS!
Bringen Sie zuerst die Lenksäule (7) und dann den Lenker (10) an. Achten Sie darauf, dass die Richtung des Lenkers (10)
richtig ist.
REMARQUE!
Fixez d'abord la colonne de direction (7), puis le guidon (10). Veillez à ce que le sens du guidon (10) soit correct.
14
12
11
107

USER MANUAL
05
STEP 03
37
1
3
108

USER MANUAL
06
STEP 04
34

USER MANUAL
07
STEP 05
EMERGENCY BRAKE
ADAPTER
15L
15R
25
EMERGENCY
BRAKE

USER MANUAL
08
USER MANUAL
FIG. A
Description of instrument window

USER MANUAL
09
FIG. B
8. In the training mode, press the <ST./SP.> key to stop the unit from running.
USER MANUAL
1
4
2
5
3

USER MANUAL
10
USER MANUAL
FIG. C
1
4 5
2 3

ENGLISH
EN
11
INDEX
Safety instructions 11
Guarantee 11
Assembly instructions 11
Adjusting 12
Moving 13
Training with heart rate 13
Training with fitness applications 13
Maintenance 14
Troubleshooting 14
Error codes 15
Console 15
Programs 15
Training guidelines 17
SAFETY INSTRUCTIONS
WARNING!
Consult your doctor before you start exercising. This is particularly
important for people with health problems. Please read all
instructions before using the machine. VirtuFit assumes no
responsibility for injury or property damage resulting from the
use of this equipment. Please read this manual carefully before
assembling and/or using the machine.
• Make sure that the machine is properly assembled and that all
nuts and bolts are tight before using it.
• Do not wear loose clothing to avoid getting caught in moving
parts.
• Install and use the unit on a solid, level surface.
• Always wear clean sports shoes when using the appliance.
• Keep children and pets away from the appliance when in use.
• Maintain your balance when using the device.
• Do not place your fingers or other objects in the moving parts.
• Before exercising, consult your physician to determine the
appropriate frequency, duration and intensity of exercise for
your age and physical condition. Stop exercising immediately
if you experience nausea, shortness of breath, fainting, headache,
chest pain, tightness or any other discomfort.
• Do not hold the machine by the seat when moving.
• This machine should only be used by one person at a time.
• This machine is designed for domestic use and the maximum
user weight is 130 kg.
• Leave 1-2 metres of space behind the machine to avoid accidents.
• Place the machine on a clean, flat surface. Do not place it on a
thick carpet, as this may hinder the ventilation of the machine.
Do not place the machine outdoors or near water.
• Keep the storage area dry, clean and level to prevent damage.
Do not use the device for any purpose other than training.
• Use the device only in an environment where the ambient
temperature is between 10°C and 35°C. Store the device only in
an environment where the temperature is between 5°C and
45°C.
GUARANTEE
Warranty claims are excluded if the cause of the defect is the result
of:
• Maintenance and repair work not carried out by an official
dealer. Unless otherwise specified by the supplier or
manufacturer.
• Improper use, negligence and/or poor maintenance.
• Failure to maintain the appliance in accordance with the
manufacturer’s instructions.
Missing parts: If any parts are missing from the packaging, carefully
check the polystyrene foam and the appliance itself. Some parts (bolts,
screws, etc.) are already attached to the unit.
Error message: Make sure that all cables are carefully attached. The
aluminium feet of the console are very sensitive and must be kept
straight. If the console gives an error message after the machine
has been mounted, the aluminium feet of the console may be bent.
Straightening the aluminium feet may make the error message
disappear.
Hex head bolts: Make sure that the hex head spanner is pushed into

ENGLISH
EN
12
• The saddle comes off and can be adjusted to a horizontal position
to adjust the distance between the saddle and the handlebars.
• Tighten the adjustment knob by turning it clockwis
A
3
Follow the steps below to adjust the seat height (FIG. 4):
• Stand next to the machine and adjust the seat to hip height (FIG.
4A).
• The height of the saddle and handlebars should be the same
(FIG. 4B). If not, adjust the handlebar height to match the saddle
height.
• Make sure your knee is just behind your foot when your foot is
towards the front of the machine (FIG. 4C).
• Adjust the handlebars so that the distance between the saddle
and the handlebars is equal to the length of your forearm (FIG.
4D).
4
A B CD
Leveling
Make sure that the bike is always on a stable surface. If in doubt, a
rubber mat can be placed underneath the exercise bike to ensure
a better grip on the floor. The bike can be adjusted by turning the
adjustable feet on either side of the bike (FIG. A). This allows the bike to
compensate for unevenness in the floor.
Safety straps
• Get on the bike.
• Put your foot on the pedal and tighten the belt.
the bolt before applying force. This will prevent the head of the socket
bolt from turning.
ADJUSTING
Adjusting the elbow pads (1)
• Unlock the bolts of the elbow pads with the hexagonal key S5.
• Adjust the elbow pads to a comfortable position.
• Retighten the bolts.
Unlock the bolts on Elbow pads by Allen wrench
S5
1
Adjusting the handlebars (2)
Before exercising, adjust the handlebar and saddle position to the
height and distance that best suits the user.
Follow the steps below to adjust the handlebars FIG (2):
• Turn the adjustment knob (A) on the front of the main frame
counter-clockwise.
• The handlebar is released and can be adjusted to the correct
height.
• Tighten the round adjustment knob by turning it clockwise.
Unlock the bolts on Elbow pads by Allen wrench
2
A
Adjusting the saddle (3-4)
Before riding, adjust the position of the handlebars and saddle to the
height and distance that best suits the user.
Follow the steps below to adjust the horizontal position of the saddle
(FIG. 3):
• Turn the adjustment knob on the underside of the saddle
counter-clockwise (anti-clockwise).

ENGLISH
EN
13
NOTE!
• A wireless heart rate monitor is not included as standard.
Contact your dealer to purchase a wireless heart rate monitor.
• To avoid interference, never use the wireless heart rate
monitor in combination with the hand sensors.
WARNING!
• If you have a pacemaker, we recommend that you consult
your physician before using a wireless heart rate monitor
• In rooms with multiple heart rate monitors, it is recommended
that you keep enough distance to avoid interference between
different devices.
• Always try to keep the wireless heart rate monitor within a
range of 1 meter from the console for optimal reception.
• Always wear a wireless heart rate monitor directly on the
body, under clothing.
TRAINING WITH FITNESS APPLICATIONS
VirtuFit does not provide service for third party fitness applications
such as Kinomap, iConsole, FitShow etc. If you encounter problems
with a third party fitness application, please contact the developer
of the application in question.
Instruction
• To scan the QR code with an Android or IOS phone or tablet, a
QR code scanner is required. The app for scanning QR codes can
be downloaded from the App Store or Google Play Store.
• Scan one of the QR codes below to go directly to the App Store or
Google Play Store page where the fitness app can be
downloaded.
• Scan the QR code on the right to access the fitness app
manual. The manual describes step by step how to connect the
fitness app to the device, how the fitness app works and what its
capabilities are.
Fitshow
APP STORE GOOGLE PLAY MANUAL
• Start pedalling.
• After pedalling, remember to press the safety button before
unfastening the safety belt.
• You can now get off the bike safely.
MOVING
CAUTION!
Store the unit in a dry place out of reach of children.
Make sure the unit is stable and secure to prevent it from falling on
children or animals.
Push the handlebar down until the transport wheels of the front
stabiliser touch the ground. When the transport wheels touch the
ground, the bike can be easily moved to the desired location.
�
11���
�
�
Final inspection
1. Do not use until the machine has been fully assembled and inspected for correct performance in accordance with the Owner’s Manual.
2. Inspect your machine to ensure that all hardware is tight and components are properly assembled.
Moving the Machine
1. Remove the power cord.
2. Use the Transport Handle to carefully lift the machine onto the transport rollers.
3. Push the machine into position.
4. Carefully lower the machine into position.
Note: The machine may be moved by one or more persons depending on their physical abilities and capacities. Make sure that you and others are all physically
fit and able to move the machine safely.
Leveling the Machine
The machine needs to be leveled if your workout area is uneven or if the Rail Assembly is slightly off the floor. To adjust:
1. Place the machine in your workout area.
2. Safely stand on the back of the Rail Assembly for approximately 20 seconds.
3. Step off the machine.
4. Loosen the locking nuts and adjust the levelers until they all contact the floor.
5. Adjust until the machine is level. Tighten the locking nuts.
Note: Do not adjust the levelers to such a height that they detach or unscrew from the machine. Injury to you or damage to the machine can occur. Make sure
the machine is level and stable before you exercise.
TRAINING WITH HEART RATE
Hand sensors
This VirtuFit fitness machine is equipped with hand sensors for
measuring heart rate. The hand sensors are attached to the handle
and only work if both sensors are held for a longer period of time. For
optimal performance, it is important that the hands are slightly moist
and exert constant pressure on the sensors. Hands that are too dry or
moist may cause abnormal readings.
NOTE!
To avoid interference, never use the hand sensors with a
wireless heart rate monitor.
Wireless heart rate receiver (5 kHz)
This VirtuFit fitness device is equipped with a wireless heart rate
receiver. For the heart rate measurement with a wireless heart
rate monitor, you use a heart rate monitor which works on a 5 kHz
frequency. With a wireless heart rate monitor, it is important that the
electrodes are slightly moist and the heart rate monitor fits well to
your body. Refer to your heart rate monitor's user manual for proper
instructions. Incorrect use of the heart rate monitor may result in
abnormal readings.

ENGLISH
EN
14
Cleaning
General cleaning of the unit will extend its life. Keep the appliance
clean by dusting it regularly. Regular maintenance will prolong the life
of your appliance and prevent injuries! For more information, please
visit https://www.virtufit.nl/service/faq/
CAUTION!
Wear clean shoes to reduce the risk of soiling the
machine. At least once a year, remove the cover to remove dust.
Opening the Chain Box
• Have a Phillips screwdriver and a flathead screwdriver ready.
• Locate the hole at the bottom of the chain case.
• Insert the flathead screwdriver into the hole.
• Pull the chain case open slightly while holding the handle of the
flathead screwdriver.
• Remove the screws with the Phillips screwdriver.
TROUBLESHOOTING
The display does not show any values: Check that the sensor and
console cables are properly attached and undamaged. If this does not
solve the problem, contact the supplier.
Device squeaks: Check that all bolts and nuts are tight. If necessary.
Check whether the brake pad needs to be lubricated.
Ticking noise when pedalling: This may be caused by one of the
pedals. Remove the pedal(s) and mount it (them) correctly on the unit.
Tighten the pedal(s) firmly. If this does not solve the problem, contact
the supplier.
NOTE!
The "R" (right) pedal must be mounted clockwise and the "L"
(left) pedal must be mounted counter-clockwise.
Console does not work: If there is no signal when pedalling, check that
the cable is correctly connected.
Zwift
APP STORE GOOGLE PLAY MANUAL
MAINTENANCE
Safe and efficient use can only be achieved if the appliance is
properly installed and maintained. It is your responsibility to ensure
that the appliance is maintained regularly. Parts that have been
used and/or damaged must be replaced before the appliance is
used again. The appliance should only be used and stored indoors.
Long-term exposure to weather and temperature/humidity changes
can have a serious impact on the electrical components and moving
parts of the unit. Always unplug the power cord from the unit before
cleaning or servicing it.
Daily maintenance
• Clean and remove sweat and moisture after each use.
• Check that the unit is free of dust and dirt.
• Do not use aggressive cleaning agents and keep the device
away from moisture.
Semi-annual maintenance
• Inspect all bolts and nuts connected to the moving parts of the
unit. Tighten bolts and nuts as necessary and appropriate.
We recommend the following:
• Clean the unit after use.
• Use a dry cloth to clean the control panel and the areas around
the on/off switch.
• Use a soft, clean cloth and detergent to remove stubborn marks
and dirt from the unit.
• Store the unit in a safe, dry place away from heat and water.
CAUTION!
Repairs must be carried out by a professional technician,
unless otherwise specified by the supplier or manufacturer.

ENGLISH
EN
15
• Start or stop training.
• FRONT Handlebar left. Increase or decrease front
gear.
• REAR Handlebar right. Increase or decrease rear
gear.
Functions
• RPM Revolutions per minute.
• SPEED The current speed during exercise is displayed.
• TIME The time measured from the start of the exercise is
displayed. If a training time has been set, the time will will be
counted down.
• DISTANCE The distance covered during the exercise is displayed.
displayed. If a distance is set, the distance will will be counted
down.
• AVERAGE SPEED The average speed during the exercise.
• CALORIES The number of calories burned during the exercise
is displayed. If a calorie target has been set, the number of
calories will be counted down.
• PULSE When using a chest strap, the heart rate will be displayed
during exercise. If a target heart rate is set, an alarm will sound
when the target heart rate is reached.
• WATT Displays the wattage.
• GEAR 24 resistance levels.
• FRONT Front gear 1-3.
• REAR Rear gear 1-8.
Manual Program (FIG. B-1)
• Press to display the different programs. P1 climb
mode, P2 mountain mode, P3 highway mode, P4 interval mode,
P5 relaxation mode, P6 circuit mode.
• Press to start the workout or press to enter the set
mode.
• In set mode, press to select the set value. The selected value
(time, distance, calories, age) will flash (in P1-P5).
• Press to increase or decrease the value and press
to select the next item.
• Press to start the workout.
• During the workout, the resistance is automatically adjusted
according to the program you set. If you are not happy with this,
you can press to increase or decrease the value.
• If one of the settings is made, the corresponding value is
counted down. If this value is 0, a signal sounds.
Heart rate display does not function:
• The sensor cables from the heart rate sensor to the display are
not properly fitted or have become loose during use.
• The sensors may have become damp, dirty or greasy. Clean
them regularly. If there is no signal when you pedalling check
that the cable is properly attached.
ERROR CODES
E1:
• Motor does not work (motor problems)
Solution: Check that the motor wiring plug is connected
correctly. Reconnect the plug. If this does not solve the problem,
contact the supplier.
• Broken cable in the machine
Solution: Check that the cables are not damaged or in danger of
causing a short circuit. Replace the cable. If this does not solve
the problem, contact the supplier.
• The console does not give a signal to the motor
Solution: Replace the console. If this does not solve the problem,
contact the supplier.
E2 :
•
fast enough with the hand.
Solution: Hold the handheld sensor within 3 seconds of starting
the test program. If this does not solve the problem, contact the
supplier.
• The console does not display the heart rate value
Solution: Check if a heart rate value is displayed in another
mode. If this does not solve the problem, contact the supplier.
CONSO
Description of instrument window
• Press to select a programme or increase/decrease
values.
• Press to go to the main menu. Press and hold to reset all
values.
• Recovery - Heart rate Recovery test.
• Confirm the selected value.

ENGLISH
EN
16
time -> distance -> calories -> target heart rate.
• Press to increase or decrease the value.
• Press to start the workout. The resistance is automatically
adjusted to the target heart rate.
• If one of the parameters is set, the corresponding value is
counted down. When this value is 0, a beep will sound.
• During the workout, press to stop or pause the unit.
NOTE!
For best use of the HRC function, it is recommended that
you wear a wireless chest belt during exercise. If the display does
not detect the heart rate value, the resistance will not change
automatically.
User Program (FIG. B-4)
• Press to select the U1-U4 program.
• Press to start the workout or to enter the setting
mode. The order of setting is: time -> distance -> calories ->
resistance.
• Press to increase or decrease the value or to move to
the next point.
• Press to start the workout and during the workout press
to increase or decrease the resistance.
• When one of the parameters is set, the corresponding value is
counted down. When this value is 0, a beep will sound.
• During the workout, press to stop or pause the workout.
Recovery (FIG. B-5)
• During a workout, press when the heart rate value is
displayed and monitor the heart rate.
• TIME displays "0:60" and begins counting down from 60
seconds. The system will begin the test.
• When TIME is at "0:00", F1 - F6 is displayed on the screen. This
indicates your heart rate recovery level.
F1 = 1.0 OPTIMUM
1.0 < F2 < 2.0 GOOD
2.0 < F3 < 2.9 RELATIVELY GOOD
3.0 < F4 < 3.9 NORMAL
4.0 < F5 < 5.9 RELATIVELY BAD
F6 = 6.0 BAD
NOTE!
It is recommended that you perform the heart rate test
within the aerobic heart rate range during training. This will not
affect the test result.
• During exercise, press to stop or pause the machine.
Body Fat (FIG. B-2)
• Press to select the programme. The order of setting is:
gender -> height -> weight -> age.
• Press to increase or decrease the value.
• M means male and F means female.
• Press for 8 seconds to start the test and the display will
show BMI, FAT%.
CAUTION!
Press the heart rate sensor in
continuous display before testing.
• The test should be performed when the body is relaxed and the
heart rate is calm.
GENDER/
AGE THIN NORMAL SLIGHTLY
FAT FAT OBESE
MALE < 30 < 14 14 ~ 20 20.1 ~ 25 25.1 ~ 35 > 35
MALE >30 < 17 17 ~ 23 23.1 ~ 28 28.1 ~ 38 > 38
FEMALE <30 < 17 17 ~ 24 24.1 ~ 30 30.1 ~ 40 > 40
FEMALE >30 < 20 20 ~ 27 27.1 ~ 33 33.1 ~ 43 > 43
GENDER LOW MEDIUM MEDIUM/
HIGH HIGH
MALE < 13 13 - 25.9 26 - 30 > 30
FEMALE < 23 23 - 35.9 36 - 40 > 40
B.M.
The average number of calories burned per day for the basic needs of
life.
• Referentie 1300 ± 100 (22 - 40 years).
B
B1 EXTREMELY THIN B6 ABOVE NORMAL
B2 THIN B7 OVERWEIGHT
B3 RELATIVELY THIN B8 OBESE
B4 BELOW NORMAL B9 EXTREMELY OBESE
B5 NORMAL B5
HRC (FIG. B-3)
• Press to select the programme. The order of setting is:

ENGLISH
EN
17
resting position at the end of the workout. A good cool-down slowly
reduces your heart rate and promotes recovery.
Pulse
SEE ALSO CHAPTER "TRAINING WITH HEART RATE".
AGE TRAINING ZONE
MIN-MAX (BPM) AGE TRAINING ZONE
MIN-MAX (BPM)
20 133 - 167 55 122 - 155
25 132 - 166 60 121 - 153
30 130 - 164 65 119 - 151
35 129 - 162 70 118 - 150
40 127 - 161 75 117 - 147
45 125 - 159 80 115 - 146
50 124 - 156 85 114 - 144
A successful training program includes a warm-up, the actual training
and a cool-down. Perform the complete training program at least
twice, but preferably three times a week and keep a rest day between
training sessions. After a few months, the intensity of the training can
be increased, for example to four or five times a week.
The warm-up
The purpose of a warm-up is to prepare the body for training and to
reduce the risk of injury. Warm up your body for two to five minutes
before starting a cardio or strength training session. Do exercises that
increase the heart rate and warm up the working muscles. Examples of
this type of activity are running, jogging, jumping jacks, skipping and
running in place.
Stretching
Stretching while the muscles are warm is very important after a good
warm-up and cool-down. It reduces the risk of injury. Stretching
exercises should be held for 15-30 seconds. Here are some examples of
stretching exercises:
• Toe touch (Fig. C-1)
• Inner thight stretch (Fig. C-2)
• Hamstring stretch (Fig. C-3)
• Achilles stretch (Fig. C-4)
• Side stretch (Fig. C-5)
Cooling down
The purpose of the cool-down is to return the body to its (near) normal

NEDERLANDS
NL
18
INHOUD
Veiligheidsinstructies 18
Garantie 18
Montage Instructies 19
Afstellen 19
Onderhoud 21
Probleemoplossingen 22
Foutcodes 22
Console 22
Programma's 23
Trainingsrichtlijnen 24
VEILIGHEIDSINSTRUCTIES
WAARSCHUWING!
Raadpleeg uw arts voordat u begint met trainen. Dit is in het
bijzonder belangrijk voor personen met gezondheidsproblemen.
Lees alle instructies alvorens het toestel gebruikt wordt.
VirtuFit neemt geen verantwoordelijkheid voor geleden letsel
of materiële schade door het gebruik van dit toestel. Lees deze
handleiding zorgvuldig door, voordat u begint met monteren
van het toestel en/of er gebruik van gaat maken.
• Zorg ervoor dat het toestel voor gebruik correct is
gemonteerd en alle bouten en moeren zorgvuldig zijn
vastgedraaid.
• Draag geen loszittende kleding om te voorkomen dat deze in
bewegende delen verstrikt raakt.
• Stel het toestel op en gebruik deze op een stevige, effen
ondergrond.
• Draag altijd schone sportschoenen bij gebruik van het
toestel.
• Houd kinderen en huisdieren uit de buurt van het toestel,
terwijl deze in gebruik is.
• Zorg dat u evenwicht behoudt tijdens gebruik van het
toestel.
• Plaats geen vingers of andere voorwerpen in de bewegende
delen.
• Raadpleeg voorafgaand aan een training uw arts om de
trainingsfrequentie, tijd en intensiteit vast te stellen die
geschikt is voor uw leeftijd en conditie. Stop onmiddellijk
met trainen in geval van misselijkheid, kortademigheid,
flauwvallen, hoofdpijn, pijn, benauwdheid in de borst of
enig ander ongemak.
• Houd het toestel niet vast aan de zitting bij het verplaatsen.
• Dit toestel dient door slechts één persoon tegelijk te worden
gebruikt.
• Dit toestel is gemaakt voor thuisgebruik en het maximaal
gebruikersgewicht bedraagt 130 kg.
• Houd 1 á 2 meter ruimte vrij achter het toestel om eventuele
ongelukken te voorkomen.
• Plaats het toestel op een schone en vlakke ondergrond.
Plaats het toestel niet op dik tapijt waardoor het ventilatie
kan belemmeren. Plaats het toestel niet buiten of in de
buurt van water.
• Het toestel is voor binnengebruik en niet voor buitengebruik.
Houd de opslagplek droog, schoon en vlak om schade te
voorkomen. Het is verboden om het toestel voor andere
doeleinden te gebruiken dan voor de trainingen.
• Gebruik het toestel alleen in een omgeving met een
omgevingstemperatuur tussen 10 °C en 35 °C. Berg het toestel
alleen op bij een omgevingstemperatuur tussen 5 °C en 45 °C.
GARANTIE
Aanspraak op garantie is uitgesloten indien de oorzaak van het
defect het gevolg is van:
• Onderhoudsmontage en reparatiewerkzaamheden die niet
door een officiële dealer zijn uitgevoerd. Tenzij anders
aangegeven door de leverancier of fabrikant.
• Bij ondeugdelijk gebruik, verwaarlozing en/of gebrekkig
onderhoud.
• Het niet volgens de fabrieksvoorschriften onderhouden van
het toestel.
MONTAGE INSTRUCTIE
Missende onderdelen: Indien bepaalde onderdelen missen in de

NEDERLANDS
NL
19
Unlock the bolts on Elbow pads by Allen wrench
2
A
Zadel afstellen (3-4)
Stel voordat je gaat trainen de positie van zowel het stuur als het zadel
in op de hoogte en afstand die voor de gebruiker het beste is.
Volg onderstaande stappen om de horizontale positie van het zadel
te verstellen (FIG. 3):
• Draai de verstelknop die onder de het zadel zit tegen de klok in
(linksom).
• Het zadel komt los en is in horizontale positie verstelbaar om de
afstand van het zadel tot het stuur aan te passen.
• Draai de verstelknop weer vast door met de klok mee te draaien
(rechtsom).
A
3
Volg onderstaande stappen om de zithoogte te verstellen (FIG. 4):
• Ga naast het apparaat staan en stel het zadel in ter hoogte van
de heup (FIG. 4A).
• De hoogte van het zadel en het stuur dienen even hoog te zijn
(FIG. 4B). Mocht dit nu niet het geval zijn, verstel dan de hoogte
van het stuur gebaseerd op de hoogte van het zadel.
• Zorg ervoor dat uw knie net voorbij uw voet komt wanneer uw
voet zich richting de voorkant van het apparaat bevindt
(FIG. 4C).
• Stel het stuur zo in dat de afstand tussen het zadel en het stuur
hetzelfde is als de lengte van uw onderarm (FIG. 4D).
4
A B CD
verpakking, controleer dan zorgvuldig het piepschuim en het toestel
zelf. Sommige onderdelen (bouten, schroeven, etc.) zitten al bevestigd
aan/in het toestel.
Foutmelding: Let er op dat alle kabels voorzichtig worden bevestigd.
De aluminium pootjes van het console zijn zeer gevoelig en deze
dienen recht te blijven. Mocht het console een foutmelding geven na
de montage van het toestel dan kan het zijn dat de aluminium pootjes
van het console schuin staan. Buig de aluminium pootjes weer recht,
dit laat de foutmelding mogelijk verdwijnen.
Inbusbouten: Zorg ervoor dat de inbussleutel goed in de bout zit
voordat er kracht op de sleutel wordt gezet. Op deze manier wordt
voorkomen dat de kop van de inbusbout wordt dolgedraaid.
AFSTELLEN
Elleboogbeschermers afstellen (1)
• Ontgrendel de bouten van de elleboogbeschermers met
inbussleutel S5.
• Stel de elleboogbeschermers af op een comfortabele positie.
• Draai de bouten weer vast.
Unlock the bolts on Elbow pads by Allen wrench
S5
1
Stuur afstellen (2)
Stel voordat je gaat trainen de positie van zowel het stuur als het zadel
in op de hoogte en afstand die voor de gebruiker het beste is.
Volg onderstaande stappen om het stuur te verstellen:
• Draai de verstelknop (A) aan de voorkant van het hoofdframe
tegen de klok in (linksom).
• Het stuur is komt los en is verstelbaar naar de juiste hoogte.
• Draai de ronde verstelknop weer vast door met de klok mee te
draaien (rechtsom).

NEDERLANDS
NL
20
TRAINEN MET HARTSLAG
Handsensoren
Dit VirtuFit fitnesstoestel is voorzien van handsensoren voor het meten
van de hartslag. De handsensoren zitten bevestig op het handvat en
werken alleen als beide sensoren voor een langere periode worden
vastgehouden. Voor een optimale werking is het belangrijk dat de
handen licht vochtig zijn en constante druk uitoefenen op de sensoren.
Te droge of vochtige handen kunnen zorgen voor een afwijkende
meting.
Draadloze hartslagmeter (5 kHz)
Dit VirtuFit fitnesstoestel is voorzien van een draadloze
hartslagontvanger. Voor de hartslagmeting met een draadloze
hartslagmeter gebruikt u een hartslagmeter welke werkt op een 5 kHz
frequentie. Bij een Draadloze hartslagmeter is het belangrijk dat de
elektroden licht vochtig zijn en de hartslagmeter goed aansluit op uw
lichaam. Raadpleeg de gebruikershandleiding van uw hartslagmeter
voor de juiste instructies. Onjuist gebruik van de hartslagmeter kan
zorgen voor een afwijkende meting.
LET OP!
• Een draadloze hartslagmeter wordt niet standaard
meegeleverd. Contacteer uw dealer voor de aanschaf van
een draadloze hartslagmeter.
• Gebruik de draadloze hartslagmeter nooit in combinatie met
de handsensoren om storing te voorkomen.
WAARSCHUWING!
• Indien u een pacemaker heeft raden wij aan uw huisarts te
raadplegen voordat u een draadloze hartslagmeter gebruikt
• In ruimte met meerdere hartslagmeter raden wij aan
voldoende afstand te houden om storing tussen verschillende
apparaten te voorkomen.
• Probeer de draadloze hartslagmeter altijd binnen een bereik
van 1 meter vanaf het console te houden voor een optimaal
ontvangst.
• Draag een draadloze hartslagmeter altijd direct op het
lichaam, onder de kleding.
TRAINEN MET FITNESS APPS
VirtuFitverleentgeenservicevoorfitness-appsvanderdepartijenzoals
Kinomap, iConsole, FitShow etc.. Zijn er problemen met een fitness-
app, neem dan contact met de desbetreffende app ontwikkelaar.
Waterpas
Zorg er te allen tijde voor dat de spinningfiets op een stabiele
ondergrond staat. Bij twijfel kan er een rubberen mat onder de
spinningfiets worden geplaatst, zodat er meer grip ontstaat op de
vloer. De spinningfiets kan worden versteld door te draaien aan de
verstelbare poten aan beide kanten van de spinbike (FIG. A). Hierdoor
kan de spinningfiets worden gecompenseerd met een ongelijke
ondergrond.
Veiligheidsriemen
• Stap op de fiets.
• Zet uw voet op het pedaal en trek de riem aan.
• Begin met fietsen.
• Zorg ervoor dat er na de fietstraining eerst op de veiligheidsknop
wordt gedrukt voordat de veiligheidsriem weer wordt
losgemaakt.
• Er kan nu veilig worden afgestapt.
VERPLAATSEN
LET OP!
Berg het apparaat op in een droge ruimte uit de buurt
van kinderen. Zorg ervoor dat het apparaat stabiel en veilig staat
waardoor het niet om kan vallen op dieren of kinderen.
Duw het stuur naar beneden totdat de transportwielen aan de voorste
stabilisator de grond raken. Wanneer de transportwielen de grond
raken kan de spinningfiets gemakkelijk naar de gewenste plek worden
verplaatst.
�
11���
�
�
Final inspection
1. Do not use until the machine has been fully assembled and inspected for correct performance in accordance with the Owner’s Manual.
2. Inspect your machine to ensure that all hardware is tight and components are properly assembled.
Moving the Machine
1. Remove the power cord.
2. Use the Transport Handle to carefully lift the machine onto the transport rollers.
3. Push the machine into position.
4. Carefully lower the machine into position.
Note: The machine may be moved by one or more persons depending on their physical abilities and capacities. Make sure that you and others are all physically
fit and able to move the machine safely.
Leveling the Machine
The machine needs to be leveled if your workout area is uneven or if the Rail Assembly is slightly off the floor. To adjust:
1. Place the machine in your workout area.
2. Safely stand on the back of the Rail Assembly for approximately 20 seconds.
3. Step off the machine.
4. Loosen the locking nuts and adjust the levelers until they all contact the floor.
5. Adjust until the machine is level. Tighten the locking nuts.
Note: Do not adjust the levelers to such a height that they detach or unscrew from the machine. Injury to you or damage to the machine can occur. Make sure
the machine is level and stable before you exercise.
Other manuals for Etappe 2.0i Spinbike
1
This manual suits for next models
1
Table of contents
Languages:
Other VIRTUFIT Elliptical Trainer manuals

VIRTUFIT
VIRTUFIT CTR 1.2i User manual

VIRTUFIT
VIRTUFIT iConsole CTR 2.1 User manual

VIRTUFIT
VIRTUFIT CTR 3.0i User manual

VIRTUFIT
VIRTUFIT FDR 2.0i User manual

VIRTUFIT
VIRTUFIT Elite FDR 2.5i Semi-Pro Crosstrainer User manual

VIRTUFIT
VIRTUFIT CTR 1.1 User manual

VIRTUFIT
VIRTUFIT CTR 1.0 User manual

VIRTUFIT
VIRTUFIT CTR 1.2i Crosstrainer User manual

VIRTUFIT
VIRTUFIT iConsole CTR 2.1 User manual

VIRTUFIT
VIRTUFIT Elite FDR 2.4i User manual