WESTHILL BIKES AEC-TDE16Z User manual

Electric Bike User Manual

0800 328 5708 • www.westhillbikes.com
2
Contents
Attention ...............................................................................................................3
1
Check Before Use ................................................................................................3
2
Product Information ...............................................................................................4
2.1
Product Performance.............................................................................................4
2.2
Product Specifications ...........................................................................................4
3
. Adjustments .........................................................................................................5
3.1
Adjusting The Handlebar........................................................................................5
3.2
Adjusting The Saddle .............................................................................................6
3.3
Adjusting The Wheels............................................................................................7
3.4
Adjusting And Maintaining The Brakes..................................................................7
3.5
Adjusting The Gear-Change Rear Derailleur...........................................................8
4
How To Use.........................................................................................................10
4.1
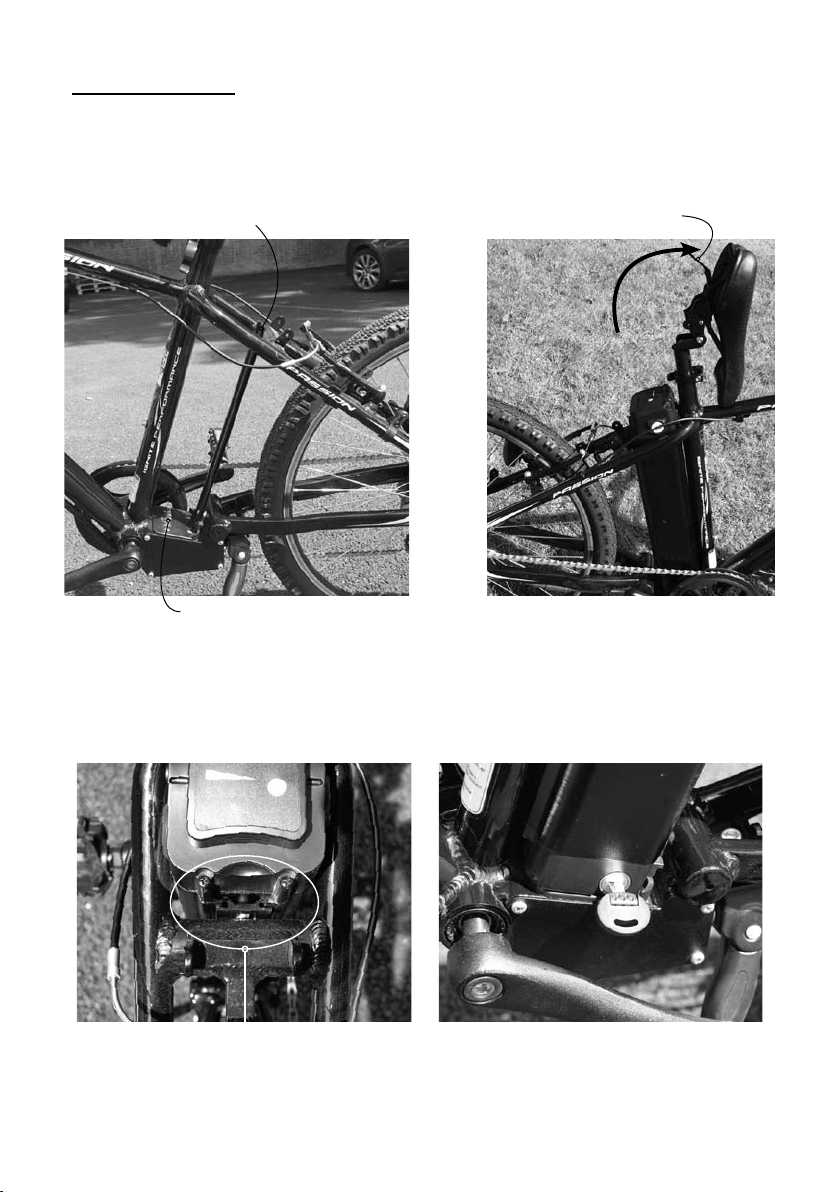
Input The Battery ..................................................................................................10
4.2
Turn On The Power ..............................................................................................11
4.3
Control Panel ........................................................................................................11
4.4
Front And Rear Lights...........................................................................................11
4.5
Caution Whilst Riding ...........................................................................................12
4.6
Caution Whilst Parked ..........................................................................................12
4.7
Charging The Battery ............................................................................................12
4.8
Battery And Charger Maintenance........................................................................12
4.9
Battery And Charger Precautions..........................................................................13
5
Bicycle Inspection And Care...............................................................................14
5.1
Regular Cleaning...................................................................................................14
5.2
Regular Maintenance (Every 1`2 Months).............................................................14
5.3
Lubricating The E-Bike ..........................................................................................15

3
0800 328 5708 • www.westhillbikes.com
Attention
Do not operate this electric bike without fully reading and understanding its opera-•
tion and limitations.
Before riding each time ensure that all parts are in good order. For any questions
•
or concerns, please contact your Authorised Dealer’s Customer Service.
Ensure you observe traffic rules and regulations when using this electric bike. Pas-
•
sengers cannot be carried. When riding in rain, snow or slippery conditions reduce
your speed and increase the distance between yourself and other vehicles.
We advise against performing maintenance operations that involve removing parts
•
or components. If necessary, please contact your Authorised Dealer’s Customer
Service.
Do not ride through deep puddles. Water could enter the hub motor, causing short
•
circuits and irreparable damage.
The two metallic contacts located on the battery box are the positive and negative
•
battery terminals. Avoid touching them, especially with wet hands, and do not use
metal objects to connect them, in order to avoid high-current electric discharge
that could cause severe burns, electric shocks or damage to the batteries.
Do not allow individuals who are unfamiliar with the features and functions of this
•
e-bike to operate it without proper instruction.
Do not modify the e-bike by yourself.
•
1. Check before use
Is the tyre pressure [3.4 - 5.1 bar] correct?•
Is the batteries sufficiently charged?•
Are the handlebar attachment and saddle post correctly inserted and tightened?•
Are the wheel hub mounting nuts correctly tightened?•
Is the bell working correctly?•

0800 328 5708 • www.westhillbikes.com
4
2. Product information
2.1 production performance
This e-bike is fitted with a high quality brushless motor, intelligent operating system,
high quality lithium battery, freewheel, power display unit and electric cut off when
braking.
2.2 Product specifications
Bike Specifications
Model AEC-TDE16Z
Motor Specifications
Type Brushless
Dimensions 1830 x 650 x
1050mm Rated Power 250W
Wheel
Diameter 660mm Rated RPM 170rpm
Wheelbase 1170mm Rated Voltage 36V
Rated Load 95kg Rated Output
Torque 13N.m
Max Speed 25km Speed Range 0~25Km/h
Range Per
Charge ≥35km
Controller
Under Voltage
Value 31.5±0.5V
Weight 23Kg Over Current Value 15±0.5A
Battery Spec
Type Lithium-ion
Charger
Current AC110v-240v
50-60 hZ
Capacity 10Ah Output DC41.7V
Rated
Voltage 36V
Packing
1500 x 280 x 770mm
Note: Maximum travel distance on a fully charged battery is measured at a condition
of 20°C, no wind, flat road, total bike weight 75Kg, and 25km/h speed. This will vary
according to load, road conditions, wind direction, temperature, braking and restarts,
tyre pressure and prompt battery charging. To obtain the maximum travel distance, we
suggest you check all factors within your control, including overloading, driving style,
tyre pressure and timely battery charging.

5
0800 328 5708 • www.westhillbikes.com
3. Adjustments
3.1 Adjusting the handlebar
Place the handlebar onto the handlebar stem, place on the cover, and fix with the
•
two screws. The tighten torque should not be less than 18Nm.
Handlebar
stem cover
Hexagon socket screws
Handlebar stem
To align the handlebars, face your bike and hold the front wheel between your•
legs. Turn the handlebars so that they are perpendicular to the front wheel.

0800 328 5708 • www.westhillbikes.com
6
Tighten the screw that fixes the handlebar attachment to the frame. The•
tightening torque should not be less than 18Nm.
Handlebar stem screw
3.2 Adjusting the Saddle
The saddle post must be inserted at least to the circular safety mark•
engraved on the tube.
Adjust the saddle height by straddling the saddle, with both feet touch-•
ing the ground, and without using the stand.
The saddle should be parallel to the ground for maximum comfort. The•
tightening torque for the saddle mounting screw and saddle post mount-
ing screw should not be less than 18Nm.
Quick release Safety mark

7
0800 328 5708 • www.westhillbikes.com
3.3 Adjusting the wheels
Tighten the screws to make sure the front and back wheels are fixed to•
the front fork and frame.
Recommended tightening torques are as follows:•
Front wheel hub: 18Nm
Rear wheel hub: 30Nm
3.4 Adjusting and maintaining the brakes
Grease and insert the brake cable in the housing.•
Use a 5-mm Allen wrench and a tightening torque of 6–8 Nm to secure•
the cable to the brake body.
Align the brake pads 1 mm below the upper edge of the wheel rim.•
Position the brake pads 1 mm from the wheel rim using the adjustment•
screw located on the brake lever.
Check that the wheels spin freely, without being hindered by the brake•
pads.
Check if the spinning wheels touch the rim on one side, if so; adjust the•
screw.
Check that the brakes stop the wheel when the brake lever on the han-•
dlebars is activated. The brake lever travel must be no greater than 2.5
cm.
Adjusting screw

0800 328 5708 • www.westhillbikes.com
8
3.5 Adjusting the Gear-Change Rear Derailleur
3.5.1 instruction in use
To change into a higher gear (used for going uphill) press in the front leaver with•
your thumb. For a lower gear (for when there is low resistance going downhill)
use your forefinger to press in the back leaver. The gear you are in is displayed on
the gear display.
Higher gears Lower gears
Gear display

9
0800 328 5708 • www.westhillbikes.com
3.5.2 Adjusting the Derailleur
Adjust the lower bolt to make the guide wheel move to the free-wheel; align the•
centre of the guide wheel and the outer line of the smallest sprocket.
Turning the front chain-wheel, operate the gear lever to shift to the lowest gear,
•
then tighten the derailleur cable and fix it by the derailleur cable nut.
Turn the low adjustment screw so that the guide pulley moves to a position direct-
•
ly below the largest sprocket.
Tighten the adjust nut when the real gear is lower than the gear shift shows;
•
loosen the adjust nut when the rear gear is upper than the gear shift shows. It is
OK when the gear changes correctly and smoothly.
Outer line of smallest sprocket
Top adjustment
screw
Guide pulley
Low adjustment
screw
Largest sprocket
Guide pulley
Note: Be sure that the cable
is securely in the groove.
Groove

0800 328 5708 • www.westhillbikes.com
10
4 How to use
4.1 input the battery
Make sure the battery terminals are dry before inserting the battery.
•
Lift up the saddle using the leaver underneath.•
Battery guide board
Battery terminals
Seat lever
Slide in the battery, ensuring that the battery guide board slots into the grooves of•
the battery.
Lock the battery into place at the bottom of the battery by turning the key clock-
•
wise.
Battery slotting into the battery guide

11
0800 328 5708 • www.westhillbikes.com
4.2 Turn on the power
Place the key into the lock and turn the key clockwise to turn the power on.
•
Press the ON/OFF button of the power display. If all the four light are on, it means•
the power is full. The lights turn off one by one as the battery power decreases
gradually. If only the L light is on, recharge the battery immediately.
4.3 Control Panel
The performance is controlled by pedalling. You can change the electric assist-
•
ance by press mode button on the power display. If on LOW mode, the electric
assistance is low; if on MED mode, the electric assistance is stronger; if on HIGH
mode, the electric assistance is strongest.
4.4 Front and rear lights
Push the light button on the power display to turn on or turn off the front light.
•
Turn the button up or down to turn on or turn off the rear light.•
Button for front light Button for rear light

0800 328 5708 • www.westhillbikes.com
12
4.5 Caution while riding
Start slowly and speed up slowly.
•
The power will automatically cut out if the e-bike overloads and automatically cut•
back in after a short period if the e-bike is ridden normally.
4.6 Caution whilst parked
Turn the power off and lock the battery box, remove the key whilst parking the
•
bike.
4.7 Charging the battery
Connect the battery to the charger; ensure the output terminal of the charger and
•
the input terminal of the battery are firmly connected.
Plug the charger into the wall outlet, the indicator LED will illuminate RED and the
•
indicator LED will change to GREEN when the battery is fully charged.
When the battery is fully charged, disconnect the charger from the wall outlet
•
before disconnecting the charger from the battery.
Charge the battery not less than 12hours for the first 3 times.
•
Be sure to use the charger supplied together with the battery, use of other charg-•
ers will invalidate the warranty.
4.8 Battery and charger maintenance
If the battery needs to be stored for an extended period, it should be kept at
•
around 50% state of charge (or charge the battery for 2-3 hours if totally flat) and
should be placed in a dry and ventilated area. The battery should be charged 2-3
hours every two months.
The battery and charger should be kept in a clean, dry and ventilated area, avoid
•
contact with corrosive substances and keep away from excessive heat and open
flames.
Storage conditions for the battery: temperature -20~35°C, relative humidity:
•
5~65%RH
The charger should be disconnected from the battery when be kept in storage.
•

13
0800 328 5708 • www.westhillbikes.com
4.9 Battery and charger precautions
4.9.1 Battery
Never short circuit and discharge or charge terminals of the battery.•
Keep the battery away from fire and excessive heat. Never put the battery into•
fire.
To avoid damage to the battery, never subject it to intense physical shock or
•
severe vibration or impact.
Protect the battery from water and moisture. Protect the discharge and charge
•
terminals of the battery from rain or water logging.
Operating temperature range when charge: 0~45°C
•
Operating temperature range when discharged: -20~45°C•
Humidity whilst battery is in a working state:• ≤80% RH
Keep the battery away from children.
•
When the battery is not in use for an extended period of time, remove the battery•
from the load for storage.
If you have any questions about this battery or its usage, please contact the Cus-
•
tomer Service Department.
Never disassemble the battery.
•
4.9.2 Charger
Charge the battery after you buy this e-bike or the power is low.•
Make sure the charger is as least 1M away from computers, TV’s, fridge, washing•
machine and other electric appliances while charging.
Use only the charger supplied with this e-bike.
•
Only use the charger in a clean and dry place, free from smoke, dust and mois-•
ture.
If the charging finished, disconnect the plug from the wall first, and then discon-
•
nect the battery.
Charge out of the reach of children.
•
Never disassemble or refit the charger.•
Never put anything on the charger.•
Do not disconnect the battery output while charging.•
Do not switch on the e-bike while charging.•

0800 328 5708 • www.westhillbikes.com
14
5 Bicycle inspection and care
5.1 Regular Cleaning
Remove the battery box from the e-bike before carrying out regular cleaning.
•
DO NOT• use water to clean the e-bike, as the electrical and electronic systems
may get wet, resulting in personal injury or malfunction of the bicycle.
Wipe any dirty painted or plastic parts with a soft, damp cloth and a neutral clean-
•
ing solution. Carefully dry the parts with a soft, dry cloth to finish.
Clean the battery contacts with a damp cloth.
•
DO NOT• grease or use a greasy cloth to wipe down the electrical connectors,
brake pads, wheels, tyres or plastic parts.
5.2 Regular maintenance (every 1-2 months)
Always carry out the following checks:
• Checkthehandlebarattachmentandsaddlepostarecorrectlyinsertedand
tightened.
• Checkthewheelhubmountingnutsarecorrectlytightened.
• Checkthewheelrimsarenotcrackedandthatnospokesareloose
or broken.
• Checkthetyresarenotwornorcut.
• Checkthetyresarecorrectlyinated.
• Checkthebatterycontactsontheframearenotdirtyoroxidized.
• Checkthebatteryissufcientlycharged.
• Checkthefrontandrearlightsareworkingcorrectly.
• Checkthefrontandrearbrakesbrakeeffectively.
• Checkthecablesaresufcientlygreased,andthatthebrakepadsareingood
condition.
• Checkframeweldsareingoodconditionandarefreefromcorrosion
or oxidation

15
0800 328 5708 • www.westhillbikes.com
5.3 Lubricating the e-bike
To maintain your e-bike in proper working order, be sure to carry out regular lubrica-
tion, as indicated in the following illustration:
Use specific transmission lubricants for the chain, freewheel and gears every 1–2
•
months, or if the driveline is dry.
Grease the brake pins, front wheel hub, saddle post and pedal pins every 1–2
•
months, or in case of excessive friction.
Do not
• lubricate or grease the speed controller, brake pads or wheel rims
Parts that should be lubricated Parts that should not be lubricated
Head set Brake cable
Front brake
Rim
Chain
Tyre
Rear brake

Need help? Contact us:
West Hill, Nr Exeter, Devon, United Kingdom, EX11 1LQ
0800 328 5708 • [email protected]
Table of contents
Other WESTHILL BIKES Scooter manuals

WESTHILL BIKES
WESTHILL BIKES VENTURE User manual

WESTHILL BIKES
WESTHILL BIKES VENTURE User manual

WESTHILL BIKES
WESTHILL BIKES LINK User manual

WESTHILL BIKES
WESTHILL BIKES ENERGISE User manual

WESTHILL BIKES
WESTHILL BIKES PHANTOM User manual

WESTHILL BIKES
WESTHILL BIKES PHANTOM User manual

WESTHILL BIKES
WESTHILL BIKES GHOST User manual

WESTHILL BIKES
WESTHILL BIKES TERRAIN User manual