Winix PlasmaWave WACU300 User manual

WINIX USA 120 Prairie lake Road. Unit E East Dundee, Illinois 60118
Tel : +1.847.551.9900
WINIX Europe 14 cours de I’Intendance, 33000 Bordeaux, France
Tel : +33.556.448.572
Contact Us
Dec. 2012
For more information
Please download WINIX app
(Android / I Phone)
Made in Korea

LIMITED PRODUCT WARRANTY
PACKAGE CONTENTS
WINIX SIGNATURETM AIR CLEANERS LIMITED WARRANTY
Limited Warranty: Winix warrants the parts of the machine to be free of defects in material and
workmanship and provides service and support for five (5) years from the date of purchase by the
original consumer.
If any part is found to be defective during the warranty period, your sole and exclusive remedy
will be repair or replacement, at Winix’s option and expense, of the defective part.
This warranty does not apply in cases of abuse, mishandling, failure to comply with product
usage standards, operation using an improper power supply (other than listed on the label), or
unauthorized repair.
Winix reserves the right to charge the consumers for any additional costs incurred by Winix to
provide parts or services outside of the country where the air purifier is initially sold by an
authorized reseller. This warranty does not include the air cleaner’s replaceable filters, this is an
expendable part that can wear out from normal use before one the warranty expires.
ANY IMPLIED WARRANTY, INCLUDING THAT OF MERCHANTABILITY OR FITNESS FOR A
PARTICULAR PURPOSE, IS HEREBY LIMITED IN DURATION TO THE APPROPRIATE
WARRANTY PERIOD SET FORTH ABOVE.
In no event shall Winix be liable for any consequential or incidental damages attributable to this
product.
This warranty gives you specific legal rights. The duration, terms, and conditions of this warranty
are valid worldwide, except where different limitations, restrictions, or conditions may be
required by local law.
For more details or to obtain service under this warranty, please contact your dealer.
1 2
TABLE OF CONTENTS
Models WACU300 AND WACU450
Winix Air Purifier (Qty.1)
Filters cassette including
- Washable Pre-Filter (Qty.1)
- True HEPA Filter (Qty.1)
- Advanced Odor Control
Washable Carbon Filter (Qty.1)
Use & Care Guide (Qty.1)
Remote control (Qty.1)
3V Lithium Battery
(CR2025 installed in remote)
Warranty 2
Package Contents 2
Instructions 3
Safety Instructions 7
Product Specifications 8
Air Cleaner Features 9
Air Cleaner Set-Up 10
Control Panel 11
Operations 11
Filter Replacement and Cleaning 11
Filter Replacement 12
Remote Control 13
Troubleshooting 14

43
Warning
▶
Power
Warning
▶
Operation
DO connect the power cord
to only proper power outlet
with a ground connection.
DO unplug air cleaner when
not in use to save energy
consumption.
DON'T
plug power cord
into loose or damaged
electrical outlet.
(Can lead to overheating or
electrical shock.)
DON'T
attempt to repair, alter or
disassemble the air cleaner.
DON'T
operate the air cleaner if standing
water is present.
DON'T
operate air cleaner on an uneven
surface. DON'T operate air cleaner near flammable
materials.
INSTRUCTIONS
WARNING:SAFETY INSTRUCTIONS
Warning
▶
Power Cord
DON'T unplug the unit by pulling on its
power cord. DON'T touch the plug with wet hands.
DON'T bend or place heavy object on the
power cord.
DON'T replace or modify the power cord.
If the power cord/plug is damaged, it must be
replaced by the manufacturer or a qualified
technician.
Follow these instructions to avoid any risk of
personal injury, property damage, electrical
shocks or fire hazards.
WARNING
Failure to follow the safety instructions can
lead to personal injury or property damage.
NOTICE
WARNING / NOTICE DIRECTION
PROHIBITED
DO NOT DISASSEMBLE
Must Follow
Ground connection protecting
from electrical shock

65
Note
▶
Operation
DON'T allow children to play on or near
the air cleaner.
DON'T fill the air cleaner with hot water.
DON'T spray flammable liquids or gases
into the unit.
DON'T
use flammable material
(such as benzene or alcohol) to clean
the air cleaner.
DON'T
place clothes and towels on top of
air cleaner while operating.
DON'T
spray liquids directly into air cleaner
during cleaning.
DON'T install the unit under direct light.
DON'T strike or drop the air cleaner.
Note
▶
Power
Note
▶
Operation
DON'T disconnect the
power cord during
operation.
DON'T unplug the power
cord before air cleaner has
cooled down.
DO unplug the unit and
contact your service dealer
if any irregular noise or
smoke occurs.
DON'T insert ANYTHING into the air inlet
or outlet. DON'T place the air cleaner near heater.
DON'T place hands or any body parts
near the air outlet during operation. DON'T place the air cleaner near curtains
or other materials that can block the
vents of the unit.

PRODUCT SPECIFICATIONS
87
Warning: Change or modifications to this unit not expressly approved by the party
responsible for compliance could void the user’s authority to operate the equipment.
NOTE: This equipment has been tested and found to comply with the limits for a Class B
digital device, pursuant to Part 15 of the FCC Rules. These limits are designed to provide
reasonable protection against harmful interference in a residential installation. This equipment
generates, uses and can radiate radio frequency energy and, if not installed and used in
accordance with the instructions, amy cause harmful interference to radio communications.
However, there is no guarantee that interference will not occur in a particular installation.
If this equipment does cause harmful interference to radio or television reception. which can
be determined by turning the equipment off and on, the user is encouraged to try to correct
the interference by one or more of the following measures:
Reorient or relocate the receiving antenna.
Increase the separation between the equipment and receiver.
Connect the equipment into an outlet on a circuit different from that to which the receiver
is connected.
Consult the dealer or on experienced radio/TV technician for help.
Model WACU300 WACU450
Room Size 300 sq. ft. 450 sq. ft.
Power Supply AC 120V/60(Hz) AC 120V/60(Hz)
Power Rate Low 4W, Turbo 60W Low 11W, Turbo 110W
Fan Speeds 4 Speeds 4 Speeds
Display Digital Digital
Control Type Auto / Manual Auto / Manual
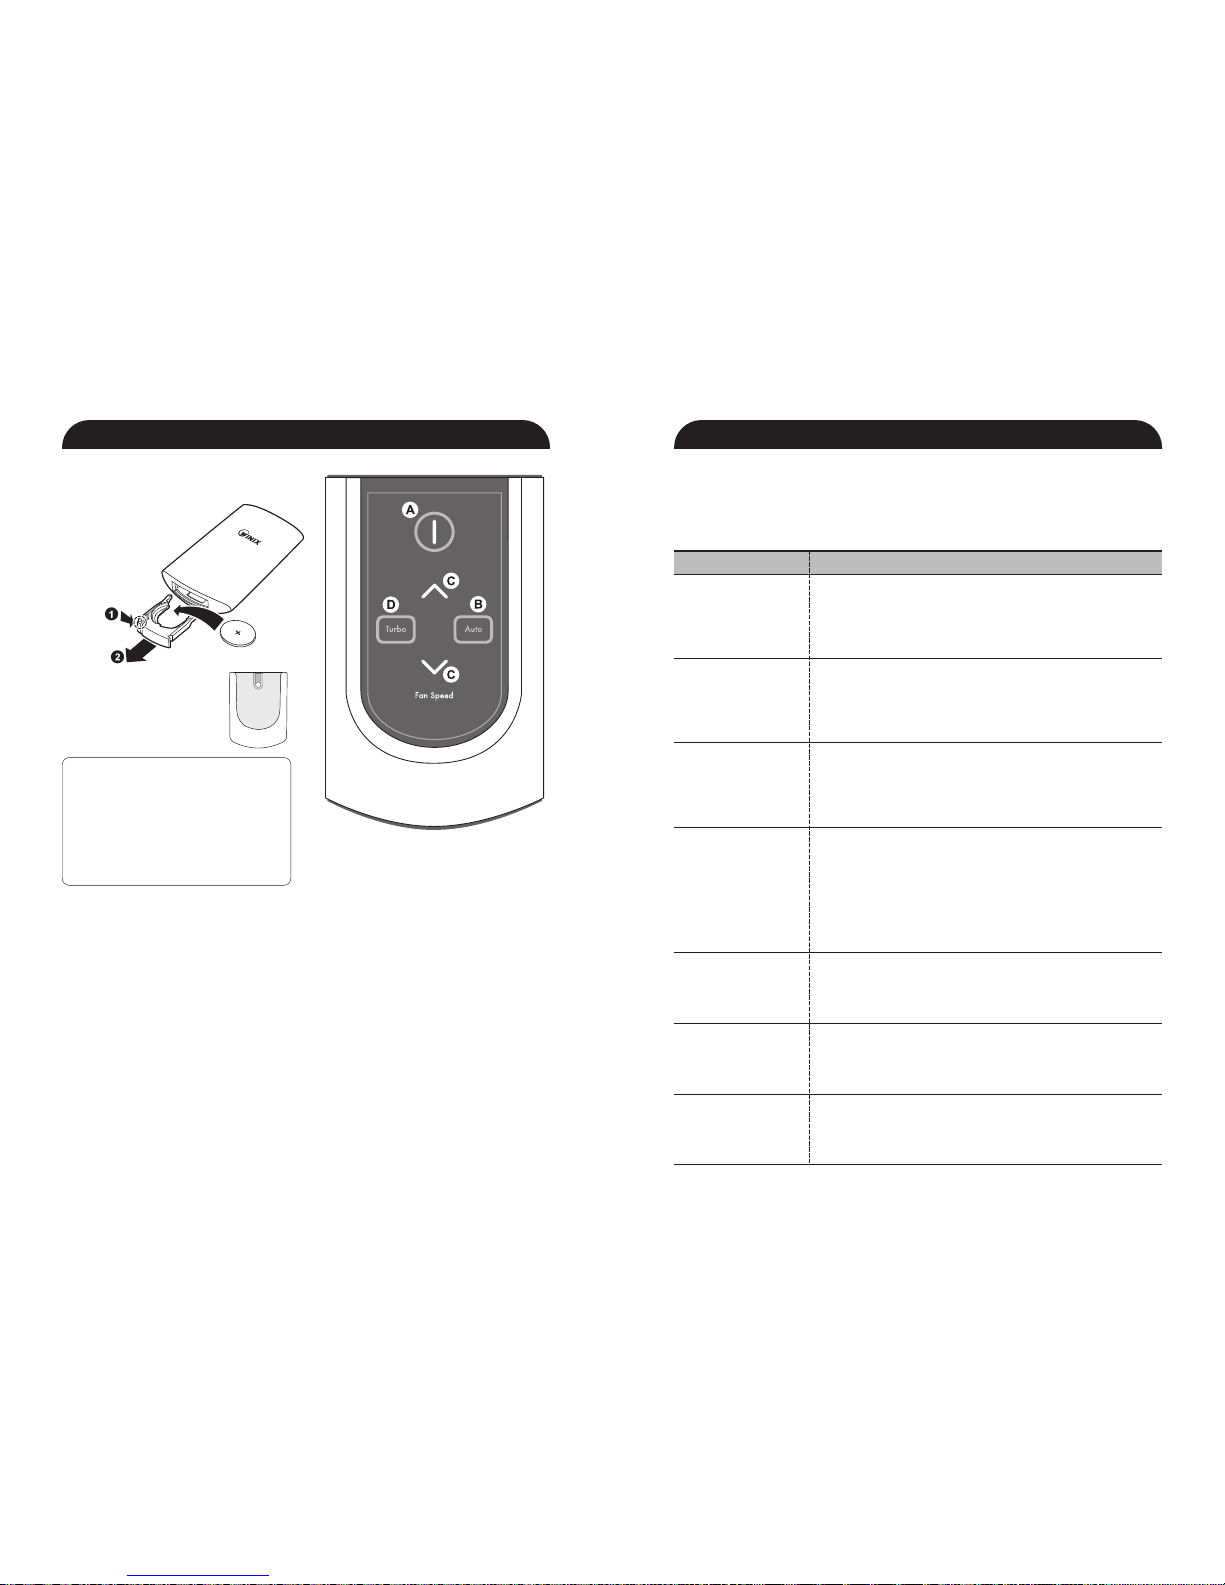
Remote Control Yes Yes
Air Quality Sensor Yes Yes
Light Sensor Yes Yes
AHAM Certified Yes Yes
UL Listed Yes Yes
Energy Star Qualified Yes Yes
Check Filter Indicator Yes Yes
Cleaning System
- Washable Anti-Bacterial
Pre-Filter Yes Yes
- CleancelTM Anti-Microbial
Filter Protection Yes Yes
- 99.99% effective
True HEPA Filter Yes Yes
- Advanced Odor Control (AOC)
Carbon Filter Yes Yes
- PlasmaWaveTM Yes Yes
CADR Smoke / Dust / Pollen Smoke / Dust / Pollen
197 / 197 / 214 291 / 298 / 343
Unit Size 8.66×21.65×16.30 10.24×25.59×17.32
(inches, L
×
W
×
H)
Unit Weight (lbs) 13.95 19.40
SAFETY INSTRUCTIONS
Thank you for purchasing a Winix air cleaner. Please read this manual carefully before using. This
product is for household use only.
IMPORTANT CAUTIONS FOR USING
YOUR AIR CLEANER
WARNING: Follow the instructions in this
manual to reduce the risk of electric shock,
short circuit, and/or fire:
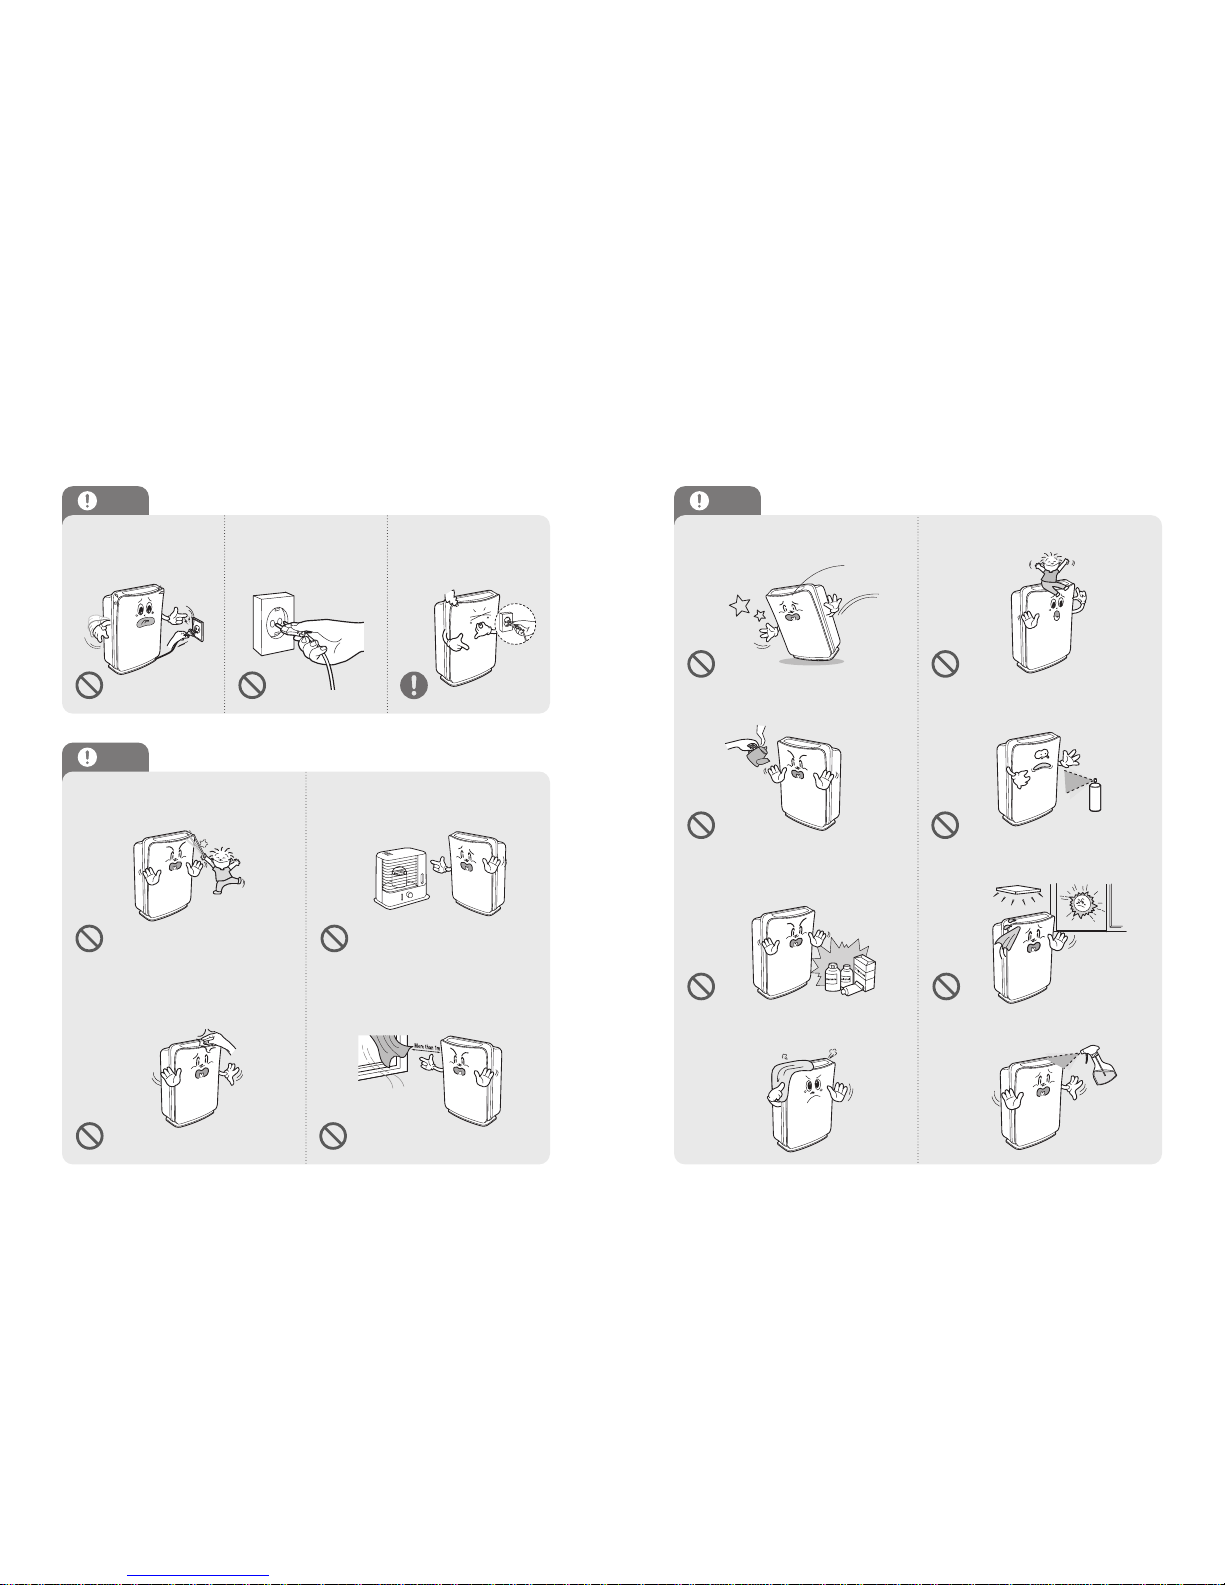
Do not repair or modify the unit unless
specifically recommended in this manual.
All other repairs should be completed by a
qualified technician.
The plug for this unit is polarized with one
blade wider than the other. Do not force
the plug into an electrical outlet. Do not
alter the plug in any way. If the plug dose
not fit into the outlet, reverse the plug. If it
still dose not fit, contact a qualified
technician to install a proper outlet.
Do not use if the power cord or plug is
damaged or the connection to the wall
outlet is loose.
Use AC 120V only.
Do not damage, break, forcefully bend,
pull, twist, bundle, coat, pinch, or place
heavy objects on the power cord.
Periodically remove dust from the power
plug. This will reduce the risk of shock due
to humidity build up.
If the power plug is damaged, it must be
replaced by the manufacturer or a
qualified technician
Remove the power plug from the outlet
before cleaning the unit. When removing
the power plug, grasp by holding the plug
itself, never hold by the cord.
Remove the power plug from the outlet
when not in use.
Do not handle the power plug with wet
hands.
Do not operate the unit when using indoor
smoke-generating insecticides.
Do not clean unit with benzene or paint
thinner. Do not spray insecticides on the
unit.
Do not use the unit where it is humid or
where the unit may become wet, such as
in a bathroom.
Do not insert fingers or foreign objects
into the air intake or outlet.
Do not use the unit near flammable gases.
Do not use near cigarettes, incense, or
other spark-creating items.
Unit will not remove carbon monoxide
emitted from heating appliances or other
sources.
IMPORTANT PRECAUTIONS FOR USING
YOUR AIR CLEANER
Do not block the intake or outlet vents.
Do not use near hot objects, such as a
stove.
Do not use where the unit may come into
contact with steam.
Do not use the unit on its side.
Keep away from products that generate
oily residue, such as a deep fryer.
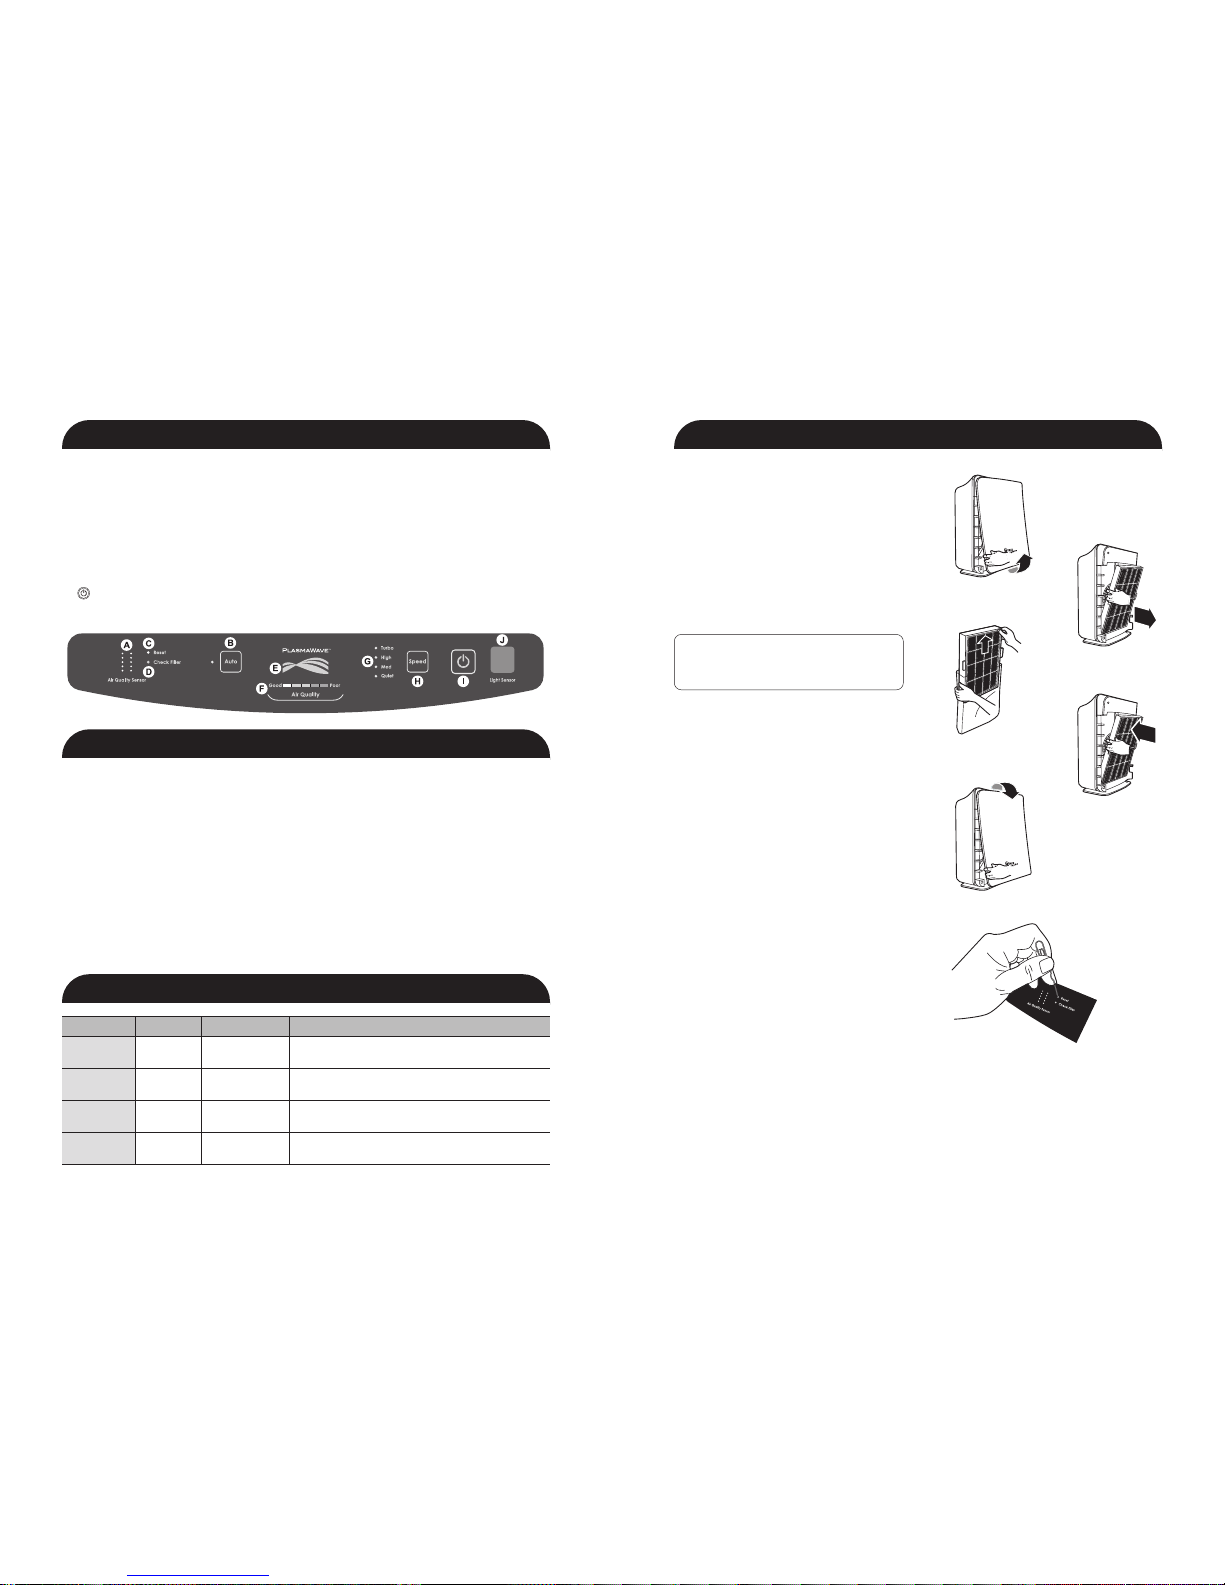
Do not use detergent to clean the unit.
Do not operate without a filter.
Hold the handle on the back of the unit to
transport.
Do not hold by the front panel.

109
AIR CLEANER SET-UP
Set-Up Procedure
1. Remove protective film from the control
panel.
2. Remove the front panel by pulling gently on
the lower portion of the panel.
Do not force, the panel should remove easily.
3. Grasp tabs located on each side of filter and
pull out the filter gently.
4. Remove the plastic wrap from the filter.
5. Return the filter to the air cleaner unit.
6. Cover the front panel after pressing the filter
change reset button.
7. Plug the power cord into a wall outlet.
8. Press and hold the POWER button until a
short “beep” sounds.
9. The air cleaner will take 3~4 minutes to
calibrate the AIR QUALITY sensor. During this
time the sensor lights will flash on and off.
Once the sensor has calibrated, the lights will
begin in AUTO mode.
10. Remove tab from remote control
(WACU300 / WACU450 only.)
Note: For best results and to maximize air flow:
Place unit at least 2 feet away from the wall.
Place the unit away from drafty areas, as the
sensors may not react accurately.
Do not place near curtains, furniture, or other
items that might inhibit air flow.
Place the unit on a stable surface.
❶
❷
❸
❺
❹
❻
AIR CLEANER FEATURES
CAUTION: Fully assemble air filter before using (See Air Cleaner Set-Up on following page).
Note: Features vary according to model.
Quiet Operation
This Winix air cleaner has a four-speed fan
with quiet operation that is ideal for night
time use.
Air Quality Sensor
This Winix air cleaner has an AIR Quality
sensor that detects the presence of various
pollutants in the air. The unit automatically
increases fan speed to clean more air
volume and remove the impurities quickly.
Light Sensor
The built-in light sensor allows undisturbed
sleep with a very smart ‘Sleep Mode’ option.
When Sleep Mode is selected the light
sensor will detect when the room is dark
and automatically dim the control panel
lights and lower the fan speed to the
whisper quite setting. Lights will remain dim
and fan will remain at the low speed until
the room is light.
Multi-Stage Cleaning
The air passes through multiple stages of
cleaning before returning to the room.
PlasmaWaveTM Technology
Safely breaks apart odor, allergens,
chemical vapors and other pollutants at
the molecular level - without producing
harmful ozone.
True HEPA Filter
Captures 99.99% of airborne
pollutants, pet dander and
allergens as small as 0.3 microns
and can be safely washed when
washing the washable pre-filter
and carbon filters.
Washable AOCTM (Advanced
Odor Control) Carbon Filter
Especially formulated to capture
offensive Pet Odors; as well as
Smoke, Cooking and other
Household Odors.
Washable Pre-Filter
The Washable Anti-Bacterial
Pre-filter extends the life of your
filter by capturing Pet Hair and
larger airborne particles and
makes housecleaning easier.
Advanced PlasmaWaveTM Technology
PlasmaWaveTM breaks apart airborne pollutants at the molecular level.
In a fraction of a second, PlasmaWaveTM combines with naturally occurring water molecules
in the air (H2O) to create billions of Hydroxyl Radical molecules (OH).
OH is an unstable molecule that seek equilibrium by stealing hydrogen atoms from adjacent
molecules containing hydrogen (the pollutants), thereby reforming them into harmless
molecules of water, carbon dioxide, and other acceptable molecules.
The result is a measurable reduction of pollutants after the air passes through the Plasma
Generator (PlasmaWaveTM).
By reforming molecules, PlasmaWaveTM technology can reduce odors, as well as VOCs
(chemicalvapors). It is also effective at reducing airborne.
The PlasmaWaveTM technology is harmless and the OH molecule only lives for a nanosecond
while it reforms surrounding molecules. Most importantly-unlike old style ion technology-
PlasmaWaveTM dose not produce high levels of ozone as a by-product.
When combined with a fan-and-filter air cleaning system, PlasmaWaveTM offers an effective
and efficient way of cleaning the air of unwanted pollutants including dust, smoke, and
pollen, as well as VOCs, allergens, and odors.

1211
FILTER REPLACEMENT
CAUTION: Turn off the air clearner and
unplug the electrical cord before
performing any maintenance.
❷
❹
❻
❸
❺
Filter Replacement
The CHECK FILTER indicator will signal
when to replace the entire Filter Cassette.
The replacement period will vary
depending on the hours of usage, air
quality, and location of the unit. However,
in most cases of normal use the filter will
need to be replaced annually.
Change the Filter Cassette when the
CHECK FILTER indicator is on.
This filter should be disposed of when
changed.
Filter Cassette Replacement
1. Turn off the air cleaner and unplug the
electrical cord.
2. Remove the front panel by pulling gently
from the lower portion of the panel. Do
not force, the panel should remove easily.
3. Remove the Filter Cassette by gently
pulling out from the bottom and down
from the top.
4. Remove the plastic wrap from the filter.
5. Install the Filter Cassette by inserting tabs
up into the air cleaner and gently pushing
in at the bottom tab until the frame fits
into place snuggly.
6. Replace the front panel by hooking the
panel on the top of the unit. Swing the
panel in by pushing gently on each side of
the unit and then lock it into place.
7. Plug in air cleaner and press POWER
button until short “beep” sounds.
8. Press the RESET FILTER button by gently
inserting a paperclip into the RESET FILTER
hole on the control panel. The light will
flash 5 times before a “beep” sounds to
indicate the filter has been reset. See
figure C on page 8 or Diag. 9 to the right.
The air cleaner will take 3-4 minutes to
calibrate the AIR QUALITY sensor. During this
time the sensor lights will flash on and off.
Once the sensor has calibrated, the lights will
stop flashing and the unit will begin in AUTO
mode.
OPERATIONS
CONTROL PANEL
A. AIR QUALITY SENSOR: Automatically monitors the air quality level and adjusts fan speed
accordingly in Auto.
B. AUTO Mode: Changes the mode setting to AUTO.
C. RESET: Resets the CHECK FILTER indicator light.
D. CHECK FILTER: Signals when to replace filters.
E. PlasmaWaveTM:Shows that PlasmaWaveTM Technology is active.
F. AIR QUALITY: Green, yellow, and red lights indicate the quality of the air.
G. Turbo / High / Med / Quiet: Shows current fan speed setting.
H. SPEED: adjusts fan speed to QUIET, MED, HIGH or TURBO.
I. : Turns the unit On and Off.
J. LIGHT SENSOR: dims the control panel lights and sets the fan speed to QUIET when the
room is dark.
AUTO Mode: The unit is set to AUTO mode when it is first turned on. The air cleaner will actively
monitor the air and adjust the fan speed accordingly to quickly remove any impurities detected.
When the room is dark, the light sensor will automatically switch the unit to QUIET fan speed and
dim the control panel lights.
MANUAL OPERATION: After you turn on the unit, you can switch to manual operation by using
the SPEED button. To go back to the automatic operation press AUTO.
QUIET, MED OR HIGH: These levels are recommended for standard daytime use. HIGH will
activate automatically when sensors detect poor air quality in AUTOMATIC OPERATIONS. Use the
SPEED button to select the required level.
TURBO: This is the highest fan speed. It can be activated manually for maximum air purification
by pushing the SPEED button until the light by Turbo is illuminated.
PlasmaWaveTM:Push the Auto button for 3 seconds to turn on or off. ❽
Filter Replacement and Cleaning
Filter Service life Cleaning Cycle How to clean
Washable
Pre filter 12 month every 3 month
Washable
HEPA filter 12 month every 3 month
Washable AOCTM
Carbon filter 12 month every 3 month
Filter
Cassette 12 month -
Clean with vacuum cleaner or soft brush, Use a
lukewarm water when the filter is very dirty
Put the filter into the lukewarm water for
30 minutes and dry it out in the shade for 24 hours
-
Put the filter into the lukewarm water for
30 minutes and dry it out in the shade for 24 hours

1413
REMOTE CONTROL
BATTERY REPLACEMENT
1. Squeeze tabs of battery cover and at the
same time pull cover out of remote.
2. Insert battery as shown and
close battery cover.
3. Always use 3V lithium
battery CR2025.
CRADLE: The remote control
has a separate wall-mountable
storage cradle that can be
conveniently attached to any
wall using a screw.
PROPER OPERATING CONDITIONS
Operate the remote control facing the
air cleaner.
Operate within 20 feet of the air cleaner.
IMPROPER OPERATING CONDITIONS
Any location where there is inverter
lighting equipment or electronic
spontaneous lighting equipment.
When objects or furniture are located
between the remote and the air cleaner.
When air cleaner unit is located in direct
sunlight, as sunlight may interfere with the
infrared sensor.
In areas where fluorescent lighting is
flickering due to worn-out bulbs.
Keep remote control away from direct
sunlight or heaters.
A. POWER: Use the power button to turn
the power on and off. A short “beep” will
sound when the unit turns on o off.
B. AUTO Mode: Use the AUTO button to
eput air cleaner in AUTO mode.
C. FAN SPEED: By pressing up or down,
the unit will change fan speeds and enter
into manual mode.
D. TURBO: Use this button to switch from
automatic operation and begin the maximum
amount of room air cleaning and air
movement and will remain in Turbo speed
until changed into Auto or Manual mode.
BATTERY USE
Always use 3V lithium battery CR2025
Incorrect battery usage may cause
battery fluid leakage and/or damage.
When not using remote control for an
extended period, remove the battery.
Avoid dropping or damaging the
remote control.
TROUBLESHOOTING
Before You call
Solutions to Common Problems
Before you call for service, review the list below. This list covers problems that are not the result
of defective materials or workmanship.
The remote control
dose not work.
Make sure the remote control battery is inserted correctly.
dose not work.
Replace a worn-out battery.
Make sure that the remote control has a clear line of sight to
the air cleaner.
The unit has stopped
removing odors
effectively, or seems to
be emitting an odor.
Make sure the AIR QUALITY sensor is not blocked or clogged.
Move the unit closer to the offending odors.
Replace the filters as they may have reached their capacity to
absorb pollutants. You may need to replace filters more
frequently.
OCCURRENCE POSSIBLE CAUSE / SOLUTION
The AIR QUALITY LEVEL
indicator is orange or
red, but the air seems
clean.
Clear the AIR QUALITY sensor with a vacuum cleaner as it may be
blocked or clogged.
Unit interferes with radio
or television reception.
Because this unit radiates radio frequency energy, try one or more
of the following suggestions:
Reorient or relocate the receiving antenna.
Increase the distance between the equipment and the air cleaner.
Connect the air cleaner to an outlet on a circuit different from
that to which the equipment is connected.
Consult an experienced television/radio technician.
The CHECK FILTER
indicator remains lit
after replacing the
Filter Cassette.
Press the RESET FILTER button by gently inserting a paper-clip into
the RESET FILTER button hole. Hold for 3-5 seconds until a “beep”
sounds to indicate the unit has been reset.
The unit does not
remove smoke and
odors in the air.
Make sure the sensor is not blocked or clogged.
- The filters may need replacement
The unit seems to
produce odors. Move the unit closer to the offending odors.
- Replace the filter

1615
The air quality light is
green, but there is still
dust/odor in the air. Replace the filters as needed.
The air quality light is
yellow or red, but the
air seems clean.
Clear the sensor with a vacuum cleaner, as it may be blocked or
clogged.
- Sometimes a compressed can of air may unclog the dust in the
sensor.
OCCURRENCE POSSIBLE CAUSE / SOLUTION
Unit makes a ticking
sound.
This is caused by the PlasmaWaveTM . technology, it may come
and go depending on the environment, but as long as the
PlasmaWaveTM light is on, the function is working.
Unit interferes with radio
or television reception.
Because this unit radiates radio frequency energy, we suggest
you try one or more of the following:
- For better reception, adjust the television/radio antenna.
- Move the unit away from the affected television/radio.
- Plug the unit power cord into an outlet different from the
television/radio power cord.
The unit is running on
high all the time.
Clear the sensor with a vacuum cleaner, as it may be blocked or
clogged.
- Sometimes a compressed can of air may unclog the dust in the
sensor.
OCCURRENCE POSSIBLE CAUSE / SOLUTION
There is an odor coming
from the unit and I just
opened it.
The unit has been concealed in a tightly wrapped package of
currogated cardboard and plastic. Because this has a fan and
pulls air through it, it may give off some “new” odors.
Depending on sensitivity, this should wear off in several days or
perhaps a week depending on how much it is used.
I am not sure what filter
to buy? Go to www.winixinc.com to see which filter options are available
for your unit by reviewing the reference chart.
Will this clean a bigger
area than what it is
rated for?
CADR ratings are provided from a controlled testing environment,
if that environment changes, it can affect the performance.
However if you have a slightly larger room than what the CADR
rating is, it will still help improve the air, but may take a bit longer
to do so.
Where should I place the
unit?
At least 2 feet away from the wall to allow proper circulation
around the unit. If there are doors or narrow hallways it may
reduce the airflow to the air cleaner, but will eventually circulate
near the machine.
Can I turn off the sleep
mode? No, however you can manually push what fan speed you prefer
which will stay at that speed until you change it.
The unit has stopped
removing odors
effectively, or seems to
be emitting an odor.
Make sure the AIR QUALITY sensor is not blocked or clogged.
Move the unit closer to the offending odors.
Replace the filters as they may have reached their capacity to
absorb pollutants. You may need to replace filters more
frequently.
Can I vacuum my filter? NO - vacuuming will only spread the dust back into the air. If you
think the filter is too dirty, it may be time to replace.
The Remote Control
Does Not Work
- Make sure the battery is installed properly.
- Make sure the battery may not need replacing due to being
worn out.
- Make sure the remote has a clear line of sight to the air
cleaner.
There is still some dust
you can see in the air or
on my furniture
- The unit will capture most dust and particles, however with
opening doors, windows, central HVAC etc… there may still
be some level of dust that you can see.
There is nothing holding
the filters in place
- The filters are meant to rest inside the unit. Once the unit is
turned on, the force of air pulled through the machine will
create a tight seal of the filters.
I can hear revving of the
fan motor
- This is normal, especially at night when all environmental
sounds are quiet, you may hear the motor running in
repetition.
The unit is running on
high all the time.
Clear the sensor with a vacuum cleaner, as it may be blocked or
clogged.
- Sometimes a compressed can of air may unclog the dust in the
sensor.

Notes Notes
Other manuals for PlasmaWave WACU300
1
This manual suits for next models
3
Table of contents
Other Winix Air Cleaner manuals