7
9
8
10
PRODUCT WARRANTY
User Manual
2610-0209-01 Rev.02
AIR PURIFIER
Model Name AUS-1050AZBU
Power Voltage 220 - 240 V, 50 / 60 Hz
Power Rate 35 W
Recommended room capacity 38.2 m
2
Weight 7kg
Dimensions 380 mm(W) x 208 mm(D) x 600 mm(H)
Replacement Filter FILTER GI, item : 1712-0090-01
※The exterior, design, and product specifications may be changed without prior notice to improve product
performance.
Product Name Air Purifier
Model Name AUS-1050AZBU
Purchase Date
Warranty period Two (2) Years
Place of purchase
Place of purchase Tel.
Customer
Address
Name
Tel.
※After purchase, be sure to complete all of the above information.
FREQUENTLY ASKED QUESTIONS UNIT SPECIFICATIONS
Problem Check / Actions to take
It does not
turn on at all.
•Is the plug securely attached to
the outlet?
- Make sure the outlet has power
going to it, and ensure the plug
is secured.
•Is there a power outage?
- Check to see if other lights
and electrical equipment are
working and try again.
It doesn’t work
in Auto Mode.
•Has Auto Mode been selected?
- Press the Mode button until
Auto Mode is selected.
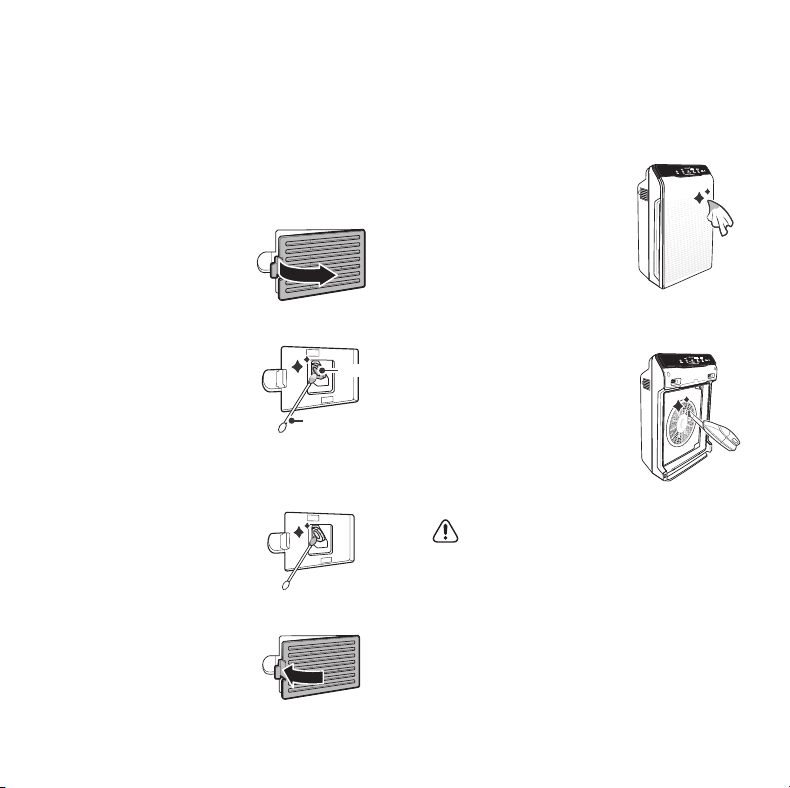
•Is the sensor blocked or clogged?
- Wipe Odour Sensor with wet
cloth, then dry.
It vibrates and
makes a lot of
noise.
•Is it running on a slanted or
uneven surface?
- Move the unit to a hard, flat,
even area of the floor.
The power plug
and outlet feel hot.
•Is the plug securely plugged in?
- Make sure the plug is properly
plugged into the outlet.
Problem Check / Actions to take
There is a
strange smell.
•Is it being used in a place with a
lot of smoke, dust, or odours?
- Clean the air intakes on either
side and clean the Pre-Filter.
- Clean or change the filter.
The fan
strength is
weak.
The unit is not
purifying
the air.
•Is the Check Filter indicator light
on?
- Change the filters as required.
The display
panel is dim.
•Is the Light Sensor blocked by
debris?
- When Auto Mode is on,
Sleep Mode is automatically
activated when the Light
Sensor detects that the room
is dark.
SAFETY AND CAUTIONS
Before operating this equipment, carefully read and follow these safety cautions.
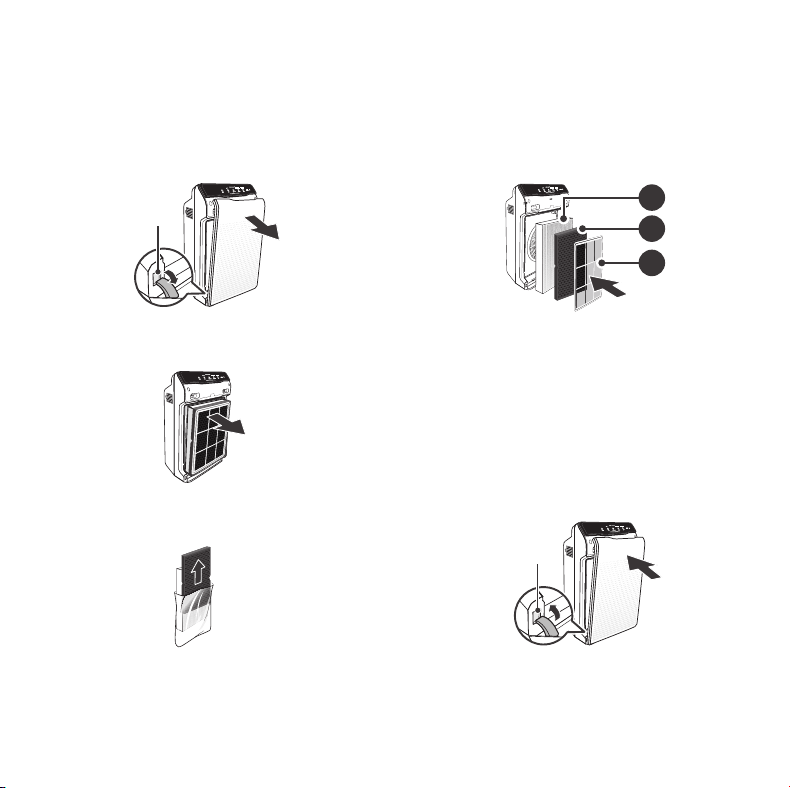
Ensure filters are inserted before running unit
Running the unit without filters can shorten the unit's life and cause electric shock or injury.
Be sure foreign objects are NOT inserted into the vents on the unit
Objects can include pins, rods, and coins.
Do not touch any part of the interior of the unit with wet hands
The high voltage may cause electric shock.
Ensure unit intake and outlet vents do not become blocked
Blockage may lead to increased internal temperatures causing product failure and derformation.
Do not use the unit as a step stool or place heavy objects on it
Personal injury may occur or product failure and deformation.
WARNING
Follow these instructions to reduce the risk of serious injury or death and to reduce risk of damaging the unit.
Do not pull on the power cord when unplugging the unit.
Do not tie or knot the power cord when unit is in operation.
If the unit becomes submerged in water, unplug it and contact customer service.
Do not unplug or move the unit while in operation.
Do not plug additional appliances into the same outlet or power supply.
Do not touch the plug with wet hands.
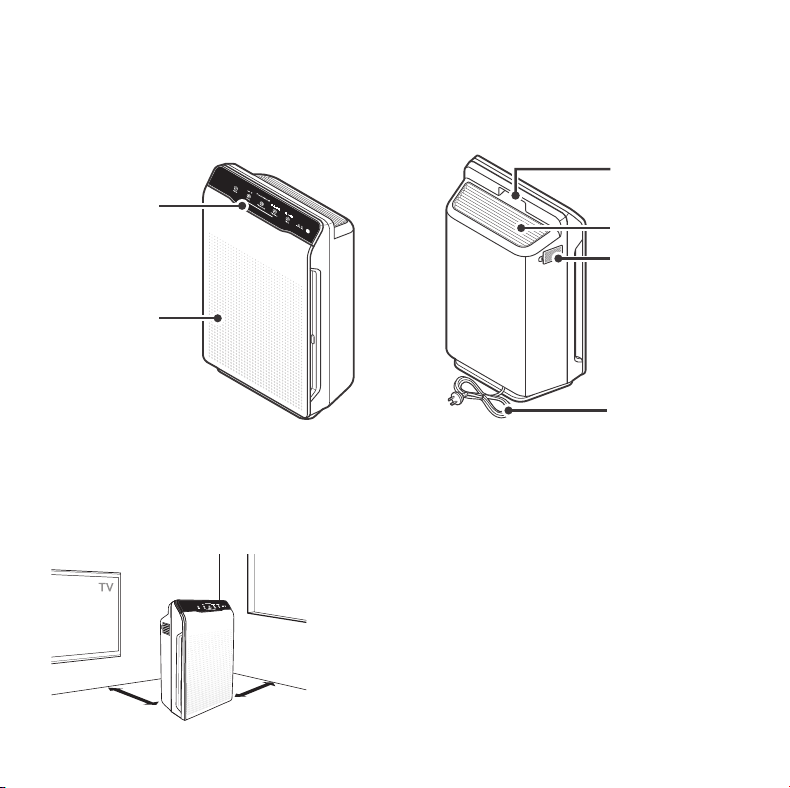
Do not place unit closer than 30 cm from the wall during operation. It may cause condensation to the wall and
the surrounding area.
Unplug the unit when not in operation for extended periods of time.
Cord can become damaged by forcefully bending, pulling, twisting, bundling, pinching or placing heavy objects on it.
• If the supply cord is damaged, it must be replaced by a special cord or assembly available from the manufacturer or its
service agent.
• This appliance is not intended for use by a person (including children) with reduced physical sensory or mental capabilities,
or lack of experience and knowledge, unless they have been given supervision or instruction concerning use of the appliance
by a person responsible for their safety.
• Children should be supervised to ensure that they do not play with the appliance.
SAFETY INSTRUCTIONS
• Do not repair or modify the unit unless specifically
recommended in this manual. All other repairs
should be completed by a qualified technician.
• Do not use if the power cord or plug is damaged or
the connection to the wall outlet is loose.
• Use AC 220 - 240 V only.
• Do not damage, break, forcefully bend, pull, twist,
bundle, coat, pinch, or place heavy objects on the
power cord.
• Periodically remove dust from the power plug. This
will reduce the risk of shock due to humidity build
up.
• If the power plug is damaged, it must be replaced
by the manufacturer or a qualified technician.
• Remove the power plug from the outlet before
cleaning the unit. When removing the power plug,
grasp by holding the plug itself, never hold by the
cord.
• Remove the power plug from the outlet when not in
use.
• Do not handle the power plug with wet hands.
• Do not operate the unit when using indoor smoke-
generating insecticides.
• Do not clean unit with benzene or paint thinner. Do
not spray insecticides on the unit.
• Do not use the unit where it is humid or where the
unit may become wet, such as the bathroom.
• Do not insert fingers or foreign objects into air
intake or outlet.
• Do not use the unit near flammable gases. Do
not use near cigarettes, incense, or other spark-
creating items.
• Unit will not remove carbon monoxide emitted from
heating appliances or other sources.
• This appliance is not intended for use by children
or other persons without assistance or supervision
if their physical, sensory or mental capabilities
prevent them from using it safely. Children should
be supervised to ensure that they do not play with
the appliance.
Thank you for purchasing a Winix air purifier. This product is for household use only.
IMPORTANT CAUTIONS FOR USING YOUR AIR PURIFIER
WARNING : Follow the instructions in this manual to reduce the risk of electric shock, short circuit, and/or fire.
IMPORTANT PRECAUTIONS FOR USING YOUR AIR PURIFIER
• Do not block the intake or outlet vents.
• Do not use near hot objects, such as a stove.
• Do not use where the unit may come into contact
with steam.
• Do not use the unit on its side.
• Keep away from products that generate oily
residue, such as a deep fryer.
• Do not use detergent to clean the unit.
• Do not operate without a filter.
• Do not wash and reuse the True HEPA Filter or
the Deodorization Filter.
• Hold the handle on the back of the unit to transport.
• Do not hold by the front panel.
• Please read and follow all safety rules and instructions
in this manual before operating.
• The product warranty is printed on the back of this guide,
so please keep it in a safe place for future use.
ZERO (AUS-1050AZBU)Model
Use & Care
Guide
To expedite service, please specify the model name and number,
the nature of the problem, your contact information, and your address.
Contact for product
related inquiries and
customer service
After sales and warranty enquiries, visit website or call 1800 122 100
Website : www.ausclimate.com.au / www.winixaustralia.com.au
Distributed by
Ausclimate Pty Ltd
AUSCLIMATE FILTER CLUB
For exclusive savings on
replacement filters
ausclimate.com.au/replacement-filter-club