manuals.online logo
Brands
  1. Home
  2. •
  3. Brands
  4. •
  5. Woodhaven
  6. •
  7. Tools
  8. •
  9. Woodhaven 5432 User manual

Woodhaven 5432 User manual

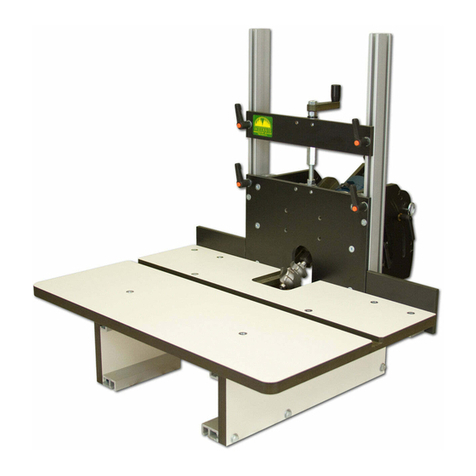
5432
HD Panel Master
Owners Manual
U.S. Patent #5,960,843
Please Read Carefully!
Additional Hardware:
Parts listed below are not shown in the hardware
drawings. Refer to photos in the instructions:
Part Desc ........................Qty
5432B Base .....................................1
5432S 5-7/8" One Track . . . . . . . . . . . . . . . . . . . . . . . . .2
5432T 6-3/4" Ultra Track Fence . . . . . . . . . . . . . . . . . .2
6305 Toggle Clamps ...........................2
Part# Description Qty.
5525 Knob 2
Part# Description Qty.
5765B Oval Nut 8
Part# Description Qty.
MP375 3/8" Screw 4
Part# Description Qty.
HB040 1-1/4" Bolt 4
Part# Description Qty.
HB030 1" Bolt 2
Part# Description Qty.
HB060 3" Bolt 2
Part# Description Qty.
WFN002 1" Washer 4
Part# Description Qty.
BUSH1250 1/4" Spacer 8
Part# Description Qty.
BUSH1125 1/8" Spacer 8
Part# Description Qty.
BUSH004 5/8" Spacer 2
Part# Description Qty.
WS002 Washer 4
Part# Description Qty.
5760B Oval Nut 4
Part# Description Qty.
MF006 5/8" screw 4
Part# Description Qty.
5590 Knob 2
BEFORE BEGINNING
 Identifyandverifythatyouhaveallthepartslisted.The
HDPanelMasterwasdesignedtobeusedwithWoodhaven
HDDoorTemplateswiththehardwareincluded.Itcanalso
beusedwithourStandardDoorTemplatesbypurchasingthe
5431HardwareKit.Itcanbeusedonashaperorarouter
tableusingtheHDDoorTemplatesandonaroutertable
onlyifusingtheStandardDoorTemplates.You'llneeda#3
Phillipsscrewdriveranda7/16"wrenchforassembly.Read
theinstructionscarefullyatleastoncebeforebeginning.
Part# Description Qty.
5548 2” T-Knob 2
1
Holes/bolts in Tracks
face each other
 Installa5/8"screw(MF006)thruthecountersunk
holesineachofthe5-7/8"OneTracks(5432S)and
startanovalnut(5765B - smooth side first)onthe
endofeachscrew.Therearetwoholesineachof
the6-3/4"UltraTrackFences(5432T).One
holeis3/4"fromtheendoftheFence
andtheotherholeis1-1/2"from
theoppositeendoftheFence.
 Placethelongedgesofthetwo
Fencesagainsteachothersotheholesareclosest
toandacrossfromeachothertoinsureyouhave
mirrorimagesofthetwoFencesafterassembly.
AttheendofeachFence,wheretheholeis1-1/2"
fromtheend,installaOneTrack.Insertthetwooval
nutsontheOneTrackintheT-slotsoftheFence,butt
thelongedgeoftheOneTrackagainsttheendofthe
Fence,checkitforsquareandtightenthescrews.
 Installawasher(WS002)oneachof
the1-1/4"bolts(HB040).Placethe6-3/4"
UltraTrackFence(5432T)ontheBase
(5432B)withtwoholesineachFence
alignedwiththetwoslotsintheBaseand
theOneTracksbuttedagainsttherearedge
oftheBase.ThetwoholesintheFences
shouldfacetowardsthecenteroftheBase.
 Insertthe1-1/4"boltsthrutheholes
intheFence/slotsinBaseand,fromthe
undersideoftheBase,startanoval
nut(5760B - smooth side first),
ontheendeachbolt.Position
theFencesabout12"apartfor
nowandsnugthebolts.
 Inserttwo3/8"screws(MP375)thru
thetwofrontholesofeachToggleClamp
(6305)andstartanovalnut(5765B -
raised side first)ontheendofeachscrew.
SlideoneToggleClampontoeachFence,
withtheovalnutsengagedinthecenter
T-slot.PositiontheToggleClampswhere
desiredandtightenthescrews.Forquicker
spindleadjustments,replacethetopnuton
thespindlewiththethumbnut(5525).
 Inserta5/8"spacer(BUSH004 on
thetwo1"bolts(HB030)andstartaknob
(5590)ontheendofeachbolt.Slidethe
boltheadintoaT-slotofthefence,
positioningtheknobwheredesired
forbestcontrol,andtighten.
5765B x2
MF006 x2
HB040 x2
WS002 x2
5760B x2
5590 x1
5525 x1
BUSH004 x1
MP375 x2
5765B x2
HB030
x1
5432S &
5432T
5432B
 Theheightofthespacerstackoneachboltshouldbemorethenthe
thicknessofthepanelanditshouldalsoplacethetemplateatthe
optimumheightforyourshapercutterbearingtoridefirmlyon
theedgeofthetemplate.Adjustthenumberof1/4"and
1/8"spacersasnecessarytoachievethebesttemplate
height.Makesuretheshapercutterwillnothitthe
template.

 Slidethepanelblank(one end should
be finished cut square)inthePanelMaster,
betweentheFences,Baseandtemplate.
Positiontheuncutendofthepanelatthe
desiredfinishedlength,usingthehigh
pointofthetemplateasareference.
Tracetheoutlineofthetemplate
onthepanelblank,removethe
panelandroughcutittoshape,
staying1/8"orlessfromtheline.
2
SETUP THE HD PANEL MASTER
 Insertthepanelbetweenthe
FencesontheBaseoftheHD
PanelMaster.Slidethe
Fencesupagainsteach
sideofthepaneland
centertheFences/panel
side-to-sideontheBase,
keepingtheOneTrack
ofeachFenceagainst
theedgeoftheBaseto
insurethepanelis
squaretotheBase.
Tightenthe
Fencebolts
usinga
7/16"
wrench.
 Selectthepaneltemplateyouwish
tousefromtheHDDoorTemplate
set.Centerthetemplateside-to-
sideontheBase,usingthe
centernotchontheedgeof
thetemplateasareference.
SelecttheholesintheBasethat
lineupwiththeholesinthe
template.

 Installtwo3"bolts
(HB060)thruthe
recessedslotin
thebottomof
thebaseand
thrutheholesinthe
Basethatlineupwith
theholesinthetemplate.
WFN002 x2
BUSH1250 x6
HB030 x2
5548 x2
WFN002 x2
 Placethree1/4"spacersoneachbolt.
The number of spacers may need adjustment
depending on your shaper cutter configuration.
Placea1"washer(WFN002)oneachbolt/spacer
stack.Installthetemplateontheboltsandanother
1"washeroneachbolt,ontopofthetemplate.
Placeaknob(5548)oneachboltandtighten.
Center Fences &
Panel Stock on Base and
tighten bolts
Center Template on Base
and install hardware
Trace template
outline on panel
and remove waste
3
RAISED PANEL CUT WITH A ROUTER
Thedoortemplatecanberemovedsincethebearing
onthepanelbitwillfollowtheedgeofthepanel,notthe
template.Makesureyouhaveatleast1"ofthebitshank
intherouter.Ifextrabitheightisneededtocutthefull
profiledepth,youmayneedtousearouterliftor
colletextension.You'llneedtomakesurethe
panelsticksoutpasttheBaseatleast
1-5/8"topreventtheraisedpanel
bitfromcuttingintotheBase.
 ClampthepanelintheHD
PanelMasterwiththetoggle
clamps,holdthehandles
andmakeincremental
passestomachine
theraisedpanel
profileonthepanel.
RAISED PANEL CUT WITH A SHAPER
 Ifpossible(depends on raised panel cutter & bearing set up),keepthe
HDDoorTemplateontheHDPanelMasterwhenmachiningtheraisedpanel
profile.Thetemplatesareextralongsothebearingcanmakecontactwith
thetemplatebeforethecuttermakescontactwiththepanel.This
providesgreatercontrolandincreasesthemarginofsafety.
 Theheightofthespacerstacksunderthe
templateshouldplacethetemplateattheoptimum
heightforyourshapercutterbearingtoridefirmly
ontheedgeofthetemplate.Adjustthenumberof
1/4"and1/8"spacersasnecessarytoachieve
thebesttemplateheight.Makesurethe
shapercutterwillnothitthetemplate.
 Makesurethetemplateisinline
withtheraisedpanelcutterbearing.Clamp
thepanelintheHDPanelMasterwiththe
toggleclamps,holdthehandlesandmakeincremental
passestomachinetheraisedpanelprofileonthepanel. ©Copyright WOODHAVEN INC. 5/20/15
(800) 344-6657 or WOODHAVEN.COM
FLUSH TRIM PANEL TO SHAPE
ClampthepanelblankintheHD
PanelMaster,holdthehandlesand
flushtrimthepaneltoshape
usingaflushtrimcutter
onyourrouteror
shaper.The
bearingofthe
flushtrimbit
willfollowthe
paneltemplate
andcutthepanel
toitsfinished
shape.
You
canuse
theHD
PanelMaster
toholdthe
panelfor
theraised
panelcut
onthepanel
endjustshaped(see below).
Aftermakingtheraised
panelcut,thepaneltonguewill
fitintothegrooveinthematingrail.
Feed Direction
At Least 1-5/8"
Overhang
Do not allow
router bit to
strike jig
base!

Other Woodhaven Tools manuals

Woodhaven 7500 User manual

Woodhaven

Woodhaven 7500 User manual

Woodhaven 7902 User manual

Woodhaven

Woodhaven 7902 User manual

Woodhaven 8395 User manual

Woodhaven

Woodhaven 8395 User manual

Woodhaven Angle-Ease 1470 User manual

Woodhaven

Woodhaven Angle-Ease 1470 User manual

Woodhaven 6002 User manual

Woodhaven

Woodhaven 6002 User manual

Woodhaven 8610 User manual

Woodhaven

Woodhaven 8610 User manual

Woodhaven Angle-Ease 1470 User manual

Woodhaven

Woodhaven Angle-Ease 1470 User manual

Woodhaven EZ Lift 1429 User manual

Woodhaven

Woodhaven EZ Lift 1429 User manual

Woodhaven 8615 User manual

Woodhaven

Woodhaven 8615 User manual

Woodhaven 5435 User manual

Woodhaven

Woodhaven 5435 User manual

Woodhaven 3210 User manual

Woodhaven

Woodhaven 3210 User manual

Woodhaven Angle Ease 1425 User manual

Woodhaven

Woodhaven Angle Ease 1425 User manual

Woodhaven 6012 User manual

Woodhaven

Woodhaven 6012 User manual

Woodhaven 8625 User manual

Woodhaven

Woodhaven 8625 User manual

Woodhaven 8715 User manual

Woodhaven

Woodhaven 8715 User manual

Woodhaven 3000 User manual

Woodhaven

Woodhaven 3000 User manual

Woodhaven 3000 User manual

Woodhaven

Woodhaven 3000 User manual

Woodhaven 8628 User manual

Woodhaven

Woodhaven 8628 User manual

Woodhaven HD Panel Master 5432 User manual

Woodhaven

Woodhaven HD Panel Master 5432 User manual

Woodhaven 204 User manual

Woodhaven

Woodhaven 204 User manual

Popular Tools manuals by other brands

Maddox MT8-1 Owner's manual & safety instructions

Maddox

Maddox MT8-1 Owner's manual & safety instructions

Atlas Copco P2530-H Safety information

Atlas Copco

Atlas Copco P2530-H Safety information

Sealey VS1668.V3 instructions

Sealey

Sealey VS1668.V3 instructions

Teseq NSG 437 user manual

Teseq

Teseq NSG 437 user manual

Parkside 89568 Operation and safety notes

Parkside

Parkside 89568 Operation and safety notes

Tiger Tool Sheppard M100 operating instructions

Tiger Tool

Tiger Tool Sheppard M100 operating instructions

Rehau RAUTOOL L1 instruction manual

Rehau

Rehau RAUTOOL L1 instruction manual

Emerson Roxar user manual

Emerson

Emerson Roxar user manual

Arrow RHT300 user manual

Arrow

Arrow RHT300 user manual

pellenc FIXION 2 user guide

pellenc

pellenc FIXION 2 user guide

Powerfix Profi Z29760A Operation and safety notes

Powerfix Profi

Powerfix Profi Z29760A Operation and safety notes

GroPoint 2625-N-T Series Operation manual

GroPoint

GroPoint 2625-N-T Series Operation manual

VAR DR-03500 manual

VAR

VAR DR-03500 manual

Ryobi RT100 Operator's manual

Ryobi

Ryobi RT100 Operator's manual

Trojan TH Series user manual

Trojan

Trojan TH Series user manual

MSW MSW-ETTBMW-05 user manual

MSW

MSW MSW-ETTBMW-05 user manual

Sealey SM94.V3 instructions

Sealey

Sealey SM94.V3 instructions

Pressol SPRAYFI Series OPERATING INSTRUCTIONS AND SAFETY NOTES

Pressol

Pressol SPRAYFI Series OPERATING INSTRUCTIONS AND SAFETY NOTES

manuals.online logo
manuals.online logoBrands
  • About & Mission
  • Contact us
  • Privacy Policy
  • Terms and Conditions

Copyright 2025 Manuals.Online. All Rights Reserved.