Worx WG324 User manual

WG324 WG324.9
20V 5’’ Pruning Saw
Scie d’élagage 20V 5’’
20V 5” Sierra de cadena para podar
EN
F
ES
P02
P16
P28

20V 5’’ Chain Saw EN
2
PRODUCT SAFETY
WARNING: Some dust created by power
sanding, sawing, grinding, drilling and
other construction activities contains chemicals
known to the state of California to cause cancer,
birth defects or other reproductive harm. Some
examples of these chemicals are:
• Lead from lead-based paints;
• Crystalline silica from bricks and cement and
other masonry products;
• Arsenic and chromium from chemically-treated
lumber.
Your risk from these exposures varies, depending
on how often you do this type of work. To reduce
your exposure to these chemical: work in a well
ventilated area, and work with approved safety
equipment, such as those dust masks that are
specially designed to filter out microscopic
particles.
WARNING: This product can expose you to
chemicals including lead and Di(2-ethylhexyl)
phthalate (DEHP) which are known to the State
of California to cause cancer and birth defects or
other reproductive harm. For more information go
to www.P65Warnings.ca.gov.
GENERAL POWER TOOL
SAFETY WARNINGS
WARNING Read all safety warnings,
instructions, illustrations and specifications
provided with this power tool.
Failure to follow all
instructions listed below may result in electric shock, fire
and/or serious injury.
Save all warnings and instructions for future
reference.
The term “power tool” in the warnings refers to your
mains-operated (corded) power tool or battery-operated
(cordless) power tool.
1) Work area safety
a) Keep work area clean and well lit.
Cluttered or
dark areas invite accidents.
b) Do not operate power tools in explosive
atmospheres, such as in the presence of
flammable liquids, gases or dust.
Power tools
create sparks which may ignite the dust or fumes.
c) Keep children and bystanders away while
operating a power tool.
Distractions can cause you
to lose control.
2) Electrical safety
a) Power tool plugs must match the outlet. Never
modify the plug in any way. Do not use any
adapter plugs with earthed (grounded) power
tools.
Unmodified plugs and matching outlets will
reduce risk of electric shock.
b) Avoid body contact with earthed or grounded
surfaces, such as pipes, radiators, ranges and
refrigerators.
There is an increased risk of electric
shock if your body is earthed or grounded.
c) Do not expose power tools to rain or wet
conditions.
Water entering a power tool will
increase the risk of electric shock.
d) Do not abuse the cord. Never use the cord for
carrying, pulling or unplugging the power tool.
Keep cord away from heat, oil, sharp edges
or moving parts.
Damaged or entangled cords
increase the risk of electric shock.
e) When operating a power tool outdoors, use an
extension cord suitable for outdoor use.
Use of
a cord suitable for outdoor use reduces the risk of
electric shock.
f) If operating a power tool in a damp location is
unavoidable, use a residual current device (RCD)
protected supply.
Use of an RCD reduces the risk of
electric shock.
3) Personal safety
a) Stay alert, watch what you are doing and use
common sense when operating a power tool. Do
not use a power tool while you are tired or under
the influence of drugs, alcohol or medication.
A
moment of inattention while operating power tools
may result in serious personal injury.
b) Use personal protective equipment. Always
wear eye protection.
Protective equipment such
as dust mask, non-skid safety shoes, hard hat, or
hearing protection used for appropriate conditions
will reduce personal injuries.
c) Prevent unintentional starting. Ensure the
switch is in the off-position before connecting
to power source and/or battery pack, picking up
or carrying the tool.
Carrying power tools with your
finger on the switch or energising power tools that
have the switch on invites accidents.
d) Remove any adjusting key or wrench before
turning the power tool on.
A wrench or a key left
attached to a rotating part of the power tool may
result in personal injury.
e) Do not overreach. Keep proper footing and
balance at all times.
This enables better control of
the power tool in unexpected situations.
f) Dress properly. Do not wear loose clothing or
jewellery. Keep your hair and clothing away
from moving parts.
Loose clothes, jewellery or long
hair can be caught in moving parts.
g) If devices are provided for the connection of
dust extraction and collection facilities, ensure
these are connected and properly used.
Use of
dust collection can reduce dust-related hazards.
h) Do not let familiarity gained from frequent use
of tools allow you to become complacent and
ignore tool safety principles.
A careless action
can cause severe injury within a fraction of a second.
4) Power tool use and care
a) Do not force the power tool. Use the correct
power tool for your application.
The correct power
tool will do the job better and safer at the rate for
which it was designed.
b) Do not use the power tool if the switch does not
turn it on and off.
Any power tool that cannot be

20V 5’’ Chain Saw EN
3
controlled with the switch is dangerous and must be
repaired.
c) Disconnect the plug from the power source and/
or remove the battery pack, if detachable, from
the power tool before making any adjustments,
changing accessories, or storing power tools.
Such preventive safety measures reduce the risk of
starting the power tool accidentally.
d) Store idle power tools out of the reach of
children and do not allow persons unfamiliar
with the power tool or these instructions to
operate the power tool.
Power tools are dangerous
in the hands of untrained users.
e) Maintain power tools and accessories. Check
for misalignment or binding of moving parts,
breakage of parts and any other condition
that may affect the power tool’s operation.
If damaged, have the power tool repaired
before use.
Many accidents are caused by poorly
maintained power tools.
f) Keep cutting tools sharp and clean.
Properly
maintained cutting tools with sharp cutting edges
are less likely to bind and are easier to control.
g) Use the power tool, accessories and tool bits
etc. in accordance with these instructions,
taking into account the working conditions and
the work to be performed.
Use of the power tool
for operations different from those intended could
result in a hazardous situation.
h) Keep handles and grasping surfaces dry, clean
and free from oil and grease.
Slippery handles and
grasping surfaces do not allow for safe handling and
control of the tool in unexpected situations.
5) Battery tool use and care
a) Recharge only with the charger specified by the
manufacturer.
A charger that is suitable for one
type of battery pack may create a risk of fire when
used with another battery pack.
b) Use power tools only with specifically
designated battery packs.
Use of any other
battery packs may create a risk of injury and fire.
c) When battery pack is not in use, keep it away
from other metal objects, like paper clips, coins,
keys, nails, screws or other small metal objects,
that can make a connection from one terminal
to another.
Shorting the battery terminals together
may cause burns or a fire.
d) Under abusive conditions, liquid may be ejected
from the battery; avoid contact. If contact
accidentally occurs, flush with water. If liquid
contacts eyes, additionally seek medical help.
Liquid ejected from the battery may cause irritation
or burns.
e) Do not use a battery pack or tool that is
damaged or modified.
Damaged or modified
batteries may exhibit unpredictable behaviour
resulting in fire, explosion or risk of injury.
f) Do not expose a battery pack or tool to fire
or excessive temperature.
Exposure to fire or
temperature above 130 °C may cause explosion.
g) Follow all charging instructions and
do not charge the battery pack or tool
outside the temperature range specified
in the instructions.
Charging improperly or at
temperatures outside the specified range may
damage the battery and increase the risk of fire.
6) Service
a) Have your power tool serviced by a qualified
repair person using only identical replacement
parts.
This will ensure that the safety of the power
tool is maintained.
b) Never service damaged battery packs.
Service
of battery packs should only be performed by the
manufacturer or authorized service providers.
1) General pruning saw safety warnings:
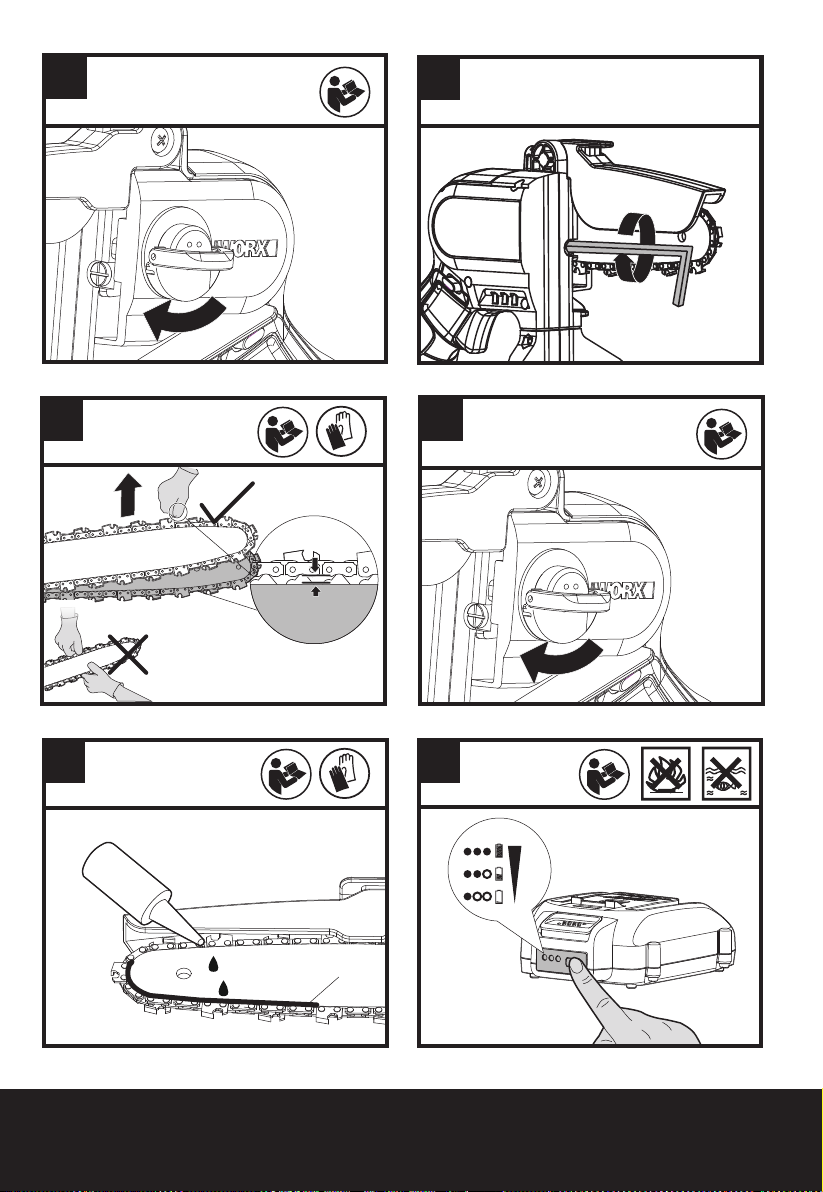
a) Keep all parts of the body away from the saw
chain when the pruning saw is operating.
Before you start the pruning saw, make sure the
saw chain is not contacting anything.
A moment
of inattention while operating pruning saws may
cause entanglement of your clothing or body with
the saw chain.
b) Always hold the pruning saw with your right
hand on the rear handle and your left hand on
the front handle.
Holding the pruning saw with a
reversed hand configuration increases the risk of
personal injury and should never be done.
c) Hold the power tool by insulated gripping
surfaces only, because the saw chain may
contact hidden wiring.
Saw chains contacting
a ”live” wire may make exposed metal parts of the
power tool ”live” and could give the operator an
electric shock.
d) Wear safety glasses protection. Further
protective equipment for hearing, head,
hands, legs and feet is recommended.
Adequate
protective clothing will reduce personal injury by
flying debris or accidental contact with the saw
chain.
e) Do not operate a pruning saw in a tree, on a
ladder, from a rooftop, or any unstable support.
Operation of a pruning saw in this manner could
result in serious personal injury.
f) Always keep proper footing and operate the
pruning saw only when standing on fixed,
secure and level surface.
Slippery or unstable
surfaces may cause a loss of balance or control of
the pruning saw.
g) When cutting a limb that is under tension , be
alert for spring back.
When the tension in the
wood fibres is released , the spring loaded limb may
strike the operator and/or throw the pruning saw out
of control.
h) Use extreme caution when cutting brush and
saplings.
The slender material may catch the saw
chain and be whipped toward you or pull you off
balance.
i) Carry the pruning saw by the front handle with
the pruning saw switched off and away from
your body. When transporting or storing the
pruning saw , always fit the guide bar cover.
Proper handling of the pruning saw will reduce the
likelihood of accidental contact with the moving saw

20V 5’’ Chain Saw EN
4
chain.
j) Follow instructions for lubricating, chain
tensioning and changing the bar and chain.
Improperly tensioned or lubricated chain may either
break or increase the chance for kickback.
k) Cut wood only. Do not use pruning saw for
purposes not intended. For example: do not use
pruning saw for cutting metal, plastic, masonry
or non-wood building materials.
Use of the
pruning saw for operations different than intended
could result in a hazardous situation.
l) This pruning saw is not intended for tree felling.
Use of the pruning saw for operations different
than intended could result in serious injury to the
operator or bystanders.
m) Follow all instructions when clearing jammed
material, storing or servicing the pruning saw.
Make sure the switch is off and the battery pack
is removed.
Unexpected actuation of the pruning
saw while clearing jammed material or servicing may
result in serious personal injury.
n) Recommendation that the first-time user
should, as a minimum, practise cutting logs on a
saw-horse or cradle.
o) Recommendation to have sharpening and
maintenance of the saw chain performed by
authorised service centres.
2) Causes and operator prevention of kickback:
Kickback may occur when the nose or tip of the guide
bar touches an object, or when the wood closes in and
pinches the saw chain in the cut.
Tip contact in some cases may cause a sudden reverse
reaction, kicking the guide bar up and back towards the
operator.
Pinching the saw chain along the top of the guide
bar may push the guide bar rapidly back towards the
operator.
Either of these reactions may cause you to lose control
of the saw which could result in serious personal injury.
Do not rely exclusively upon the safety devices built into
your saw. As a pruning saw user, you should take several
steps to keep your cutting jobs free from accident or
injury.
Kickback is the result of pruning saw misuse and/or
incorrect operating procedures or conditions and can be
avoided by taking proper precautions as given below:
a) Maintain a firm grip, with thumbs and fingers
encircling the pruning saw handles, with both
hands on the saw and position your body and
arm to allow you to resist kickback forces.
Kickback forces can be controlled by the operator,
if proper precautions are taken. Do not let go of the
pruning saw.
b) Do not overreach and do not cut above shoulder
height.
This helps prevent unintended tip contact
and enables better control of the pruning saw in
unexpected situations.
c) Only use replacement bars and chains specified
by the manufacturer.
Incorrect replacement guide
bars and saw chains may cause chain breakage and/
or kickback.
d) Follow the manufacturer’s sharpening and
maintenance instructions for the saw chain.
Decreasing the depth gauge height can lead to
increased kickback.
Safety Warnings for battery pack
a) Do not dismantle, open or shred battery pack.
b) Do not expose battery pack to heat or fire. Avoid
storage in direct sunlight.
c) Do not short-circuit a battery pack. Do not store
battery packs haphazardly in a box or drawer
where they may short-circuit each other or be
short-circuited by other metal objects. When
battery pack is not in use, keep it away from other
metal objects, like paper clips, coins, keys, nails,
screws or other small metal objects, that can make
a connection from one terminal to another. Shorting
the battery terminals together may cause burns or
fire.
d) Do not remove battery pack from its original
packaging until required for use.
e) Do not subject battery pack to mechanical
shock.
f) In the event of battery leaking, do not allow the
liquid to come in contact with the skin or eyes.
If contact has been made, wash the affected
area with copious amounts of water and seek
medical advice.
g) Observe the plus (+) and minus (–) marks on the
battery back and equipmentand ensure correct
use.
h) Do not use any battery pack which is not
designed for use with the equipment.
i) Keep battery pack out of the reach of children.
j) Seek medical advice immediately if a cell or
battery has been swallowed.
k) Always purchase the battery pack
recommended by the device manufacturer for
the equipment.
l) Keep battery pack clean and dry.
m) Wipe the battery pack terminals with a clean
dry cloth if they become dirty.
n) Battery pack needs to be charged before use.
Always use the correct charger and refer to
the manufacturer’s instructions or equipment
manual for proper charging instructions.
o) Do not leave battery pack on prolonged charge
when not in use.
p) After extended periods of storage, it may
be necessary to charge and discharge the
battery pack several times to obtain maximum
performance.
q) Battery pack gives its best performance when it
is operated at normal room temperature (68 °F ±
9 °F)(20 °C ± 5 °C).
r) When disposing of battery packs, keep battery
packs of different electrochemical systems
separate from each other.
s) Recharge only with the charger specified
by Worx. Do not use any charger other than
that specifically provided for use with the
equipment. A charger that is suitable for one type
of battery pack may create a risk of fire when used
with another battery pack.

20V 5’’ Chain Saw EN
5
t) Retain the original product literature for future
reference.
u) Use only the battery pack in the application for
which it was intended.
v) Remove the battery pack from the equipment
when not in use.
w) Dispose of properly.
SAVE THESE INSTRUCTIONS
Instructions concerning the proper techniques for
limbing, and cross-cutting
1. Limbing a tree
Limbing is removing the branches from a fallen tree.
When limbing leave larger lower limbs to support the
log off the ground. Remove the small limbs in one cut as
illustrated in Figure 1. Branches under tension should
be cut from the bottom up to avoid binding the pruning
saw.
3
22
W
YZ
X
2˝
2˝
1
1
1
2
2/3
1
1/3
12
2/3
1/3
Fig.0
Fig.1
Fig.2
Fig.3
Fig.4
Fig.5
2. BUCKING A LOG
Bucking is cutting a log into lengths. It is important to
make sure your footing is firm and your weight is evenly
distributed on both feet. When possible, the log should
be raised and supported by the use of limbs, logs or
chocks. Follow the simple directions for easy cutting.
When the log is supported along its entire length as
illustrated in Figure 2, it is cut from the top (overbuck),
avoid contacting ground as this will greatly reduce the
chain sharpness.
When the log is supported on one end, as illustrated
in Figure 3, cut 1/3 the diameter from the underside
( underbuck) (1). Then make the finished cut by
overbucking (2) to meet the first cut.
3
22
W
YZ
X
2˝
2˝
1
1
1
2
2/3
1
1/3
12
2/3
1/3
Fig.0
Fig.1
Fig.2
Fig.3
Fig.4
Fig.5
When the log is supported on both ends, as illustrated
in Figure 4, cut 1/3 the diameter from the top (overbuck)
(1). Then make the finished cut by underbucking (2) the
lower 2/3 to meet the first cut.
3
22
W
YZ
X
2˝
2˝
1
1
1
2
2/3
1
1/3
12
2/3
1/3
Fig.0
Fig.1
Fig.2
Fig.3
Fig.4
Fig.5
When bucking on a slope always stand on the uphill
side of the log, as illustrated in Figure 5. When “cutting
through”, to maintain complete control release the
cutting pressure near the end of the cut without
relaxing your grip on the pruning saw handles. Don’t
let the chain contact the ground. After completing the
cut, wait for the saw chain to stop before you move the
pruning saw. Always stop the motor before moving from
tree to tree.
3
22
W
YZ
X
2˝
2˝
1
1
1
2
2/3
1
1/3
12
2/3
1/3
Fig.0
Fig.1
Fig.2
Fig.3
Fig.4
Fig.5
3
22
W
YZ
X
2˝
2˝
1
1
1
2
2/3
1
1/3
12
2/3
1/3
Fig.0
Fig.1
Fig.2
Fig.3
Fig.4
Fig.5

20V 5’’ Chain Saw EN
6
SYMBOLS
To reduce the risk of injury, user must
read instruction manual
Wear ear protection
Wear eye protection
Wear dust mask
Do not expose to rain
Do not burn
Batteries may enter water cycle if
disposed improperly, which can be
hazardous for ecosystem. Do not
dispose of waste batteries as unsorted
municipal waste.
Li-Ion battery, battery must be
recycled
Always use pruning saw two-handed
Beware of pruning saw kickback and
avoid contact with bar tip
Wear protective gloves
POSITEC Inc. has established
a partnership with the RBRC
Corporation to recycle any Positec
batteries with the RBRC-call2recycle
seal. For environmental protection,
please do not discard batteries in the
trash. After the batteries’ life cycle
is ended, then please call 1-800-
822-8837 for a free service that will
properly dispose of the battery.

6
7
14
15
20
8
4
5
1
16
19 18
17
9
10
12
11
13
2 3

20V 5’’ Chain Saw EN
8
COMPONENT LIST
1. CHAIN GUARD
2. HOUSINGCOVER KNOB
3. SECONDARY GRIP AREA
4. LOCKOUT BUTTON
5. ONOFF SWITCH
6. GRIP AREA
7. BATTERY PACK
8. BATTERY PACK RELEASE BUTTON
9. CHAIN TENSIONING TOOL
10. HAND GUARD
11. HOUSINGCOVER
12. CHAIN
13. GUIDE BAR
14. CHAIN TENSIONING SCREW
15. BASE PLATE
16. BAR PAD
17. DRIVE SPROCKET
18. FASTENING BAR BOLT
19. BAR LOCATING TAB
20. BAR AND CHAIN SHEATHSCABBARD
* Not all the accessories illustrated or described are
included in standard delivery.
TECHNICAL DATA
Type Designation WG324 WG324.9 (3 - designation
of machinery, representative of battery-operated
pruning saw)
WG324 WG324.9
Voltage 20 V Max.**
Bar length 5 inch (12 cm)
Chain speed 18.4 ft/s (5.6 m/s)
Chain pitch 1/4 inch (6.4 mm)
Number of chain
drive links 32
Chain gauge 0.043 inch (1.1 mm)
Adaptive chain type 1/4LP.043 32E 40MTP
WA0142
Adaptive guide bar
type WA0151
Charging time 1 hr
Weight (chain & bar
included) 3.9 lbs (1.8 kg) 3.0 lbs (1.4 kg)
** Voltage measured without workload. Initial battery
voltage reaches maximum of 20 volts. Nominal voltage
is 18 volts.
ACCESSORIES
WG324 WG324.9
Chain (WA0142) 1 1
Guide bar (WA0151) 1 1
Lubrication oil 1 1
Bar and Chain Sheath/
Scabbard 1 1
Charger (WA3881) 1 /
Battery (WA3575) 1 /
Only use the appropriate accessories intended for this
tool. Accessory information can be found on the product
packaging, at a Worx dealer or on our website at www.
worx.com.

EN: Bar / F: Bar
ES: Barra de guía
0.12-0.2”
1
2
100%
0%
Kink/Plis/Torcimiento
1
2
a
C2
C1
B2
B1
A2
A1
E1
D
E2
G
F
E3

EN: Bar / F: Bar
ES: Barra de guía
0.12-0.2”
1
2
100%
0%
Kink/Plis/Torcimiento
1
2
a
C2
C1
B2
B1
A2
A1
E1
D
E2
G
F
E3

1
2
Z
Z
Y
Y
H
M
L
K
J
I
N
P
O
Q

1
2
Z
Z
Y
Y
H
M
L
K
J
I
N
P
O
Q

20V 5’’ Chain Saw EN
13
INTENDED USE
• The mini pruning saw is intended for cutting only wood
and branches up to a diameter corresponding to the
length of the pruning saw guide bar.
• The mini pruning saw must be used at ground level or
from a suitable platform that is completely stable and
secure.
• During using, the mini pruning saw should be held in
both hands, right hand on the trigger handle and left
hand on the top handle.
• The mini pruning saw is intended for outdoor use only.
• The mini pruning saw is not intended for any other use.
• Mounting of parts on the mini pruning saw is
authorized only for original or manufacturer-approved
spare parts (chain guides or saw chains for example)
as well as for authorized chain guide / saw chain
combinations as indicated in the manual.
• The user is responsible for any accident resulting from
improper use or unauthorized modification of the mini
pruning saw
ASSEMBLY
WARNING! Do not install the battery pack
before it has been completely assembled.
Always use gloves when handling the chain.
MOUNTING THE SAW CHAIN
1. Unpack all parts carefully. Remove the Housing-
Cover by turning the Housing-Cover Knob in a
counterclockwise direction. (See Fig. A1)
2. Place the pruning saw on a solid, level surface.
3. Use only genuine Worx chains or those
recommended for Guide Bar.
4. Slide the Chain in the slot around the Guide Bar.
Ensure the Chain is in correct running direction by
comparing it to the chain icon on the Guide Bar, or
referring to the chain direction symbol found on the
saw body. (See Fig. A2)
5. Fit the Chain onto the Drive Sprocket, so that the
Fastening Bar Bolt and the Bar Locating Tab on the
Bar Pad fit into the keyway of the opening on the
Guide Bar. (See Fig. B1, B2)
6. Assure all parts are seated properly. Make sure the
drive links are fully seated in the Drive Sprocket (See
Fig. C1), avoiding a kink as shown in Fig. C2. If kink
occurs, pick up the Chain at the Guide Bar just ahead
of the kink and then pull the kink out.
NOTE: Chain should rotate freely and be free of kinks.
7. Fit the Housing-Cover and tighten the Housing-
Cover by turning the Housing-Cover Knob clockwise
until it is tight. (See Fig. D)
WARNING: The Chain is not yet tensioned.
Tensioning the Chain applies as described
under “TENSIONING CHAIN”. The chain now needs to
be inspected to make sure it is properly tensioned.
TENSIONING CHAIN (See Fig. E1, E2, E3)
NOTE: New saw chains will stretch. Check the chain
tension frequently when first used and tighten when the
Chain becomes loose around the Guide Bar.
WARNING:
• Removing the battery pack before adjusting
saw chain tension.
• Cutting edges on chain are sharp. Use protective
gloves when handling chain.
• Maintain proper chain tension always. A loose
chain will increase the risk of kickback. A loose
chain may jump out of guide bar groove. This may
injure operator and damage chain. A loose chain will
cause chain, bar, and sprocket to wear rapidly.
1. Place the pruning saw on any suitable flat surface.
2. Loosen the Housing-Cover Knob a bit to loosen the
Housing-Cover lightly.
3. Adjust the chain tension. Turn the Chain Tensioning
Screw clockwise to tighten. (See Fig. E1)
4. The correct chain tension is reached when the Chain
can be raised approx. half the drivelink depth from
the Guide Bar in the center. (See Fig. E2) This should
be done by using one hand to raise the chain against
the weight of the machine.
5. Tighten the Housing-Cover Knob to secure the
Housing-Cover. (See Fig. E3)
NOTE: The Chain is properly tensioned when it can
be lifted off of the Guide Bar and the drivelink is
within the rail of the Guide Bar.
NOTE: The chain will naturally stretch and lose
proper tension under general use. To re-tention,
repeat steps 1-5 listed above.
LUBRICATION
NOTE: Chain life and cutting capacity depend on
optimum lubrication. Therefore, the chain should
be oiled before operation.
IMPORTANT: It is important to use bar and
chain lubricant that is formulated to perform
over a wide temperature range with no dilution
required. This can be found at the location where
you purchased this saw or your local hardware
store. Do not use dirty, used or otherwise
contaminated oil. Damage may occur to the bar or
chain. Use of non-approved oil will void the
warranty.
Do not swallow. If swallowed, call a physician
immediately. Keep out of reach of children. Store
away from heat or open flame.
1. Switch off the pruning saw and remove the battery.
2. Place the pruning saw on a level surface with the
sprocket cover facing up.
3. Clean the Guide Bar and Saw Chain with a soft brush
or solvent.
4. Apply multifunctional oil in area (a) between Guide
Bar and Saw Chain. (See Fig. F)
5. Fit the battery. Switch on the pruning saw.
Multifunctional oil is evenly distributed over the Chain.
The Saw Chain is lubricated.
OPERATION
1. BEFORE USING YOUR CORDLESS TOOL
WARNING! The charger and battery pack are
specially designed to work together so do not
attempt to use any other devices. Never insert or allow

20V 5’’ Chain Saw EN
14
metallic objects into your charger or battery pack
connections because of an electrical failure and hazard
will occur.
NOTE: Your battery pack is UNCHARGED and you must
charge once before use.
The battery charger supplied is matched to the Li-ion
battery installed in the machine. Do not use another
battery charger.
(1) CHARGING YOUR BATTERY PACK (See Fig. G, H)
The Li-ion battery is protected against deep discharging.
When the battery is empty, the machine is switched off
by means of a protective circuit.
In a warm environment or after heavy use, the battery
pack may become too hot to permit charging. Allow time
for the battery to cool down before recharging.
(2) TO REMOVE OR INSTALL BATTERY PACK (See Fig. I)
Depress the Battery Pack Release Button to remove the
Battery Pack from your tool. After recharging, insert the
Battery Pack into the battery port. A simple push and
slight pressure will be sufficient until a click is heard.
Check to see if the battery is fully secured.
NOTE: When removing the battery pack, hold it
firmly to avoid dropping and injury.
(3) HOLDING AND CONTROLLING THE PRUNING SAW
(See Fig. J)
Hold and control the pruning saw with one hand on the
Grip Area – wrap your thumb around the Grip Area.
Hold and control the garden pruner with your other hand
on the Secondary Grip Area.
2. SWITCHING ON AND OFF (See Fig. K)
ATTENTION: Check the battery pack before
using your cordless tool. Only use the battery
pack listed in the accessories section.
For switching on the tool, press the Lock-Out Button,
then fully press the On/Off Switch and hold in this
position. The Lock-Out Button can now be released.
For switching off, release the On/Off Switch.
3. CUTTING
IMPORTANT: Check recent replaced chain
tension about every 10 minutes during
operation.
(1) Installing the battery pack into the machine.
(2) Make sure section of log to be cut is not laying on
the ground. This will keep the chain from touching
the ground as it cuts through the log. Touching the
ground while the Chain is moving is dangerous and
will dull the Chain.
(3) When ready to make a cut, push the Lock-Out Button
completely in with the right thumb and squeeze the
trigger. This will turn saw on. Releasing the trigger
will turn the saw off. Make sure the saw is running at
full speed before starting a cut.
(4) When starting a cut, slowly place moving chain
against the wood. The wood should be as close to
the saw body as possible. Hold saw firmly in place
to avoid possible bouncing or skating (sideways
movement) of saw.
(5) Guide the saw using light pressure and do not put
excessive force on the saw, letting the saw do its
work. The motor will overload and can burn out. It will
do the job better and safer at the rate for which it was
intended.
(6) Remove the saw from a cut with the saw running
at full speed. Stop the saw by releasing the On/off
Switch. Make sure the chain has stopped before
setting the saw down.
(7) Keep practicing on scrap logs in a secure working
area until you are comfortable, using a fluid motion
and a steady cutting rate.
Kickback Safety Devices On This Saw
This saw has a low-kickback chain and reduced kickback
Guide Bar. Both items reduce the chance of kickback.
However, kickback can still occur with this saw.
The following steps will reduce the risk of kickback.
• Keep all safety items in place on saw. Make sure they
work properly.
• Do not overreach or cut above shoulder height.
• Keep solid footing and balance at all times.
• Stand slightly to the left side of saw. This keeps your
body from being in direct line with chain.
• Do not let Guide Bar nose touch anything when chain
is moving.
• Never try cutting through two logs at same time. Only
cut one log at a time.
• Do not bury the Guide Bar nose or try plunge cut
(boring into wood using Guide Bar nose).
• Watch for shifting of wood or other forces that may
pinch chain.
• Use extreme caution when reentering a previous cut.
• Use only the low-kickback chain and Guide Bar
that were supplied with this pruning saw or
recommended.
• Never use a dull or loose chain. Keep chain sharp with
proper tension.
How to use Saw Safely
1. Use the pruning saw only with secure footing.
2. Hold the pruning saw at the right-hand side of your
body (See Fig. L).
3. The Chain must be running at full speed before it
makes contact with the wood.
4. Use the Base Plate to secure the saw onto the wood
before starting to cut.
5. Use the Base Plate as a leverage point while cutting.
(See Fig. M)
6. Raise the Chain Guard when cutting from bottom to
top of material. (See Fig. N)
7. Do not operate the saw with arms fully extended,
attempt to saw areas which are difficult to reach, or
stand on a ladder while sawing. (See Fig. O)
Never use the pruning saw above shoulder height.
Cutting wood under tension (See Fig. P)
WARNING: When cutting a limb that is under
tension, use extreme caution. Be alert for
wood springing back. When wood tension is
released, limb could spring back and strike
operator causing severe injury or death.
When sawing logs supported on both ends, start the

20V 5’’ Chain Saw EN
15
cut from above(Y) about 1/3 of the diameter into the
log (overbuck) and then finish the cut (Z) from below,
in order to avoid contact of the pruning saw with the
ground. When sawing logs supported on only one end,
start the cut from below (Y) about 1/3 of the diameter into
the log (underbuck) and finish the cut from above (Z)
in order to avoid log splitting or jamming of the pruning
saw.
SAW MAINTENANCE
Follow maintenance instructions in this manual. Proper
cleaning of saw and chain and Guide Bar maintenance
can reduce chances of kickback. Inspect and maintain
saw after each use. This will increase the service life of
your saw.
NOTE Even with proper sharpening, risk of kickback can
increase with each sharpening.
MAINTENANCE AND STORAGE OF Pruning saw
1. Remove the battery pack
• When not in use
• Before moving from one place to another
• Before servicing
• Before changing accessories or attachments, such
as saw chain and guard
2. Inspect pruning saw before and after each use.
Check saw closely if guard or other part has been
damaged. Check for any damage that may affect
operator safety or operation of saw. Check for
alignment or binding of moving parts. Check for
broken or damaged parts. Do not use pruning saw if
damage affects safety or operation. Have damage
repaired by authorized service center. To locate an
authorized service center, visit www.worx.com.
3. Maintain pruning saw with care.
• Never expose saw to rain or direct moisture.
• Keep chain sharp, clean, and lubricated for better
and safer performance.
• Follow steps outlined in this manual to sharpen
chain.
• Keep handles dry, clean, and free of oil and grease.
• Keep all screws and nuts tight.
4. When servicing, use only identical replacement
parts.
5. When not in use, always store pruning saw
• in a high or locked place, out of children’s reach
• in a dry place
• with Bar and Housing-Cover in place
Bar Maintenance
To maximize bar life, the following bar maintenance is
recommended.
The bar rails that carry the chain should be cleaned
before storing the tool or if the bar or chain appear to be
dirty.
The rails should be cleaned every time the chain is
removed.
To clean the Bar rails.
1. Remove Housing-Cover and bar and chain. (see
section ASSEMBLY)
2. Using a wire brush, screwdriver or similar tool, clear
the residue from the inner groove of the bar. (See Fig.
Q)
3. Make sure to clean oil passages thoroughly.
Conditions which require Chain and Guide Bar
maintenance:
• Saw cuts to one side or at an angle.
• Saw has to be forced through the cut.
• Inadequate supply of oil to the bar and chain.
Check the condition of the Guide Bar each time the chain
is sharpened. A worn Guide Bar will damage the chain
and make cutting difficult.
After each use, remove the battery pack, clean all
sawdust from the Guide Bar and sprocket hole.
When rail top is uneven, use a flat file to restore square
edges and sides.
File Rail Edges and
Sides
Square
Worn Groove Correct Groove
Replace the Guide Bar when the groove is worn, the
Guide Bar is bent or cracked, or when excess heating or
burring of the rails occurs. If replacement is necessary,
use only the Guide Bar specified for your saw in the repair
parts list or on the decal located on the pruning saw.
Replacing Bar & Chain
Replace chain when cutters are too worn to sharpen or
when chain stops. Only use replacement chain noted in
this manual.
Inspect Guide Bar before sharpening chain. A worn or
damaged Guide Bar is unsafe. A worn or damaged Guide
Bar will damage chain. It will also make cutting harder.
SHARPENING SAW CHAIN
WARNING:
Remove the battery pack before servicing.
Severe injury or death could occur from electrical
shock or body contact with moving chain.
Cutting edges on chain are sharp. Use protective
gloves when handling chain.
Keep chain sharp. Your saw will cut faster and more
safely. A dull chain will cause undue sprocket, Guide Bar,
chain, and motor wear. If you must force chain into wood
and cutting creates only sawdust with few large chips,
chain is dull.
FOR BATTERY TOOLS
The ambient temperature range for the use and storage
of tool and battery is 0 oC-45 oC (32 °F - 113 °F).
The recommended ambient temperature range for the
charging system during charging is 0 oC-40 oC (32 °F -
104 °F).

1716
Scie d’élagage 20V 5’’ F
TROUBLESHOOTING TABLE
The following table gives checks and actions that you
can perform if your machine does not operate correctly.
If these do not identify/remedy the problem, contact
your service agent.
WARNING: Switch off and remove the battery pack
before investigating fault.
Symptom Possible Cause Remedy
Chainsaw
fails to
operate
Out of battery. Charge the
battery pack.
Fuse faulty. Replace fuse.
Chainsaw
operates
intermittently
Over heating
Place the
machine in a cool,
ventilated place to
cool it down
Applying too
much pressure
while cutting.
Applying
relatively less
pressure while
cutting
Loose
connection.
Contact service
agent 1-866-354-
Worx (9679).
Internal wiring
defective.
On/off switch
defective.
Chain/chain
bar over-heats
Chain is over
tensioned Adjust chain
tension
Dull chain Sharpen chain or
replace
Chainsaw rips,
vibrates,
does not saw
properly
Chain tension too
loose Adjust chain
tension
Dull chain Sharpen chain or
replace
Chain worn out Replace chain
Chain teeth are
facing in the
wrong
direction
Reassemble with
chain in correct
direction
SÉCURITÉ DU PRODUIT
AVERTISSEMENT! Certaines des poussières
produites en utilisant des outils électriques
sont considérées par l’État de Californie comme
susceptibles de provoquer le cancer, des
anomalies congénitales et d’autres problèmes de
reproduction. Voici des exemples de ces produits
chimiques:
• plomb issu de peinture à base de plomb;
• silice crystalline issue de briques et du ciment
et autres produits de maçonnerie;
• arsenic et chrome issus de bois traité
chimiquement.
Votre risque de ces expositions varie en fonction
de la fréquence à laquelle vous effectuez ce travail.
Pour réduire votre exposition à ces produits
chimiques: travaillez dans une zone bien ventilée;
portez un équipement de sécurité approuvé, tel que
des masques antipoussières spécialement conçus
pour éliminer les particules microscopiques par
filtrage.
AVERTISSEMENT: Ce dispositif peut vous
exposer aux produits chimiques notamment
le plomb et le di-phtalate (de 2-éthylhexyle) (DEHP)
qui sont reconnus dans l’État de Californie comme
causant des cancers et des anomalies congénitales
ou d’autres anomalies de la reproduction. Pour
en savoir plus, veuillez consulter le site www.
P65Warnings.ca.gov.
AVERTISSEMENTS
GENERAUX CONCERNANT
LA SECURITE DES OUTILS
ELECTRIQUES
AVERTISSEMENT!Lisezet assimileztoutes les
instructions.Le non-respect des instructions
ci-après peut entraîner un risque de choc électrique,
d’incendie et/ou de blessures graves.
Conservez tousles avertissementset instructions
pourpouvoirles consulterultérieurement.
L’expression « outil électrique » dans tous les
avertissements énumérés ci-dessous se réfère à votre outil
électrique fonctionnant sur secteur (branché) ou à batterie
(sans-fil).
1. AIRE DE TRAVAIL
a) Veillez à ce que l’aire de travail soit propre et
bienéclairée.Le désordre et le manque de lumière
favorisent les accidents.
b) N’utilisez pas d’outils électriques dans un milieu
présentantun risqued’explosion, par exemple
en présence de liquides, de gaz ou de poussières
inflammables.Les outils électriques créent des
étincelles qui pourraient enflammer les poussières ou
les vapeurs.
c) Gardez à distance les curieux, les enfants et les
visiteurs lorsque vous travaillez avec un outil

1716
Scie d’élagage 20V 5’’ F
électrique. Ils pourraient vous distraire et vous faire
faire une fausse manoeuvre.
2. SÉCURITÉ ÉLECTRIQUE
a) Les fichesdes outilsélectriques doivent
correspondre auxprises murales.Ne jamais
modifierla fichede quelque façon quece soit.
Ne pas utiliser de fiches d’adaptation avec des
outils électriques mis à la terre (mis à la masse).
Des fiches non modifiées et des prises qui leur
correspondent réduiront le risque de choc électrique.
b) Éviteztout contactcorporel avec des surfaces
mises à la terre (tuyauterie, radiateurs,
cuisinières,réfrigérateurs,etc.). Le risque de choc
électrique est plus grand si votre corps est en contact
avec la terre.
c) N’exposez pas les outils électriques à la pluie ou
à l’eau. La présence d’eau dans un outil électrique
augmente le risque de choc électrique.
d) Ne maltraitez pas le cordon. Ne transportez jamais
l’outilpar son cordonet ne débranchez jamais
la fiche en tirant sur le cordon. N’exposez pas le
cordon à la chaleur, à des huiles, à des arrêtes
vives ou à des pièces en mouvement. Un cordon
endommagé augmente le risque de choc électrique.
e) Lorsque vous utilisez un outil électrique à
l’extérieur, utilisezun prolongateur adapté àune
utilisation en extérieur. L’utilisation d’un cordon
adapté à une utilisation extérieure réduit le risque de
choc électrique.
f) Si vous devez utiliser un outil électrique dans
un endroit humide, utilisez un dispositif de
courant résiduel(RCD)d’alimentationprotégée.
L’utilisation d’un RCD réduit le risque de choc
électrique.
3. SÉCURITÉDES PERSONNES
a) Restez alerte, concentrez-vous sur votre travail et
faites preuve de bon sens. N’utilisez pas un outil
électrique sivous êtesfatigué ou sousl’influence
dedrogues, d’alcooloudemédicaments.Un instant
d’inattention lors de l’utilisation d’outils électriques
peut entraîner des blessures graves.
b) Utilisezdes accessoires desécurité.Portez
toujoursuneprotectionoculaire.De l’équipement
de sécurité tel que le masque antipoussière, les
chaussures de sécurité antidérapantes, des casques
durs ou des protections antibruit utilisés dans des
conditions appropriées réduiront les blessures
corporelles.
c) Évitezles démarrages accidentels. Avant
d’insérer la batterie dans l’outil, assurez-vous que
son interrupteur est en position « OFF » (Arrêt) ou
verrouillée. Le fait de transporter un outil avec le doigt
sur la détente/l’interrupteur ou d’insérer la batterie
dans un outil dont la détente est en position « ON »
(Marche) peut causer un accident.
d) Retirer les clés de réglage avant de mettre l’outil
soustension.Une clé restée attachée à une partie
mobile de l’outil pourrait entraîner des blessures
corporelles.
e) Ne vous penchez pas trop en avant. Maintenez un
bon appui et restez en équilibre en tout temps.
Une bonne stabilité vous permet de mieux réagir à une
situation inattendue.
f) Habillez-vousconvenablement. Ne portez ni
vêtementsflottants nibijoux. Gardezles cheveux,
les vêtements etles gantséloignés despièces en
mouvement.Les vêtements flottants, les bijoux ou les
cheveux longs risquent d’être happés par des pièces
en mouvement.
g) Si un sac de récupération de la poussière est
fourniavec unconnecteur pour aspirateur,
assurez vous qu’il est correctement relié et utilisé
defaçonappropriée.L’utilisation de ce système
réduit les dangers physiques et physiologiques liés à la
poussière.
h) Ne laissez pas les habitudes acquises par une
utilisation fréquented’outils relâcher notre
vigilance etignorer les principesde sécurité des
outils.Une utilisation négligente peut causer des
blessures graves en une fraction de seconde.
4. UTILISATIONET ENTRETIEN DE L’OUTIL
a) Ne forcez pas l’outil. Utilisez l’outil approprié à la
tâche.L’outil approprié fonctionne mieux et de façon
plus sécuritaire. Respectez aussi la vitesse de travail
qui lui est propre.
b) N’utilisez pas un outil si l’interrupteur ne le met
pas en marche ou ne peut l’arrêter. Un outil qui ne
peut être contrôlé par l’interrupteur est dangereux et
doit être réparé.
c) Débranchez la batterie de l’outil ou mettez son
interrupteur en position « OFF » (Arrêt) ou «
LOCKED »(Verrouillé) avantd’effectuerun
réglage, dechanger d’accessoireou de ranger
l’outil. De telles mesures de sécurité préventive
réduisent le risque de démarrage accidentel de l’outil.
d) Rangez les outils hors de portée des enfants et
d’autrespersonnes inexpérimentées.Les outils
sont dangereux dans les mains d’utilisateurs novices.
e) Prenez soin de bien entretenir les outils. Soyez
attentifà toutdésalignementou coincement des
pièces en mouvement, à tout bris ou à toute autre
conditionpréjudiciable aubon fonctionnement
de l’outil. Si vous constatez qu’un outil est
endommagé,faites-le répareravantde vousen
servir. De nombreux accidents sont causés par des
outils en mauvais état.
f) Les outils de coupe doivent être toujours bien
affûtéset propres. Des outils bien entretenus,
dont les arêtes sont bien tranchantes, sont moins
susceptibles de se coincer et plus faciles à contrôler.
g) Utilisezl’outil électrique,les accessoires etles
forets etc., enconformité avec cesinstructions
et de la manière conçue pour le type particulier
d’outilélectrique, prend en compteles conditions
de travail et le travail qui doit être accompli.
L’emploi de l’outil électrique pour des opérations
différentes de celles pour lesquelles il a été conçu
pourrait entraîner une situation dangereuse.
h) Maintenezles poignéeset les surfacesde prise
sèches, propreset exemptesd’huileet degraisse.
Des poignées et surfaces de prise glissantes ne
permettent pas une manipulation et un contrôle

1918
Scie d’élagage 20V 5’’ F
sécurisés de l’outil dans des situations inattendues.
5. UTILISATION DELA BATTERIE ET ENTRETIEN
a) Un outil à batterie avec batteries incorporées
ou unebatterieséparée doit êtrerechargé
uniquementavecle chargeur indiqué pourla
batterie.Un chargeur qui peut être adéquat pour
un type de batterie peut créer un risque d’incendie
lorsqu’il est utilisé avec une autre batterie.
b) Utiliser un outil à batterie uniquement avec la
batterie désignée. L’emploi de toute autre batterie
peut créer un risque d’incendie.
c) Lorsque labatterie n’est pasutilisée, tenez-la
à l’écart d’autresobjets métalliques telsque
trombones, pièces demonnaie, clés, clous,vis
ou autrespetitsobjets métalliques susceptibles
d’établir uneconnexion d’une borneà une autre.
Le court-circuitage des bornes de batterie peut causer
des étincelles, des brûlures, une explosion ou un
incendie.
d) Dans lecadrede conditionsd’abus, dufluide peut
être éjecté de la batterie, évitez tout contact. Si
un contactse produisaitaccidentellement, rincez
abondamment avec del’eau. Sile fluide toucheles
yeux, cherchez en plusde la mesureprécédente
del’aidemédicale.Le fluide éjecté de la batterie peut
causer des irritations ou des brûlures.
e) N’utilisez pas une batterie ou un outil endommagé
ou modifié. Les batteries endommagées ou modifiées
peuvent avoir un comportement imprévisible
entraînant un incendie, une explosion ou un risque de
blessure.
f) N’exposez pas une batterie ou un outil au feu ou
àune températureexcessive.Une exposition au
feu ou à une température supérieure à 130 °C (266 °F)
pourrait provoquer une explosion.
g) Respectez toutes lesinstructions de chargement
et nechargez pas labatterieou l’outil en dehors
de la plage de température spécifiée dans les
instructions.Un chargement incorrect ou à des
températures en dehors de la plage spécifiée peut
endommager la batterie et augmenter le risque
d’incendie.
6. ENTRETIEN
a) Ayez votre outil électrique entretenu par un
réparateuragréé n’utilisant quedes piècesde
rechange identiques.Cela assurera que la sécurité
de l’outil électrique est maintenue.
b) Ne jamais tenter de réparer des batteries
endommagées.L’entretien et la réparation des
batteries doit uniquement être effectué par le fabricant
ou par des centres de services agréés.
1) Consignes de sécurité pour la scie à chaîne
a) Tenez la scie à chaîne bien éloignée des parties
de votre corps lorsque celle-ci est en marche.
Avant de mettre en marche la scie à chaîne,
veillez à ce qu’elle ne soit en contact avec aucun
objet. Vos vêtements peuvent s’accrocher à la scie
à chaîne ou alors votre corps peut s’y coller pendant
un moment d’inattention lors du fonctionnement du
matériel.
b) Toujours tenir la poignée arrière de la scie à
chaîne avec votre main droite et la poignée
avant avec votre main gauche. Évitez d’inverser
la position des mains, car ceci pourrait augmenter le
risque de blessure et ne doit jamais être fait.
c) Tenez l’outil électrique par ses surfaces de prise
isolées uniquement, car la chaîne de la scie peut
entrer en contact avec un câblage dissimulé ou
son propre câble. Les chaînes de la scie qui entrent
en contact avec un câble conducteur peuvent rendre
conducteurs les pièces en métal de l’outil électrique
et causer ainsi un choc électrique à l’opérateur.
d) Portez des lunettes de sécurité et des protège-
oreilles. Des équipements de protection
supplémentaires pour la tête, les mains, les
jambes et les pieds sont recommandés. Portez
des vêtements de protection adaptés afin de réduire
les risques de blessure par des débris volants ou
d’éviter un contact accidentel avec la chaîne de scie.
e) Ne pas utiliser la scie d’élagage dans un arbre,
sur une échelle, d’un toit, ou tout support
instable. Faire fonctionner une scie à chaîne tout
en haut d’un arbre peut entraîner des blessures.
f) Gardez toujours une bonne assise et ne faites
fonctionner la scie à chaîne que lorsque vous
êtes debout sur une surface fixe, sécurisée
et plane. Les surfaces glissantes ou instables
telles que les échelles peuvent entraîner une perte
d’équilibre ou de contrôle de la scie à chaîne.
g) Lors de la coupe d’une branche sous tension,
faites attention au retour de celle-ci. Lorsque la
tension des fibres de bois est relâchée, la branche
semblable à un ressort peut frapper l’opérateur et/
ou rendre la scie à chaîne incontrôlable
h) Soyez extrêmement prudent lors de la coupe de
la broussaille et des jeunes arbres. Le matériau
fin peut être pris dans la chaîne et vous frapper ou
vous faire perdre l’équilibre.
i) Portez la scie à chaîne par la poignée avant
lorsqu’elle est en arrêt, et éloignez-la de votre
corps. Lors du transport ou du stockage de la
scie à chaîne, toujours rabattre le protecteur de
guide-chaîne. Une manipulation appropriée de la
scie à chaîne permettra de réduire la probabilité de
contact accidentel avec la chaîne en mouvement.
j) Respectez les instructions relatives à la
lubrification, à la tension de la chaîne et au
remplacement des accessoires. Une chaîne ayant
une tension inappropriée ou mal lubrifiée peut soit
casser ou augmenter le risque de recul.
k) Uniquement destinée à la coupe de bois. Évitez
d’utiliser une scie à chaîne à d’autres fins que
celles prévues. Par exemple : évitez d’utiliser
une scie à chaîne pour couper des matières
plastiques, du matériau de maçonnerie ou
des matériaux de construction autre que le
bois. L’utilisation de la scie à chaîne à d’autres fins
que celle prévue pourrait entraîner une situation
dangereuse.
l) Cette scie d’élagage n’est pas destinée à
l’abattage des arbres. L’utilisation de la scie
d’élagage pour des opérations différentes de celles

1918
Scie d’élagage 20V 5’’ F
prévues pourrait causer des blessures graves à
l’opérateur ou aux personnes autour.
m) Suivez toutes les instructions pour nettoyer
les matériaux coincés, ranger ou entretenir la
scie d’élagage. Assurez-vous que la machine
est désactivée et que la batterie est retirée. Le
démarrage inattendu de la scie d’élagage pendant
le nettoyage du matériau coincé ou l’entretien peut
entraîner des blessures graves.
n) En cas de première utilisation, il est
recommandé d’apprendre à utiliser la scie
pour couper des bûches sur un chevalet ou un
support de sciage.
o) Il est recommandé de confier l’affûtage et
l’entretien de la chaîne de scie à des ateliers
d’entretien agréés.
2) Causes et prévention du recul de l’opérateur :
Un recul peut se produire lorsque le nez ou le bout de
la guide-chaîne touche un objet ou lorsque le bois se
resserre et pince la chaîne de la tronçonneuse dans la
coupe.
Dans certains cas, un contact du bout peut provoquer
une réaction inverse extrêmement rapide, propulsant
la guide-chaîne vers le haut et vers l’arrière en
direction de l’opérateur. Un pincement de la chaîne
de la tronçonneuse le long de la partie supérieure
de la guidechaîne peut repousser rapidement la
guide-chaîne vers l’opérateur. Ces réactions peuvent
toutes deux provoquer une perte de contrôle de la
tronçonneuse pouvant entraîner des blessures graves
pour l’utilisateur.
Ne pas compter exclusivement sur les dispositifs de
sécurité de la scie. En tant qu’utilisateur d’une scie à
chaîne, vous devez prendre des mesures nécessaires
pour effectuer vos travaux de coupe sans accident ou
blessure.
Le recul est le résultat d’une mauvaise utilisation
de l’outil et/ou du non-respect des procédures ou
conditions d’utilisation, il peut être évité en respectant
les précautions indiquées ci-dessous :
a) Tenez fermement l’équipement, les pouces et
les doigts refermés sur les deux poignées ; vous
devez tenir la scie à chaîne avec vos deux mains
et votre corps et vos bras doivent être placés
dans une position qui vous permet de résister
aux forces de recul. Les forces de recul peuvent
être contrôlées par l’opérateur, si les précautions
nécessaires sont prises. Évitez de lâcher la scie à
chaîne.
b) Évitez de trop vous pencher en avant et de
couper à une hauteur au-dessus du niveau
des épaules. Cela permet d’éviter tout contact
involontaire avec l’embout et permet un meilleur
contrôle de la scie à chaîne en cas de situation
inopinée.
c) Utilisez uniquement des barres et chaînes
de rechange spécifiées par le fabricant. Les
barres et chaînes de rechange inadaptées peuvent
provoquer une cassure et/ou recul de la chaîne.
d) Respectez les instructions relatives à
l’affûtage et à l’entretien de la chaîne de la scie
fournies par le fabricant. Diminuer la hauteur
du limiteur de profondeur peut entraîner une
augmentation de recul.
CONSIGNES GÉNÉRALES DE
SÉCURITÉ CONCERNANT LA
BATTERIE
a) Ne pas démonter, ouvrir ou déchiqueter le bloc
batterie.
b) Ne pas exposer le bloc batterie à la chaleur ou
au feu. Evitez de ranger la batterie dans un
endroit exposé à la lumière directe du soleil.
c) Ne pas court-circuiter une batterie. Ne stockez
pas les blocs batterie en vrac dans une boîte
ou un tiroir où ils peuvent se court-circuiter
ou être court-circuités par d’autres objets
métalliques. Lorsque le bloc batterie n’est
pas utilisé, conservez-le loin d’autres objets
métalliques, tels que des trombones, des pièces
de monnaie, des clés, des clous, des vis ou d’autres
objets métalliques de petite taille, qui pourraient
établir une connexion d’un terminal à l’autre. Le
fait de créer un court-circuit entre les bornes de la
batterie peut causer des brûlures ou des incendies.
d) Ne pas retirer la batterie de son emballage
d’origine avant utilisation dans l’appareil.
e) Ne pas soumettre la batterie à des chocs
mécaniques.
f) En cas de fuite de la batterie, ne pas laisser le
liquide entrer en contact avec la peau ou les
yeux. Si un contact a été effectué, laver la zone
touchée avec beaucoup d’eau et consulter un
médecin.
g) Respecter les marques plus (+) et moins (-) sur
le bloc batterie et sur l’appareil et veiller à bien
le positionner.
h) Ne pas utiliser de batterie qui n’a pas été
conçue pour être utilisée avec cet appareil.
i) Maintenez la batterie hors de portée des
enfants.
j) Consultez immédiatement un médecin si une
cellule ou une batterie a été avalée.
k) Achetez toujours une batterie recommandée
par le fabricant de l’appareil.
l) Conservez le bloc batterie propre et sec.
m) Essuyez les bornes de la batterie avec un
chiffon propre et sec si elles deviennent sales.
n) La batterie doit être chargée avant son
utilisation. Utilisez toujours le chargeur adapté
et reportez-vous aux instructions du fabricant
ou au manuel de l’équipement pour suivre
les instructions concernant la procédure de
charge.
o) Ne laissez pas le bloc batterie en charge
prolongée lorsqu’il n’est pas utilisé.
p) Après de longues périodes de stockage, il peut
être nécessaire de charger et de décharger
la batterie plusieurs fois pour obtenir des
performances optimales.

2120
Scie d’élagage 20V 5’’ F
q) La batterie offre de meilleures performances
lorsqu’elle est utilisée à température ambiante
normale (20 °C ± 5 °C) (68 °F ± 9 °F).
r) Lors de l’élimination des batteries, conservez
les blocs batteries de différents systèmes
électrochimiques séparés les uns des autres.
s) Rechargez le bloc batterie uniquement avec le
chargeur spécifié par Worx. N’utilisez pas un
chargeur autre que celui spécifiquement conçu
pour être utilisé avec l’équipement. Un chargeur
adapté à un type de batterie peut entraîner un
risque d’incendie lorsqu’il est utilisé avec une autre
batterie.
t) Conservez la documentation originale du
produit pour référence ultérieure.
u) Utilisez uniquement la batterie dans
l’application pour laquelle elle a été prévue.
v) Retirez la batterie de l’équipement lorsqu’il
n’est pas utilisé.
w) Éliminez la batterie de façon adéquate.
CONSERVEZ CES INSTRUCTIONS
Les instructions relatives aux techniques de coupe,
d’abattage, d’ébranchage et de tronçonnage de
base appropriées.
1. ÉBRANCHAGE
L’ébranchage est la coupe des branches d’un arbre
tombé. Ne pas retirer les grosses branches sous l’arbre
qui soutiennent le tronc surélevé. Retirer chaque
branche d’une seule coupe. Pour éviter le pincement,
entamer l’entaille sur des branches libres, à partir du
dessus de la branche. (Fig. 1) Pour les branches sous
tension, entamer l’entaille à partir du dessous de la
branche.
2. TRONÇONNAGE D’UNE BILLE
Le tronçonnage d’une bille se fait en la coupant en
tronçons. Veiller à maintenir un bon équilibre. Garder les
pieds écartés. Répartir le poids également sur les deux
pieds. Se tenir légèrement à gauche de la tronçonneuse.
Ceci évite que le corps ne soit en prolongement direct
de la chaîne. Autant que possible, soulever la bille ou
le tronçon audessus du sol. Pour ce faire, utiliser des
branches, tronçons, cales, etc. Procéder de la façon
suivante pour tronçonner une bille.
Lorsque la bûche est soutenue sur toute sa longueur,
comme illustré à la figure 2, elle est coupée par le
haut (au-dessus du bâti), évitez de la couper à partir
du sol, évitez tout contact avec le sol car cela réduira
considérablement le tranchant de la scie.
Lorsque la bûche est soutenue à partir d’une extrémité,
comme illustré à la figure 3, veuillez couper 1/3 du
diamètre de la partie inférieure (au-dessous du bâti) (1).
Puis, réalisez la coupe finale en-dessous (2) du bâti de
sorte qu’elle soit conforme à la coupe initiale.
Quand le billot est soutenu aux deux bouts (Fig.
4), tel qu’illustré, coupez 1/3 le diamètre à partir du
tronçonnage au sommet (1). Par la suite, terminez la
coupe en tronçonnant (2) le 2/3 plus pas pour rencontrer
la première coupe.
Lors du tronçonnage sur une pente, toujours se tenir
vers le haut de la grume comme illustré à la figure 5.
Lors de la « réalisation de la coupe », pour maintenir un
contrôle complet, relâchez la pression de coupe près de
la fin de coupe sans relâcher votre prise sur les poignées
de la scie à chaîne. Évitez de laisser la chaîne toucher
le sol. Après avoir terminé la coupe, laissez s’arrêter
la chaîne de la scie avant de déplacer la scie à chaîne.
3
22
W
YZ
X
2˝
2˝
1
1
1
2
2/3
1
1/3
12
2/3
1/3
Fig.0
Fig.1
Fig.2
Fig.3
Fig.4
Fig.5
3
22
W
YZ
X
2˝
2˝
1
1
1
2
2/3
1
1/3
12
2/3
1/3
Fig.0
Fig.1
Fig.2
Fig.3
Fig.4
Fig.5
3
22
W
YZ
X
2˝
2˝
1
1
1
2
2/3
1
1/3
12
2/3
1/3
Fig.0
Fig.1
Fig.2
Fig.3
Fig.4
Fig.5
3
22
W
YZ
X
2˝
2˝
1
1
1
2
2/3
1
1/3
12
2/3
1/3
Fig.0
Fig.1
Fig.2
Fig.3
Fig.4
Fig.5
This manual suits for next models
1
Table of contents
Languages:
Other Worx Lawn And Garden Equipment manuals

Worx
Worx WG801E.X Series Operation instructions

Worx
Worx WP808E X Series User manual

Worx
Worx Landroid User manual

Worx
Worx WG430 User manual

Worx
Worx WG800E Installation manual

Worx
Worx WG801E User manual

Worx
Worx WG441E User manual

Worx
Worx WG801 User manual

Worx
Worx WG430 User manual

Worx
Worx WG430E User manual