manuals.online logo
Brands
  1. Home
  2. •
  3. Brands
  4. •
  5. Yealink
  6. •
  7. IP Phone
  8. •
  9. Yealink W52H User manual

Yealink W52H User manual

Other manuals for W52H

4

Other Yealink IP Phone manuals

Yealink T46S Skype for Business User manual

Yealink

Yealink T46S Skype for Business User manual

Yealink CP920 User manual

Yealink

Yealink CP920 User manual

Yealink Voipon User manual

Yealink

Yealink Voipon User manual

Yealink T32G User manual

Yealink

Yealink T32G User manual

Yealink SIP-T33G User manual

Yealink

Yealink SIP-T33G User manual

Yealink T40P User manual

Yealink

Yealink T40P User manual

Yealink Enterprise User manual

Yealink

Yealink Enterprise User manual

Yealink V0.2 User manual

Yealink

Yealink V0.2 User manual

Yealink WP52P User manual

Yealink

Yealink WP52P User manual

Yealink SIP-T57W User manual

Yealink

Yealink SIP-T57W User manual

Yealink SIP-T48U User manual

Yealink

Yealink SIP-T48U User manual

Yealink Yealink SIP-T41P User manual

Yealink

Yealink Yealink SIP-T41P User manual

Yealink SIP-T23P User manual

Yealink

Yealink SIP-T23P User manual

Yealink T33 User manual

Yealink

Yealink T33 User manual

Yealink SIP-T27G User manual

Yealink

Yealink SIP-T27G User manual

Yealink T57W User manual

Yealink

Yealink T57W User manual

Yealink T48G User manual

Yealink

Yealink T48G User manual

Yealink T33G User manual

Yealink

Yealink T33G User manual

Yealink Yealink SIP-T28P User manual

Yealink

Yealink Yealink SIP-T28P User manual

Yealink SIP-T18P User manual

Yealink

Yealink SIP-T18P User manual

Yealink Yealink SIP-T42G User manual

Yealink

Yealink Yealink SIP-T42G User manual

Yealink T54W User manual

Yealink

Yealink T54W User manual

Yealink T58A Teams User manual

Yealink

Yealink T58A Teams User manual

Yealink SIP-T41S User manual

Yealink

Yealink SIP-T41S User manual

Popular IP Phone manuals by other brands

Cortelco C62 VoIP Phone user guide

Cortelco

Cortelco C62 VoIP Phone user guide

VanillaIP Polycom IP300 user manual

VanillaIP

VanillaIP Polycom IP300 user manual

Viking SR-IP product manual

Viking

Viking SR-IP product manual

Panasonic KX-UT133-B Administrator's guide

Panasonic

Panasonic KX-UT133-B Administrator's guide

Avaya one-X 9600 Series overview

Avaya

Avaya one-X 9600 Series overview

AVA Enterprises B179 Installation and administration guide

AVA Enterprises

AVA Enterprises B179 Installation and administration guide

Cisco Unified 7900 Series System guide

Cisco

Cisco Unified 7900 Series System guide

Polycom SoundPoint IP 450 datasheet

Polycom

Polycom SoundPoint IP 450 datasheet

Cisco SPA-500 Series user guide

Cisco

Cisco SPA-500 Series user guide

IPitomy IP290 user manual

IPitomy

IPitomy IP290 user manual

Polycom SoundPoint IP 650 user guide

Polycom

Polycom SoundPoint IP 650 user guide

Proximus Maestro 3016 IP quick start guide

Proximus

Proximus Maestro 3016 IP quick start guide

Polycom IP 450 user guide

Polycom

Polycom IP 450 user guide

Fanvil X4 user manual

Fanvil

Fanvil X4 user manual

Snom 320 quick start guide

Snom

Snom 320 quick start guide

Avaya Integral 5 R3.0 user guide

Avaya

Avaya Integral 5 R3.0 user guide

Nortel 1140E Getting started

Nortel

Nortel 1140E Getting started

Nexotek NT-P500 user manual

Nexotek

Nexotek NT-P500 user manual

manuals.online logo
manuals.online logoBrands
  • About & Mission
  • Contact us
  • Privacy Policy
  • Terms and Conditions

Copyright 2025 Manuals.Online. All Rights Reserved.

Yealink W52H
IP DECT Phone
Quick Reference User Guide
Page 4 | Copyright © Telair Pty Ltd (ABN 92 119 713 745) | www.telair.com.au | 1800 telair (835 247) Copyright © Telair Pty Ltd (ABN 92 119 713 745) | www.telair.com.au | 1800 telair (835 247)
ACCESS VOICEMAIL
1. Press .
2. When prompted, enter PIN-Code and press .
• For new messages, press .
• For saved messages, press .
• For advanced voicemail settings, press .
PLACE CALL ON HOLD/RESUME A CALL
To place a call on hold:
• Press the Options soft key during a call, and select Hold.
To resume a call, do one of the following:
• If only one call is on hold, press the Resume soft key.
• If there are two calls on hold, press the Resume soft key to resume the current call. Press the
Swap soft key to swap between calls.
TRANSFER A CALL
Blind Transfer - The call is transferred directly without the need to announce the caller:
• Press the Options soft key during a call, and select Blind ransfer.
• Enter the number you wish to transfer the call to.
• Press the Transfer soft key.
Attended Transfer - Allows you to announce the caller prior to releasing the call
• Press the Options soft key during a call, and select Transfer.
• Enter the number you wish to transfer the call to.
• Press the Transfer soft key to dial out.
• Press Transfer after announcing the call to the third-party.
ENABLE CALL FORWARD
To enable Call Forward on a specific line:
• Press the OK key to enter the main menu, and select Call Features > Call Forward.
• Press or to highlight the desired line, and press the OK soft key.
• Press or to highlight the desired forwarding type, and press the OK soft key.
• Always----Incoming calls are forwarded immediately.
• Busy----Incoming calls are forwarded when the line is busy.
• No Answer----Incoming calls are forwarded if not answered after a period of time.
• Select Enabled from the Status field.
• Enter number to forward to in the Target field and press the Save soft key to accpet the change.
How to (cont...):
Page 2 | Copyright © Telair Pty Ltd (ABN 92 119 713 745) | www.telair.com.au | 1800 telair (835 247) Page 3 | Copyright © Telair Pty Ltd (ABN 92 119 713 745) | www.telair.com.au | 1800 telair (835 247)
Layout & Features:
How to:
REGISTER HANDSET TO W52P BASE STATION
Each W52P base station can register a maximum of 5 handsets each. Each handset can be
registered to up to 4 dierent base stations.
To register your handset manually, do one of the following:
• Long press on the base station till the registration LED flashes slowly. Then press the OK
key to enter the main menu on the handset, select Settings > Registration > Register Handset.
• If the handset LCD screen prompts “Press base page 2s then press OK”, long press on the
base station till the registration LED slow flashes. Then press the OK soft key on the handset,
select Register Handset.
1. Select a base station and press the OK soft key. The handset will initiate the connection.
2. Press the OK soft key to confirm connection to the base station.
3. Enter the base station PIN (default: 0000) and then press the Done soft key to complete
registration.
TURN HANDSET ON/OFF
To turn handset on, do one of the following:
• Press until the LCD screen lights up.
• Place handset in the charger cradle. It will then turn on automatically.
To turn handset o:
• Long press until the LCD turns o.
PLACE/REDIAL A CALL
To place a call directly, do one of the following:
• Enter the desired number when the handset is idle, and press .
To place a call from the local directory:
1. Press when the handset is idle.
2. Press or to highlight the desired entry, and then press .
To redial the last dialled number:
1. Press when the handset is idle.
2. Press again to place the call.
To redial a previously dialled number:
1. Press when the handset is idle.
2. Press or to highlight the desired entry, and then press to place the call.
ANSWER/END/IGNORE A CALL
To answer a call, do one of the following:
• Press the Accept soft key.
• Press or .
To end an active call:
• Press during an active call.
To ignore an incoming call, do one of the following:
• Press when an incoming call is presented.
• Press the Silence soft key when an incoming call is presented.
LOCK/UNLOCK KEYPAD
• Long press when the handset is idle to unlock the keypad.
• Long press again to lock the keypad.
ENABLE/DISABLE SILENT MODE
• Long press when the handset is idle to enable/disable silent mode.
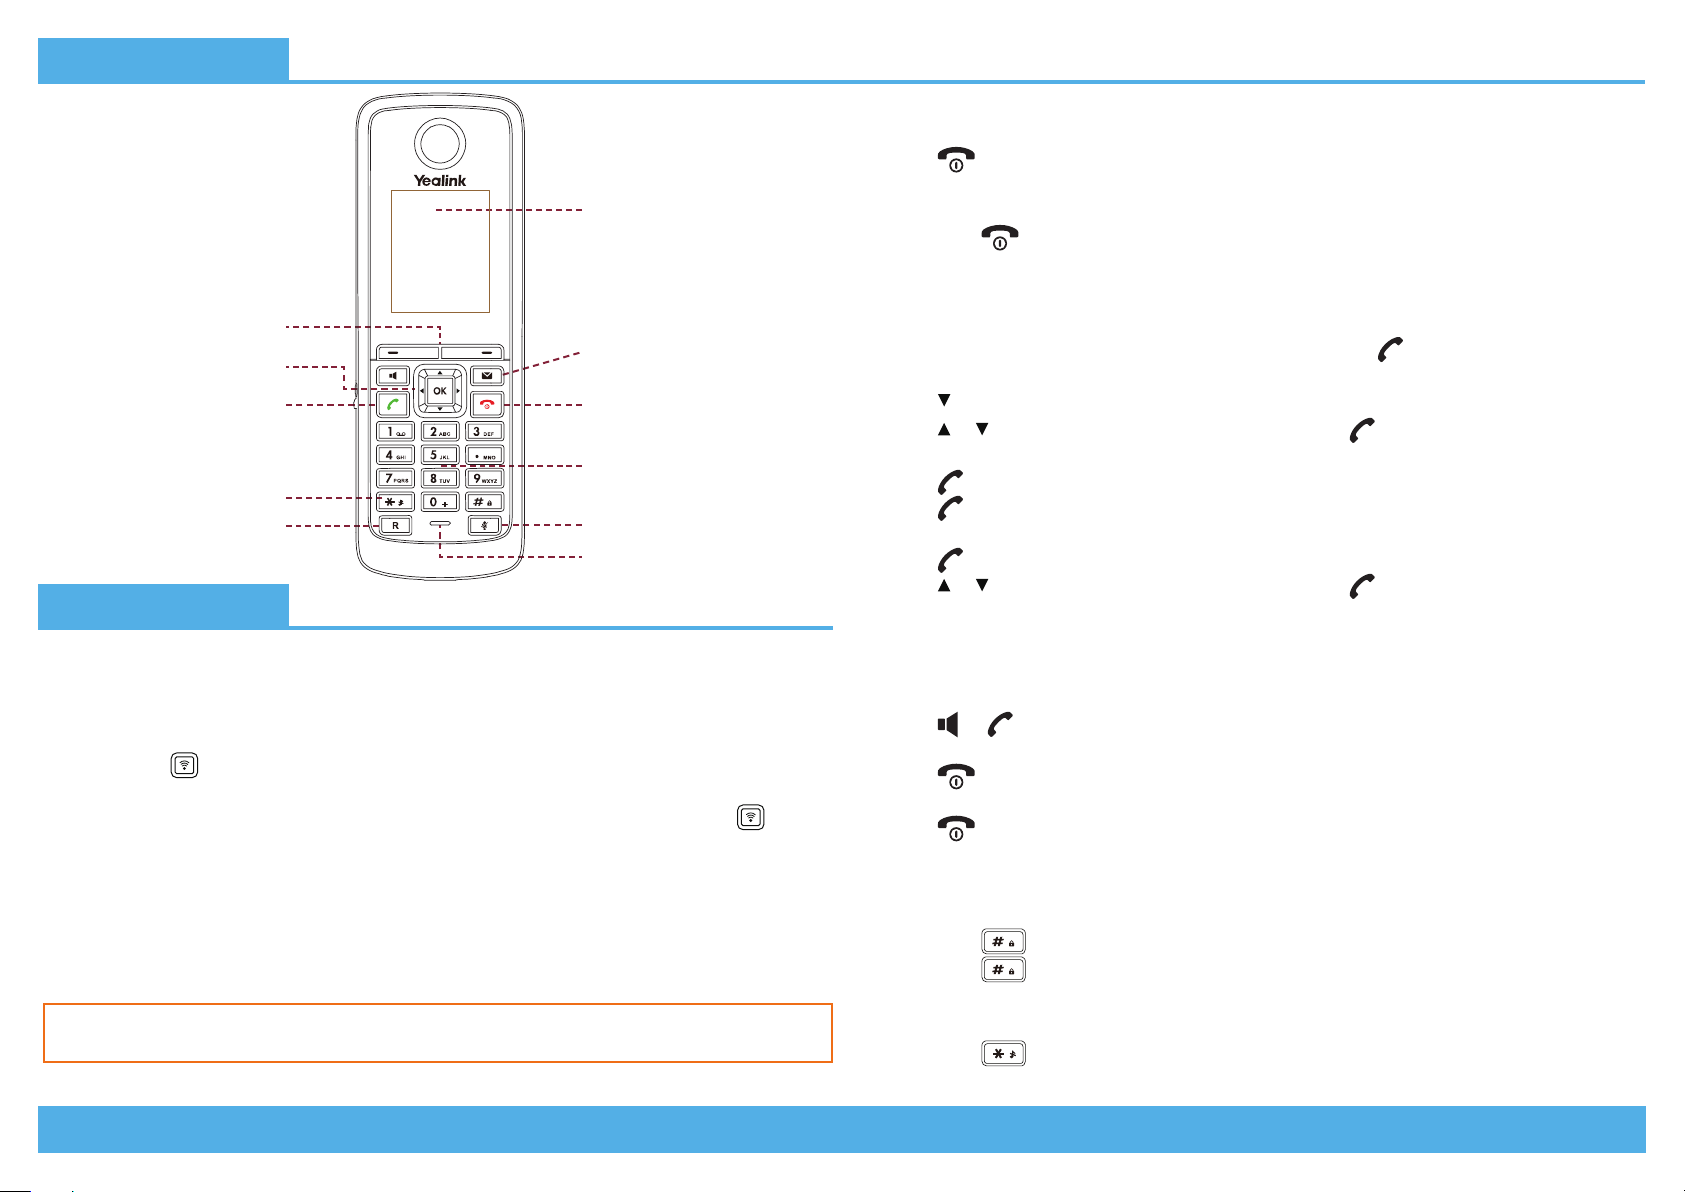
LCD Screen
Silent Mode
Redirect Key
Soft Keys
Scroll/Confirmation Keys
Answer/Dial Key On/O/Reject Call
Dial Pad
Mute Key
Microphone
Message Key
If successful, handset will display “Handset Subscribed”. If handset prompts
“Searching for Base”, please check your base station is powered on.
