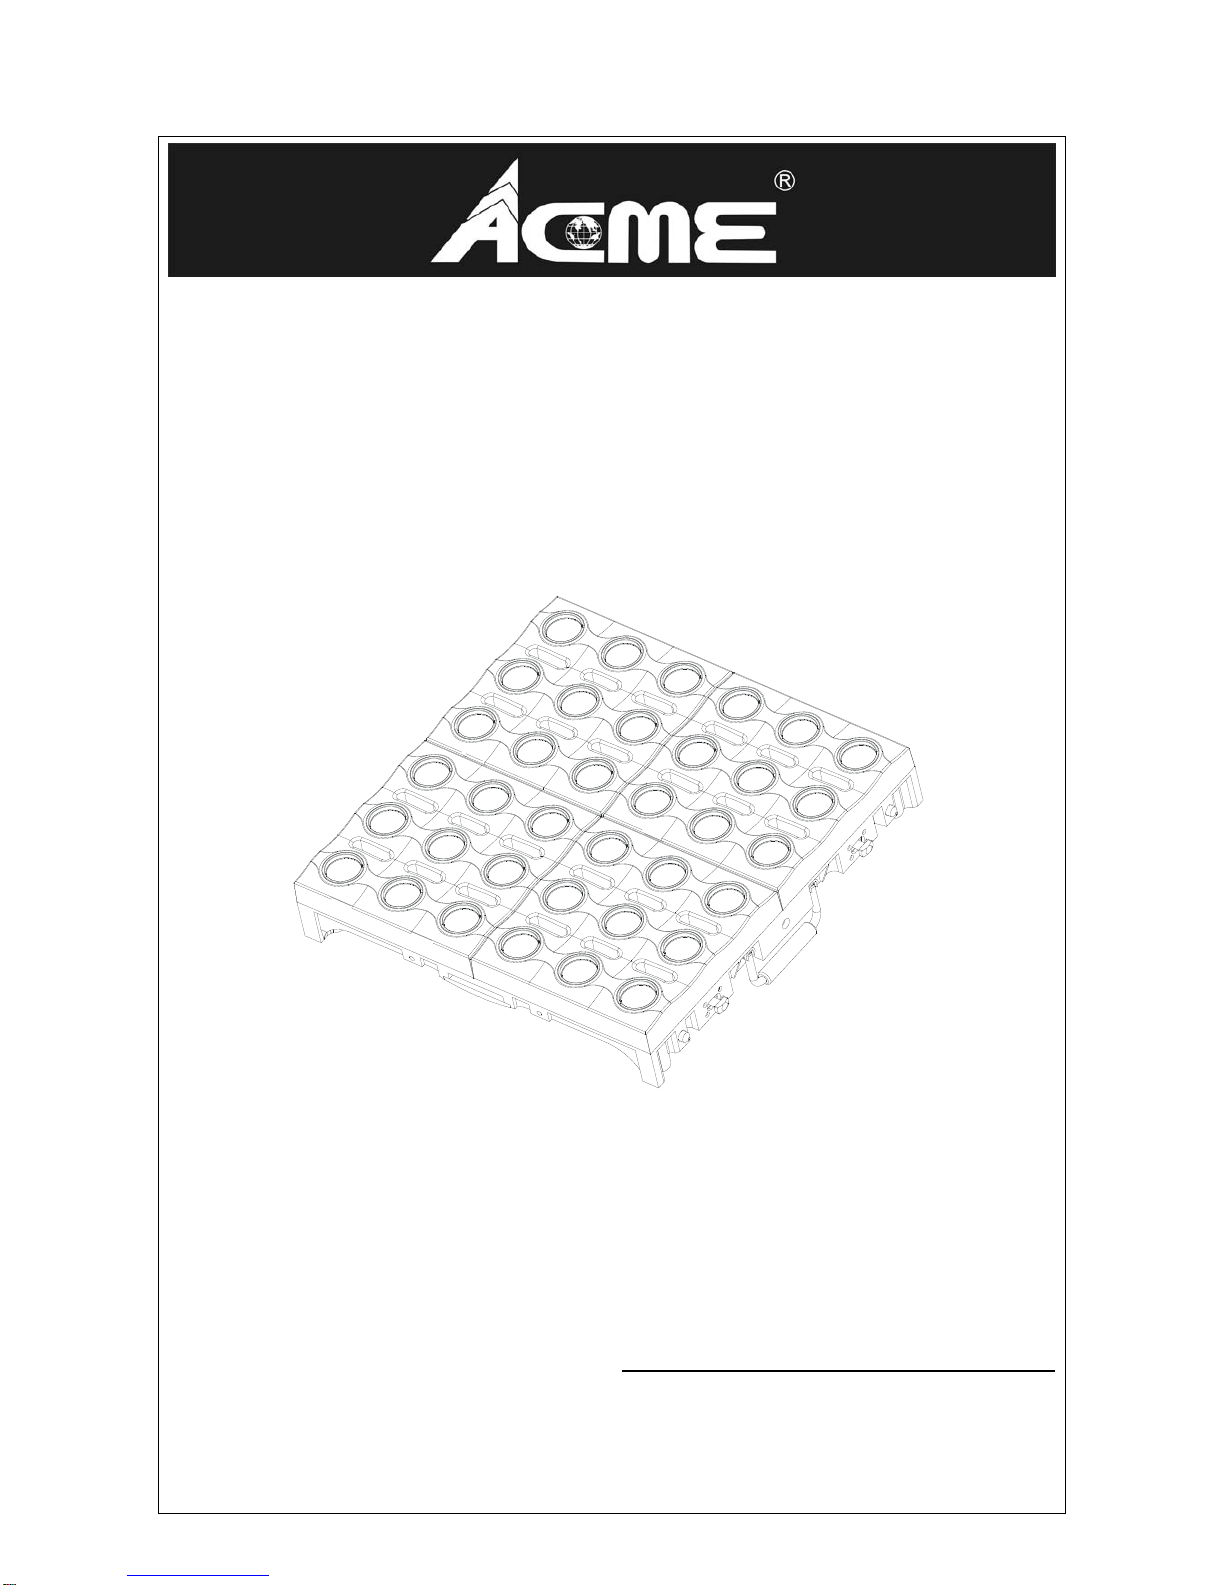
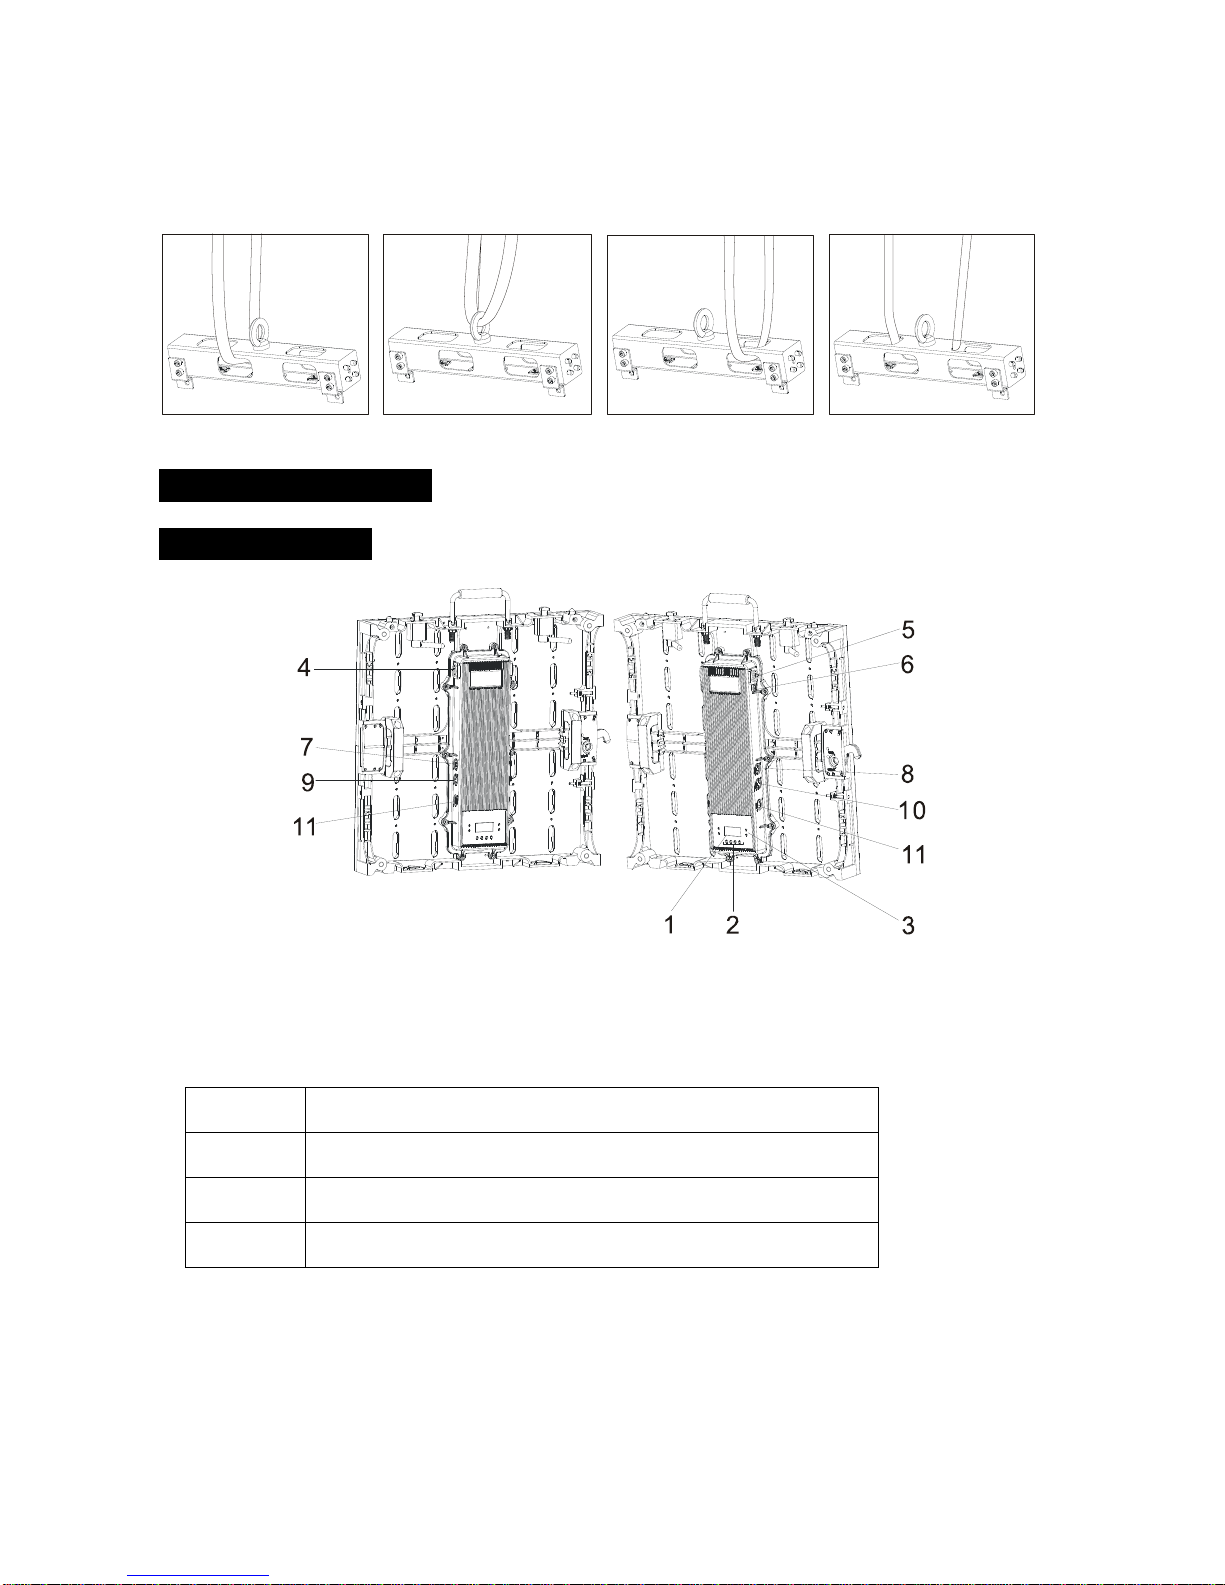
ACME LED-MTX36 HEX User manual

INFINITYMATRIXHEX
LED‐MTX36HEX
UserManual
Pleasereadtheinstructionscarefullybeforeuse

1A
CONTENTS
1.SafetyInstructions.......................................................................................................................2
2.TechnicalSpecifications...............................................................................................................3
3.Accessories..................................................................................................................................4
4.Installation...................................................................................................................................4
4.1FixtureJointing......................................................................................................................4
4.2FixtureHanging.....................................................................................................................6
5.HowToSetTheUnit....................................................................................................................8
5.1ControlPanel.........................................................................................................................8
5.2MainFunction.......................................................................................................................9
6.HowToControlTheUnit...........................................................................................................13
6.1Mater/SlaveBuiltInPreprogrammedFunction..................................................................14
6.2DMXController....................................................................................................................14
6.3ArtNet..................................................................................................................................14
6.4DMXConfiguration..............................................................................................................14
7.Troubleshooting.........................................................................................................................21
8.FixtureCleaning.........................................................................................................................22

2A
1.SafetyInstructions
WARNING
PleasekeepthisUserManualforfutureconsultation.Ifyousellthefixturetoanotheruser,be
surethattheyalsoreceivethisinstructionbooklet.
Pleaseunpackandcheckcarefullythereisnotransportationdamagebeforeusingthefixture.
Pleasedisconnectmainpowerbeforeservicingandmaintenance.
ThemaximumambienttemperatureisTa:40 .D℃ONOToperateitwherethetemperatureis
higherthanthis.
DONOTconnectthedevicetoanydimmerpack.
Thehousingmustbereplacediftheyarevisiblydamaged.
Unitsurfacetemperaturemayreachupto85 .Don’t
℃touchthehousingbare‐handduringits
operation.Turnoffthepowerandallowabout15minutesfortheunittocooldownbefore
replacingorserving.
Therearenouserserviceablepartsinsidethefixture.Donotopenthehousingorattemptany
repairsbyyourself.Intheunlikelyeventyourfixturemayrequireservice,pleasecontactyour
nearestdealer.
Intheeventofseriousoperatingproblem,stopusingthefixtureimmediately.Nevertrytorepair
thefixturebyyourself.Repairscarriedoutbyunskilledpeoplecanleadtodamageor
malfunction.Pleasecontactthenearestauthorizedtechnicalassistancecenter.Alwaysusethe
sametypespareparts.
Warning:
It’simportanttogroundtheyellow/greenconductortoearthinordertoavoid
electricshock.
DONOTtouchanywireduringoperationandtheremightbeahazardofelectricshock.
Topreventorreducetheriskofelectricalshockorfire,donotexposetheunittorainor
moisture.
Pleasereadcarefullytheinstruction,whichincludesimportant
informationabouttheinstallation
,
usa
g
eandmaintenance.

3A
DONOTopentheunitwithinfiveminutesafterswitchingoff.
Thehousing,thelenses,ortheultravioletfiltermustbereplacediftheyarevisiblydamaged.
DonotlookdirectlyattheLEDlightbeamwhilethefixtureison.
Caution:
Therearenouserserviceablepartsinsidetheunit.DONOTopenthehousingorattemptany
repairsyourself.Intheunlikelyeventyourunitmayrequireservice,pleasecontactyournearest
dealer.
2.TechnicalSpecifications
DMXChannels:3/4/144/216channelsmode
Controlmodes:DMX,ArtNet,Master/Slave,SoundActive
DataIn/Out:3‐pin&5‐pinXLRsockets,ArtNetconnectors
Dimmer:0~100%smoothdimming
InfiniteMatrixfeaturesprofessionalLCDscreencaseforeasyandquickinstallation;pixel
controlandpowerfuloutput,perfectforevents,rentalsandallkindsofshows.
Voltage:AC100~240V,50/60Hz
Powerconsumption:173W
LED:36x3WRGBPYWLEDs
Fuse:
BeamAngle:
T6.3Amp
45Degree
Dimension:510x500x122mm
Weight:12.4Kgs

4A
3.Accessories
StandardAccessories:
1.1.5mPOWERCONcablex1pc
2.1.5mCAT5eLANcablex1pc
3.Fastenerx1pc
4.M10x20Hexagonsocketscrewx4pcs
OptionalAccessories:
1.0.5mHangingBarx1pc,Liftingbeltsx1pc,FixedplateforHangingBarx2pcs,M10x25
Hexagonsocketscrewx2pcs
2.ClampC‐200(Differentmodelsofclampcanbechosen)
3.8mmAllenKey
4.1mPOWERCONConnectingcable
4.Installation
4.1FixtureJointing
Beforejointthefixtures,pullthehandledownwardasFigure1andFigure2showedbelowtohide
thehandle.
Figure1Figure2

5A
HorizontalJointing:
Releasethespringofthelocatingpin(A&B)sothattwofixtureslocated(Step1),anduseLtype
HexagonwrenchtoclockwiserotatetheLockCatchtotheendtofastentwofixtures(Step2).
Figure3
VerticalJointing:
PlugtheLocatingPinandtheQuicklockintothecorrespondingholestolocatetwofixtures(Step
1),andcounter‐clockwiserotatethestickofthelocktofastentwofixtures(Step2&Step3).
Figure4

6A
JointingwithFastener
Weprovideonefastenerforonefixturesoyoucanalsousefastenertocombineandfixthe
fixturestomakethemmorefirm.Pleasefixthefastenerindifferentplacesasneeded.
Figure5
4.2FixtureHanging
ThefixturealsocanbehangedbytheClamporHangingBar.
Clamp(Onlyonefixturecanbehanged)
Differentmodelsofclampcanbechoose,C‐200forreferenceasbelow.
Bolttheclamptothefixturewithscrewandnutthroughtheholeintheheadofthefixture.Hang
itinthetrussthroughtheclamp.
Figure6Figure7

7A
HangingBar(Morethanonefixturecanbehanged.Foronebar,maxload≤150kg.)
HangthefixturewithHangingBarjustasVerticalJointingbetweentwofixtures,plugtheLocating
PinandtheQuicklockintothecorrespondingholesoftheHangingBartolocatethefixturesand
thebar,andcounter‐clockwiserotatethestickoftheQuickLocktofastenthem(Fixture8).Then
screwtheHexagonsocketscrewsbytheAllenkeytofixthebarwiththefixture(Fixture9).
Figure8Figure9
PlugtheLocatingPinintothecorrespondingholesofanotherHangingBartolocateandcombine
thebars.
Figure10
Note:Wesuggestthatjointhefixtureshorizontalfirst,thencombinethemlayerbylayer.

8A
UseLiftingbeltstohangthebarindifferentwaysaccordingtotheinstallationconditions.
Youcanfindbelowfiguresforreference:
5.HowToSetTheUnit
5.1ControlPanel
1. Display
Toshowthevariousmenusandtheselectedfunctions;
2. Button
MENUToselecttheprogrammingfunctions
DOWNTogobackwardintheselectedfunctions
UPTogoforwardintheselectedfunctions
ENTERToconfirmtheselectedfunctions

9A
3. LED
DMXOnDMXinputpresent
MASTEROnMasterMode
SLAVEOnSlaveMode
SOUNDFlashSoundactivation
4. PowerIn:Connecttosupplymainspower;
5. PowerOut:Connecttosupplymainspowerforthenextunit;
6. Fuse(T6.3Amp):Usedtoprotecttheunitfromthedamageofovercurrent;
7. 3‐pinDMXIn:ForDMX512link,use3‐pinXLRcabletolinktheunitandtheDMXcontroller;
8. 3‐pinDMXOut:ForDMX512link,use3‐pinXLRcabletolinkthenextunitandoutputDMX
signal;
9. 5‐pinDMXIn:ForDMX512link,use5‐pinXLRcabletolinktheunitandtheDMXcontroller;
10. 5‐pinDMXOut:ForDMX512link,use5‐pinXLRcabletolinkthenextunitandoutputDMX
signal;
11. NUTRRJ45in/out:Connectwiththemultimediaandusesoftwaretocontroltheunitsvia
ArtNet.
5.2MainFunction
Toselectanyofthegivenfunctions,presstheMENUbuttonuptowhentherequiredoneis
showingonthedisplay.SelectthefunctionbytheENTERbuttonandthedisplaywillblink.Usethe
DOWNandUPbuttontochangethemode.Oncetherequiredmodehasbeenselected,pressthe
ENTERbuttontosetup,togobacktothefunctionswithoutanychangepresstheMENUbutton
again.HoldandpresstheMENUbuttonaboutonesecondorwaitforoneminutetoexitthemenu
mode.
Note:Underthemastermode,holdtheENTERbuttonandusetheDOWNandUPbuttonto
adjustthedimmerfortheshow.

10A
Themainfunctionsareshowingbelow:

11A
DMXAddress
SelecttheDMXAddress,presstheENTERbuttontoconfirm,thedisplaywillshowthepresent
address.UsetheUPandDOWNbuttontoselectPortAorPortB(PortBonlyappearsunder
PairShowchannelmode)andadjusttheaddress(Theaddressvaluerangewillbedifferentwhen
selectdifferentchannelmode),presstheENTERbuttontostore.PresstheMENUbuttonbackto
thelastmenuoridling30secondstoexitmenumode.
Eth‐NetAddress
SelecttheEth‐NetAddress,presstheENTERbuttontoconfirm.UsetheUPandDOWNbuttonto
selectIPAddr,IPMask,GatewayandMACAddr,presstheENTERbuttontosetthevaluefor
theseitems.PresstheMENUbuttonbacktothelastmenuoridling30secondstoexitmenu
mode.
ArtNetUniverse
SelecttheArtNetUniverse,presstheENTERbuttontoconfirm.UsetheENTERbuttontoselect
Net,Sub‐NetorUniversePortAorUniversePortB,usetheUPandDOWNbuttontosetthe
valuefortheseitems.PresstheMENUbuttonbacktothelastmenuoridling30secondstoexit
menumode.
ChannelMode
SelecttheChannelMode,presstheENTERbuttontoconfirm,thedisplaywillshowthepresent
channelmode.UsetheUPandDOWNbuttontoadjust3ChMode,4ChMode,36RGB,36RGBW,
36RGBWPYorPairShow,presstheENTERbuttontostore.PresstheMENUbuttonbacktothe
lastmenuoridling30secondstoexitmenumode.
M/SMode
SelecttheM/SMode,presstheENTERbuttontoconfirm,thedisplaywillshowthepresent
channelmode.UsetheUPandDOWNbuttontoadjustMaster,Slave1…Slave4,presstheENTER
buttontostore.PresstheMENUbuttonbacktothelastmenuoridling30secondstoexitmenu
mode.

12A
SpliceSet
SelecttheSpliceSet,presstheENTERbuttontoconfirm,usetheUPandDOWNbuttontoselect
the1‐1(1unit),1‐2(2unitsconnected)or2‐2(4unitsconnected)mode,presstheENTERbutton
tostore.PresstheMENUbuttonbacktothelastmenuoridling30secondstoexitmenumode.
ShowMode
SelecttheShowMode,presstheENTERbuttontoconfirm,thepresentmodewillblinkonthe
display,usetheUPandDOWNbuttontoselecttheShow1toShow5,presstheENTERbuttonto
store.PresstheMENUbuttonbacktothelastmenuoridling30secondstoexitmenumode.
FadeMode
SelecttheFadeMode,presstheENTERbuttontoconfirm,thepresentmodewillblinkonthe
display,usetheUPandDOWNbuttontoselecttheJump,Fade1toFade4,presstheENTER
buttontostore.PresstheMENUbuttonbacktothelastmenuoridling30secondstoexitmenu
mode.
SoundMode
SelectSoundMode,presstheENTERbuttontoconfirm,thepresentmodewillblinkonthedisplay,
usetheUPandDOWNbuttontoselectOnorOff,presstheENTERbuttontostore.Pressthe
MENUbuttonbacktothelastmenuoridling30secondstoexitmenumode.
SoundSense
SelectSoundSense,presstheENTERbuttontoconfirm,thepresentmodewillblinkonthedisplay,
usetheUPandDOWNbuttontoadjustthevaluefrom1or100,presstheENTERbuttontostore.
PresstheMENUbuttonbacktothelastmenuoridling30secondstoexitmenumode.
Blackout
SelectBlackout,presstheENTERbuttontoconfirm,thepresentmodewillblinkonthedisplay,
usetheUPandDOWNbuttontoselectYesorNo,presstheENTERbuttontostore.Pressthe
MENUbuttonbacktothelastmenuoridling30secondstoexitmenumode.
LCDLight
SelectLCDLight,presstheENTERbuttontoconfirm,thepresentmodewillblinkonthedisplay,

13A
usetheUPandDOWNbuttontoselectOnorOff,presstheENTERbuttontostore.Pressthe
MENUbuttonbacktothelastmenuoridling30secondstoexitmenumode.
ManualTest
SelectManualMode,presstheENTERbuttontoconfirm,thepresentmodewillblinkonthe
display,usetheUPandDOWNbuttontoselecttheNumberorLetter,presstheENTERbuttonand
usetheUPandDOWNbuttontoadjustthevaluefrom0~9andA~Z,a~z,presstheENTER
buttontostore.PresstheMENUbuttonbacktothelastmenuoridling30secondstoexitmenu
mode.
AutoTest
Selecttest,presstheENTERbuttontoconfirm,thentheunitwilltestbyitself.PresstheMENU
buttonbacktothelastmenu.
FixtureTime
PresstheMENUbuttonuptowhentheFixtureTimeisblinkingonthedisplay.PresstheENTER
buttonandthedisplaywillshowthenumberofworkinghoursoftheunit.Togobacktothe
functionspresstheMENUbuttonagain.
SoftwareVersion
PresstheMENUbuttonuptowhentheSoftwareVersionisblinkingonthedisplay.Pressthe
ENTERbuttonandthedisplaywillshowtheversionofsoftwareoftheunit.Togobacktothe
functionspresstheMENUbuttonagain.
6.HowToControlTheUnit
Youcanoperatetheunitintwoways:
1. Bymaster/slavebuilt‐inpreprogramfunction
2. ByuniversalDMXcontroller
3. BymultimediasoftwareviaArtNet
NoneedtoturntheunitoffwhenyouchangetheDMXaddress,asnewDMXaddresssettingwill
beaffectedatonce.

14A
6.1Mater/SlaveBuiltInPreprogrammedFunction
Bylinkingtheunitsinmaster/slaveconnection,thefirstunitwillcontroltheotherunitstogivean
automaticlightshow.YouhavetosetthefirstunitinmastermodeandselectShow1toShow10.
ItsDMXinputjackwillhavenothingpluggedintoit,andItsmasterLEDwillbeconstantlyonand
soundLEDwillflashtothemusic.
6.2DMXController
ByusingauniversalDMXcontrollertocontroltheunits,youhavetosetDMXaddressfrom1to
512sothattheunitscanreceiveDMXsignal.
PresstheMENUbuttonuptowhentheDMXAddressisshowingonthedisplay.PressingENTER
buttonandthedisplaywillblink.UseDOWNandUPbuttontochangetheDMX512address.Once
theaddresshasbeenselected,pressandkeepENTERbuttonpresseduptowhenthedisplaystops
blinkingorstoringautomatically8secondslater.Togobacktothefunctionswithoutanychange
presstheMENUbuttonagain.Ifyouusepleaserefertothefollowingdiagramtoaddressyour
DMX512channelforthefirst4units:
Channelmode
Unit1
Address
Unit2
Address
Unit3
Address
Unit4
Address
3Channel14710
4Channels15913
36RGB(108)Channels1109217325
36RGBW(144)Channels1145289433
36RGBWPY(216)Channels1217433/
6.3ArtNet
ByusingmultimediasoftwareviaArtNettocontroltheunits,youhavetoselectchannelmode36
inthemenu.AlsosettheEth‐Netaddresstomakesuretheyaresamewiththemultimediaservice.
IfMACaddresshasconflictpleaseusetherandomaddress.
6.4DMXConfiguration
3ChannelsMode:

15A
ChannelValueFunction
1
000‐255
Dimmer
0‐100%
2
000‐050
051‐101
102‐152
153‐203
204‐255
FadeMode
Jump
Fade1
Fade2
Fade3
Fade4
3
000‐007
008‐055
056‐103
104‐151
152‐199
200‐247
248‐255
Show
Blackout
Show1
Show2
Show3
Show4
Show5
Standalone(Triggerbysound)
4ChannelsMode:
ChannelValueFunction
1000‐255Dimmer0‐100%
2
000‐019
020‐049
050‐064
065‐069
070‐084
085‐089
090‐104
105‐109
110‐124
125‐129
130‐144
145‐149
150‐164
165‐169
170‐184
185‐189
190‐204
205‐209
210‐224
225‐229
230‐244
245‐255
Strobe
Close
Open
Strobe,slowtofast
Open
Fastcloseslowopen
Open
Fastopenslowclose
Open
RandomStrobe
Open
Randomfastcloseslowopen
Open
Randomfastopenslowclose
Open
Burstpulseslowtofast
Open
RandomBurstpulse
Open
sinewave
Open
Burst
Open

16A
3
000‐014
015‐047
048‐095
096‐135
136‐175
176‐215
216‐255
Mode
Blackout
FullOn
Lineeffect(SeeChannel4‐1)
Number1to9(SeeChannel4‐2)
LetterAtoZ(SeeChannel4‐3)
Letteratoz(SeeChannel4‐4)
Blackout
4‐1
000‐007
008‐015
016‐023
024‐031
032‐039
040‐047
048‐055
056‐063
064‐071
072‐079
080‐087
088‐095
096‐103
104‐111
112‐119
120‐127
128‐135
136‐143
144‐151
152‐159
160‐167
168‐175
176‐183
184‐191
192‐199
200‐207
208‐215
216‐223
224‐231
232‐239
240‐247
248‐255
LineEffect(WhenCH3between048‐095)
NoFunction
Effect1
Effect2
Effect3
Effect4
Effect5
Effect6
Effect7
Effect8
Effect9
Effect10
Effect11
Effect12
Effect13
Effect14
Effect15
Effect16
Effect17
Effect18
Effect19
Effect20
Effect21
Effect22
Effect23
Effect24
Effect25
Effect26
Effect27
Effect28
Effect29
Effect30
Effect31
4‐2
000‐025
026‐048
Number(WhenCH3between096‐135)
Nofunction
Number–0

17A
049‐071
072‐094
095‐117
118‐140
141‐163
164‐186
187‐209
210‐232
233‐255
Number–1
Number–2
Number–3
Number–4
Number–5
Number–6
Number–7
Number–8
Number–9
4‐3
000‐021
022‐030
031‐039
040‐048
049‐057
058‐066
067‐075
076‐084
085‐093
094‐102
103‐111
112‐120
121‐129
130‐138
139‐147
148‐156
157‐165
166‐174
175‐183
184‐192
193‐201
202‐210
211‐219
220‐228
229‐237
238‐246
247‐255
CapitalLetter(WhenCH3between136‐175)
Nofunction
Letter–A
Letter–B
Letter–C
Letter–D
Letter–E
Letter–F
Letter–G
Letter–H
Letter–I
Letter–J
Letter–K
Letter–L
Letter–M
Letter–N
Letter–O
Letter–P
Letter–Q
Letter–R
Letter–S
Letter–T
Letter–U
Letter–V
Letter–W
Letter–X
Letter–Y
Letter–Z
4‐4
000‐021
022‐030
031‐039
040‐048
049‐057
058‐066
SmallLetter(WhenCH3between176‐215)
Nofunction
Letter–a
Letter–b
Letter–c
Letter–d
Letter–e

18A
067‐075
076‐084
085‐093
094‐102
103‐111
112‐120
121‐129
130‐138
139‐147
148‐156
157‐165
166‐174
175‐183
184‐192
193‐201
202‐210
211‐219
220‐228
229‐237
238‐246
247‐255
Letter–f
Letter–g
Letter–h
Letter–i
Letter–j
Letter–k
Letter–l
Letter–m
Letter–n
Letter–o
Letter–p
Letter–q
Letter–r
Letter–s
Letter–t
Letter–u
Letter–v
Letter–w
Letter–x
Letter–y
Letter–z
36RGBChannelsMode:
ChannelValueFunction
1‐108
000‐255
Pixel01–Pixel36RGBDimmer
0‐100%
36RGBWChannelsMode:
ChannelValueFunction
1‐144
000‐255
Pixel01–Pixel36RGBWDimmer
0‐100%
36RGBWPYChannelsMode:
ChannelValueFunction
1‐216
000‐255
Pixel01–Pixel36RGBWPYDimmer
0‐100%
PairShowMode:
DMXInput1(ControlbyArtNet)
ChannelValueFunction
1–108
000‐255
Pixel01–Pixel36RGBDimmer(ValidwhenInput2
CH1on036‐095or166‐235)
0‐100%

19A
DMXInput2(ControlbyDMXconsole)
ChannelValueFunction
1
000‐025
036‐095
096‐165
166‐235
236‐255
FunctionControl
Blackout
DMXInput1(Channel1‐108)isinvalid,DMXInput2
(Channel2‐109)isvalid
DMXInput1(Channel1‐108)isvalid,DMXInput2
(Channel2‐109)isinvalid
DMXInput1(Channel1‐108)isvalid,DMXInput2
(Channel2‐109)isvalid
Blackout
2–109
000‐255
Pixel01–Pixel36WPYDimmer(ValidwhenInput2
CH1on096‐165or166‐235)
0‐100%
7.DMXConnections
Pleaseconnectthefixturesasbelow:
Modeconnection1‐1:(Oneunitinagroup)
Modeconnection1‐2:(Twounitsinagroup)
Table of contents
Other ACME Dj Equipment manuals

ACME
ACME XP-1000WZ User manual

ACME
ACME iColorLed 18TC User manual

ACME
ACME LED WAVE 100 User manual

ACME
ACME MH-600A Mobile Color User manual

ACME
ACME LED-737 User manual

ACME
ACME XP-470 BSW User manual

ACME
ACME Stage Panel 1080 User manual

ACME
ACME CP-21TC User manual

ACME
ACME Elf Laser User manual

ACME
ACME Ellipsoidal 10 DMX User manual

ACME
ACME LED-MS50A User manual

ACME
ACME CP-56U User manual

ACME
ACME Dotline360 TB-1230 QW User manual

ACME
ACME MH-640S-ELC User manual

ACME
ACME LP-F2000 VW User manual

ACME
ACME LED-MS150 User manual

ACME
ACME DVS-2500 User manual

ACME
ACME BLINDER LINE 10 IP User manual

ACME
ACME LED-BL8 User manual

ACME
ACME LED-Exercet User manual