Akai ATT-11BTN User manual

Turntable with Built-in Speakers
ATT-11BTN
INSTRUCTION MANUAL
EN - ENGLISH

SAFETY INSTRUCTIONS
Read these safety instructions before using your device and store them for possible future reference.
•The device is not intended for use by persons (including children) with reduced physical, sensory
or mental capacity. Persons who have not read the manual, unless they have received explanations
by a person responsible for their safety and supervision should not use this unit.
•Children should be monitored to ensure that they do not play with the device.
•The device should always be readily accessible.
•The device should not be exposed to dripping or splashing water.
•No objects filled with liquids such as vases shall be placed on the device.
•high audio volume and no more than one hour per day at medium audio volume. Always leave a
minimum distance of 10 cm around the unit to ensure sufficient ventilation.
•Open flame sources, such as candles, should not be placed on top of the device.
•The device is intended for use only in a temperate climate.
•At full volume, prolonged listening to the portable audio device may damage the user’s hearing
and cause hearing troubles (temporary or permanent deafness, hearing drone, tinnitus,
hyperacusis). So we recommend not to listen to the portable audio device at high audio volume
and no more than one hour per day at medium audio volume.
SWITCH OFF IN RESTRICTED AREAS
Switch the mobile device off where the use of mobile devices is not allowed or where there is a risk of
causing interference or danger, for example on board an aircraft, near medical equipment, fuel,
chemicals or blasting sites.
INTERFERENCE
All wireless devices are susceptible to interference which may affect their performance.
AUTHORISED PERSONNEL
Only qualified people are authorized to install or repair this product
ACCESSORIES
Only use chargers and other accessories which are compatible with this equipment. Do not connect
incompatible products.
KEEP THE EQUIPMENT DRY
This equipment is not water proof. Keep it dry.
CHILDREN
Keep your device in a safe place, out of the reach of young children. The device contains small parts
that may present a choking hazard.
FUNCTIONS:
•3-speed (33 1/3, 45 and 78 RPM)
•Built-in stereo speakers for great sound
•High quality ceramic cartridge produces detailed
sound
•Belt driven turntable mechanism
•DC power adapter, 45 RPM adapter included
•AUTO-STOP tone arm
•RCA audio out
•Play 7", 10" & 12" Records
•Bluetooth function
•Bluetooth V5.0
•SD card reader & USB flash driver
•Record vinyl to SD card or USB Drive
2

DESCRIPTION
1. 45-rpm Adaptor
2. Tone arm lift
3. Speed selection –Three speed for choice:
33 1/3, 45, 78 RPM
4. Auto stop control
5. tone-arm rest/lock
6. Tone arm
7. Cartridge
8. Turntable Platter
9. Speaker
10. BT Launch Indicator light (Power light)
11. Power Switch/Volume control
12. R channel
13. L channel
14. DC power jack
15. Previous music
16. Pause/play button/DEL
17. Next music
18. Mode: REC/Bluetooth /BT Launch/USB/SD
selection button
19. USB connector
20. SD card connector
3

Fitting the dust cover
Refer to the diagram below to
attached the plastic dust cover.
Take care when fitting, and do not
press down too hard. Remove the
dust cover in the same manner,
but pull the cover upwards.
INITIAL SET-UP
MAINS CONNECTION
Ensure that the mains voltage of your home corresponds to the operating voltage of the unit. Your unit
is ready to be connected to a mains voltage of 5V DC adaptor.
CONNECTING TO AN EXTERNAL SOUND SYSTEM
Should you wish to connect the turntable to an external amplifier follow the below steps.
4

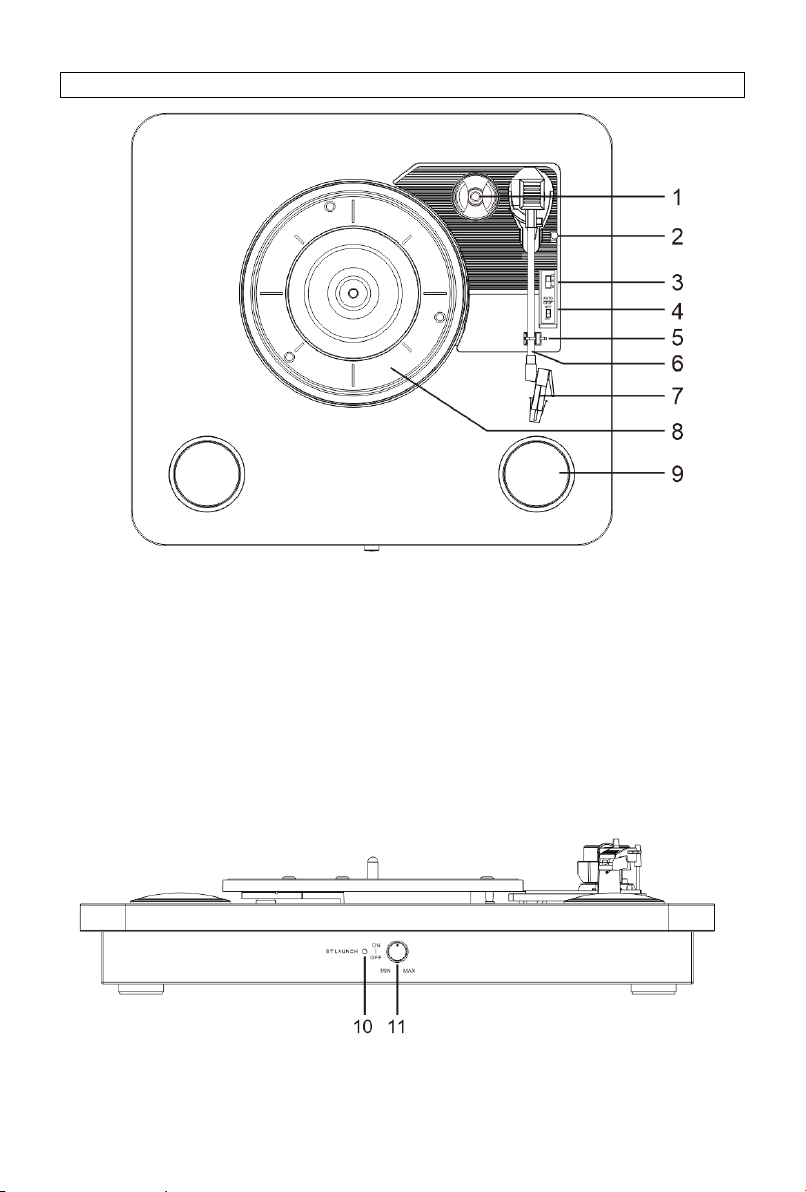
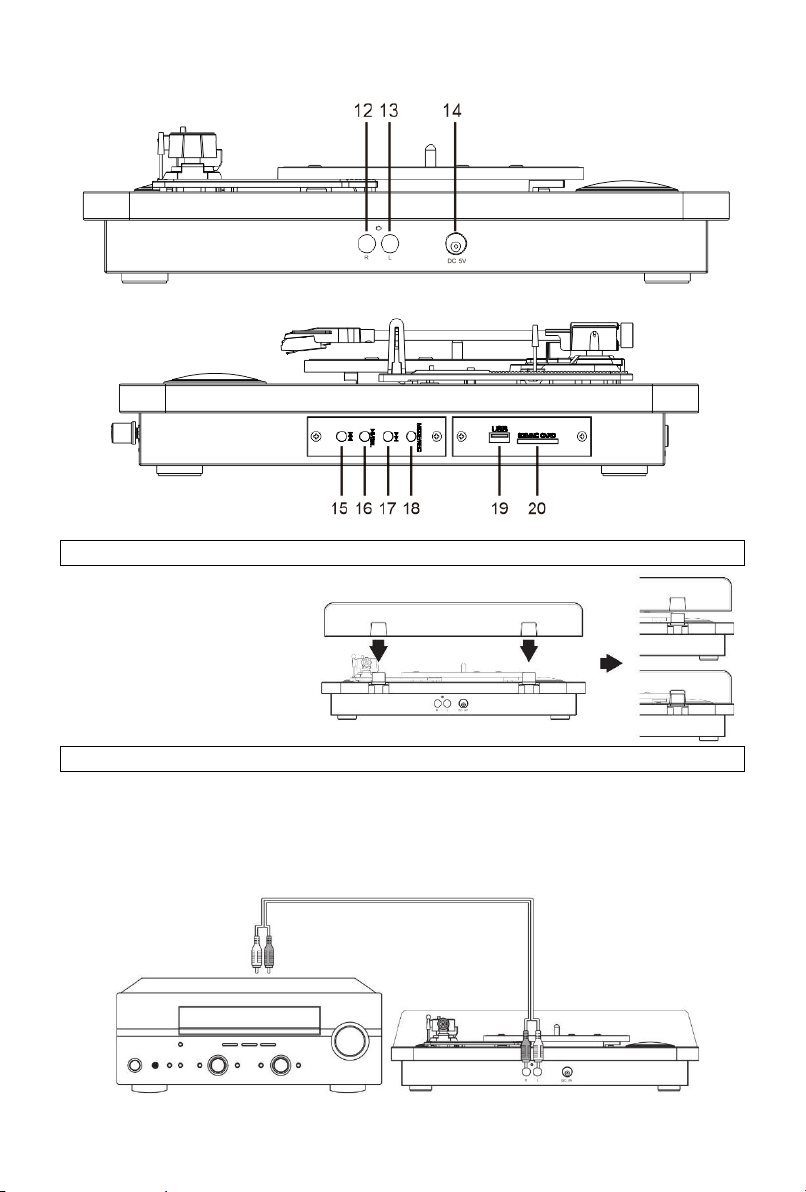
•Connect an RCA audio cable (not supplied) to the AUDIO LINE OUT sockets on the rear of the
turntable.
Note: Take care to match the RED/WHITE plugs to the corresponding RED/WHITE sockets.
•Connect the other end of the cable to an AUDIO INPUT on the amplifier (check your amplifier user
manual if you are not sure).
•The volume control on the turntable will have no effect on the volume level when connected this
way. All volume controls should be operated from the amplifier.
Note: Turn the volume on the turntable all the way down, so it does not interfere with the external
sound system.
Playing a record
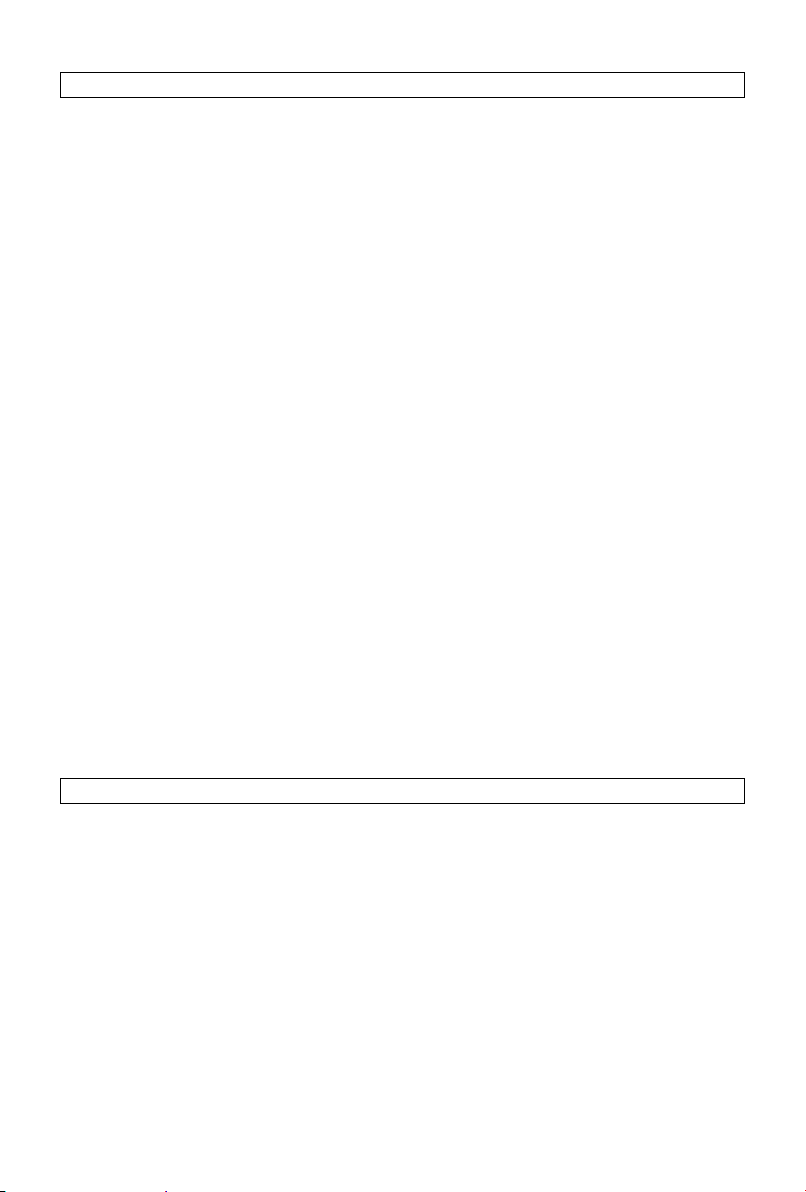
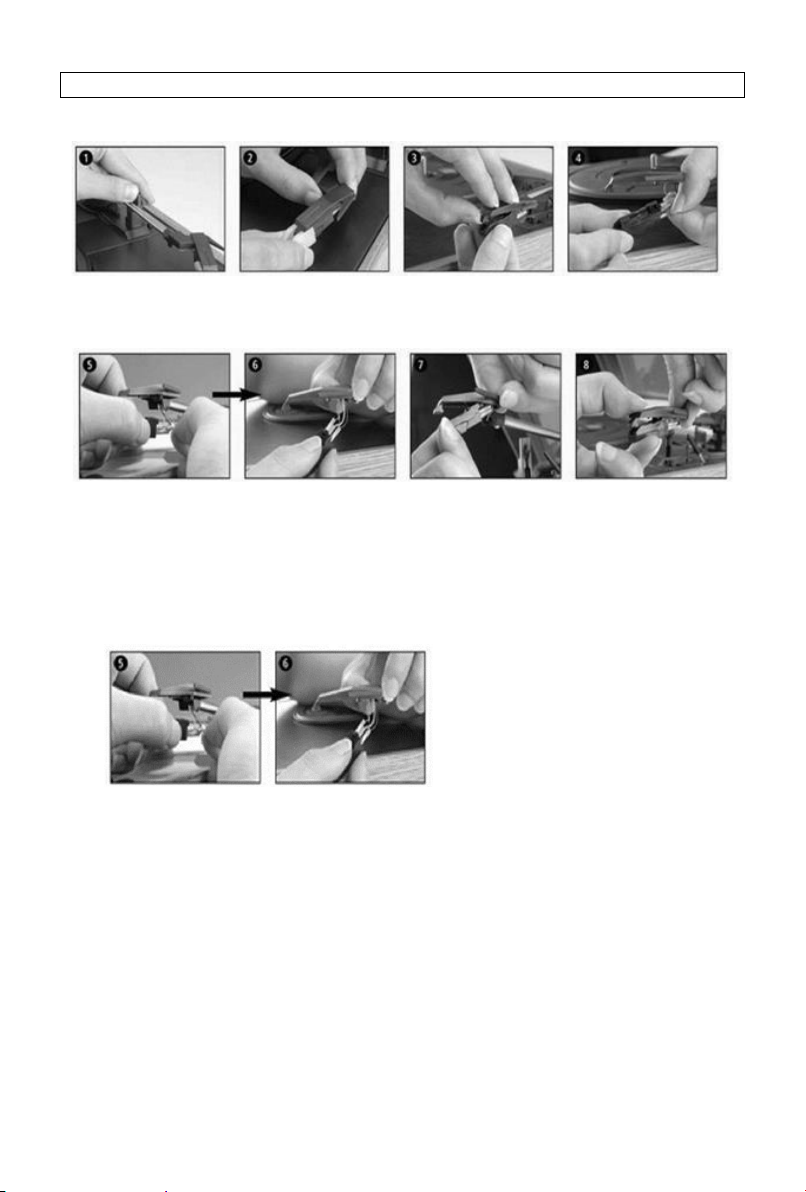
Before use, ensure the security wire (tone-arm rest/lock) and the cartridge protector
(stylus/cartridge) have been removed. And the tone-arm lock is released.
•Place a record on the turntable platter.
•Select the speed required using the speed selector switch.
•Raise the tone-arm using the tone-arm lift lever. As you move the tone-arm towards the record
the turntable begins spinning. Lower the needle gently onto the outer edge of the record using
the tone-arm lift lever.
•Rotate the ON/OFF/Volume control knob to increase or decrease the volume level.
•When a record comes to the end, the turntable will stop automatically if the auto-stop switch is
in the “ON” position. If the switch is in the off position then it will keep revolving all the time.
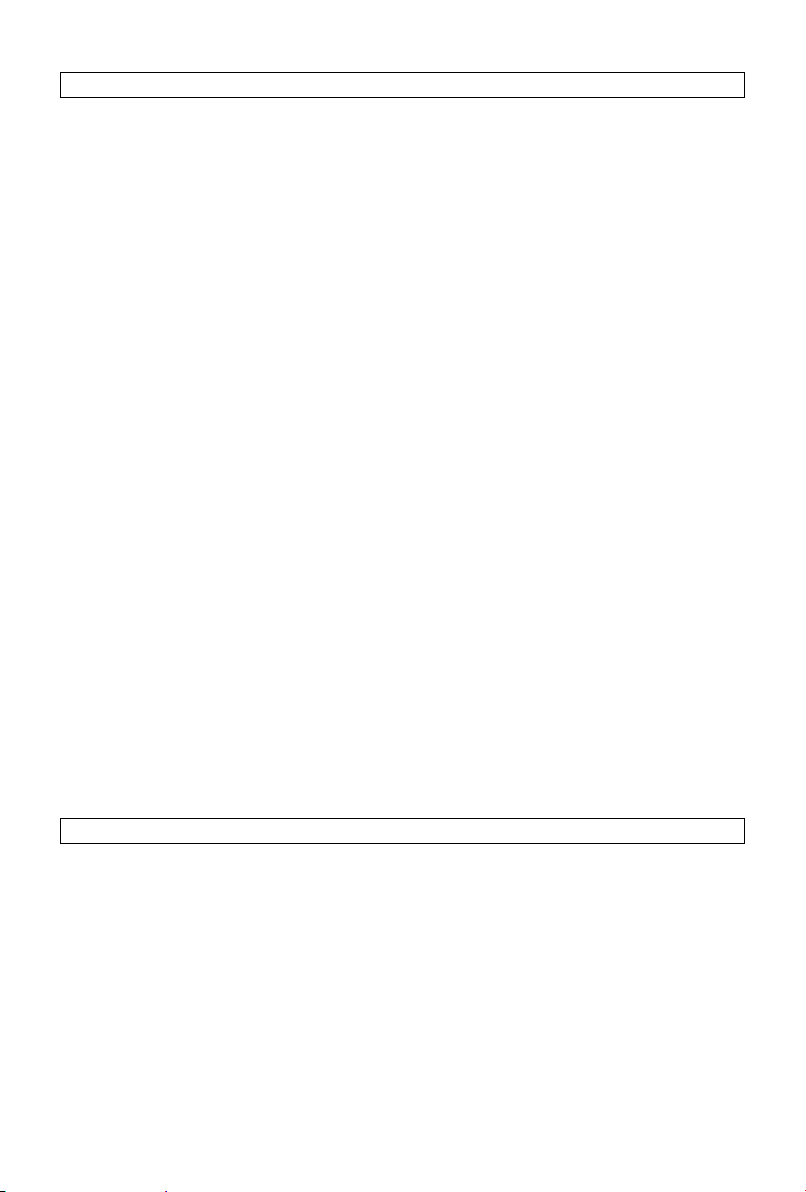
•Lift up the tone arm and put it on the rest when finished.
•Replace the protective cap on the stylus and close the tone arm lock.
•Turn off power at mains.
USB flash drive and SD card reader Recording
(Lift up the tone arm and put it on the rest.)
LISTEN TO MUSIC:
•If you want to play or pause music from your installed SD card or USB flash memory, turn the
power & volume control knob clockwise to power on; the music will start playing automatically.
•You can play or pause music by pressing the play-pause/Del button.
•If you want to play the next or previous track from your installed SD card or USB flash memory,
press the next track or previous track button.
•If you have installed an SD card & USB flash memory, the last one installed will start playing. You
can select the desired source by pushing the MODE/REC button. (SD => USB). The mode button
will select the active/installed sources only. Only mp3 file format is supported.
Note: the tone arm must be in rest position.
RECORDING MUSIC:
You can convert your vinyl records into digital mp3 files by inserting an SD/MMC card in the SD/MMC
card reader slot or USB flash memory device into the USB port.
•Play your ‘vinyl’ music, as described in ‘listening to a record’.
•Press and hold the MODE/REC button for 2 seconds.
•You will hear one ‘short beep’, indicating that recording has started.
•When finished recording, press “MODE/REC” for 2 seconds to stop recording.
•You will hear 2 ‘short beeps’, indicating that the recording has stopped.
•The recorded songs will be saved in the “RECORD0” folder as mp3 file, in 128 kbps.
•The file names of the recorded songs will be “REC001L, REC002L, etc”.
•You can only switch folders between the “RECORD0” folder and the SD card and/or USB flash
memory by pressing the MODE/REC button (SD/MMC=> SD/MMC record0=> USB => USB record0
=> SD/MMC).
5

DELETE RECORDED MUSIC:
If you want to delete the song being played from your USB flash memory or SD/MMC card, press and
hold the play-pause/Del button for 2 seconds. You will hear 2 “short beeps” confirming that the song
being played has been deleted.
Bluetooth function
(Lift up the tone arm and put it on the rest)
•Press “MODE/REC” button to select Bluetooth mode.
•Open up your Bluetooth settings and search for “ATT-11BTN” to connect.
•A sound prompt will indicate connection.
Under this function, turntable function will be stopped automatically.
Bluetooth out function
•Rotate the ON/OFF control knob, and thrice click the Mode button, the Bluetooth indicator will
flash blue quickly.
•Place a record on the turntable platter, or insert a SD/MMC card in the SD/MMC card reader slot
or USB flash memory device into the USB port.
•Enable your Bluetooth speaker or Bluetooth headset power ON, and make sure it is in searching
mode.
•Waiting for 10-15 seconds, the Bluetooth indicator will be blue, the Bluetooth connected
successfully.
•You can enjoy the music from Bluetooth speaker or Bluetooth headset.
6

MAINTENANCE
REPLACING THE STYLUS
-Refer to the figures 1-8
Push the arm lock to
release the tone-
arm.
Take off cap of
cartridge to expose
the needle out.
Separate the
cartridge from the
socket lightly.
Take off the audio-line
from the cartridges
completely.
To fit a new one just in opposite deals, insert the audio-line accordingly, and install the cartridge to the
socket lightly.
Note: Please exercise extreme care whilst performing this operation so as to avoid the tone arm and
audio line wires from any damage.
INSTALLING A NEW STYLUS CARTRIDGE
-Refer to the figures 5 & 6
NOTES
We advise you to clean your records with an anti-static cloth to gain maximum enjoyment from them
and to make them last.
We would also point out that for the same reason your stylus should be replaced periodically
(approximately every 250 hours).
Dust the stylus from time to time using a very soft brush dipped in alcohol (brushing from back to front
of the cartridge).
WHEN TRANSPORTING YOUR RECORD PLAYER DO NOT FORGET TO:
•Replace the protective cap on the stylus.
•Put the rest clip into the pick-up arm.
7

TECHNICAL DATAS
Rated voltage: DC 5V, 1A
Puissance sound power: 2 x 0.8W
Power consumption: 5W
Memory card port: 32GB
BT version: 5.0
BT channel emission power: 2 dbm
BT frequency: 2.400 – 2.483 GHz
Distance Bluetooth stays connected :10m
Accessories included: adaptor, user manual, warranty
card Adaptor: INPUT: AC 100-240 ~50/60Hz 0.15A
OUTPUT: DC 5V 1A
Frequency: 2,4 GHz
DISPOSAL OF ELECTRICAL AND ELECTRONIC EQUIPMENT
This symbol on the product or packaging means that the product should
not be treated as household waste. Do not throw garbage at the end of its
life, but take it to a collection center for recycling. In this way you will help
to protect the environment and be able to prevent any negative
consequences that it would have on the environment and human health.
To find your nearest collection center:
–Contact local authorities
–Access the website: www.mmediu.ro
–Request additional information from the store where you purchased
the product.
8

Pick-up cu difuzoare incorporate
ATT-11BTN
MANUAL DE INSTRUCTIUNI
RO - ROMANA
9

INSTRUCTIUNI DE SIGURANTA
Cititi aceste instructiuni de siguranta inainte de a folosi aparatul si pastrati-le pentru posibile referinte
viitoare.
•Aparatul nu este destinat utilizarii de catre persoane (inclusiv copii) care au capacitati psihice,
senzoriale sau mentale reduse. Persoanele care nu au citit manualul, nu ar trebui sa utilizeze
acest produs, decat daca au primit explicatii de la o persoana responsabila cu siguranta si
supravegherea acestora.
•Copiii trebuie supravegheati, pentru a va asigura ca nu se joaca cu aparatul.
•Aparatul trebuie sa fie intotdeauna usor accesibil.
•Aparatul nu trebuie stropit sau udat cu apa.
•Pe aparat nu trebuie asezate obiecte pline cu lichide, cum ar fi vaze.
•Lasati intotdeauna o distanta de minim 10 cm in jurul aparatului pentru a asigura o ventilare
suficienta.
•Pe aparat nu trebuie asezate surse deschise de foc, cum ar fi lumanari.
•Aparatul este destinat folosirii doar in medii de clima temperate.
•La volum maxim, ascultarea prelungita la un dispozitiv audio portabil poate afecta auzul
utilizatorului (asurzire temporara sau permanenta, aparate auditive, tinnitus, hiperacuzie).
Asadar recomandam sa nu ascultati dispozitivul audio portabil la un volum ridicat si nu mai mult
de o ora pe zi, la volum audio mediu.
OPRIREA IN ZONE CU RESTRICTIE
Opriti aparatul in zone in care nu este permisa folosirea dispozitivelor mobile sau unde exista riscul de
interferente sau pericol, de exemplu la bordul unei aeronave, langa echipament medical, combustibil,
substante chimice sau in zone de producere a exploziei.
INTERFERENTE
Toate dispozitivele wireless sunt susceptibile de interferente care pot afecta performanta acestora.
PERSONAL AUTORIZAT
Doar personalul calificat este autorizat sa instaleze sis a repare acest produs.
ACCESORII
Folositi doar incarcatoare si alte accesorii care sunt compatibile cu acest echipament. Nu conectati
produse incompatibile.
PASTRATI ECHIPAMENTUL USCAT
Acest echipament nu este rezistent la apa. Pastrati-l uscat.
COPII
Pastrati aparatul intr-un loc sigur, care se nu fie la indemana copiilor. Aparatul contine piese mici care
pot prezenta risc de sufocare.
FUNCTII:
⚫3 viteze (33 1/3, 45 si 78 RPM)
⚫Difuzoare incorporate pentru un sunet grozav
⚫Acul ceramic de inalta calitate, produce sunet
detaliat
⚫Pick-up cu mecanism de actionare pe curea
⚫Adaptor DC, cu incarcator de 45 RPM inclus
⚫Brat cu functie AUTO-STOP
⚫RCA audio out
⚫Redare discuri de 7", 10" & 12"
⚫Bluetooth 5.0
⚫Cititor card SD & stick USB
⚫Inregistrare disc vinil pe card SD sau stick USB
10

DESCRIERE
1. Adaptor 45-rpm
2. Clapeta ridicare brat
3. Selectare viteză – Trei viteze disponibile:
33 1/3, 45, 78 RPM
4. Auto stop control
5. Încuietoare pentru braț
6. Brat
7. Doza cu ac
8. Platan pick-up
9. Difuzor
10. Indicator luminos activare BT (Power light)
11. Comutator de alimentare/Control volum
12. Canal D
13. Canal S
14. Mufă de alimentare DC
15. Piesa anterioară
16. Buton Pauză/Redare/DEL
17. Piesa următoare
18. Mod: REC/Bluetooth /selectare
BT/USB/buton selectare SD
19. Conector USB
20. Conector card SD
11

MONTAREA CARCASEI ANTI PRAF
Vezi diagrama de mai jos pentru a atasa
carcasa anti praf.
Aveti grija sa nu apasati prea tare
carcasa, atunci cand o montati. Scoateti
carcasa in acelasi mod, dar ridicati
carcasa in sus.
SETARE INITIALA
CONEXIUNI PRINCIPALE
Sursa principala de curent a locuintei trebuie sa corespunda cu voltajul de operare al aparatului.
Aparatul poate fi conectat la sursa principala de curent, prin incarcator DC de 5V.
CONECTAREA LA UN SISTEM EXTERN DE SUNET
Daca doriti sa conectati pick-up-ul la un amplificator extern, urmati pasii de mai jos.
12

⚫Conectati un cablu audio RCA (nu este furnizat) la mufele de iesire AUDIO de pe spatele pick-up-
ului.
Nota: Potriviti cu grija cablurile ROSU/ALB la mufele ROSU/ALB corespunzatoare.
⚫Conectati celalat capat al cablului la INTRAREA AUDIO a amplificatorului (verificati manualul de
instructiuni al amplificatorului, daca aveti incertitudini).
⚫Butonul de control al volumului de pe pick-up nu va avea niciun efect cand aparatul este
conectat in acest fel. Toate butoanele de volum trebuie operate de la amplificator.
Nota: Dati volumul pick-up-ului la minim, pentru a nu interfera cu sistemul extern de sunet.
REDAREA UNUI DISC
Înainte de utilizare, asigurați firul de siguranță (repaus/blocare braț) și protecția cartușului.
⚫Asezati un disc pe platanul pick-up-ului.
⚫Selectati viteza necesara, folosind butonul de selectare a vitezei.
⚫Ridicati bratul (5) folosind parghia de ridicare a bratului. Cand miscati bratul inspre disc, platanul
incepe sa se invarta. Lasati acul usor in jos, pe marginea exterioara a discului, folosind parghia de
ridicare a bratului.
⚫Rotiti butonul de PORNIRE/OPRIRE/Control volum, pentru a mari sau a micsora nivelul volumului.
⚫Cand un disc se termina, pick-up-ul se va opri automat daca butonul de oprire automata este in
pozitia “ON”. Daca butonul este in pozitia “OFF”, atunci platanul se va roti in continuu.
⚫Ridicati bratul si asezati-l in furca la sfarsitul redarii discului.
⚫Puneti capacul de protectie al acului si blocati bratul.
⚫Opriti alimentarea de la sursa principala de alimentare.
INREGISTRARE PE STICK USB SI CITITOR CARD SD
(Ridicați brațul și lăsați-l în repaus.)
ASCULTAREA MUZICII:
⚫Daca doriti sa redati sau sa puneti pe pauza muzica de pe cardul SD sau stickul USB, rotiti butonul
de alimentare & control volum, in sensul acelor de ceasornic, pentru a porni aparatul; muzica se
va reda automat.
⚫Puteti reda sau pune pe pauza muzica, prin apasarea butonului redare-pauza/del.
⚫Daca doriti sa redati melodia urmatoare sau anterioara de pe cardul SD sau stick-ul USB, apasati
butonul pentru melodia urmatoare sau anterioara.
⚫Daca aveti instalat un card SD sau stick USB, se va reda ultimul instalat. Puteti selecta sursa dorita
prin apasarea butonului MODE/REC (SD => USB). Butonul “mode”va selecta doar sursele
active/instalate. Sunt acceptate doar fisiere in format MP3.
Nota: bratul trebuie sa fie in pozitia de repaus.
INREGISTRAREA MUZICII:
Puteti converti discurile de vinil in fisiere MP3 digitale prin introducerea unui card SD/MMC in cititorul
de card SD/MMC sau stickul USB in portul USB.
⚫Redati muzica pe vinil, conform descrierii din “ascultarea unui disc”.
⚫Apasati si tineti apasat butonul MODE/REC timp de 2 secunde.
⚫Veti auzi un “beep” scurt, care indica faptul ca inregistrarea a inceput.
⚫Cand inregistrarea se incheie, apasati “MODE/REC” timp de 2 secunde, pentru a opri
inregistrarea.
⚫Veti auzi doua “beep-uri” scurte, indicand faptul ca inregistrarea s-a oprit.
⚫Melodiile inregistrate vor fi salvate in fisierul “RECORD0”, ca fisier MP3, de 128 kbps.
⚫Numele fisierelor inregistrate vor fi “REC001L, REC002L, etc”.
⚫Puteti doar schimba fisierele intre fisierul “RECORD0” si cardul SD si/sau stick-ul USB, prin
apasarea butonului MODE/REC (SD/MMC=> SD/MMC record0 => USB => USB record0 =>
SD/MMC).
13

STERGEREA MELODIILOR INREGISTRARE:
Daca doriti sa stergeti melodia redata de pe stick-ul USB sau de pe cardul SD, apasati si tineti apasat
butonul redare-pauza/del, timp de 2 secunde. Veti auzi 2 “beep-uri” scurte, care confirma ca melodia
a fost stearsa.
Funcția Bluetooth
(Ridicați brațul și lăsați-l în repaus.)
●Apăsați butonul “MODE/REC” pentru a selecta modul Bluetooth.
●Deschideți setările Bluetooth și căutați „ATT-11BTN” pentru a vă conecta.
●Realizarea conexiunii va fi semnalată prin emiterea unui sunet.
Când această funcție este activă, funcția de platan este oprită automat.
FUNCTIE IESIRE Bluetooth (OUT)
⚫Rotiți butonul de control ON / OFF și faceți clic de trei ori pe butonul Mode, indicatorul Bluetooth
va clipi rapid în albastru.
⚫Asezati un disc pe platanul pick-up-ului sau introduceti un card SD/MMC in cititorul de card
SD/MMC sau stick-ul de memorie USB in portul USB.
⚫Activati functia Bluetooth de pe boxa sau de pe casti si asigurati-va ca dispozitivele sunt pe
modul de cautare.
succes.
⚫Acum puteti asculta muzica de pe boxa sau castile cu Bluetooth.
14
⚫Asteptati 10-15 secunde, iar indicatorul Bluetooth va fi albastru, indicand conexiunea realizata cu

INTRETINERE
INLOCUIREA ACULUI
-Vezi imaginile 1-8
Impingeti dispozitivul
de blocare pentru a
elibera bratul.
Scoateti capacul dozei
si expuneti acul.
Separati usor doza de
locasul de conectare.
Indepartati complet
cablul audio de la
doza.
Pentru a fixa un ac nou, repetati miscarile in sens invers, introduceti corespunzator cablurile audio si
conectati usor doza la locasul de conectare.
Nota: Va rugam sa efectuati aceste operatii cu multa grija, pentru a evita deteriorarea bratului si a
cablurilor audio.
INSTALAREA UNUI AC NOU
-Vezi imaginile 5 & 6
NOTE
Va sfatuim sa curatati discurile cu o carpa antistatica, pentru a va bucura la maxim de ele si pentru a le
mari durata de viata.
Dorim, de asemenea, sa mentionam, ca, din acelasi motiv, acul trebuie inlocuit periodic (aproximativ la
fiecare 250 ore).
Stergeti de praf din cand in cand acul, folosind o perie foarte moale, inmuiata in alcool (periati din spate
inspre fata dozei).
CAND TRANSPORTATI PRODUSUL, NU UITATI SA:
⚫Puneti capacul de protectie pentru ac.
⚫Blocati bratul de ton cu ajutorul dispozitivului de blocare.
15

DATE TEHNICE
Tensiune nominala: DC 5V, 1A
Putere acustica: 2 x 0.8W
Consum de putere: 5W
Port card memorie: 32GB
Versiune compatibila Bluetooth: 5.0
Putere canal Bluetooth: 2 dbm
Frecventa Bluetooth : 2.400 – 2.483 GHz
Distanta la care Bluetooth-ul sta conectat: 10m
Accesorii incluse: incarcator, manualul utilizatorului
Incarcator: INTRARE: AC 100-240 ~50/60Hz 0.15A
IESIRE: DC 5V 1A
Frecventa: 2,4 GHz
DEZAFECTAREA ECHIPAMENTELOR ELECTRICE ŞI ELECTRONICE UZATE
Acest simbol prezent pe produs sau pe ambalaj semnifică faptul că produsul
respectiv nu trebuie tratat ca un deşeu menajer obişnuit. Nu aruncaţi aparatul
la gunoiul menajer la sfârşitul duratei de funcţionare, ci duceţi-l la un centru de
colectare autorizat pentru reciclare. În acest fel veţi ajuta la protejarea mediului
înconjurător şi veţi putea împiedica eventualele consecinţe negative pe care le-
ar avea asupra mediului înconjurător şi veţi putea împiedica eventualele
consecinţe negative pe care le-ar avea asupra mediului şi sănătăţii umane.
Pentru a afla adresa celui mai apropiat centru de colectare:
-Contactaţi autorităţile locale;
-Accesaţi pagina de internet: www.mmediu.ro;
-Solicitaţi informaţii suplimentare de la magazinul de unde aţi achiziţionat
produsul.
Producator:
SC Intervision Trading RO SRL
Pitesti, Bd. I.C. Bratianu, nr. 48-52, corp A, et. 5, cam 504-505, Jud. Arges, Romania,
cod postal: 110121
www.akai.com.ro
16

Πικάπ με ενσωματωμένα ηχεία
ATT-11BT
Οδηγίες χρήσεως
GR – ΕΛΛΗΝΙΚA
17

ΣΗΜΑΝΤΙΚΕΣ ΟΔΗΓΙΕΣ ΑΣΦΑΛΕΙΑΣ
Διαβάστε αυτές τις οδηγίες ασφαλείας πριν χρησιμοποιήσετε τη συσκευή σας και αποθηκεύστε τις
για πιθανή μελλοντική αναφορά.
⚫Η συσκευή δεν προορίζεται για χρήση από άτομα (συμπεριλαμβανομένων παιδιών) με μειωμένη
φυσική, αισθητηριακή ή νοητική ικανότητα. Τα άτομα που δεν έχουν διαβάσει το εγχειρίδιο, εκτός
εάν έχουν λάβει εξηγήσεις από ένα άτομο υπεύθυνο για την ασφάλεια και την εποπτεία τους, δεν
πρέπει να χρησιμοποιούν αυτή τη μονάδα.
⚫Τα παιδιά πρέπει να παρακολουθούνται για να βεβαιωθείτε ότι δεν παίζουν με τη συσκευή.
⚫Η συσκευή πρέπει να είναι πάντα εύκολα προσβάσιμη.
⚫Η συσκευή δεν πρέπει να εκτίθεται σε νερό που στάζει ή εκτοξεύεται.
⚫Στη συσκευή δεν πρέπει να τοποθετούνται αντικείμενα γεμάτα με υγρά όπως βάζα.
⚫Αφήνετε πάντοτε μια ελάχιστη απόσταση 10 cm γύρω από τη μονάδα για να εξασφαλίσετε
επαρκή αερισμό.
⚫Οι ανοικτές πηγές φλόγας, όπως τα κεριά, δεν πρέπει να τοποθετούνται στην κορυφή
τηςαερισμό.
⚫Η συσκευή προορίζεται για χρήση μόνο σε εύκρατο κλίμα.
⚫Σε πλήρη ένταση, η παρατεταμένη ακρόαση στη φορητή συσκευή ήχου μπορεί να προκαλέσει
υσκευής. βλάβηστην ακοή του χρήστη και να προκαλέσει προβλήματα ακοής (προσωρινή ή
μόνιμη κώφωση, ακοή, εμβοές, υπεκφυγές). Συνεπώς, συνιστούμε να μην ακούτε τη φορητή
συσκευή ήχου με υψηλή ένταση ήχου και όχι περισσότερο από μία ώρα την ημέρα σε μεσαία
ένταση ήχου.
ΑΠΕΝΕΡΓΟΠΟΙΗΣΤΕ ΣΕ ΠΕΡΙΟΡΙΣΜΕΝΕΣ ΠΕΡΙΟΧΕΣ
Απενεργοποιήστε την κινητή συσκευή όπου δεν επιτρέπεται η χρήση κινητών συσκευών ή όπου
υπάρχει κίνδυνος παρεμβολών ή κινδύνου, π.χ. σε αεροσκάφος, κοντά σε ιατρικό εξοπλισμό,
‘ΠΑΡΕΜΒΑΣΗ
Όλες οι ασύρματες συσκευές είναι επιρρεπείς σε παρεμβολές οι οποίες ενδέχεται να επηρεάσουν
την απόδοσή τους.
ΕΞΟΥΣΙΟΔΟΤΗΜΕΝΟ ΠΡΟΣΩΠΙΚΟ
Μόνο εξειδικευμένα άτομα έχουν εξουσιοδότηση να εγκαταστήσουν ή να επιδιορθώσουν το προϊόν
ΑΞΕΣΟΥΑΡ
Χρησιμοποιείτε μόνο φορτιστές και άλλα εξαρτήματα που είναι συμβατά με αυτόν τον εξοπλισμό.
ΦΥΛΑΞΤΕ ΤΟ ΣΥΣΚΕΥΗ ΣΕ ΣΤΕΓΝΟ ΜΕΡΟΣ
Αυτός ο εξοπλισμός δεν είναι αδιάβροχος. Κρατήστε το στεγνό.
ΠΑΙΔΙΑ
Κρατήστε τη συσκευή σας σε ασφαλές μέρος, μακριά από μικρά παιδιά. Η συσκευή περιέχει μικρά
ΛΕΙΤΟΥΡΓΙΕΣ
⚫3 ταχύτητες (33 1/3, 45 και 78 σ.α.λ.)
⚫Ενσωματωμένα στερεοφωνικά ηχεία για εξαιρετικό ήχο
⚫Η κεραμική κασέτα υψηλής ποιότητας παράγει λεπτομερή ήχο
⚫Μηχανισμός περιστρεφόμενου δίσκου με ιμάντα
⚫Προσαρμογέας τροφοδοσίας DC, συμπεριλαμβανόμενος ο προσαρμογέας 45 RPM
⚫Βραχίονας τόνου AUTO-STOP
⚫Έξοδος ήχου RCA
⚫Αναπαραγωγή αρχείων 7 ", 10" & 12 "
⚫Bluetooth 5.0
⚫Αναγνώστης κάρτας SD & USB flash driver
⚫Αντιγράψτε βινύλιο σε κάρτα SD ή USB Drive
18

ΠΕΡΙΓΡΑΦΗ
1. Προσαρμογέας 45 rpm
2. Σηκώστε τον βραχίονα
3. Επιλογή ταχύτητας – 3 διαθέσιμες
ταχύτητες: 33 1/3, 45, 78 RPM
4. έλεγχος αυτόματης διακοπής
5. θέση ανάπαυσης βραχίωνα
6. Βραχίονας
7. Φυσίγγιο
8. Πλάκα πικάπ
9. Ηχείο
10. Φωτεινή ένδειξη ενεργοποίησης ΒΤ
(φως ενεργοποίησης)
11. Διακόπτης ισχύος / Έλεγχος έντασης
12. Κανάλι R (ΔΕΞΙΑ)
13. Κανάλι L (ΑΡΙΣΤΕΡΑ)
14. Υποδοχή τροφοδοσίας
15. Προηγούμενη μουσική
16. Πλήκτρο
Παύσης/Αναπαραγωγής/Διαγραφή
17. Επόμενη μουσική
18. Κατάσταση: ΕΓΓΡΑΦΑ/ Ενεργοποίηση
BLUETOOTH/Πλήκτρο ΒΤ/USB/SD
19. USB σύνδεση
20. SD card σύνδεση
19

ΤΟΠΟΘΕΤΗΣΗ ΓΙΑ ΤΟ ΚΑΠΑΚΙ ΠΡΟΣΤΑΣΙΑΣ ΑΠΟ ΣΚΟΝΗ
Δείτε το διάγραμμα παρακάτω για να
τοποθετήσετε το καπάκι προφύλαξης από τη
σκόνη.
Μην πιέσετε πολύ κατά την τοποθέτηση.
Βγάλετε το καπάκι κατά τον ίδιο τρόπο αλλά
τραβώντας προς τα επάνω.
ΑΡΧΙΚΗ ΕΓΚΑΤΑΣΤΑΣΗ
ΣΥΝΔΕΣΗ ΤΡΟΦΟΔΟΣΙΑΣ
Βεβαιωθείτε ότι η τάση του δικτύου του σπιτιού σας αντιστοιχεί με την τάση λειτουργίας της μονάδας.
Η συσκευή σας είναι έτοιμη να συνδεθεί σε μια τάση δικτύου ενός 5V DC μετασχηματιστή.
ΣΥΝΔΕΣΗ ΜΕ ΕΞΩΤΕΡΙΚΟ ΣΥΣΤΗΜΑ ΗΧΟΥ
Εάν επιθυμείτε να συνδέσετε το πικάπ σε έναν εξωτερικό ενισχυτή ακολουθήστε τα παρακάτω βήματα.
20
Table of contents
Languages:
Other Akai Turntable manuals