9
5. Place the sling over the patient’s back and head
with the inside of the sling against the patient. The
sling label is located on the outside.
6. Make sure that the centre of the sling is aligned
with the patient’s spine and coccyx.
7. Tuck in the end of the sling at the coccyx or against
the seat. If needed, use an Arjo sliding sheet/
tube for placing the sling under the patient. See
respective Sliding sheet/tube IFU
8. Lean the patient back.
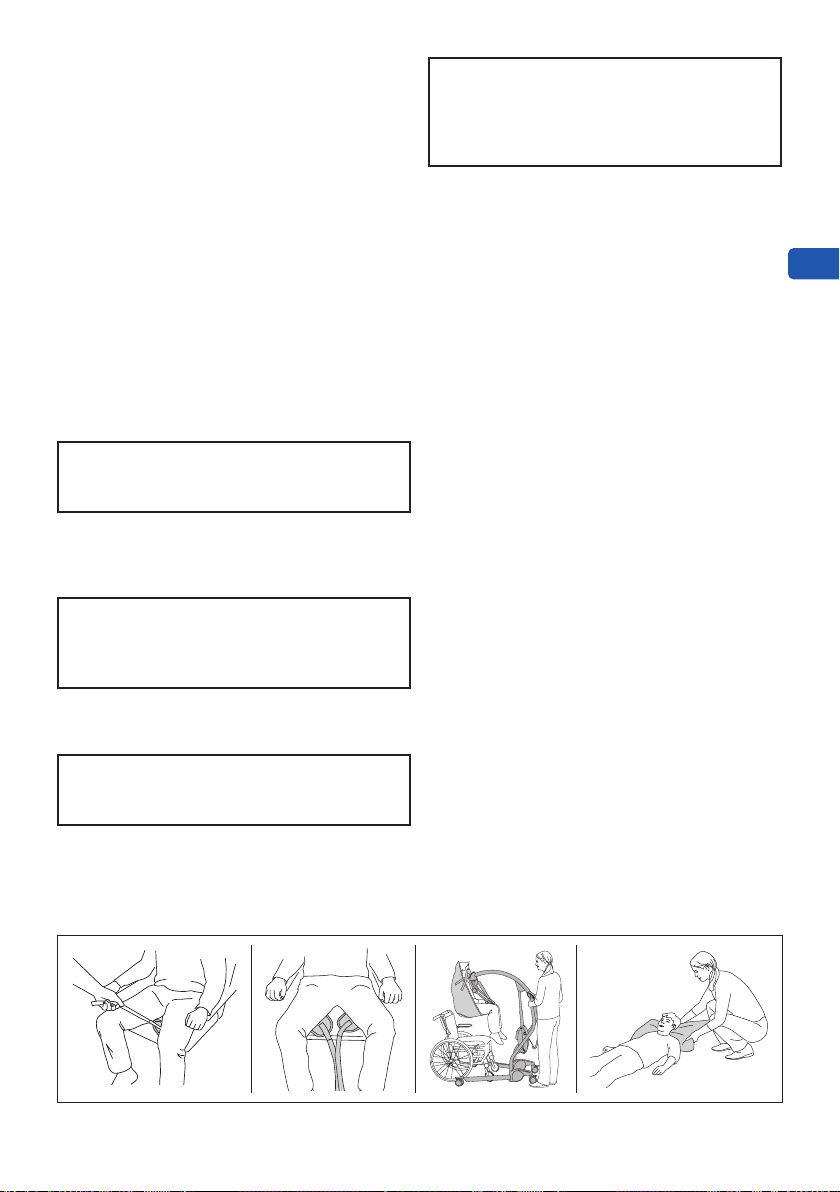
9. Place the leg aps underneath the patient’s legs.
(See Fig. 9)
10. Make sure that the: (See Fig. 10)
• sling is centred and at without creases,
• sling’s head support covers the neck/head area,
• sling pieces are not twisted underneath the
patient
• all buckles are safely closed, if any
• patient’s arms are inside the sling.
WARNING
To avoid injury, make sure the patient’s
arms are placed inside of the sling.
11. Make sure the spreader bar is in a seated position
and place the lift in front of the patient with the lift
legs wide open.
12. Apply the brakes on the lift.
WARNING
To avoid injury to the patient, pay close
attention when lowering or adjusting the
spreader bar.
13. Attach the sling. If possible adjust the bed or
spreader bar to a seated position (for easier
attachment).
WARNING
Make sure straps are not caught by
wheelchair or lift castors.
14. Slightly lift the patient to create tension in the
sling. (See Fig. 11)
WARNING
To avoid the patient from falling, make sure
that the sling attachments are attached
securely before and during the lifting
process.
15. Make sure that all clips are attached securely and
the patient lays comfortably in the sling. . If an
adjustment is needed, lower the patient and make
sure that the weight of the patient is taken up by
the receiving surface before removing the clip.
(See Fig. 4)
16. Release the brakes on the lift.
17. Transfer/transport the patient according to the lift
IFU.
On Floor (31 steps)
1. Make a clinical assessment of the patient. Do not
use the sling if the patient has a head, neck, spine
or hip injury. Use a scoop stretcher instead. See the
Scoop Stretcher IFU.
2. Place a pillow under the patient’s head.
(See Fig. 12)
3. Make sure the patient is in an area that is accessible
for the lift. If needed, move the patient by using
an Arjo sliding sheet/tube. See respective Sliding
sheet/tube IFU.
4. Check that the stieners are completely inside the
stiener pockets, if any.
5. If the patient is able to sit up, continue to
next step. If not able to sit up, proceed to
step 9.
6. Patient able to sit up: Stand behind the patient
and help him/her to a seated position.
7. Place the sling over the patient’s back and head
with the inside of the sling against the patient. The
sling label is located on the outside.
8. Make sure that the centre of the sling is aligned
with the patient’s spine, starting at the coccyx or
against the seat. Continue to step 16.
9. Patient not able to sit up: Fold the sling
lengthwise along the centre of the sling, outside
facing outside. The sling label is located on the
outside.
Continue with the steps on the next page.
Fig. 9 Fig. 10 Fig. 11 Fig. 12
ENEN