AVer M70W User manual

M70W
Instruction Manual


Content
Package Contents................................................................................................... 1
Optional Accessories .............................................................................................. 1
Overview ................................................................................................................. 2
Compound Key ....................................................................................................... 2
Remote Controller................................................................................................... 3
LED Indicator .......................................................................................................... 4
Device Connection.................................................................................................. 5
Power Connection and Charging ................................................................... 5
USB Connection............................................................................................. 6
HDMI Connection........................................................................................... 7
P2P connection via Wi-Fi Dongle ........................................................................... 7
Wi-Fi Connection .................................................................................................. 10
Miracast Connection ............................................................................................. 11
Using the Camera................................................................................................. 13
Object Position ............................................................................................. 13
Shooting Area............................................................................................... 13
Storage the Camera ..................................................................................... 14
Mounting the Camera on a Flat Surface ...................................................... 14
Specification.......................................................................................................... 15


1
Package Contents
The items below are included with this product. If any item is missing, contact the dealer from whom
you purchased this product.
M70W unit Remote controller Power Adaptor
Power cord* USB Cable
AAA Batteries Quick Guide Wi-Fi Dongle
*The power cord will vary depending on the standard power outlet of the country where it is sold.
Optional Accessories
Carrying Bag
Anti-glare Sheet
Microscope Adapter
( 28mm and 34mm Rubber Coupler are included)

2
Overview
1
3
2
45
78
9
6
14 15
1. Camera head 2. LED lighting
3. Arm 4. IR sensor
5. Control panel 6. Handle
7. Built-in MIC 8. Battery Indicator
9. USB mini port 10.USB port
11.Wi-Fi dongle 12.Anti-theft Slot
13.HDMI Input 14.HDMI Output
15.DC power jack
Compound Key
Press keys to operate the compound key function.
:Back to factory default settings.
: Press to switch between following modes:
- Auto detects the best resolution(4K, 720P, 1080P)
- 1024x768 (If HDMI device support)
- 4K 60Hz (If HDMI device support)
:Press to switch between following modes:
Norma, Motion, High quality, Microscope, Infinity, Marco

3
Remote Control
1
2
3
4
5
6
7
8
9
10
12
11
14
16
17
21
22
19
20
13
15
18
1
9
21
8,19
2
16
4
12
6
23
21
7
9
15
3
Name Function
(1) POWER Turn the unit on/off/standby*.
*Standby mode is supported when
power plugged in.
(2) WiFi/USB Switch between WiFi and USB mode.
(3) CAPTURE Capture still image in Camera mode.
In continuous capture mode, press
this button again to stop.
(4) FREEZE Freeze live images.
(5) ROTATE Rotate the image by 0/180° in
Camera mode.
(6) INFO/ Press to view system information and
battery power status.
(7) ▲,▼,◄, & ►Pan and zoom-in image in live
streaming.
-
(8) AUTO FOC Adjust the focus automatically.
(9) ZOOM +/- Increase/decrease the image
magnification in camera mode.
(10) ZOOM 1X Reset zoom level to 100%.
(11) MUTE Set the volume to mute.
(12) CAMERA / PC Switch the video signal between
camera and computer from the HDMI
Input port
(13) RECORD Start/Stop audio & video recording.
Video recording can only be saved in
a USB flash drive.
(14) RESOULTION Press to switch between following
modes:
- Auto detects the best
resolution(4K, 720P, 1080P)
- 1024x768 (If HDMI device support)
- 4K 60Hz (If HDMI device support)
(15) AE LOCK Lock the exposure to stop M70W
attempting to find optimal exposure.
(16) LAMP Turn the overhead light on/off.
(17) DEL Delete the selected picture/video in
Playback mode.
(18) MODE Press to switch between Normal, High frame, and High quality,
Microscope, Infinity, or Marco mode.
(19) Make a selection.
(20) VOLUME +/- Adjust the volume.
(21) BRIGHTNESS +/- Adjust the brightness.
(22) RESET +/- Reset to factory default setting.
(23) WiFi indicator WiFi status indicator: Please refer to LED Indicator section.
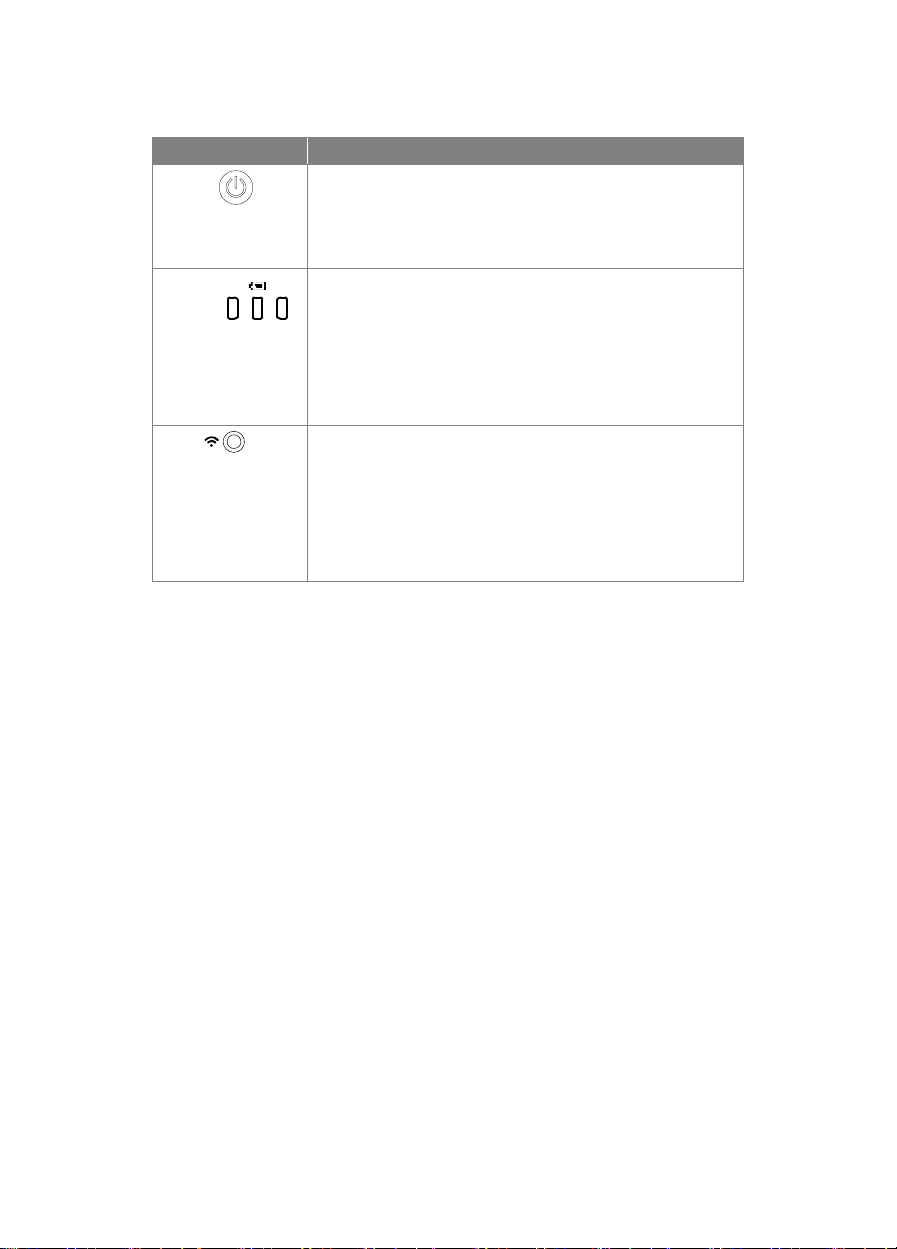
4
LED Indicator
Name Status indicator
Power Solid green: Power on
No light: Power off
Solid red: Standby mode*
*Standby mode is supported when power plugged in.
Battery Solid green(x3): Battery is full(100% ~ 60%)
Solid green(x2): Battery is 60% ~ 30%
Solid green(x1): Battery is 30% ~ 5%
Solid red (x1): Battery is 5% ~ 0%
Flashing red (x1): Battery is out of power
Solid orange(x3): Battery is abnormal
WiFi Solid blue: AP Mode Ready / STA connected
Slow flashing blue: Software connection with camera
Short flashing blue: Create AP mode / STA connecting
Solid green: Miracast mode ready
Slow flashing green: Miracast streaming start
Quick flashing green: Miracast device scan / connecting
[Note]
The battery will be exhausted for long-term usage. Do not replace the battery by yourself. Please
contact your dealer.

5
Device Connection
Power Connection and Charging
Plug in power adapter and turn on M70W.
[Note]
Please full charge the camera for the first time use.
When the camera is power on, the camera is in “Standby” mode. In standby mode, it can
be charging with the USB connection between other devices; but the power supply is
required 5V2A and the charging time will be longer.
The laptop, projector, or monitor cannot provide the power through the USB connection to
the camera while the camera is operating.
When the camera is charging with the wall outlet, the battery indicator is in green flashing.
Press + to reboot when the camera doesn't work properly.
1

6
USB Connection
1
2 Connect USB pen drive to USB port to save the recording file.
PC
1 Press Wi-Fi button to disable Wi-Fi mode.
Connect M70W to laptop/PC with USB port.
PC
Other manuals for M70W
2
Table of contents
Other AVer Document Camera manuals

AVer
AVer AVerVision U70+ User manual

AVer
AVer M15-13M User manual

AVer
AVer AVerVision M70 User manual

AVer
AVer AVerVision VP-1HD User manual

AVer
AVer AVerVision F70W User manual

AVer
AVer M70W User manual

AVer
AVer M11-8M User manual

AVer
AVer AVerVision M70 User manual

AVer
AVer M15-13M User manual

AVer
AVer Vision F50+ User manual

AVer
AVer AVerVision M50 User manual

AVer
AVer AVerVision M50 User manual

AVer
AVer M5 User manual

AVer
AVer W30 User manual

AVer
AVer AVerVision F50HD User manual

AVer
AVer M70Wv2 User manual

AVer
AVer M5 User manual

AVer
AVer TabCam User manual

AVer
AVer AVerVision U70i User manual

AVer
AVer AVerVision U70+ User manual


