manuals.online logo
Brands
  1. Home
  2. •
  3. Brands
  4. •
  5. B.E.G.
  6. •
  7. Security Sensor
  8. •
  9. B.E.G. LUXOMAT LC-Mini 120 Owner's manual

B.E.G. LUXOMAT LC-Mini 120 Owner's manual

LUXOMAT®LC-Mini 120 / 180
GB
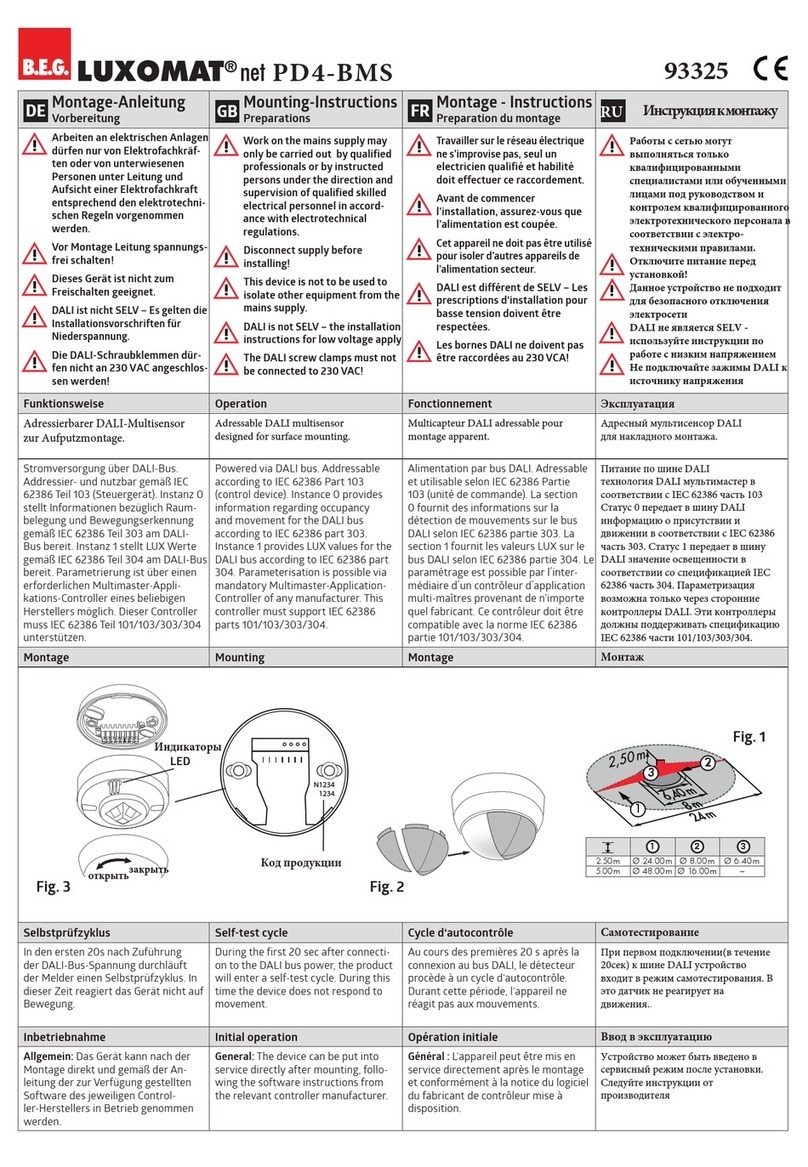
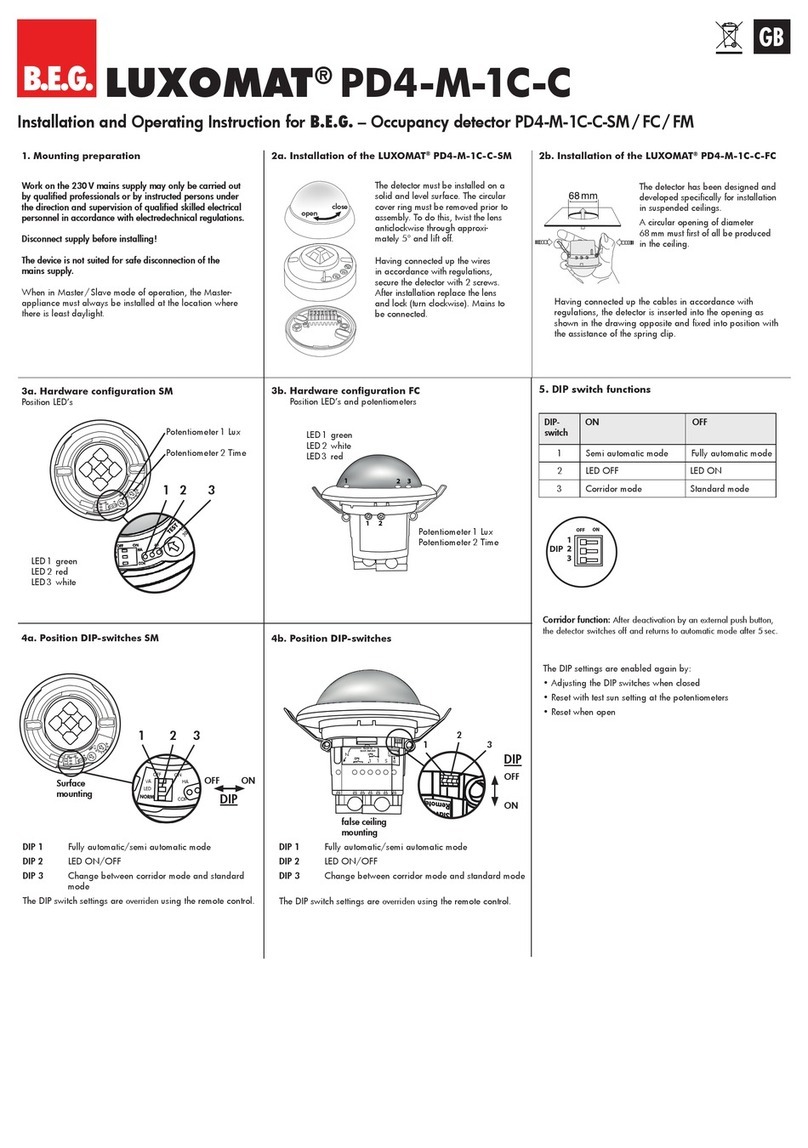
Installation and Operation Instruction motion detector
B.E.G. – LUXOMAT®LC-Mini 120 and LC-Mini 180
1. Mounting preparations
1) Caution: have all work involving the
230V mains supply carried out by a
qualified electrician! Before starting
disconnect the mains! Please be aware,
that the LUXOMAT®LC-Mini 120/180 is
not suitable as an intrusion detector, since
it is not equipped with a tamper contact.
2) Socket base corner mounting
Important: The LUXOMAT®LC-Mini
120/180 has to be mounted in such a way,
that the adjusting elements / rotary regulators
are always pointed downward.
1
2. Mounting types
1) Wall mounting
1
4.
Inserting of the connection cable
1) Connection cable from top down
2) Terminal markings
8. Putting into operation / Settings
Follow-up time
4 sec. ...10 min.
Lux value
Night operation...Dusk...Day operation
(Day operation: light sensor inactive, switching at
any brightness value)
Self test cycle
After mounting and connecting the 230 VAC supply
voltage, the LC-Mini 120 / 180 goes through a self
testing unit of 60 seconds. Then the unit is ready for
operation and the settings can be made manually
or with remote control.
3. Plug-in socket
Mount the plug-in socket with two screws and
the enclosed seal rings on a firm base.
(Pay attention to inserting of the connection
cable, see point 4)
5. Connection
By swinging the sensor head horizontally
(ca. ±45°) and vertically (ca. ±15°) the
detection area can be changed.
2
6. Sensor head optics
7.
Exclude sources of interference
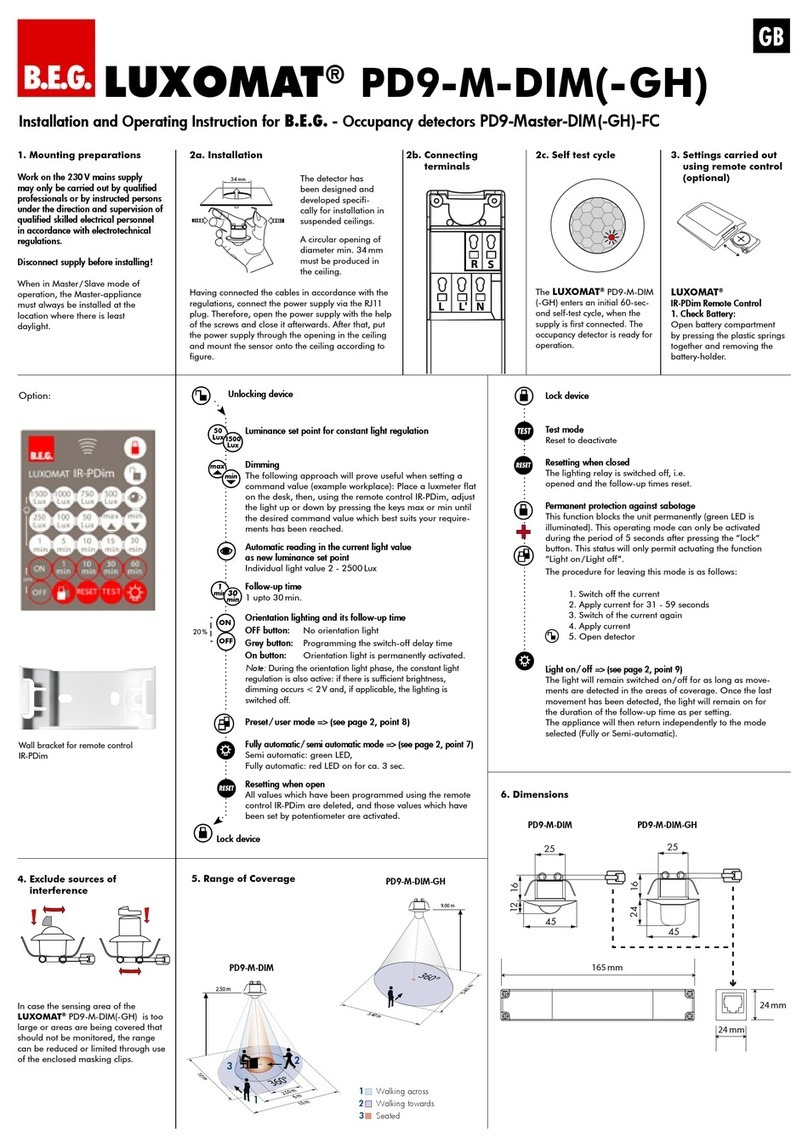
9. Range of Coverage
walking towards
walking across
1
2
walking towards
walking across
1
2
1) If possible mount unit on a safe place
(wall or ceiling mount)
10. Mounting place
12
2) Influence of weather reduces the lifetime of
the unit. Please take care to mount correctly.
3
> 1m
4
3) Minimum distance to switched lighting,
frontally or laterally to device: 1m
4) Never mount the connected lights below the
motion detector!
If necessary, the lens segment(s) corresponds to
unwanted detection zones may be masked with
WKHHQFORVHGFRYHUVWRUHGXFHWKHÀHOGRIYLVLRQ
L
N
L’
LNL’
Cover
LNL’
4
sec
20
50 1.2
10
min
6
1000
40 10
2Lux
130
1000
40 10
2Lux
130
4
sec
20
50 1.2
10
min
6
2
1
2
1
1) Connecting cable from top down
and behind
2) Terminal markings
Typ Colour Part nr.
LC-Mini 120 white 91051
LC-Mini 120 black 91071
LC-Mini 180 white 91052
LC-Mini 180 black 91072
Accessory:
RC-Suppressor 10880
15.
Article / Part nr. / Accessory
14. Technical data
Power supply
:230 V~ ±10 %
Detection area
: LC-Mini 120
120°
LC-Mini 180
180°
Range of coverage in m:
max. 10 m when walki
n
g across (tangential
)
Degree of protection/class:
IP 44 / II /
Dimension:
L 80 x B 55 x H 70 mm
Ambiente temperature: -25°C to +50°C
Package:
Housing UV- and
shock-resistant Polycarbonate
Chanel 1 for light control
Contact load:
1000 W, cosƙ=1,
μ-Contact
Time-settings:
4 s - 10 min.
Brightness value: 2 - 1000 Lux
Declaration of Conformity:
The product complies with the low voltage
recommendation 2006/95/EC/ and the EMV
recommendation 2004/108/EC.
12. Dimensions (mm)
MAN 6936 – 010611-1
11. Wiring diagrams
N
L
N L L‘
C1
E1
L
N
E1 S1
RC
N L L‘
C1
N
N
L
LL‘
C1
E1T7
L
L L
C1 C1
L‘ L‘
N
N
N
E1
L
L
L
L‘
N
N
N
E1
T1 T2 30 s -
10 min.
43
13.
Trouble Shooting-Practical hints
1. Lamp does not light up
Cause - Action
Lamp is defective
- Replace light bulb.
No mains connection
- Check mains fuse.
Switching threshold of the twilight switch is not
correct
- Accordingly adjust sensitivity of twilight
switch via the setting dial.
Detection area not set correctly
Set detection area correctly.
Unit mounted too high
- Mount at recommended height (2.50m)
PIR detector lens obstructed by dirt or other
objects
- Clean lens or remove objects
2. Delayed lamp activation
Mounted too high
0RXQWDWKHLJKWVWDWHGLQVSHFLÀFDWLRQ
(2.5 m)
Only direct in-line approach of detector is
possible
- Mount detector in such a way that a
sideways approach is also detected.
3. Lamp stays on continuously
Continuous thermal movement within detection
area
- Remove the heat source out of the detection
area.
Check the correct functioning of the detector
in fully covering the lens (lights should go out
after a certain time-delay).
Motion detector is switched parallel to a switch
that enables direct manual switching on
- Mind the correct connection of the switch.
4. Light source remains on for long periods
when no persons are present
3HUPDQHQWLQÁXHQFHIURPKHDWVRXUFHVZLWKLQ
detection area (trees, shrubs when blown by
the wind, presence of animals like cats and
dogs in the detection area)
- Reduce detection area of the detector in
turning the detector head downward or
cover parts using the enclosed covers.
Direct sunlight radiation into detector lens
- Shelter lens from direct sunlight.
Detector mounted above extractor fan
- Change mounting place of the detector.
5. Limitation of range (not up to the minimum
VSHFLÀFDWLRQ
Mounting height is not optimal
- Accordingly change mounting height
(2.50 m).Persons only move directly towards
the detector
- Mount detector in such a way that a
sideways approach is also detected.
Steep terrains
- Adjust spherical head accordingly.
6. No reaction to vehicles
Vehicle not warmed up
Vehicle is well insulated (by silencing equip-
ment)
Standard mode with 1-channel motion detector
Standard mode with 1-channel motion detector with
permanent light function
Standard mode with 1-channel motion
detector with NC pushbutton
Parallel connection with 1-channel motion detectors Standard mode with 1-channel motion detector
(e.g. stairs)
optional:
S1 = switch for permanent light
RC = RC-suppression kit if required
T 1 = NC button
Manual switching addition-
ally possible (press opener
approx. 2 sec.).
The position of the poten-
tiometers should not be
on “test” or “sun”. If so,
the pre-set time and safety
values get lost.
38
7
41
10
7
48
22
58
22
LNL’
This manual suits for next models

1

Other B.E.G. Security Sensor manuals

B.E.G. LUXOMAT PD4-S Series User guide

B.E.G.

B.E.G. LUXOMAT PD4-S Series User guide

B.E.G. KNX RC-plus next 230 KNX Service manual

B.E.G.

B.E.G. KNX RC-plus next 230 KNX Service manual

B.E.G. LUXOMAT PD4-S-GH User guide

B.E.G.

B.E.G. LUXOMAT PD4-S-GH User guide

B.E.G. LUXOMAT LC-Click 140 Owner's manual

B.E.G.

B.E.G. LUXOMAT LC-Click 140 Owner's manual

B.E.G. LUXOMAT PD4-M-GH-SM User guide

B.E.G.

B.E.G. LUXOMAT PD4-M-GH-SM User guide

B.E.G. LUXOMAT PD2-M-DALI/DSI-1C/PD2-S User guide

B.E.G.

B.E.G. LUXOMAT PD2-M-DALI/DSI-1C/PD2-S User guide

B.E.G. LUXOMAT Indoor 180-SC Service manual

B.E.G.

B.E.G. LUXOMAT Indoor 180-SC Service manual

B.E.G. Luxomat PD11-M-1C-FLAT User guide

B.E.G.

B.E.G. Luxomat PD11-M-1C-FLAT User guide

B.E.G. LUXOMAT PICO-N-M-1C-FC User guide

B.E.G.

B.E.G. LUXOMAT PICO-N-M-1C-FC User guide

B.E.G. LUXOMAT Indoor 180-M-2C User guide

B.E.G.

B.E.G. LUXOMAT Indoor 180-M-2C User guide

B.E.G. LUXOMAT PD2N-KNX-ST-UP User manual

B.E.G.

B.E.G. LUXOMAT PD2N-KNX-ST-UP User manual

B.E.G. LUXOMAT LC-Click 140 Owner's manual

B.E.G.

B.E.G. LUXOMAT LC-Click 140 Owner's manual

B.E.G. LUXOMAT PD4-M-DIM-SM User guide

B.E.G.

B.E.G. LUXOMAT PD4-M-DIM-SM User guide

B.E.G. LUXOMAT PD2-M-DALI/DSI-SM/FC User guide

B.E.G.

B.E.G. LUXOMAT PD2-M-DALI/DSI-SM/FC User guide

B.E.G. LUXOMAT PD11-BMS-FLAT User manual

B.E.G.

B.E.G. LUXOMAT PD11-BMS-FLAT User manual

B.E.G. LUXOMAT Indoor 180-R User manual

B.E.G.

B.E.G. LUXOMAT Indoor 180-R User manual

B.E.G. LUXOMAT PD4-S Series User guide

B.E.G.

B.E.G. LUXOMAT PD4-S Series User guide

B.E.G. LUXOMAT PD9-M-DALI/DSI-FC User guide

B.E.G.

B.E.G. LUXOMAT PD9-M-DALI/DSI-FC User guide

B.E.G. LUXOMAT PD2-M-DALI/DSI User guide

B.E.G.

B.E.G. LUXOMAT PD2-M-DALI/DSI User guide

B.E.G. PD4-M-1C-GH-SM User guide

B.E.G.

B.E.G. PD4-M-1C-GH-SM User guide

B.E.G. LUXOMAT net PD2N-KNX-DX User manual

B.E.G.

B.E.G. LUXOMAT net PD2N-KNX-DX User manual

B.E.G. LUXOMAT Indoor 180/R-2W UK Service manual

B.E.G.

B.E.G. LUXOMAT Indoor 180/R-2W UK Service manual

B.E.G. LUXOMAT RC-plus next Series User guide

B.E.G.

B.E.G. LUXOMAT RC-plus next Series User guide

B.E.G. LUXOMAT PD4-M-DIM-Corridor User guide

B.E.G.

B.E.G. LUXOMAT PD4-M-DIM-Corridor User guide

Popular Security Sensor manuals by other brands

Visonic SRN-2000 SERIES installation instructions

Visonic

Visonic SRN-2000 SERIES installation instructions

Velodyne HDL- 64E user manual

Velodyne

Velodyne HDL- 64E user manual

Baumer URDK 10N8914/S35A quick start guide

Baumer

Baumer URDK 10N8914/S35A quick start guide

Omron F3SL instruction manual

Omron

Omron F3SL instruction manual

Leakomatic Pro 1 installation manual

Leakomatic

Leakomatic Pro 1 installation manual

PCB Piezotronics ICP W105C12/003AG030FW Installation and operating manual

PCB Piezotronics

PCB Piezotronics ICP W105C12/003AG030FW Installation and operating manual

VIDICON FLASH PLUS Installation

VIDICON

VIDICON FLASH PLUS Installation

MAXIMUM Security VIP Pro Installation & operating guide

MAXIMUM Security

MAXIMUM Security VIP Pro Installation & operating guide

System Sensor 885-WP Installation and maintenance instructions

System Sensor

System Sensor 885-WP Installation and maintenance instructions

Philio PAR02 quick start guide

Philio

Philio PAR02 quick start guide

Electronics Line EL-4755 manual

Electronics Line

Electronics Line EL-4755 manual

Bohle BO 51 646 12 quick start guide

Bohle

Bohle BO 51 646 12 quick start guide

OPTEX FA V Series instruction manual

OPTEX FA

OPTEX FA V Series instruction manual

Meiji MSD-01 instruction manual

Meiji

Meiji MSD-01 instruction manual

Honeywell 5800PIR-COM installation instructions

Honeywell

Honeywell 5800PIR-COM installation instructions

Simpnic M1 Quick installation guide

Simpnic

Simpnic M1 Quick installation guide

TOOLCRAFT 2331524 operating instructions

TOOLCRAFT

TOOLCRAFT 2331524 operating instructions

Ampac EV3000 154-0258 installation guide

Ampac

Ampac EV3000 154-0258 installation guide

manuals.online logo
manuals.online logoBrands
  • About & Mission
  • Contact us
  • Privacy Policy
  • Terms and Conditions

Copyright 2025 Manuals.Online. All Rights Reserved.