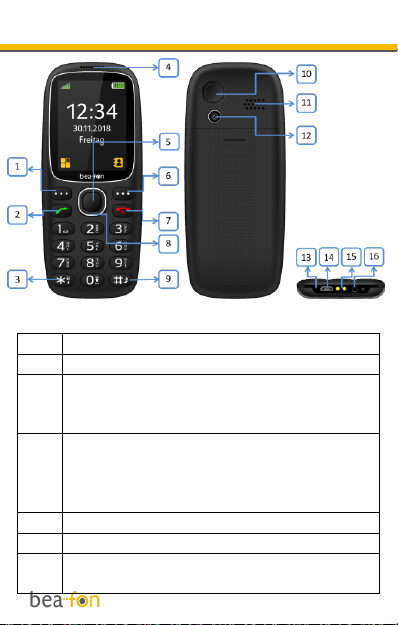
Bea-fon SL360 User manual

User Manual EN
SL360

2
General Information
Congratulations on the purchase of your
Bea-fon SL360!
Please read this information before using
the phone to make a better use of your
phone. We are not responsible for any
damage due to your misunderstanding of
this information and misacting.
We are endeavouring to improve our
products and services. We reserve all the
rights to revise and change the
description of this product and its
software as well as this user’s manual
without obligation to notify any person of
such revisions and changes.
This user manual is for your better use of
this phone not an approval of any
accessories. All the pictures in this
manual are for reference only. There may
be slight difference between the
appearance of phone/ keys/ contents of
display used in this manual and those of
your phone. Please refer to your phone
for actuality. Some features introduced in
this manual are network or subscription-

3
supported features. Please contact your
network operator for further information.
Please check the package contents to
ensure that all components listed below
are included. If the product is defective or
if there is a component missing,
immediately contact the retailer where
you purchased this handset.

4
General Information
Your Bea-fon SL360 box contains:
•1 mobile phone (SL360)
•1 desktop charger (SL360)
•1 travel charger (SL360)
•1 battery (SL360)
•1 USB cable (SL360)
•User manuals (SL360)
If you find the size of the script not easily
readable for you, you can also find this
manual on our website, where you will be
able to adjust the size of the script.
Go to: www.beafon.com/Products
Device Code:
This device code ensures that
unauthorized persons will not be able to
use your phone. The default code is 0000
PIN-Code:
The PIN-code was supplied to you by
your network operator together with your
SIM card and/or adjusted/set up by
yourself.

5
Directory
General Information ............................1
General Information ............................4
Device Code: ...................................4
PIN-Code: .......................................4
Directory............................................5
Your Phone.........................................9
Getting started..................................11
What is a SIM card? .......................11
Insert the SIM card and Micro SD card
..Fehler! Textmarke nicht definiert.
Insert the battery as follows ............13
Charging the battery ......................13
Switching the telephone on or off .....15
Display (Standby mode)..................16
LED describtionFehler! Textmarke
nicht definiert.
Screen icons:.................................16
Menu Operation .............................18
Torch............................................18
Connect an optional headset............19
Make a call ....................................20
Make a call using the phone book.....20
Answering a call.............................21
Operations during a call ..................21
Hands Free....................................22
Menu ...............................................22
Shortcut key functions ....................23

6
Phonebook .......................................24
To access the phonebook ................24
Add new contact: ...........................24
To edit a Phone Book entry: ............25
To delete all entries from the phone or
SIM card .......................................25
To copy all entries from the phone or
SIM card .......................................25
Store a Phonebook entry to a Speed
dial key (2-9) ................................26
Direct Number:Fehler! Textmarke
nicht definiert.
Making calls using the Photo Contacts
...................................................27
Create photo contact ......................27
Messages .........................................29
Inbox: ..........................................30
Drafts:..........................................30
Outbox: ........................................30
Sent messages ..............................31
Message settings............................31
Voicemail server ............................32
Call history .......................................33
Missed Dialled and Received ............33
Delete call logs ..............................33
Organizer .........................................34
Alarm ...........................................34
Tasks............................................34
Calculator......................................35

7
Multimedia .......................................37
Image viewer ................................39
FM-radio .......................................40
File Manager..................................41
Settings ...........................................42
Profiles (Tone settings) ...................42
Silent mode...................................42
SOS settings..................................43
Phone settings ...............................46
Time and date: ..............................46
Language:.....................................46
Pref. Input method:........................ 46
Display: ........................................46
Call settings ..................................47
Caller ID: ......................................47
Call waiting: ..................................47
Call divert: ....................................47
Call barring: ..................................47
Call time reminder: ........................47
Answer Mode:................................ 48
Advanced settings ..........................48
Black list:......................................48
Network settings ............................48
Network selection: .........................49
Set automatic or manual mode ........49
Security settings ............................49
Connectivity: .................................49
Bluetooth:.....................................49
Visibility:.......................................50

8
My device: ....................................50
Search audio device: ......................50
Search audio device descripton:.......50
My Name: .....................................51
Restore factory settings ..................51
Basic Specifications: .......................51
Troubleshooting ................................52
Intended operation/use...................... 56
Phone ...........................................56
Battery .........................................58
Recycling .........................................61
For your safety .................................62
Traffic safety: ................................63
Operating environment:..................63
Electronic equipment:.....................64
Pacemakers: .................................64
Hearing aids?.................................65
Other medical equipment:............... 65
Approved locations:........................66
Potentially explosive atmospheres:...66
Vehicles:.......................................67
Information ......................................68
Certification information (SAR): .......68
Declaration of Conformity:..............69
Limitation of liability:...................... 69
More information............................70
Address ........................................70

9
Your Phone
1
Left menu key/Main menu
2
Green Call key/Call logs
In order to access the call logs in
standby mode
3
* Key
Press this key in standby mode in
order to enter the following
characters: */+/P/W.
4
Speaker
5
OK key
6
Right menu key/in standby mode,
enter the phonebook

10
7
Turn on/off, end a call, decline a call
8
4-way navigation key
Arrow key (downwards)
In standby mode, enter the photo
contacts
Arrow key (upwards): In standby
mode, enter the SMS menu,
Arrow key (left): In standby mode,
enter the calendar.
Arrow key (right): In standby mode,
enter the alarm.
9
# Pound key
Press and hold in standby mode to
activate/deactivate the silent mode.
In write mode; change the input
method.
10
Emergency call button
11
Polyphonic speakers
12
Camera
13
Microphone
14
Micro USB charging port
15
Charger cradle connector
16
Headset jack plug (3.5mm)

11
Getting started
What is a SIM card?
Every mobile phone has a SIM card
(Subscriber Identity Module). This is a
micro-chip that holds your personal
information such as names and phone
numbers. Your phone won’t work without
it. If you already have contacts on your
SIM card, they can be transferred in most
cases.
Keep the SIM card away from children.
The SIM card can easily be damaged or
bent. You should therefore handle the
SIM card with care during installation
and/or removal.
Inserting the SIM cards
1. The telephone must be switched off
and disconnected from the charger.
2. Remove the battery cover on the back
of the phone

12
3. Should the battery be in the device,
please remove it.
4. You see 2 card holders: the upper
right one for the SIM card and the
lower right one for the Micro SD card.
5. Carefully insert the SIM card in the
SIM card slot. Make sure that the
gold-colored contacts on the card are
facing downwards and the tapered
corner is facing left.
Inserting the Micro SD card
1. Slide the holder down to unlock it.
2. Open the holder and gently insert the
Micro SD card into the Micro SD card
holder (2).
3. Close the holder and push it up to lock
in place.

13
Insert the battery as follows
1. Insert the battery by aligning the gold
contacts in the battery compartment
on the phone.
2. Push down on the upper section of the
battery until it 'clicks' into place.
3. Close the battery compartment by
sliding the cover closed until you hear
a ‘click’.
Charging the battery
There are two ways of SL360 battery
charging:
A. Desktop charging
B. Handset charging

14
The lithium battery of the mobile phone
can be immediately used after unpacking.
A new battery, is not fully charged, and
performs best after performing a full
charge/discharge 3 times:
1. Plug the charger into the charger
connector.
2. Plug the other end into an electrical
outlet.
3. The phone may need several hours for
reaching a fully charge.
When your phone is power off, it
might take a few seconds to show
charging display and it shows charge
complete when finished.
When your phone is power on, the
battery icon flickers when it starting
charging and become still with full
bars in battery icon when finished.
4. The battery is fully charged when the
red LED is off. Disconnect the charger
from the phone and the AC outlet.
Note: Charge the battery for at least 12
hours before using the phone for the first
time.

15
Switching the telephone on or off
Make sure that you SIM card is in your
mobile phone and that the battery is
charged.
1. Press the red key to switch the phone
on.
2. If prompted, choose your language
and press OK.
3. If you have entered a PIN-code
before, the phone will ask for the code
now. Enter the PIN-code and confirm
by pressing OK.
4. To turn off your phone, press and hold
the red key for two seconds.
If you don’t insert a SIM card, your phone
shows Insert SIM. None of the functions
related to SIM card can be used. You can
make an emergency call only.
Note: If you enter an incorrect PIN-code
3 times in succession, the phone will
require you to enter the PUK-code. You
have received this PUK-code together
with your SIM card.

16
Display (Standby mode)
1
2
3
4
5
6
7
8
1. Signal status 5. Time
2. Pictograms 6. Date and day
3. Battery status 7. Menu
4. Network operator 8. Names
Screen icons
Signal Strength
The vertical bars show the
network connection strength. SIM
card has signals.
New messages
This icon shows when you receive
a new message.
SIM Card has an unread message
The inbox is full.
This icon flickers when the inbox
is full and you need to delete
messages to receive new
messages.
Earphone
This icon shows when you plug
the earphone in. Voice will be
heard from the earphone.

17
Missed Calls
This icon shows when you are
viewing the missed call. SIM card
has a missed call.
Alert Type
Ring
Silent mode on and Vibration only
Vibrate and ring
Call Divert
This icon shows when you divert
all calls unconditionally. SIM card
has been set up call divert.
Turn alarm on
This icon shows when you turn
alarm on.
Roaming
This icon shows when your phone
is in roaming state. SIM card is
roaming.
Bluetooth
This icon shows when the
Bluetooth is active.
Battery capacity
This icon’s colour changes
according to the status of battery
capacity: , , ,

18
Menu Operation
Menu lists are used for set up and
operation.
The left and right menu keys initially are
Menu ( ) and Phonebook ().
Press Menu ( ) and the display changes
and the soft keys become OK and Back.
Use Up or Down to move up or down
menu lists, and OK or Back for the next
or previous display.
Key
Function
Arrow key up
Message
Arrow key down
Photocontacts
Arrow key left
Calendar
Arrow key right
Alarm
OK key
Main menu
Torch
Press and hold the 0 key of the phone to
switch the built-in torch on/off.

19
Connect an optional headset
You can use a headset (not supplied) with
the 3.5mm Jack type, plugged into the
Headset socket on the bottom of the
handset.
When using headsets, including Beafon
approved ones, pay attention to volume
levels and read its user guide for safety
instructions. Do not connect incompatible
products.
When correctly inserted the headset icon
is shown.
Headset Connector
Plug in headset accessory for headset
use. (3.5mm Jack)

20
Call function
Make a call
1. To make a call, enter the phone
number with the prefix and press the
green key. For international calls,
enter ‘+’ by pressing for 2 sec.
Then enter the country code followed
by the telephone number, in which
the 0 of the prefix must be dropped.
2. If you have entered a wrong number,
press the soft key ‘right’ Clear to
remove the number to the left of the
blinking cursor.
3. Press the green key to call the
number.
4. Press the red key to end the call or to
cancel the call attempt.
Make a call using the phone book
If you have saved a name and number in
the phone book, you can also use the
phonebook to make a call.
In standby mode, press the soft key
‘right’ to go to Phonebook.
1. Scroll with the up and down arrow key
to the name you want to call.
Table of contents
Other Bea-fon Cell Phone manuals

Bea-fon
Bea-fon SL User manual

Bea-fon
Bea-fon Active Line Series User manual

Bea-fon
Bea-fon S50 User manual

Bea-fon
Bea-fon SL250 User manual

Bea-fon
Bea-fon T850 User manual

Bea-fon
Bea-fon S30 User manual

Bea-fon
Bea-fon S200 User manual

Bea-fon
Bea-fon SL630 User manual

Bea-fon
Bea-fon SL140 User manual

Bea-fon
Bea-fon S400 User manual

Bea-fon
Bea-fon CLASSIC LINE C350 User manual

Bea-fon
Bea-fon S700 User manual

Bea-fon
Bea-fon X5 Premium User manual

Bea-fon
Bea-fon C150 User manual

Bea-fon
Bea-fon S20 User manual

Bea-fon
Bea-fon S40 User manual

Bea-fon
Bea-fon SL205 User manual

Bea-fon
Bea-fon SL651A User manual

Bea-fon
Bea-fon CLASSIC C245 User manual

Bea-fon
Bea-fon SL570 User manual