manuals.online logo
Brands
  1. Home
  2. •
  3. Brands
  4. •
  5. Bpt
  6. •
  7. Intercom System
  8. •
  9. Bpt YC/300 User manual

Bpt YC/300 User manual

1
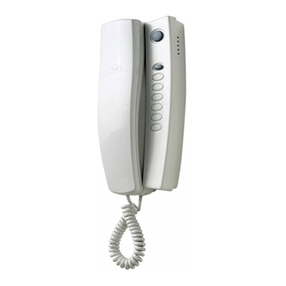
HANDSETYC/300
Receiver compatible with the X2
TECHNOLOGY system and system
300.
It can accommodate the loudspeaker
YAL to make the call note more
powerful.
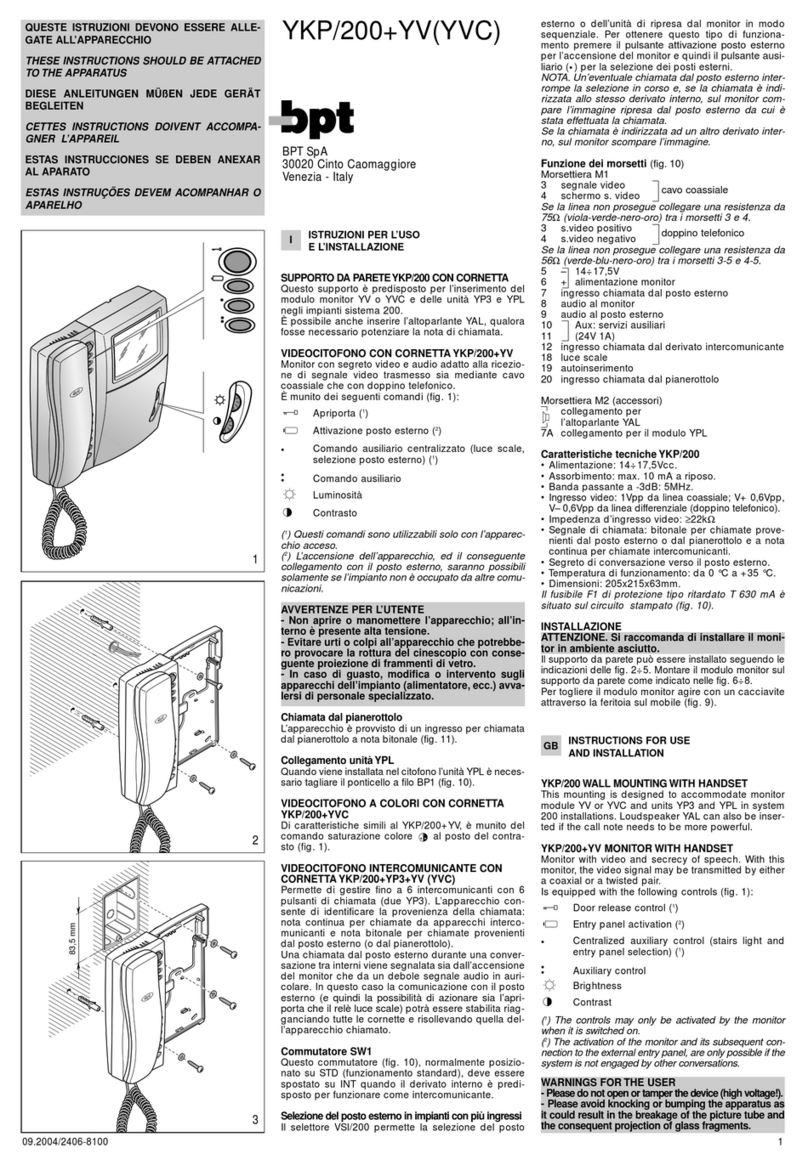
It features the following controls:
Door lock release (1)
• Auxiliary
•
(1) This control can only be used if the
unit is on.
By using actuators VLS/300 or custo-
mizing control unit XA/300LR by
means of programmer MPP/300LR or
PCS/300, you can have the control
enabled at all times.
Function of each terminal (fig. 5)
Terminal block M1
Bline
personal door-bell
connection for
YAL loudspeaker
Function of jumper SW1
(Call attenuated)
Normally supplied ready inserted.
Remove the jumper SW1 (fig. 5) in
the event the volume of the call note
is to be attenuated, or if you have a
number of receivers activated by the
same call.
GB INSTALLATION
INSTRUCTIONS
I
CITOFONO YC/300
Derivato interno compatibile con il
sistema X2 TECHNOLOGY e sistema
300.
È predisposto per l’inserimento del-
l’altoparlante YAL per potenziare la
nota di chiamata.
È munito dei seguenti comandi:
Apriporta (1)
• Ausiliario
•
(1) Questo comando è utilizzabile solo
se l’apparecchio è attivo.
Previo utilizzo di attuatori VLS/300 o
personalizzazione dell’alimentatore
XA/300LR tramite programmatore
MPP/300LR o PCS/300, il comando è
sempre disponibile.
Funzione dei morsetti (fig. 5)
Morsettiera M1
Blinea
chiamata dal pianerottolo
collegamento per
l’altoparlante YAL
Funzione del ponticello SW1
(Attenuazione della chiamata)
Normalmente viene fornito inserito.
Togliere il ponticello SW1 (fig. 5) qua-
lora si voglia attenuare il volume della
nota di chiamata, oppure nel caso di
più derivati attivati dalla stessa chia-
mata.
Numero massimo di derivati attivati
dalla stessa chiamata:
- 3 con chiamata normale (ponticello
SW1 inserito);
- 2 con chiamata normale e 6 con
chiamata attenuata (ponticello SW1
non inserito).
ATTENZIONE.L’altoparlanteYAL è da
ISTRUZIONI
PER INSTALLAZIONE
YC/300
BPT S.p.A.
30020 Cinto Caomaggiore
Venezia/Italy
09.2004/2406-6900
QUESTE ISTRUZIONI DEVONO ESSERE ALLEGATE ALL’APPARECCHIO
THESE INSTRUCTIONS SHOULD BE ATTACHEDTOTHE APPARATUS
DIESE ANLEITUNGEN MÜßEN JEDE GERÄT BEGLEITEN
CETTES INSTRUCTIONS DOIVENT ACCOMPAGNER L’APPAREIL
ESTAS INSTRUCCIONES SE DEBEN ANEXAR AL APARATO
ESTAS INSTRUÇÕES DEVEM ACOMPANHAR O APARELHO
60 mm
4
considerare come un derivato interno.
Chiamata dal pianerottolo
L’apparecchio è provvisto di un
ingresso (morsetto ) per un pulsan-
te di chiamata (es. dal pianerottolo) a
nota continua (2 s circa).
Caratteristiche tecniche
• Alimentazione: dalla stessa linea
dati.
• Assorbimento: 0,5 mA.
• Numero massimo di derivati che si
possono collegare all’alimentatore
XA/300LR: 200.
• Numero massimo di derivati che si
possono collegare a un posto
esterno X2: 64.
• Linea di collegamento audio/ dati:
doppino non polarizzato Z = 100 Ω.
• Temperatura di funzionamento: da
0 °C a +35 °C.
Installazione
Dopo aver tolto il mobile (fig. 1) fissa-
re la base direttamente al muro (fig.
2), oppure alla scatola incasso (fig. 3
o 4).
Su pareti non perfettamente piane
evitare il serraggio eccessivo delle
viti.
ATTENZIONE. Negli impianti con
XA/300LR si raccomanda di racco-
gliere i codici identificativi ID (SN) dei
derivati interni, applicati all’esterno
del mobile, e riportarli nelle tabelle
allegate alle apparecchiature
XA/300LR, MPP/300LR e
IPC/300LR.
Qualora la programmazione dell’ap-
parecchio venga effettuata tramite
MPP/300LR, utilizzare il profilo dedi-
cato per il derivato interno XC/300.
Maximum number of receivers acti-
vated by same call:
- 3 with normal call (jumper SW1
inserted);
- 2 with normal call and 6 with attenua-
ted call (jumper SW1 not inserted).
WARNING. Loudspeaker YAL should
be considered as a receiver.
Personal door-bell button
The receiver is fitted with a differen-
tiated call input (terminal ) (i.e.: for
personal door-bell) a continuous tone
call (approximately 2 s).
Technical features
• Power supply: from data line itself.
• Current demand: 0,5 mA.
• Maximum number of receivers that
can be connected to control unit
XA/300LR: 200.
• Maximum number of receivers that
can be connected to an X2 entry
panel: 64.
• Audio/data connection line: non
polarized twisted pair Z = 100 Ω.
• Working temperature range: 0 °C to
+35 °C.
Installation
First, remove the housing (fig. 1) and
fasten the base directly to the wall
(fig. 2) or to the embedding box (fig.
3 or 4).
If walls are not perfectly level, do not
overtighten screws.
WARNING. In installations with
XA/300LR we recommend you gather
up the receiver’s ID (SN) codes,
applied on the outside of the housing,
and enter them in the tables that
come with the XA/300LR,
MPP/300LR and IPC/300LR.
When programming the unit through
the MPP/300LR unit, use the dedica-
ted profile for the XC/300 receiver.
SPRECHGARNITURYC/300
System X2 TECHNOLOGY und Sys-
tem 300 kompatible Innensprechstelle.
Es ist für den Einsatz des Lautspre-
chers YAL konfiguriert, der den
Rufton verstärkt.
Mit folgenden Steuerfunktionen aus-
gestattet:
Türöffner (1)
• Zusatz
•
(1) Diese Steuerfunktion ist nur bei
eingeschaltetem Gerät verwendbar.
Die Steuerfunktion ist bei einer
Verwendung der Stellantriebe
VLS/300 oder einer kundenspezifi-
schen Gestaltung des Netzgeräts
XA/300LR über das Programmier-
gerät MPP/300LR oder PCS/300
stets vorhanden.
Funktion der Klemmleisten (Abb.5)
Klemmleiste M1
BLeitung
Anruf vom Treppenhaus
Anschluss für
Lautsprecher YAL
Belegung der
Überbrückungsklemme SW1
(Abschwächung des Anrufs)
Wird gewöhnlich schon eingefügt
DINSTALLATIONS-
ANLEITUNG
1
2
83,5 mm
3
5789
B
SW1
M1
5
2
PINSTRUÇÕES PARA
A INSTALAÇÃO
TELEFONEYC/300
Derivado interno compatível com o
sistema X2 TECHNOLOGY e sistema
300.
Está predisposto para a inserção do
altifalante YAL para aumentar a
potência a nota de chamada.
Está dotado dos seguintes comandos:
Abertura da porta (1)
• Auxiliare
•
EINSTRUCCIONES
PARA LA INSTALACIÓN
TELEFONOYC/300
Derivado interno compatible con siste-
ma X2 TECHNOLOGY y sistema 300.
Está predispuesto para la introduc-
ción del altavoz YAL para aumentar
la nota de llamada.
Dispone de los siguientes comandos:
Abrepuerta (1)
• Auxiliare
•
(1) Es posible utilizar este comando
sólo si el aparato está activo. Previa
utilización de actuadores VLS/300 o
COMBINE YC/300
Poste intérieur compatible avec le
système X2 TECHNOLOGY et le
système 300.
Il est prévu pour recevoir le haut-par-
leur YAL afin d’augmenter la puissan-
ce de la note d'appel.
Il comprend les commandes suivantes:
Ouvre-porte (1)
• Auxiliaire
•
(1) Il n’est possible d’utiliser cette com-
mande que si l’appareil est activé. La
commande est toujours disponible, à
condition d'utiliser des actionneurs
VLS/300 ou de personnaliser l'alimen-
tateur XA/300LR au moyen du pro-
grammateur MPP/300LR ou PCS/300.
FINSTRUCTIONS
POUR L’INSTALLATION
geliefert. Falls man die Lautstärke
des Ruftons herabsetzen möchte ist
die Überbrückungsklemme SW1
(Abb. 5) abzunehmen, oder mehrere
Sprechstellen über denselben Anruf
aktiviert werden.
Höchstanzahl von Sprechstellen, die
über denselben Ruf aktivierbar sind:
- 3 bei normalem Ruf (Über-
brückungsklemme SW1 zwischen
geschaltet);
- 2 bei normalem Ruf und 6 bei
abgeschwächtem Ruf (Über-
brückungsklemme SW1 nicht zwi-
schen geschaltet).
ACHTUNG. Der Lautsprecher YAL ist
wie eine Innensprechstelle zu behan-
deln.
Etagenruf
Das Gerät verfügt über einen
Eingang (Klemmleiste ) für die
Anruf unterscheidung (z.B. Etagen-
ruf) mit Dauertoner (ca. 2 s).
Technische Daten
• Stromversorgung: von derselben
Datenleitung.
• Stromaufnahme: 0,5 mA.
• Höchstanzahl von Sprechstellen,
die an das Netzgerät XA/300LR
anschließbar sind: 200.
• Höchstanzahl von Sprechstellen,
die an eine Außenstation X2 ansch-
ließbar sind: 64.
• Ton-/Datenanschlussleitung: unge-
polte Telefonschleife Z = 100 Ω.
• Betriebstemperatur: von 0 °C bis
+35 °C.
Installationsanleitung
Gehäuse abnehmen (Abb. 1) und
Basis direkt an die Wand (Abb. 2)
oder an den UP-Kasten (Abb. 3 oder
4) befestigen.
Bei unebenen Wänden sollten die
Schrauben nicht allzu eng angezogen
werden.
ACHTUNG.In Anlagen mit XA/300LR
sollten auf der Gehäuseaußenseite
die ID-Codes (SN) der Sprechstellen
abgelesen und in die Tabellen einge-
tragen werden, die den Geräten
XA/300LR, MPP/300LR und
IPC/300LR beigelegt wurden.
Falls das Geräts über MPP/300LR
programmiert wird, ist das für die
Innensprechstelle XC/300 dedizierte
Profil zu verwenden.
Fonction des bornes (fig. 5)
Bornier M1
Bligne
appel du palier
raccordement pour
le haut-parleur YAL
Function du pontet SW1
(Atténuation de l'appel)
Normalement il est fourni inseré.
Déplacer le pontet SW1 (fig. 5), si
vous désirez atténuer le volume de la
note d’appel, ou en présence de plu-
sieurs postes activés par le même
appel.
Nombre de postes sur le même
appel:
- 3 avec appel normal (cavalier SW1
branché);
- 2 avec appel normal et 6 avec
appel atténué (cavalier SW1 non
branché).
ATTENTION.Le haut-parleurYAL doit
être considéré comme un poste inté-
rieur.
Appel porte palière
L’appareil est muni d’une entrée
(borne ) pour appel différencié (par
exemple à partir de l’étage) à note
continue (2 s environ).
Caractéristiques techniques
• Alimentation: de la même ligne de
données.
• Absorption: 0,5 mA.
• Nombre maxi de postes pouvant
être branchés à l'alimentateur
XA/300LR: 200.
• Nombre maxi de postes pouvant être
branchés à un poste extérieur X2: 64.
• Ligne de liaison audio/données:
paire non polarisée Z = 100 Ω.
• Température de fonctionnement: de
0 °C à +35 °C.
Installation
Après avoir ôté le meuble (fig. 1), fixer
la base directement au mur (fig. 2) ou
au boîtier d'encastrement (fig. 3 ou 4).
Si le mur n'est pas parfaitement plat,
éviter de serrer excessivement les vis.
ATTENTION. Dans les installations
avec XA/300LR il est conseillé de
regruper les codes d’identification ID
(SN) des postes intérieurs , appliqués
à l’extérieur du meuble, et de les
noter dans les tableaux joints aux
appareils XA/300LR, MPP/300LR et
IPC/300LR.
Dans le cas où la programmation de
l’appareil serait effectuée au moyen
du MPP/300LR, utiliser le profil dédié
pour le poste intérieur XC/300.
personalización del alimentador
XA/300LR mediante programador
MPP/300LR o PCS/300, el comando
está siempre disponible.
Función de los bornes (fig. 5)
Bornera M1
Blínea
llamada desde el rellano
conexión para
el altavoz YAL
Función del puente SW1
(Atenuación de la llamada)
Normalmente es entregado conecta-
do. Quitar el puente SW1 (fig. 5) en el
caso de que se desee atenuar el volu-
men de la nota de llamada, o cuando
son varios los derivados activados
por la misma llamada.
Número máximo de derivados activa-
dos por la misma llamada:
- 3 con llamada normal (puente SW1
puesto);
- 2 con llamada normal y 6 con llama-
da atenuada (puente SW1 quitado).
ATENCIÓN. El altavoz YAL es a con-
siderar como un derivado interno.
Llamada desde el rellano
El monitor está provisto de una entra-
da (borne ) para llamada diferen-
ciada (ej. desde el rellano) a nota
continua (cerca 2 s).
Características técnicas
• Alimentación: desde la propia línea
de datos.
• Consumo: 0,5 mA.
• Número máximo de derivados que
se pueden conectar al alimentador
XA/300LR: 200.
• Número máximo de derivados que
se pueden conectar a una placa
exterior X2: 64.
• Línea de conexión audio/datos: par
no polarizado Z = 100 Ω.
• Temperatura de funcionamiento:
entre 0 °C y +35 °C.
Instalación
Después de haber quitado la caja
(fig. 1), fijar la base directamente en
la pared (fig. 2), o en la caja a empo-
trar (fig. 3 o 4).
En paredes no perfectamente planas
cabe evitar un apriete excesivo de los
tornillos.
ATENCIÓN. En las instalaciones con
XA/300LR se recomienda recoger los
códigos de identificación ID (SN) de los
derivados internos, aplicados al exterior
del meuble, y apuntarlos en las tablas
adjuntas a los aparatos XA/300LR,
MPP/300LR y IPC/300LR.Si la progra-
mación del aparato es efectuada trça-
mite MPP/300LR, utilizar el perfil
dedicado para el derivado interno
XC/300.
(1) É possível utilizar este comando só
se o aparelho estiver ligado. Prévia
utilização dos actuadoresVLS/300 ou
personalização do alimentador
XA/300LR através do programador
MPP/300LR o PCS/300, o comando
está sempre disponível.
Função dos bornes (fig. 5)
Placa de bornes M1
Blinha
chamada do patamar
ligação para
o altifalante YAL
Função da ponte SW1
(Atenuação da chamada)
Normalmente é fornecida inserida.
Tirar a ponte SW1 (fig. 5) se por
acaso se deseja atenuar o volume do
toque de chamada, ou então no caso
de vários derivados activados pela
mesma chamada.
Número máximo de derivados activa-
dos pela mesma chamada:
- 3 com chamada normal (ponte
SW1 inserida);
- 2 com chamada normal e 6 com
chamada atenuada (ponte SW1 não
inserida).
ATENÇÃO. O altifalante YAL deve ser
considerado como um derivado inter-
no.
Chamada do patamar
O aparelho está dotado de uma entra-
da (borne ) para chamada diferen-
ciada (ex. do patamar) com nota con-
tínua (2 s aproximadamente).
Características técnicas
• Alimentação: da mesma linha
dados.
• Absorção: 0,5 mA.
• Número máximo de derivados que
se podem ligar ao alimentador
XA/300LR: 200.
• Número máximo de derivados que
se podem ligar a uma placa boto-
neira X2: 64.
• Linha de ligação áudio/dados: cabo
bifilar não polarizado Z = 100 Ω.
• Temperatura de funcionamento:
desde 0 °C até +35 °C.
Instalação
Depois de ter tirado o móvel (fig. 1),
fixar a base directamente ao muro
(fig. 2), ou então à caixa de encastre
(fig. 3 ou 4).
Sobre paredes não perfeitamente
planas evitar o aperto excessivo dos
parafusos.
ATENÇÃO. Nas instalações com
XA/300LR se aconselha de recolher
os códigos identificativos ID (SN) dos
derivados internos, aplicados na parte
de fora do móvel, e referi-los nas
tabelas anexas às aparelhagens
XA/300LR, MPP/ 300LR e
IPC/300LR.
Se por acaso a programação do apa-
relho for efectuada através do
MPP/300LR, utilizar o perfil dedicado
para o derivado interno XC/300.
Other manuals for YC/300

1

Other Bpt Intercom System manuals

Bpt YC/300A Operation manual

Bpt

Bpt YC/300A Operation manual

Bpt AZV/304 User manual

Bpt

Bpt AZV/304 User manual

Bpt MTMRFID Owner's manual

Bpt

Bpt MTMRFID Owner's manual

Bpt YC/300 US User manual

Bpt

Bpt YC/300 US User manual

Bpt HEV/301 User manual

Bpt

Bpt HEV/301 User manual

Bpt KC/2 User manual

Bpt

Bpt KC/2 User manual

Bpt IPD/300LR US User manual

Bpt

Bpt IPD/300LR US User manual

Bpt YVL301 User manual

Bpt

Bpt YVL301 User manual

Bpt Mitho User manual

Bpt

Bpt Mitho User manual

Bpt NVMKIT/X1 User manual

Bpt

Bpt NVMKIT/X1 User manual

Bpt Agata C 200 User manual

Bpt

Bpt Agata C 200 User manual

Bpt LYNEAKIT/02 Operation manual

Bpt

Bpt LYNEAKIT/02 Operation manual

Bpt HEV/301 User manual

Bpt

Bpt HEV/301 User manual

Bpt Agata C User manual

Bpt

Bpt Agata C User manual

Bpt Perla PEV User manual

Bpt

Bpt Perla PEV User manual

Bpt BAK01 User manual

Bpt

Bpt BAK01 User manual

Bpt OPALE User manual

Bpt

Bpt OPALE User manual

Bpt XC/301 Operation manual

Bpt

Bpt XC/301 Operation manual

Bpt VSI/200 User manual

Bpt

Bpt VSI/200 User manual

Bpt b-red VKW200 User manual

Bpt

Bpt b-red VKW200 User manual

Bpt Futura X2 User manual

Bpt

Bpt Futura X2 User manual

Bpt LYNEAKIT/22 Operation manual

Bpt

Bpt LYNEAKIT/22 Operation manual

Bpt YKP/301+YV(YVC) User manual

Bpt

Bpt YKP/301+YV(YVC) User manual

Bpt Agata VC User manual

Bpt

Bpt Agata VC User manual

Popular Intercom System manuals by other brands

Novus NVE-EP200 installation manual

Novus

Novus NVE-EP200 installation manual

Bogen PI35A Specifications

Bogen

Bogen PI35A Specifications

NuTone KNOCK DCAM100 Installation instructions and specification

NuTone

NuTone KNOCK DCAM100 Installation instructions and specification

Telikou BK-104 instruction manual

Telikou

Telikou BK-104 instruction manual

Scolmore ESP Aperta A1IPMW quick start guide

Scolmore

Scolmore ESP Aperta A1IPMW quick start guide

golmar G2+ user manual

golmar

golmar G2+ user manual

Valcom V-2900 user guide

Valcom

Valcom V-2900 user guide

Altair WBP-200 owner's manual

Altair

Altair WBP-200 owner's manual

NACD Noralsy MIHP/6 installation instructions

NACD

NACD Noralsy MIHP/6 installation instructions

Visco IT-OUT250 user manual

Visco

Visco IT-OUT250 user manual

ELCOM RE 610Y Series Customer's operating and assembly instructions

ELCOM

ELCOM RE 610Y Series Customer's operating and assembly instructions

Commax CDV-43Q user manual

Commax

Commax CDV-43Q user manual

TekTone Tek-View VM600A installation instructions

TekTone

TekTone Tek-View VM600A installation instructions

DoorBird D21 Series installation manual

DoorBird

DoorBird D21 Series installation manual

Renkforce 1275880 operating instructions

Renkforce

Renkforce 1275880 operating instructions

TCS ISW3230-0140 instruction manual

TCS

TCS ISW3230-0140 instruction manual

Moman H3 user manual

Moman

Moman H3 user manual

Panasonic LST 116 Installation and operating instructions

Panasonic

Panasonic LST 116 Installation and operating instructions

manuals.online logo
manuals.online logoBrands
  • About & Mission
  • Contact us
  • Privacy Policy
  • Terms and Conditions

Copyright 2025 Manuals.Online. All Rights Reserved.