manuals.online logo
Brands
  1. Home
  2. •
  3. Brands
  4. •
  5. Bristan
  6. •
  7. Plumbing Product
  8. •
  9. Bristan PM2 SHCDIV C Wiring diagram

Bristan PM2 SHCDIV C Wiring diagram

Pressure
BAR
1.0
5.0
4.0
2.0 3.0
0.
Pressure
BAR
1.0
5.0
4.0
2.0 3.0
0.
Specifications
Maximum Static Pressure: 10.0 bar
Inlet Water Temperature
Min: 0.2 bar Max: 5.0 bar
Dynamic Water Pressure
5°C
25°C
Cold Water Supply
Min: 5°C Max: 25°C 65°C Recommended
Tools You’ll Need
Hot Water Supply
Pack Contents
65°C
150
Centres
15mm
Compression
Inlet Connections
Inlet Dimensions
Cavity Dimensions (mm)
35
30 45
Minimum
Cavity Depth: 35mm
Concealing Plate
Adjustment Range: 30mm
IMPORTANT
The inlet hot water must
be at least 10°C above the
required blend temperature.
Draw around
the concealing
plate as a template,
measuring in by
10mm to give
clearance. Finish the
wall surface. Using a
silicon sealant, push
on the concealing
plate and hold
firmly until set.
x1
x2
x2
x2
x2
x1
x1
Flat head
Screwdriver Silicon Sealant Hexagonal KeysPipe CutterDrill Adjustable Spanner
Hot
Cold
4
3
2
Connect the inlet
pipes ensuring the
olives are fitted.
Screw the shrouds
onto the valve.
Pipe & Wire Detector
5
Elbows can
be pointed up
or down
6
2.5
mm
3
1
Fit the temperature
handle back in the
maximum hot position.
Increase
Temperature
Decrease
Temperature
Pre-set to
42°C
2
Socket Spanner
Temperature Adjustment
REMEMBER
To service
your
product!
Turn the spindle
to increase or
decrease the
temperature.
Check the
temperature and
adjust until you
achieve the
desired result.
Fit the handles.
2.5
mm
2.5
mm
Plumb the valve into
your chosen outlet.
Turn on the water
supply and check the
valve for any leaks.
Turn the
handle to the
maximum
temperature
setting, then
remove it.
Green Flow
Limiter (Cold)
1
Valve Configuration
Remove the inlet elbows and filters.
Remove the plastic inserts from the valve
inlets and insert the flow regulators.
Replace the elbows, ensuring the
filters are fitted.
IMPORTANT
If installed in
conjunction with
combination
boiler flow
regulators
must be
fitted.
Yellow Flow
Limiter (Hot)
12
Secure the valve using the screws supplied
(solid walls only) or a suitable alternative.
Installation
REMEMBER
hot on the left,
cold on the
right
Min 35mm
Max 45mm
Baton
Install suitable
batons
(if required) onto
the rear cavity.
Mark the position
of the valve
and drill and plug
holes to suit.
Installation Instructions
& User Guide
Prior to Installation
Please leave these instructions
with the end user
All products manufactured and supplied by Bristan are safe to use
provided that they are installed, operated and receive regular
maintenance in accordance with these instructions.
This product needs to be installed in accordance with, and meet the
requirements of the Water Supply (Water Fittings) Regulations 1999
and current by-laws. For full Installation Requirements & Notes (IRN)
please visit wras.co.uk/directory.
Isolation valves must be fitted to the inlet water supplies to ensure ease
of future maintenance. Before installing this product the water supply
must be thoroughly flushed in order to remove any swarf, solder etc.
Full access must be made available for future maintenance/
servicing purposes.
Before drilling into walls, check that there are no hidden electrical
wires, cables or water supply pipes. This can be checked with the
aid of an electronic detector.
If power tools are used do not forget to:
- Wear eye protection
- Unplug equipment after use
This product must not be modified in any way
as this will invalidate the guarantee.
If in doubt, contact a registered plumber, your Local Water
Authority or the Secretary of the Institute of Plumbing,
address as follows:-
The Institute of Plumbing,
64 Station Lane,
Hornchurch,
Essex,
RM12 6NB, Tel: 01708 472791
Product Code: PM2 SHCDIV C (D7)
Unscrew the shrouds.
Remove the cartridges
and piston.
24
mm
Left
Outlet On/
Increased
Flow
O
Right
Outlet On/
Increased
Flow
Increased
Temperature Decreased
Temperature
General Cleaning Operation
Bristan products are made from premium materials, with
hand polishing and electroplated finishes.
Your taps or shower should be regularly cleaned with warm
water, a mild pH-neutral liquid soap, and polished with a soft
cloth. Any residues from soap, toiletries etc. should be rinsed
o straight after use.
Household bleaches and cleaners contain harsh chemicals and
may damage the surface finish. Avoid using abrasive cloths,
scouring pads, scrub sponges, steel wool or anything similar.
Some surfaces such as nickel and pewter may be aected by
the dye found in some cloths, so it is also important to avoid
hanging cloths on spouts.
Choose the location for the wall outlet
and create a 25-30mm hole in the wall.
Ensure your shower accessories have
enough reach from that position.
Finish the wall surface.
To reduce the build up of lime scale and to
ensure this shower works to its maximum
performance we recommend this shower
is serviced every 6-12 months depending
on the hardness of your water.
Servicing Intervals
Wall Outlet Installation
Fit the wall outlet,
ensuring the
washers are fitted
either side of
the wall.
Go to Step 6 in the
Installation Steps.
With rear access
Without rear access
Screw the wall outlet into
the 1/2” female connection,
using a suitable thread sealant
ensuring the rubber seal is fitted
to the back of the wall outlet.
Follow Step 6 in the
Installation Steps, fitting a 1/2”
female connection at the hole in
the wall (not supplied).
IMPORTANT
Isolate the
water supply
before
starting!
Increase
Temperature
Decrease
Temperature
Follow the Temperature
Adjustment Steps if required.
1
46
2
5
3
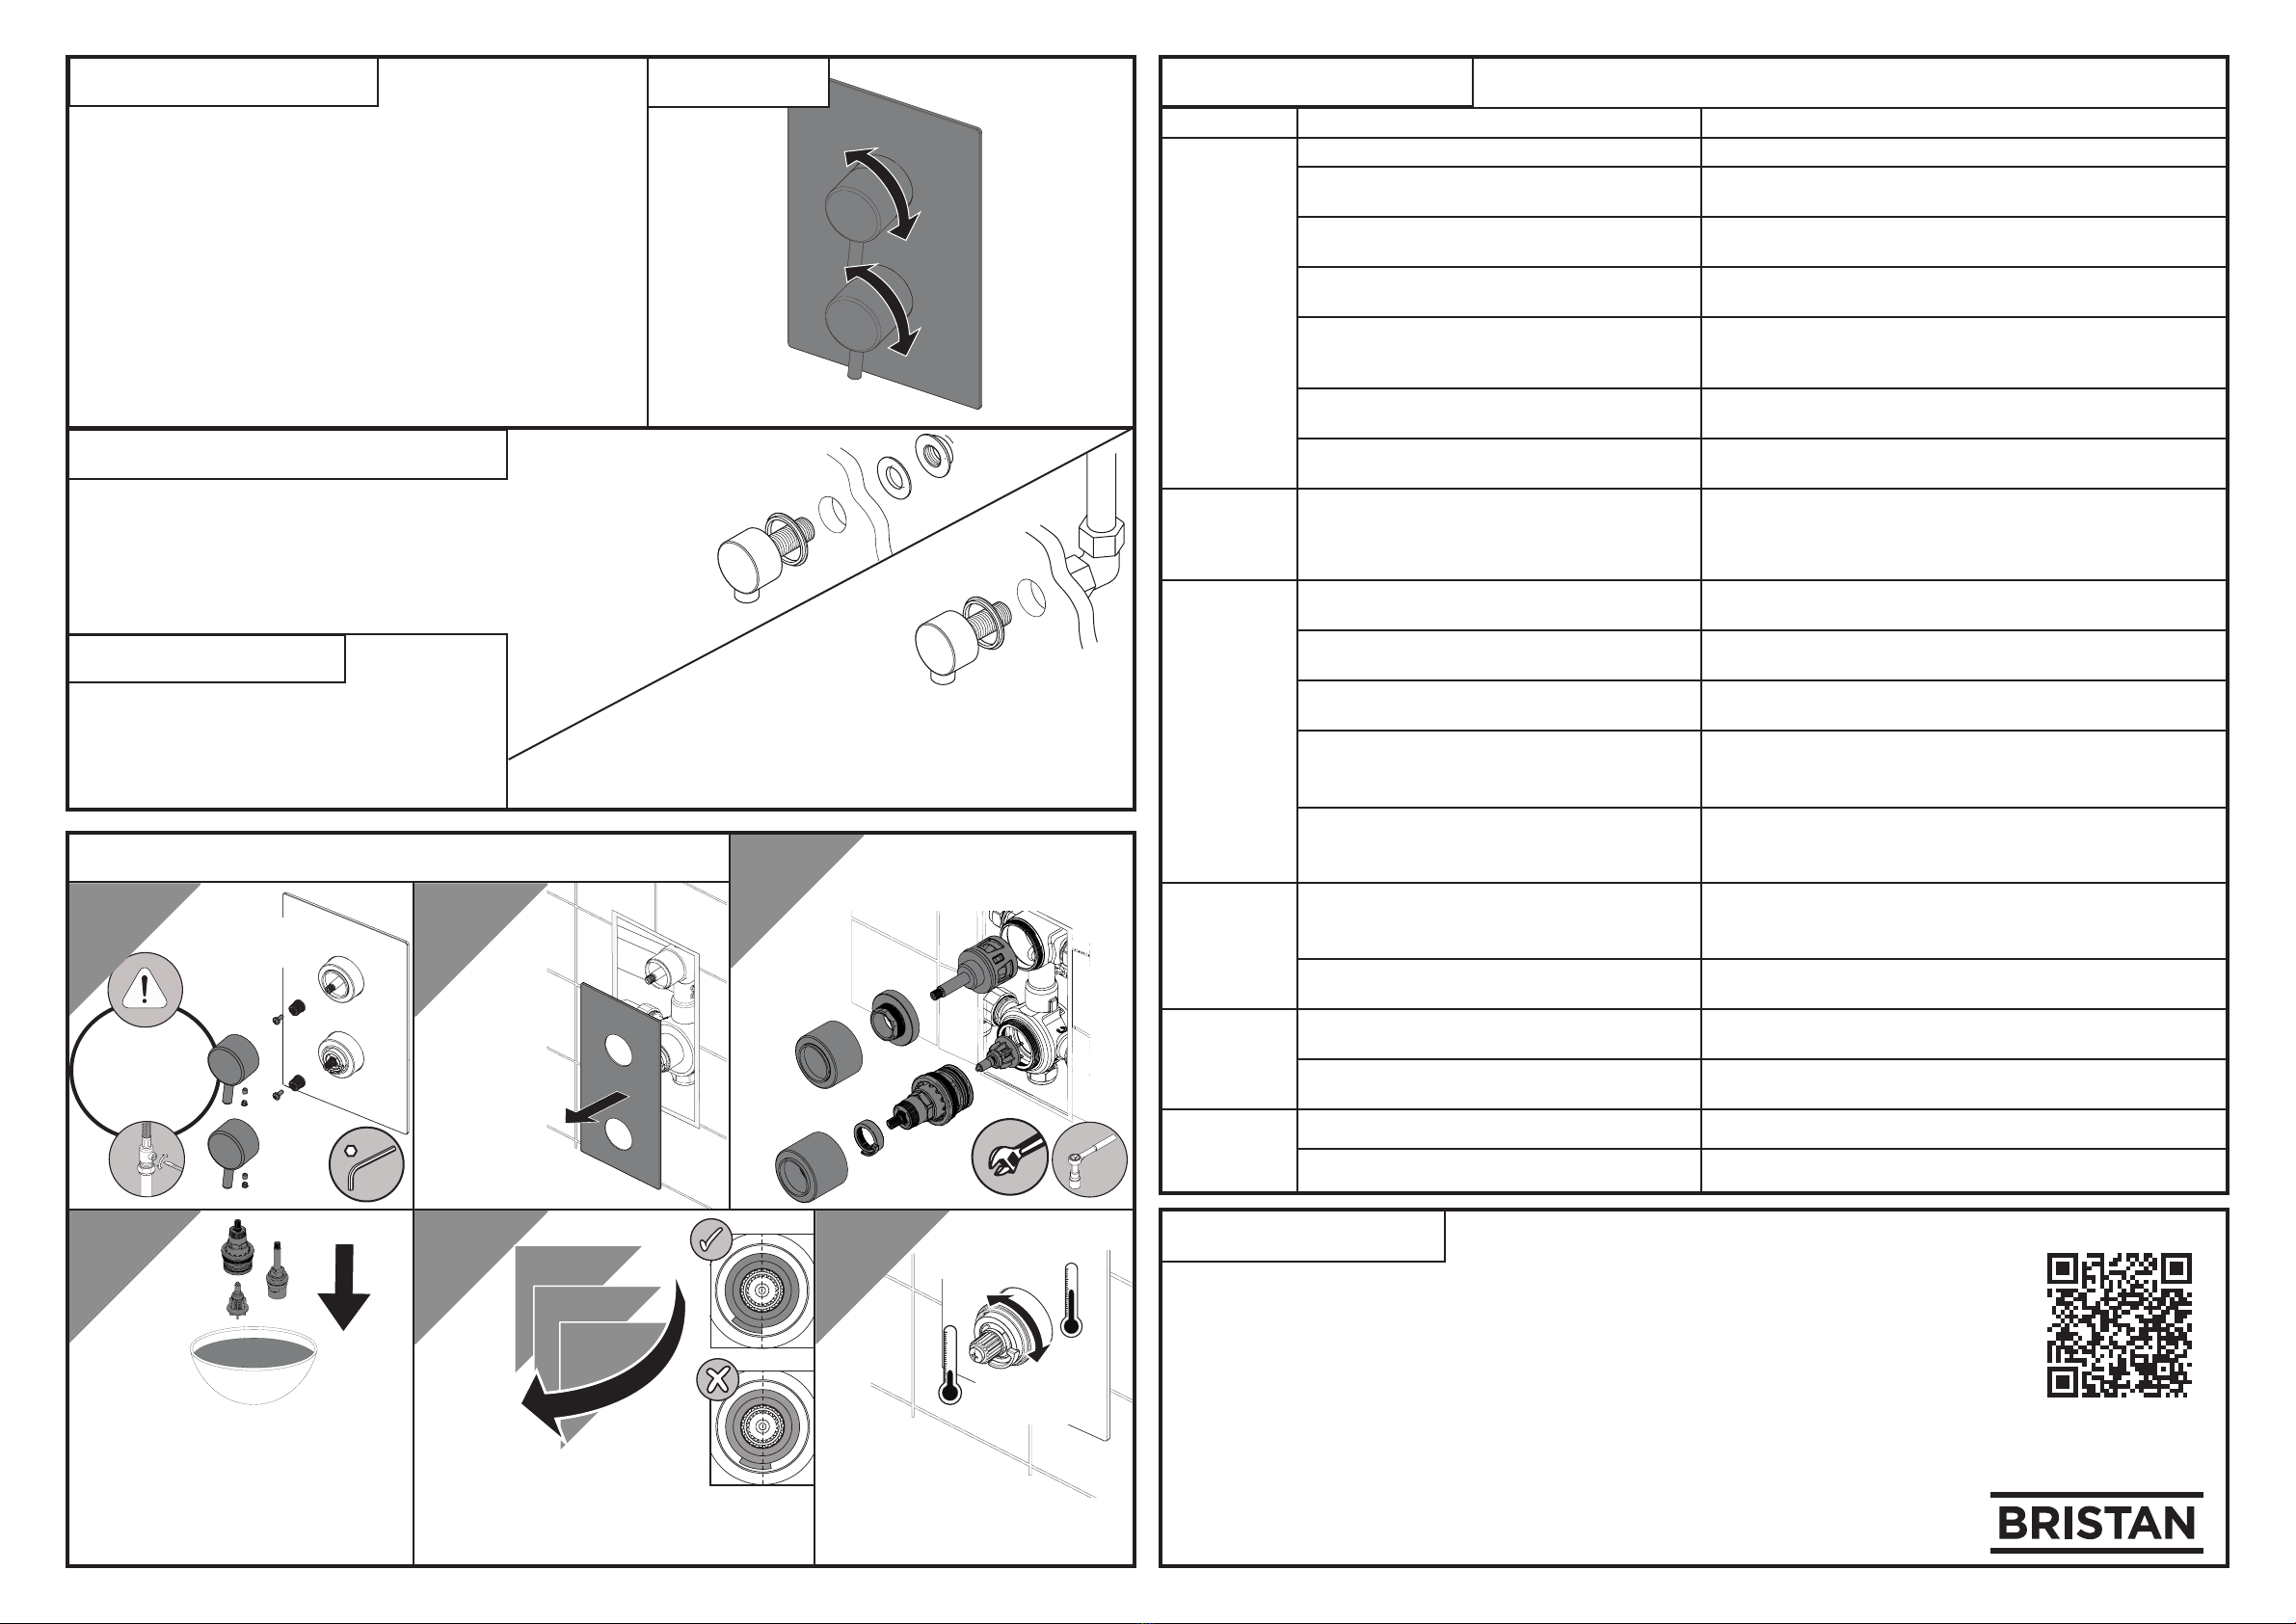
Maintenance - Cartridge Cleaning
Gently
remove the
concealing
plate from
the wall.
Remove any O-rings and soak all
components in de-scaler and wash o
in clean water. Examine all seals and
replace if needed. Use WRAS
approved silicon based grease
on all seals.
Reverse the installation steps,
ensuring the temperature
stop is aligned correctly.
12
3
2.5
mm
Remove the
handles.
Troubleshooting
At Bristan, we want to make things as easy as possible for our customers. That’s why we oer
solid guarantees on all our products, eective from the date of purchase, to give you peace of mind.
To start your free guarantee simply scan the QR code and register your product.
Alternatively visit www.bristan.com/register.
For any other queries, please call our Customer Service on 0330 026 6273
where our expert team of advisors will be able to oer you any help and advice.
For full guarantee terms and conditions visit www.bristan.com/service-centre/guarantees.
Our Guarantee
Customer Service: +44330 026 6273
Web: www.bristan.com
Email: enquir[email protected]
A Masco Company
Symptom Cause Remedy
No flow or
low flow rate
Partially closed isolation valve. Open isolation valve.
Instantaneous water heater cycles on and o
as flow rate or pressure is too low.
Increase water flow rate or
pressure through system.
Head of water is below the
minimum distance required.
Refer to the specification for the
minimum distance required.
Are the water supply pressures balanced? If pressures are unbalanced, a pressure reducing valve
should be used for optimum performance.
Hot or cold water being drawn o elsewhere
causing pressure changes or instantaneous
boiler temperature changes.
Do not use other water outlets when using the shower.
Airlock or partial blockage in the supply
pipework.
Flush through pipework and filters to ensure removal
of debris and any airlocks.
Hot/Cold water supply has failed Check the hot and cold feeds. The shower will not
work if either fails.
Maximum
Water
Temperature
too Hot/Cold
Maximum Water Temperature
needs adjusting.
Refer to the Temperature Setting section to set your
desired maximum temperature.
Outlet Water
Temperature
too Hot/Cold
Filter/pipe blockage Flush through pipework and filters to ensure
removal of debris and any airlocks.
Installtion conditions outside
operating parameters.
Refer to the specification for the
minimum distance required.
Hot water temperature is less than 10°C
above the required blend temperature
Adjust hot water temperature or wait for water to
reheat if a stored water system is used.
Instantaneous water not igniting because the
water flow rate is too low.
Increase water flow rate through the system. Refer to the
Maintenance section to clean/check the cartridge and filters
for any damage. Contact your boiler manufacturer.
Instantaneous water not igniting because the
water pressure is too low.
Refer to the specification for system requirements.
Increase water pressure through the system.
Contact your boiler manufacturer.
Only hot/
cold water
from Shower
Valve
Inlet water supplies are reversed.
Check the water inlet connections are the correct way
around: Hot on the left, Cold on the right when viewed from
the front. Rework pipework as necessary.
Filter/pipe blockage Flush through pipework and filters to ensure removal of
debris and any airlocks.
Water
dripping
from shower
This is normal for a short time after using the
shower.
This is caused by residual water tension, the build up of
water in the shower.
If water continues to drip,
possibly due to the cartridge
Remove cartridge and clean, refer to 'Maintenance' section
before starting any maintenance.
Shower does
not turn on
Closed isolation valve. Open isolation valve.
Mains water supply turned o. Turn on mains water supply.
Bristan Group Ltd.
UK: Bristan Group, B78 1SG.
EU: Masco Europe S.à.r.l., 14 Rue Strachen
6933 Mensdorf, Luxembourg.

Other manuals for PM2 SHCDIV C

1

Other Bristan Plumbing Product manuals

Bristan DUL3 THBSM C User manual

Bristan

Bristan DUL3 THBSM C User manual

Bristan NIVA NVA BSM C Wiring diagram

Bristan

Bristan NIVA NVA BSM C Wiring diagram

Bristan CRAZE CRZ2 SHXDIVCTFF C Wiring diagram

Bristan

Bristan CRAZE CRZ2 SHXDIVCTFF C Wiring diagram

Bristan PIV BSM C User manual

Bristan

Bristan PIV BSM C User manual

Bristan Vantage VTX 1/2 C User manual

Bristan

Bristan Vantage VTX 1/2 C User manual

Bristan Joy ThermoSafe Series Mounting instructions

Bristan

Bristan Joy ThermoSafe Series Mounting instructions

Bristan Quest QST BF C User manual

Bristan

Bristan Quest QST BF C User manual

Bristan Blade BL BAS C User manual

Bristan

Bristan Blade BL BAS C User manual

Bristan Buzz Wiring diagram

Bristan

Bristan Buzz Wiring diagram

Bristan Colonial K BRSNK C User manual

Bristan

Bristan Colonial K BRSNK C User manual

Bristan RS2 BSM C (D3) Wiring diagram

Bristan

Bristan RS2 BSM C (D3) Wiring diagram

Bristan WASTES W BATH09 C Wiring diagram

Bristan

Bristan WASTES W BATH09 C Wiring diagram

Bristan Rio User manual

Bristan

Bristan Rio User manual

Bristan W BASIN06 C User manual

Bristan

Bristan W BASIN06 C User manual

Bristan Wine Easyfit Wiring diagram

Bristan

Bristan Wine Easyfit Wiring diagram

Bristan Value VAL BSM C CD Wiring diagram

Bristan

Bristan Value VAL BSM C CD Wiring diagram

Bristan BL3105 Mounting instructions

Bristan

Bristan BL3105 Mounting instructions

Bristan JU BAS C User manual

Bristan

Bristan JU BAS C User manual

Bristan TRD RISE C Mounting instructions

Bristan

Bristan TRD RISE C Mounting instructions

Bristan K 1/2 C Wiring diagram

Bristan

Bristan K 1/2 C Wiring diagram

Bristan SAF SHCDIV BLK (D1) Wiring diagram

Bristan

Bristan SAF SHCDIV BLK (D1) Wiring diagram

Bristan W SNK6 C User manual

Bristan

Bristan W SNK6 C User manual

Bristan Artisan AR2 SHXMTFF2 C Mounting instructions

Bristan

Bristan Artisan AR2 SHXMTFF2 C Mounting instructions

Bristan CAP2 SHUAR C Mounting instructions

Bristan

Bristan CAP2 SHUAR C Mounting instructions

Popular Plumbing Product manuals by other brands

Omnires Y1255 Installation and Maintenance

Omnires

Omnires Y1255 Installation and Maintenance

Mira Mode 1.1980.001 Installation and user guide

Mira

Mira Mode 1.1980.001 Installation and user guide

EZANDA 14166 installation guide

EZANDA

EZANDA 14166 installation guide

Grohe Somerset 20 133 manual

Grohe

Grohe Somerset 20 133 manual

Insignia KYS2000 installation manual

Insignia

Insignia KYS2000 installation manual

Grohe Grohtherm XL manual

Grohe

Grohe Grohtherm XL manual

GLÄSS HAVANA Installation & maintenance manual

GLÄSS

GLÄSS HAVANA Installation & maintenance manual

Delta 1824 parts manual

Delta

Delta 1824 parts manual

JADO Borma 814 201 Series installation instructions

JADO

JADO Borma 814 201 Series installation instructions

Armitage Shanks Markwik 21 installation instructions

Armitage Shanks

Armitage Shanks Markwik 21 installation instructions

Gessi INGRANAGGIO 63582 manual

Gessi

Gessi INGRANAGGIO 63582 manual

Moen T4111 SERIES Specification sheet

Moen

Moen T4111 SERIES Specification sheet

KEUCO IXMO 59551 000070 Mounting instruction

KEUCO

KEUCO IXMO 59551 000070 Mounting instruction

Grundfos Sololift2 WC-1 Installation and operating instructions

Grundfos

Grundfos Sololift2 WC-1 Installation and operating instructions

Intra SLU 32NB Instructions for use

Intra

Intra SLU 32NB Instructions for use

Svedbergs Twit manual

Svedbergs

Svedbergs Twit manual

Pfister Arterra RT6-4DE Quick installation guide

Pfister

Pfister Arterra RT6-4DE Quick installation guide

Hansa Activejet Installation and maintenance guide

Hansa

Hansa Activejet Installation and maintenance guide

manuals.online logo
manuals.online logoBrands
  • About & Mission
  • Contact us
  • Privacy Policy
  • Terms and Conditions

Copyright 2025 Manuals.Online. All Rights Reserved.