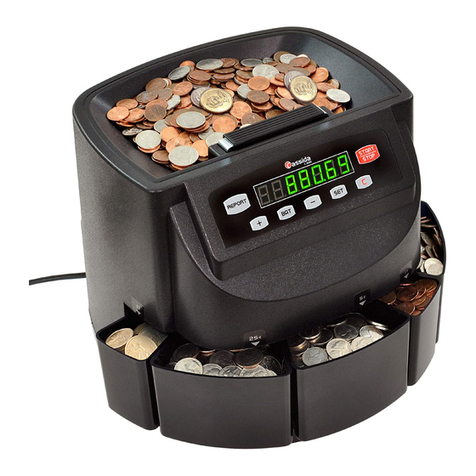
Cassida C550 User manual

Designed by Cassida Corporation, USA
Assembled in China
©Copyright 2014 Cassida Corporation. All rights reserved.
Specifications subject to change without notice. Cassida is a registered trademark of Cassida Corporation.
USER MANUAL
Cassida C550 Professional Coin Counter
6
7
ver. 210917

3
Cassida C550 HIGH SPEED COIN COUNTER
Attention: Do not use the unit until you read this user manual.
If you have any questions, please contact your distributor or
sales manager.
This manual contains important information on safety
measures and operational features. Please read it carefully
before operating your coin counter, and keep it for future
reference.

moving money forward
Table of contents:
1. Introduction
1.1 About the Cassida C550
1.2 Box contents
1.3 System overview
1.4 Keypad
1.5 Specifications
1.6 Safety instructions
2. Preparation before work
2.1 Installation of the counter
2.2 Calibration of the counter
3. Operation
3.1 Counting coins and counters of one face value
3.2 Summing up of coins and counters of one face value
3.3 Batch operation mode with equal face value coins
3.4 Sort mode of different coins and counters
Maintenance and troubleshooting
4.
Maintenance
4.1 Daily
4.2 Troubleshooting
4.3 Warranty
4.4 Contact information
5
5
6
7
8
9
11
10
12
10
11
5
1. INTRODUCTION
1.1 About the Cassida Ñ550
1.2 Box contents
• Cassida C550 coin counter
• Extended hopper
• Maintenance kit (optional)
• User manual
Cassida C550 HIGH SPEED COIN COUNTER
The Cassida C550 coin counter is a professional coin-processing machine intended for
heavy-duty use. It provides precise and fast counting with operation speed up to 2300
coins per minute. The Cassida C550 is extremely easy to use. Its features include simple
count mode, add and batch modes.
Showing the amount of coins by denomination, as well as, total sum
the Cassida C550 is able to satisfy all the coin processing requirements from the user.
The Cassida C550 is light-weight, compact and stylish unit which will fit in any of your
business atmosphere.
12
4
13
13
14
15

1.3 System overview
1) Keypad
2) Diameter adjustment knob
3) Thickness adjustment knob
4) Extended hopper
5) Upper cover
6) Coin outlet
7) Reject coin box
8) Power switch
9) Power connector
7
1.4 Keypad
START/STOP
ADD
ADD
BATCH
MEMO
0 - 9
Start or stop counting
Clears the current displayed count
Press to turn the Add mode on or off
Press to enable Batch mode
Press this key for adding the present count number into memory
User to enter custom batch quantity
6Cassida C550 HIGH SPEED COIN COUNTER
5
8 9
6
7
1
4
2
3
6
7
moving money forward

1.6 Safety notes
8
1.5 Specifications:
Hopper capacity
Extended hopper
up to 3000 coins (diameter 15mm)
up to 11000 coins (diameter 15 mm)
Display LCD (max count display 9999999)
Demensions 265 x 340 x 345 mm
10.43” x 13.39” x 13.58”
Weight 8.8 êã (19.4 ôóíòîâ)
Counting speed up to 2300 coins/ìin
Power requirements 110-220V/ 50-60Hz
Power consumption < 60 W in operation
Cassida C550 HIGH SPEED COIN COUNTER
1. Diameter adjustment knob
2. Thickness adjustment knob
IMPORTANT:
When counting mixed coin denominations, the Cassida C550 must be adjusted
for the largest diameter and largest thickness coin present in the batch.
,
.
.
.
..
Before loading coins into the hopper please remove all paper scraps, lint, rubber
bands or other foreign objects. Foreign objects can cause jamming or faulty
counting.
Do not open the top cover when coins are in the hopper. Do not defeat the top
cover interlock or operate the machine with the top cover open.
When using a bag to vcounted coins, place the bag on the floor or on a stand to
prevent the machine from tipping over.
When using this unit, basic safety precautions should always be taken, including the
following:
- Do not use this unit in areas where it may be exposed to water or any other
liquids.
- Only use the power cord supplied with the unit. Plug the power cord into a
properly grounded wall outlet. Do not remove the ground pin from the power cord.
Failure to properly ground the unit can result in severe injury or fire.
- Make sure the unit is installed on a flat surface. Do not operate the machine in
areas with high temperature, humidity or smoke: it may prevent it from working
correctly.
- When not using this unit for an extended period of time, remove the power plug
from the wall outlet.
- Unplug this unit from the wall outlet before cleaning. Use specified cleaning
products such as can of compressed air a soft cloth or a soft bristle brush.
- To avoid the risk of electrical shock, do not disassemble this unit.
Disassembling it will expose you to dangerous voltages and other risks. Incorrect re-
assembly can cause electrical shock when the appliance is subsequently used. Take
it to a qualified technician when service or repair is required.
9
moving money forward

2. PREPARATION BEFORE WORK
2.1 Instalation of the counter
11
Cassida C550 HIGH SPEED COIN COUNTER
10
2.2 Calibration of the counter
Put the counter on worktable.
Fix the tray for not counted coins on the right side.
Using locking ring fix a sack on the tube for counted coins.
Connect network cord to power supply socket.
Turn network switch to ON position.
Attention! Calibration of the counter for Russian coins is not required.
Attention! Calibration of the counter is done once for coins or counters of a certain value.
Additional calibration is required only when new coins or counters with different value or
geometrical sizes (diameter and thickness ) are issued. The rate of one division by
diameter: one click is equal to 0.33mm (1/8")
Attention! Set diameter accurately.
Choose a coin or a counter. Set the corresponding diameter of a coin.
Set the corresponding thickness of a coin. Put a coin in the feed hopper and start the
counter pressing "START" button. If after several seconds of engine running the coin is
ejected from non-counted coins tube (on the right) move the diameter setting handle 1
division (1 click) back.
If after several seconds of engine running the coin is "dangling" in the centrifugal disk shift
the diameter setting handle 1 division (1 click) forward and shift the thickness setting
handle in the increase direction. Make sure that that the coin or a counter should get in
the eject stacker of the counted coins and the display shows the result. Calibration
procedure is required in case of coins and counters of other nominal values are issued. Put
the results of calibration in a table. If diameter setting handle is blocked, increase
the diameter by one or several divisions (one click=0.33 mm(1/8")).
Face value Diameter Thickness Face value Diameter Thickness
3. OPERATION
3.1 Counting coins and counters of one face value
Set the corresponding diameter of a coin Set the corresponding thickness of a coin.
Put coins of one face value in the hopper.
Start the counter, pressing " START " button.
Coins will get in the stacker hopper for counted coins and the result will be shown on the
display.
Repeat the procedure until there no coins in the hopper.
3.2 Summing up of coins and counters of one face value
Set proper diameter of a coin.
Set proper thickness of a coin.
Put coins of one face value in the hopper.
Press "ADD" button. Indicator will light. Start counter by pressing START button. Coins will
get in the stacker hopper for counted coins and the result will be shown on the display Fig
1-8
The counter will runs 3 operating cycles and stop. Press "START" again. Repeat the
moving money forward

13
Cassida C550 HIGH SPEED COIN COUNTER
12
procedure until there are no coins in the hopper.
Add new coins when necessary. To exit sum up mode press ADD and CLR buttons to reset
the display value.
3.3 Batch operation mode with equal face value coins.
Set the corresponding diameter of a coin.
Set the corresponding thickness of a coin.
Put coins of one face value in the hopper.
Enter the number of coins to be counted. Press "BAT" button on control panel the
necessary number of times.
The indicator will light. (BAT) Using buttons "-1" ,"+1", "-10", "+10" you can set the
necessary amount. Set by pressing "BM " button the value of batch which will be stored.
New value is stored during all further operation.
Start the counter by pressing "START" button.
Coins will get in the stacker hopper for counted coins and the result will be shown on the
display Fig 1-8.
The counter will run 3 operating cycles and stop. Press "START" again. Repeat the
procedure until there no more coins in the hopper.
Add more coins when necessary.
3.4 Sort mode of different coins and counters
Sorting coins by face values should be started from the biggest coin!
Set the biggest diameter of a coin.
Set the biggest thickness of a coin.
Put coins of one face value in the hopper, press "START" button.
Coins of a set value will get in the stacker hopper for counted coins and the result will be
shown on the display Fig. 1-8.
Coins of other face values will be ejected from the tube of not counted coins (on the right).
The counter will run 3 operating cycles and stop. Press "START" again. Repeat the
procedure until there are no more coins in the hopper.
Add new coins when necessary.
Insert a new bag.
Repeat 3.4 operations.
In case of one face value coins being in the hopper, repeat 3.1 operations.
4. MAINTENANCE AND TROUBLESHOOTING
4.1 Daily maintenance
The most troubles which appear while the coin counter is in operation be prevented by
daily maintenance Regular care of the counter will significantly prolong life time and allow
you to avoid costly repair.
• Turn off the machine before making making maintenance.
• Clean the coin runway and the count sensor at least once a day with a soft brush .
• Check whether the feed belt is dirty or worn. If it’s dirty, it may be cleaned using
soft cloth moistened with denatured alcohol. If the belt is worn, it should be replaced
to new one.
•If service maintenance or repair is required, refer to the distributor for qualified
service.
IMPORTANT: Please turn off and unplug the machine before cleaning.
4.2 Troubleshooting
• Coin runway jamming
If coins are jammed on the coin runway, rotate the coin diameter knob counter -
clockwise to release the left guide plate. The jammed coin will fall into the reject coin
box. Then you can reset coin diameter knob again.
Important: Don’t disassemble or repair machine singly.
Don’t place foreign objects especially metallic things.
If any malfunctions occur, please contact Cassida Technical
Support.
Keep your hands away from coin runway when the counter is in
operation! It may cause fingers injury.
moving money forward
15
Cassida C550 HIGH SPEED COIN COUNTER
14
4.3 Warranty
Warranty is effective for a period of one year from the date of purchase. In most cases, the
malfunction of the machine can be resolved by cleaning the unit.
• Customer should allow Cassida the time and opportunity to test and diagnose the
machine to determine warranty and non- warranty claims.
• After receiving and unpacking the units, Customer shall keep the package and its user
manual. Warranties are canceled in the event the device is transported in a non-original
packaging or operation/ maintenance conditions are not met.
• Company is not responsible for unit malfunction due to improper maintenance, storage
and transportation including mechanical damage.
• Manufacturer is entitled to introduce updated software, not described in the current user
manual.
Non-warranty service:
Cassida can perform maintenance and cleaning for an extra fee. For a non-warranty
repair or maintenance quotation, contact Cassida Technical Support.
Warranty service is not available in the following cases:
• Cleaning of the unit from dust and mud
• Absence of a warranty card or an incorrectly filed warranty card
• Operation or maintenance requirements detailed in the user manual are not met
• There is mechanical damage to the unit or the seal portions of the unit have been
opened or tampered with
• There are foreign objects or liquid inside of the unit.
Shipping:
The warranty does not cover shipping cast to or from Cassida Technical Service Center.
Before shipping the unit to the Cassida Technical Service Center the warranty card must
be filled out with model full name and number, serial number, cause for service, errors
occurred.
4.4 Contact information
Technical Support contact information:
e-mail: [email protected]
tel: 042 739 328
www.cassida.me, www.cassidausa.com
When contacting Cassida Technical Support, please have the following:
• Product model – Located on the back side of your currency counter
• Serial number – Located on the back side of your currency counter
• Nature of the problem – What happens, and when did it happen? Did the
machine display an error message?
• Steps already taken to resolve the problem, and the results.
Office # 101,
Biyat Complex (Landmarks: Emirates Billiard Centre)
Hor Al Anz East, Behind Al Mamzar Centre
Dubai - United Arab Emirates
PO box 454867
moving money forward

moving money forward
Table of contents
Other Cassida Cash Counter manuals

Cassida
Cassida 6600 Manual

Cassida
Cassida Xpecto User manual

Cassida
Cassida TillTally User manual

Cassida
Cassida 6600 User manual

Cassida
Cassida Xpecto LiTE User manual

Cassida
Cassida InstaCheck II User manual

Cassida
Cassida 5520 UV User manual

Cassida
Cassida 5510 User manual

Cassida
Cassida Cube User manual

Cassida
Cassida 3200 User manual