Chuango LTE-400 User manual

LTE-400
WiFi & Cellular Smart Home
Alarm System
User Manual

Foreword
Thank you for purchasing the alarm system. Please unpack the product, familiarize
yourself with the component parts, and carefully read through the instruction guide
before installation.
The installation must be completed in the order shown in the guide to ensure a successful
installation.
Disclaimer
All statements, technical information and recommendations in this manual are believed to
be reliable, but the accuracy and completeness thereof are not guaranteed or warranted.
The specications and information regarding the products as shown in this document is
subject to change without notice.
The reproduction, language translation modication, storage in a retrieval system or re-
transmission, in any form or by any means, electronic, mechanical or otherwise, is strictly
prohibited without prior written permission.
In no event are we liable for any indirect, special, incidental, or consequential damages,
including, without limitation, lost prots or loss or damage to data arising out of the use
or inability to use this document.

Contents
Packing List -------------------------------------------------------------------------------------------- 1
Getting Know Your System -------------------------------------------------------------------------- 2~3
Hub ------------------------------------------------------------------------------------------------- 2
Description of Indicator Lights ---------------------------------------------------------------------- 3
How to identify if the system is working through WiFi or Cellular? ---------------------------------- 3
Remote Control ---------------------------------------------------------------------------------------- 4
Door/Window Contact --------------------------------------------------------------------------------- 5
Tamper Switch --------------------------------------------------------------------------------------- 5
Low Battery Indication ------------------------------------------------------------------------------- 5
Pet-Immune PIR Motion Detector ------------------------------------------------------------------- 6~7
Tamper Switch --------------------------------------------------------------------------------------- 6
Detection Area --------------------------------------------------------------------------------------- 6
Pet-Immune Function -------------------------------------------------------------------------------- 7
Working Mode --------------------------------------------------------------------------------------- 7
Getting Started ------------------------------------------------------------------------------------ 8~11
Step One: Download the App ------------------------------------------------------------------------ 8
Step Two: Sign Up/ In -------------------------------------------------------------------------------- 8
Step Three: Add the Smart Hub to the App ----------------------------------------------------- 9~11
Device Control and Settings ----------------------------------------------------------------------11~19
System Status --------------------------------------------------------------------------------------- 12
Edit Accessories ------------------------------------------------------------------------------------- 12
Zone Mode ----------------------------------------------------------------------------------------- 13
Add New Accessories to the Hub -------------------------------------------------------------------14
Settings -----------------------------------------------------------------------------------------15~19
App Operation -----------------------------------------------------------------------------------20~23
Remote Phone Operation----------------------------------------------------------------------------- 24
Installation ----------------------------------------------------------------------------------------25~28
Hub ------------------------------------------------------------------------------------------------- 25
Door/Window Sensor ------------------------------------------------------------------------------- 26
PIR Motion Detector ----------------------------------------------------------------------------27~28
Replacing Accessory Batteries ------------------------------------------------------------------------ 29
Restoring to Factory Settings -------------------------------------------------------------------------29
Specications -------------------------------------------------------------------------------------30~31

01
Packing List
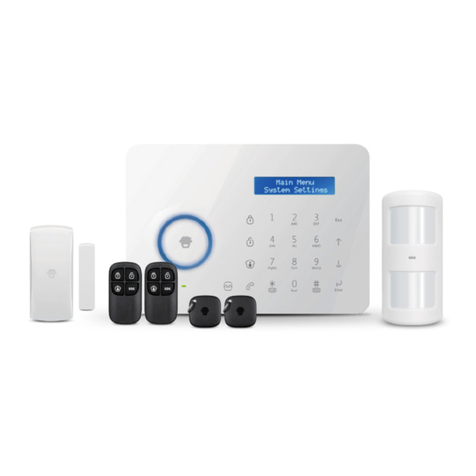
Smart Hub x1 PIR-910 Pet-immune PIR
Motion Detector x1
DWC-102 Door/
Window Contact x2
RC-80 Remote Control x2 Power Adapter x1 Hub Bracket x1
PIR Motion Detector
Bracket x1
Double-sided Tape
for Door/Window
Sensor x4
Quick Guide

02
Getting to Know Your System
Hub
WiFi
Indicator
Light
Cellular Indicator Light
Status Indicator Light
Front Side
SOS Button
Top Side
Tamper Switch
SIM Card Slot AC Adapter Port
Power Switch
Conguration Button
Back Side

03
Description of Indicator Lights
Indicator Light Status Meaning
Wi-Fi Indicator
Light
Blinking Searching for Wi-Fi network
Solid Yellow Booting up after power on or Cellular network is
connected, but the system is using the WiFi network.
Status Light
White Powered on
Blinking White Hub is in low battery condition. Please connect with AC
power.
Blue Home mode
Green Disarm mode
Red Arm mode
Blinking Red Alarm/panic mode
Alternating Red
and Blue The hub is in AP Mode or SIM Card Cong Mode.
Alternating Red,
Green and Blue The hub is in Accessory Pairing Mode.
Off Hub is not powered on, or not powered with the adapter.
Off No SIM card or Cellular has been deactivated on the App
Cellular Indicator
Light
Blinking (3 times
per second)
Cellular network is connected and the system is using the
Cellular network.
Blinking (once
per second) Searching for the Cellular network
Off No SIM card or Cellular has not been activated on the
App.
Note: The hub must be always being connected to AC power in order to maintain a WiFi
connection. When AC power is lost, the speaker will beep for 30 seconds and the Hub will
stay online for 2 minutes; long enough to send out push notications to users alerting them
of the power disconnection. The system will remain active and continue to monitor during a
power outage. If the system is armed, it will activate its onsite alarm if a sensor is triggered.
How to identify if the system is working through WiFi or Cellular?
Working through WiFi: The WiFi indicator is steady on.
Working through Cellular: The WiFi indicator and the Cellular indicator blink quickly.

04
Remote Control
The remote control can be used to Arm, Home Arm and Disarm the system. It can also
be used to trigger an emergency alarm (SOS) manually.
Arm Button
LED Indicator
Disarm Button
SOS Button
Home Arm Button
Button System Status
All sensors will be Armed. Set to this mode when the property is
unoccupied.
The system will be Disarmed, no sensor will trigger the alarm.
Note: When system is set to ‘Disarm’, all re, smoke and water sensors
(purchased separately) will remain active as they are factory set to 24-
Hour Zone.
Sets the system to Home mode. Sensors that are set to the Home Zone
will not be Armed while all the others will be Armed. This mode allows
a select set of sensors (Sensor in Arm Zone and 24-Hour Zone, for
example, door/ window contacts) to be Armed, allowing the occupier
freedom of movement within the property.
The SOS button will trigger the alarm and send an alert notication to
registered users regardless of the hub mode.

05
Door/Window Contact
Door/window contacts are set to ‘Armed’ zone by default and are ideal for protecting
entry/exit points such as front doors, back doors, and windows. When the system is
Armed (Away Mode) and the door/window contact is triggered (magnet separated
from the transmitter), the hub internal siren will sound immediately and send a push
notication with the sensor name to its registered users.
2.5m
Triggers
when >2cm
LED blinks once
Tamper Switch
The tamper switch (small black button underneath the back cover) will activate the alarm
if an unauthorized attempt is made to remove the contact from its installed location.
Low Battery Indication
If the LED indicator ashes once per 3 seconds, the battery must be replaced.

06
Pet-Immune PIR Motion Detector
The motion detector is designed for use on interior walls and is set to Home Mode by
default. Whenever the sensor detects movement (only while the alarm is armed), a push
notication including the sensor name will automatically be sent to the registered users,
and the hub’s internal siren will sound immediately.
2.5m
Triggers
when >2cm
LED blinks once
1. Detection Window
2. LED Indicator
3. Snap Joint
4. Test Button
5. Bracket
2.5m
Triggers
when >2cm
LED blinks once
Zone Setting
Infrared Sensor
Infrared Sensor
LED ON / OFF
Tamper Switch
Blinks continuously Motion detector is performing a self-test
Blinks once Motion detected
Blinks once every 3 seconds Low battery indication, please change the battery
immediately
Tamper Switch
The tamper switch will trigger an alarm notication if an unauthorized attempt is made to
remove the cover of the detector from its housing.
Detection Area
2.5m
Triggers
when >2cm
LED blinks once
Top View
Side View

07
Pet-Immune Function
This sensor adopts dual detection window design to improve detection accuracy.
It was only when both detection windows detect body movement will it trigger an
alarm. While only one window will not cause an alarm. Based on this principle, pets
less than 25 kg will not be detected by the sensor.
Working Mode
Testing Mode
Press the test button, the detector enters testing mode and detects once every 10
seconds. After 3 minutes, the LED indicator blinks twice, and the detector switches to
power saving mode.
Power Saving Mode
This motion detector has smart power saving function. If the detector is triggered
twice within 3 minutes, it enters sleeping state immediately to save power. During this
period, any movement detected does not generate an alarm. After no movement
within the next 3 minutes, it goes back to working state again.
Note: When the detector goes into sleeping state, the precondition of alarm is that no one
moves in 3 minutes in the detection area; otherwise it will remain in the sleeping state.
If the detector is in sleeping state, it is suggested to leave the room and make sure nobody
moves in the detection area. The detector will go back to working state in 3 minutes.

08
Getting Started
Step One: Download the App
Download the app from the App Store or Google Play by searching the keywords
“DreamCatcher Life”.
DreamCatcher Life
Step Two: Sign Up/ In
Press the “Sign up” button on the page and follow the instructions to create your account
rst.
Once you have an account, select the “Sign in” to enter the login page.

09
Step Three: Add the Smart Hub to the App
1. Press the [ + ] button on the main page. Tap on [Security & Sensor], then follow the
device set up steps to connect the hub with your home WiFi.
2. There are two ways to add the device: AP Mode and SIM Card Cong.
AP Mode: Press the conguration button for 5 times and you will hear one beep, then
enter the Wi-Fi password and tap “Conrm”. Next, connect your mobile phone to the
device’s hotspot. In your phone’s Wi-Fi list, connect to “LTE-400 Alarm” and then return
to the app, wait for the connecting process to complete.
Important: The Hub does not support 5GHz band Wi-Fi. If a dual-band (5GHz and 2.4GHz) router is
used, make sure to connect to the 2.4GHz Wi-Fi instead of the 5GHz’s. Make sure your smart phone is
connected to the local Wi-Fi network and then follow the steps in the app to connect the hub to the
router.

10
SIM Card Cong: If home Wi-Fi is not available, SIM card Cong comes in handy for
sending notications, SMS and phone calls. First prepare a regular-size 4G SIM card and
insert it into the hub’s SIM slot.
Press the conguration button for 5 times and you will hear one beep, and then connect
your mobile phone to the device’s hotspot. In your phone’s Wi-Fi list, connect to “LTE-400
Alarm” and then return to the app, wait for the connecting process to complete.
If the SIM card cong fails, you might need to ll in the APN settings of the card.
*Note: The APN setting varies from country to country. Please consult the local operator
on how to set the APN correctly.

11
Note: If you intend to use Cellular as a backup in case of Wi-Fi disconnection, please insert
the SIM card and go to LTE-400 Settings --Advanced Settings -- rst enable Cellular Network
and input required information for cellular data in APN Settings. Set up SMS & Phone calls
notication can be found here as well, input the number which you’d like to receive SMS/
Phone calls and click the SMS/Phone call icon(s) respectively.
Device Control and Settings
History & Setting
SOS Alarm
Tap to add new accessories
Accessory Status
System Status: Home Arm, Disarm, Arm

12
System Status
Arm
All sensors will detect for anomalies during this mode. The hub internal siren will sound
immediately when a sensor is triggered. You and other pre-authorized users will receive
push notications on your phones.
This mode is suitable when the property is unoccupied. It can be set from the remote
control or app.
Home (Part Arm)
All Home Zone sensors will stop detecting during this mode. This allows you and your
family to move freely inside your home without triggering an unwanted alarm.
Note: The door/window sensors in this kit have been set to Arm Zone and the PIR sensor is set to
Home Zone by default, you can change their zone mode on the “Accessory” section of the App.
This mode is recommended for when someone is at home. It can be set from the remote control
or app.
Disarm
All sensors stop detecting except 24-Hour Zone sensors, which will trigger the alarm
regardless of system status.
Edit Accessories
Tap the accessory to enter its setting page where you can rename the device or set the
device type and zone mode.
Tap the switch to disable the accessory.

13
Zone Mode
Arm Zone
Sensors set to Arm Zone are armed when the system is in Away (Full Arm) or Home Arm
(Part Arm) status. We recommend setting window/door sensors to this zone as they
usually secure the perimeter of the house.
Home Zone
Sensors set to Home Zone are only armed when the system is in Away (Full Arm) status.
During Home Arm mode, these sensors will not be armed and will not activate the alarm
when triggered. We recommend setting PIR motion sensors to this zone as they usually
secure the interior of the house.
24-Hour Zone
Sensors set to 24-Hour Zone will activate the alarm when triggered, regardless of the
alarm status at the time (away or disarmed).
Delay Zone
The working mode of sensor in this zone will be same as Arm Zone sensor’s, but the Hub
will alarm after an Entry Delay Time*if this sensor is triggered when system was armed or
in home mode.
* Entry Delay Time: you can set this delay time on LTE-400[Settings]-[Delay Settings]-[Entry Delay].
Note: Optional Smoke, Gas Leakage or Water Flood Sensors are automatically registered as 24-
Hour Zone sensors and cannot be changed to other Zones. Any motion or door/window sensors
paired to the hub by the tamper switch will be registered as an 24-Hour sensor.

14
Add New Accessories to the Hub
Remote control, Door sensor and other accessories.
Enter the LTE-400 Smart Hub home page and tap “+”beside accessory, then trigger the
accessory to add it to the hub.
Pair with Remote Control
Press any button on the
remote control
Pair with Door Sensor
Separate the transmitter
from the magnet
Pair with PIR Sensor
Place the PIR motion
detector in a high position
and then walk within the
detection area to trigger the
PIR alarm once (the indicator
light ashes once).
Please note that pressing the tamper switch instead of triggering the sensor will register it
as an 24-Hour Zone sensor.
(Optional Accessory) Wireless Siren
1. Press the Learn Button on the Siren
2. Arm the Hub via the App

15
Settings
Tap [ ] button to enter into hub setting page.
Device Name
This setting enables you to rename your hub, and the new name will be shown on the
Home Page.
Device Information
Check detailed information of the hub and update rmware if needed.

16
Wireless Outdoor Siren
When connecting an Outdoor Siren (optional accessory) to the Hub, you can enable the
arm/disarm alert sound of the siren on the app.
Auto Arm/Disarm
The system can be programmed to automatically Arm and Disarm the system at
predened times by following the steps below:
1. Enable a timer to add a scheduled action.
2. Choose any mode you want the system to become (Away / Disarm / Home ).
3. Choose the activate time of the status.
4. Select the date that you want this timer to repeat.

17
Delay Settings
Exit Delay Time
Set a time delay for you to leave your property without triggering an alarm. You can
choose to switch on the delay alert sound.
Entry Delay Time (Available only for Delay Zone Sensor)
Set a time delay for you to enter your property without triggering an alarm. You can
choose to switch on the delay alert sound.
Test Mode
Under test mode, if you trigger any sensors, the system will not sound the alarm but give
out 3 beeps. You can quit this mode once you nish the testing.
Table of contents
Other Chuango Security System manuals
Chuango
Chuango OV-300 User manual
Chuango
Chuango SPS-260 User manual
Chuango
Chuango H4 PLUS User manual

Chuango
Chuango G5 User manual

Chuango
Chuango WS-105 User manual
Chuango
Chuango WS-280 User manual
Chuango
Chuango AWV Plus User manual
Chuango
Chuango G5 User manual

Chuango
Chuango AW1 Plus User manual

Chuango
Chuango G5 User manual
