manuals.online logo
Brands
  1. Home
  2. •
  3. Brands
  4. •
  5. Cisco
  6. •
  7. IP Phone
  8. •
  9. Cisco 7945 Series User manual

Cisco 7945 Series User manual

Other manuals for 7945 Series

15

Other Cisco IP Phone manuals

Cisco 7931G - Unified IP Phone VoIP User manual

Cisco

Cisco 7931G - Unified IP Phone VoIP User manual

Cisco SPA525 Series User manual

Cisco

Cisco SPA525 Series User manual

Cisco 7962G - Unified IP Phone VoIP User manual

Cisco

Cisco 7962G - Unified IP Phone VoIP User manual

Cisco Cisco Unified IP Phone 7960G Service manual

Cisco

Cisco Cisco Unified IP Phone 7960G Service manual

Cisco Unified 8961 User manual

Cisco

Cisco Unified 8961 User manual

Cisco 7931G - Unified IP Phone VoIP Instruction Manual

Cisco

Cisco 7931G - Unified IP Phone VoIP Instruction Manual

Cisco 8800 Series User manual

Cisco

Cisco 8800 Series User manual

Cisco 8800 Series User manual

Cisco

Cisco 8800 Series User manual

Cisco 7961 User manual

Cisco

Cisco 7961 User manual

Cisco SPA504 User manual

Cisco

Cisco SPA504 User manual

Cisco 7942G - Unified IP Phone VoIP User manual

Cisco

Cisco 7942G - Unified IP Phone VoIP User manual

Cisco 7905 serie User manual

Cisco

Cisco 7905 serie User manual

Cisco SPA 303 Series User manual

Cisco

Cisco SPA 303 Series User manual

Cisco 7912 User manual

Cisco

Cisco 7912 User manual

Cisco MCS 7800 Series Instruction Manual

Cisco

Cisco MCS 7800 Series Instruction Manual

Cisco SVP2000P User manual

Cisco

Cisco SVP2000P User manual

Cisco Cisco 7960 Service manual

Cisco

Cisco Cisco 7960 Service manual

Cisco 7841 User manual

Cisco

Cisco 7841 User manual

Cisco Cisco 7940 User manual

Cisco

Cisco Cisco 7940 User manual

Cisco 7911 User manual

Cisco

Cisco 7911 User manual

Cisco 8945 Setup guide

Cisco

Cisco 8945 Setup guide

Cisco Cisco 7940 User manual

Cisco

Cisco Cisco 7940 User manual

Cisco SPA504 User manual

Cisco

Cisco SPA504 User manual

Cisco 8861 User manual

Cisco

Cisco 8861 User manual

Popular IP Phone manuals by other brands

Cortelco C62 VoIP Phone user guide

Cortelco

Cortelco C62 VoIP Phone user guide

VanillaIP Polycom IP300 user manual

VanillaIP

VanillaIP Polycom IP300 user manual

Yealink Yealink SIP-T22P Quick installation guide

Yealink

Yealink Yealink SIP-T22P Quick installation guide

Viking SR-IP product manual

Viking

Viking SR-IP product manual

Yealink VP59 Teams user guide

Yealink

Yealink VP59 Teams user guide

Panasonic KX-UT133-B Administrator's guide

Panasonic

Panasonic KX-UT133-B Administrator's guide

Avaya one-X 9600 Series overview

Avaya

Avaya one-X 9600 Series overview

AVA Enterprises B179 Installation and administration guide

AVA Enterprises

AVA Enterprises B179 Installation and administration guide

Polycom SoundPoint IP 450 datasheet

Polycom

Polycom SoundPoint IP 450 datasheet

IPitomy IP290 user manual

IPitomy

IPitomy IP290 user manual

Polycom SoundPoint IP 650 user guide

Polycom

Polycom SoundPoint IP 650 user guide

Proximus Maestro 3016 IP quick start guide

Proximus

Proximus Maestro 3016 IP quick start guide

Polycom IP 450 user guide

Polycom

Polycom IP 450 user guide

Fanvil X4 user manual

Fanvil

Fanvil X4 user manual

Snom 320 quick start guide

Snom

Snom 320 quick start guide

Avaya Integral 5 R3.0 user guide

Avaya

Avaya Integral 5 R3.0 user guide

Yealink Yealink SIP-T46G Guide

Yealink

Yealink Yealink SIP-T46G Guide

Yealink SIP-T52S quick start guide

Yealink

Yealink SIP-T52S quick start guide

manuals.online logo
manuals.online logoBrands
  • About & Mission
  • Contact us
  • Privacy Policy
  • Terms and Conditions

Copyright 2025 Manuals.Online. All Rights Reserved.

Cisco IP Phone 7945 Phone Instructions | 1
Cisco IP Phone 7945 Phones
Instructions
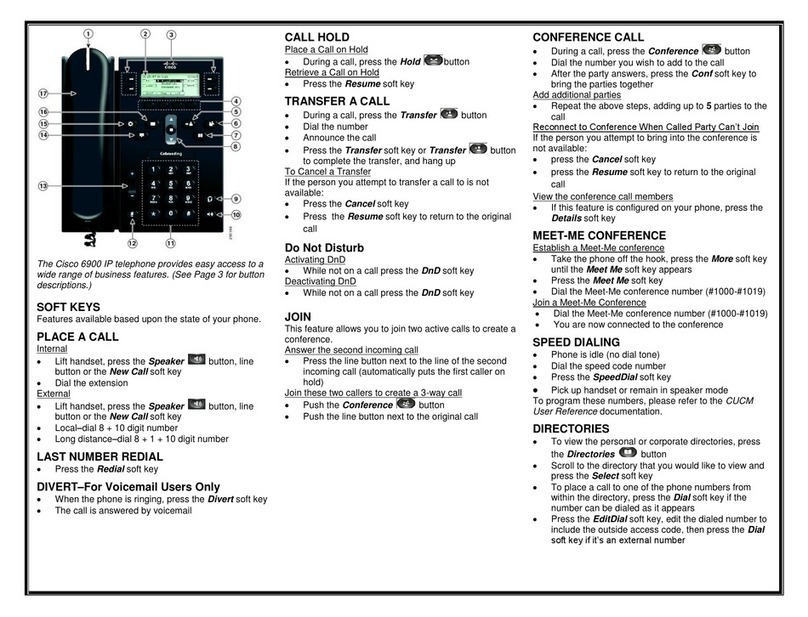
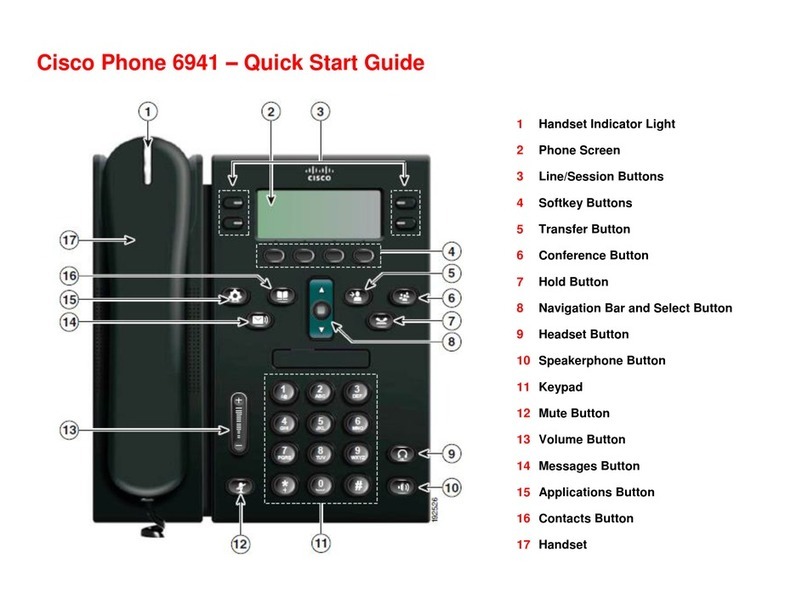
Programmable Buttons (Softkeys)
1
Programmable
buttons
Depending on configuration, programmable buttons provide access to:
!Phone lines (line buttons) and intercom lines.
!Speed-dial numbers (speed-dial buttons, including the BLF – busy
indicator, speed-dial feature).
!Web-based services (for example, a Personal Address Book button).
!Call features (for example, Privacy, Hold or Transfer button).
Buttons illuminate to indicate status:
Green, steady—Active call or two-way intercom call.
Green, flashing—Held call
Amber, steady—Privacy in use, one-way intercom call,
DND active or logged into Hunt Group
Amber, flashing—Incoming call or reverting call
Red, steady—Remote line in use (shared line or BLF
status).
2
Footstand button
Enables you to adjust the angle of the phone base.
3
Display button
Cisco Unified IP Phone 7965G: Awakens the phone screen from sleep mode.
No color – Ready for input.
Green Steady – Sleep mode.
4
Messages button
Auto-dials your voice message service (varies by service).
5
Directories button
Opens/closes the Directories menu. Use it to access call logs and directories.
6
Help button
Activates the Help menu.
7
Settings button
Opens/closes the Settings menu. Use it to change phone screen and ring
settings.
8
Services button
Opens/closes the Services menu.
9
Volume button
Controls the handset, headset, and speakerphone volume (off-hook) and the
ringer volume (on-hook).
10
Speaker button
Toggles the speakerphone on or off. When the speakerphone is on, the
button is lit.
11
Mute button
Toggles the microphone on or off. When the microphone is muted, the
button is lit.
12
Headset button
Toggles the headset on or off. When the headset is on, the button is lit.
13
4-Way Navigation
pad button and
Select button
(center)
Enables you to scroll through menus and highlight items. Use the Select
button to select an item that is highlighted on the screen. Navigation button –
Scroll up and down to see menus and highlight items and right and left across
multiple-column displays. Select button – Scroll to highlight a line using the
Navigation button and then press to open a menu, play a ringer item, or
access other features, as described on the screen.
14
Keypad
Enables you to dial phone numbers, enter letters and choose menu items.
15
Softkey buttons
Each activates a softkey option (displayed on your phone screen).
16
Handset light strip
Indicates an incoming call or new voicemail message.
17
Phone screen
Shows phone features.
Cisco IP Phone 7945 Phone Instructions | 2
Dialing Patterns
!Internal Calls: 4-Digit Dialing
!Outside Calls: 9 + Number
!School Receptionist: Dial 0
!Dial 9911 for Emergency Dialing
Voicemail Instructions
To log on to voicemail from another phone:
!Dial voicemail, or press the Messages button.
!Press the *key immediately; it will ask for your User ID. Enter your
4-digit Extension and the #key.
!Enter your Password, and then press the #key. (First time users enter
12345 to complete First Time Enrollment.)
Basic Call Features
Five ways to place a call (dial 9 for outside calls):
!Lift the handset, press the line button, press the Speaker button or press
the New Call softkey and dial the number.
!Enter the number and press the Dial softkey.
Four ways to answer a call:
!Lift the handset, press the line button associated with the incoming call,
press the Answer softkey (appears for incoming calls) or press the
Speaker button.
Three ways to end a call:
!Hang up the handset, press the Speaker button or press the EndCall
softkey.
Place a call on and off hold:
!While on a call, press the Hold softkey.
!To return to the call, press the Resume softkey.
!If multiple calls on the same line are on hold, use the Navigation button
to select the desired call before you press Resume softkey.
Redial the most recently dialed number:
!Lift the handset and press the Redial softkey, or press the Redial softkey
to call the last called person.
Call Waiting
You will hear a call waiting tone and see caller ID in your display when
another call is coming in.
To answer:
!Press the Answer softkey; the original caller is placed on hold
automatically.
!To reconnect and toggle between calls, use your Navigation button to
select the calling party and press the Resume softkey.
Call Transfer
To transfer a call:
1. During a call, press the Transfer softkey. This places the call on hold.
2. Place a call to another party.
3. When you hear ringing, press the Transfer softkey again, or when the
party answers, announce the call and press Transfer softkey.
4. If the party does not accept the call, press the EndCall softkey and select
Resume softkey to return to the original call.
5. Transfer Directly to Voice Mail – Enter *+ 4-Digit Extension. This
will transfer caller directly to Voice Mail greeting without ringing the
phone. Note: Useful for transferring callers to users who do not want to
be interrupted during a meeting or unavailable.
Directories Button (Call History)
To view a missed call, received call or placed call:
1. Press the Directories button.
2. Press the Navigation up or down button to select the appropriate option
in the Directory menu.
3. Press the Select softkey to display the calls list.
4. To dial the outside number, press the Navigation up or down button
to select the number. Press the Edit Dial softkey and press 9for an
outside line. Press the Dial softkey to dial.
5. When you are finished with the Directories options, press the Exit
softkey several times to exit the Directory menu.
Type. Press Play softkey to hear a sample of a ringtone.With the new
ring type selected, press Select softkey, then Save softkey.
Extension Mobility (Temporary Phone)
This is used to log in to another Cisco IP Phone using your own phone
profile (extension). Press the Services button then select Extension
Mobility:
!Enter User ID: Computer Login ID
!Enter PIN:12345 (Default PIN can be changed using the Extension
Mobility feature (Change PIN option on phone screen)
!Phone resets to apply your personal phone configuration settings of
your extension(s) from selected phone type profile.
!Press Services button for logout option when you are done using the
temporary phone.
!If you are logged in on another phone and would like to log in to
another IP phone, repeat the same login process. The phone system will
automatically log you out from the previous IP Phone.
!Maximum Login Timer: 12 Hours before auto-logout
Cisco IP Phone 7945 Phone Instructions | 3
Forward All Calls
To forward calls to Voice Mail, another extension or outside number:
1. Press the CallFwdAll softkey.
2. Immediately press the Messages button or enter the 4-Digit
Extension for internal calls or 9 + Number for outside number
(mobile number) temporarily.
To cancel Forward All Calls:
1. Press the CallFwdAll softkey.
Ring Type
Press the Settings button. Press 1, 1 for Ring Type or arrow down to Ring
Type. Press 1to select Default Ring settings and press Select softkey. Use
the Navigation button to select User Preferences, then highlight the Ring
Conference Call (Max: 6 total participants)
To place a conference call:
1. During a call, press the More softkey and then the Confrn softkey. This
will automatically select a new line and place the other party on hold.
2. Place a call to another party.
3. When the call connects or starts ringing, press the Confrn softkey again
to add the party to the call.
4. Repeat to add additional callers.
5. To remove/view participants from the call, press More softkey, select
ConfList softkey. The user with the * after the extension is the
individual who has control of the conference bridge. Highlight the
user that needs to be removed and select Remove softkey. Use
RmLstC softkey to remove the last participant who joined the
conference.
Note: Only the individual who initiated the conference bridge will be able
to remove/add Participants. Users who are participants of an existing
bridge can still view other users following above steps
Conference Call Options
!Mute: Press the Mute button to turn off the microphone. The
conference parties cannot hear you, but you can hear them.
!Hold: To place a conference call on hold, press the Hold softkey. You
cannot hear the other parties and they can’t hear you.
!Speaker: To place a conference call on speakerphone, press the Speaker
button.
!Add Caller: To add additional callers to an existing conference call,
follow the steps listed previously in the place a conference call section.
Note: Only the person initiating the conference call can add callers
Corporate Directory
1. Press the Directories button.
2. Press 5on the keypad or use the Navigation button down to Corporate
Directory.
3. Enter the first letter of the party’s first name, last name or phone
extension you are looking for by using the Navigation button to that
category (e.g., for the letter “B,” press 2 on the keypad twice) then press
the Search softkey.
4. The phone will display all corporate contacts with a name beginning with
the letter you entered.
5. Use the Navigation button to select the name, or press the number
next to the name you want to call. Press the Dial softkey and you will be
connected.
Join
This feature allows you to join two incoming calls.
To answer the second incoming call:
!Press the Answer softkey, if it’s appropriate to place your first caller on
hold (pressing this softkey automatically puts the first caller on
hold).
To join these two callers and create a 3-party call:
!Navigate to the call that is on hold. Press the more softkey. Press the
Join softkey;the second call shows a checkbox next to the call. Use the
Navigation button to toggle back to the first call and select the Join
softkey to join all three calls.
Brightness
Press the Settings button. Press 1, 4 on the keypad, or use the Navigation
button to select Brightness,then press Select softkey. Use the Up and
Down softkeys to change brightness, then press the Save softkey.
Volume Settings
Press the Volume up and down button to the desired level. Press the Save
softkey to keep setting.
Speaker Volume Setting
Press the Speaker button. Press the Volume up or down button to the
desired level. Press the Save softkey to keep setting.
Handset Volume Setting
Pick up the handset. Press the Volume up or down button to the desired
level. Press the Save softkey to keep setting.
Note: While the phone is on-hook, pressing the Volume button will increase
or decrease the Ringer volume.