Clas Ohlson PLD7060 User manual

EnglishSvenskaNorskSuomiDeutsch
Automatic Paint Roller
Automatroller
Automatrulle
Automaattinen maalitela
Automatik-Farbroller
Art.no Model
40-9404 PLD7060 Ver. 20140528

2
English
Automatic Paint Roller
Art.no 40-9404 Model PLD7060
Please read theentire instruction manual before using theproduct and then save
it for future reference. We reserve theright for any errors in text or images and any
necessary changes made to technicaldata. In theevent of technical problems or other
queries, please contact our Customer Services (see address details on theback).
Safety
• Never use thepaint roller in any other manner or for any other purpose than that
described in this instruction manual.
• Use only water-soluble paints or paint which does not require stronger solvents
than white spirits. Neveruse any form of paint remover together with thepaint
roller. Doingso could result in considerable danger to property, theuser or roller.
• Always read themanufacturer’s painting instructions before beginningwork.
Failureto do so could result in considerable danger to property, theuser or
damage to theroller.
• Protect your eyes and skin and always use arespirator mask when handling and
mixing paint during any use or cleaning of theroller. Paintand paint fumes can lead
to personal injury.
• Only use theroller in awell-ventilatedarea.
• Always clean theroller thoroughly whenever changing painttypes.
• Only use accessories that are recommended by themanufacturer or retailer.
• Use only accessories and spare parts that are recommended by themanufacturer
or retailer whenever repairs are needed.
Certain paints contain toxic substances. Usesufficient protective equipment
such as gloves, respirator masks,etc. Always read any relevant paint
information on thetin before beginningwork.
Note: Itis extremely important that all instructions in theCare and maintenance -
Lubrication section below are carefully followed for thebest performance and results.
Usetheincluded lubricant for any necessary lubrication requirements.
!

3
English
a
Quick-startguide
1. Thread theroller frame into theroller
assembly and fasten everything
securely with theinner lock collar (a).
5. Secure thefill-tube holder assembly
onto thepainttin.
3. Assemble thepaint handle reservoir,
kickstand coupling and roller assembly.
7. Press thetrigger once to release
theplunger. Thenpull theplunger
back to fill withpaint.
2. Mount thedrip guard onto theroller.
6. Lubricate thefill-tube with asmall
amount of lubricant and attach
theautomatic roller’s fill-valve
onto thefill-tube. Makesure that
thevalve fits completely snug over
thefill-tube.
4. Press thefill-tube firmly into
theholder.
8. Press thetrigger to advance
theplunger forward and fill theroller
head withpaint.

4
English
1
2
3
4
5
6
7
8
910
11
12
13
14
15
Parts
9. Startworking. 10. Let theroller rest on its kickstand
when not inuse.

5
English
ba c d
abce
f
d
1. Plunger
2. Paint reservoir handle
3. O-rings
4. Non-returnvalve
5. Wiperseal
6. Valve fillercap
7. Rollerframe
8. Rollercore
9. Paint roller
10. End cap
11. Dripguard
12. Connector hose (sold separately)
13. Fill-tube
14. Fill-tube holder
15. Lubricant
Assembly
1. Lubricate part (b) with thesupplied lubricant.
2. Thread theroller assembly (d) onto theroller
frame (c).
3. Secure theroller with thelock collar (a).
4. Slide theroller frame (e) into thekickstand
coupling (d) and secure it with thelock collar (f).
5. Ensure that theO-ring (c) (seated at
thebottom of thekickstand coupling) is
securely in place and insert thepaint reservoir
handle (b) into thekickstand coupling.
6. Secure everything with thelock collar (a).
7. Mount thedrip guard onto theroller.

6
English
a b
b
a
Refilling
1. Lubricate thefill-tube (a) with alittle lubricant
and press it securely into the clips of
theholder (b).
Painting
• Start rolling while simultaneously pressing in
theplunger or pulling thetrigger in order to
feed theroller head withpaint.
• Whenever resting theroller, pull thetrigger out
abit in order to ensure sure that no paint is
accidentally fed to theroller.
2. Secure thefill-tube holder assembly onto
thepainttin.
3. Oversized paint tins may require you to
extend thefill-tube. Attach ahose with
a3/4″inner-diameter onto thefill-tube’s hose
coupling (12).
4. Slant theroller at about a45º angle and
align and lower theroller’s filler valve (a)
onto thefill-tube. Makesure that thevalve is
completely snug over thefill-tube.
5. Pull theplunger (b) back to fill with paint
(thismay require some force). Oncethepaint
reservoir is full, lift theroller’s valve carefully
from thefill-tube.
6. Note: Ifthepaint reservoir does not fill
thefirst time, press theplunger forward
carefully and make sure that you have
theroller at a45º angle and that thefiller valve
fits snugly over thefill-tube. Nowtry pulling
theplunger back again and filling withpaint.

7
English
b
a
Note:
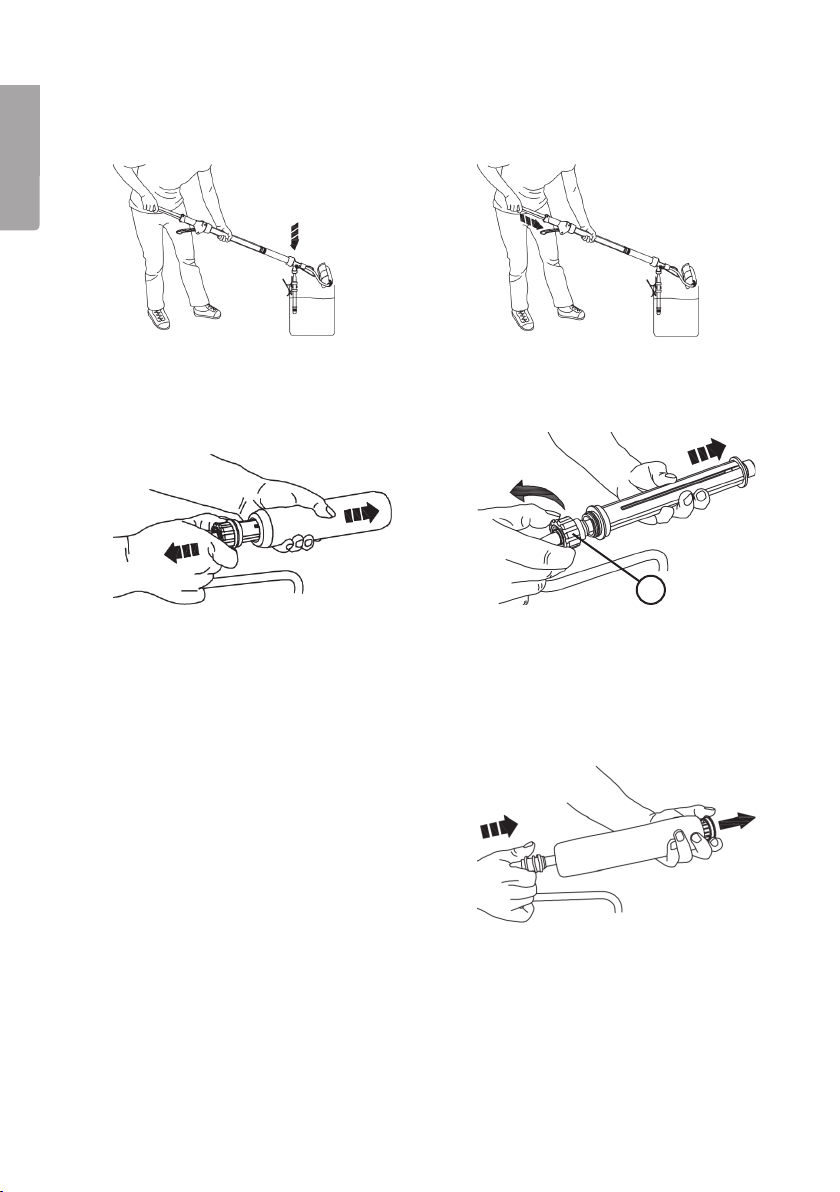
• Theroller may need to be fed with more paint initially since theroller will be
completely dry and needs to be saturated before painting. Topthereservoir up
with more paint if necessary.
• If you are considering changing rollers, remember that they must be perforated in
order to work with this type of roller
Handyhint!
• Thetrigger only needs to be pressed when more paint needs to befed.
• Press thetrigger to feed more paint if you notice that thepaint isn’t enough to
cover theroller.
• If theroller feels like it is sliding in paint, reduce thepaint feed amount.
• In order to avoid drips, hold theroller in motion when feeding paint to theroller.
• When painting in tight spaces, try to avoid filling thereservoir as this allows
theentire roller to be shorter, lighter and easier to manage.
• Wrap theroller head in aplastic bag whenever you take abreak from work in order
to prevent paint from drying onto theroller.
• Cover thefloor or any other surfaces that need protecting whenever youwork.
Makesure to also protect areas where you must handle or fillpaint.
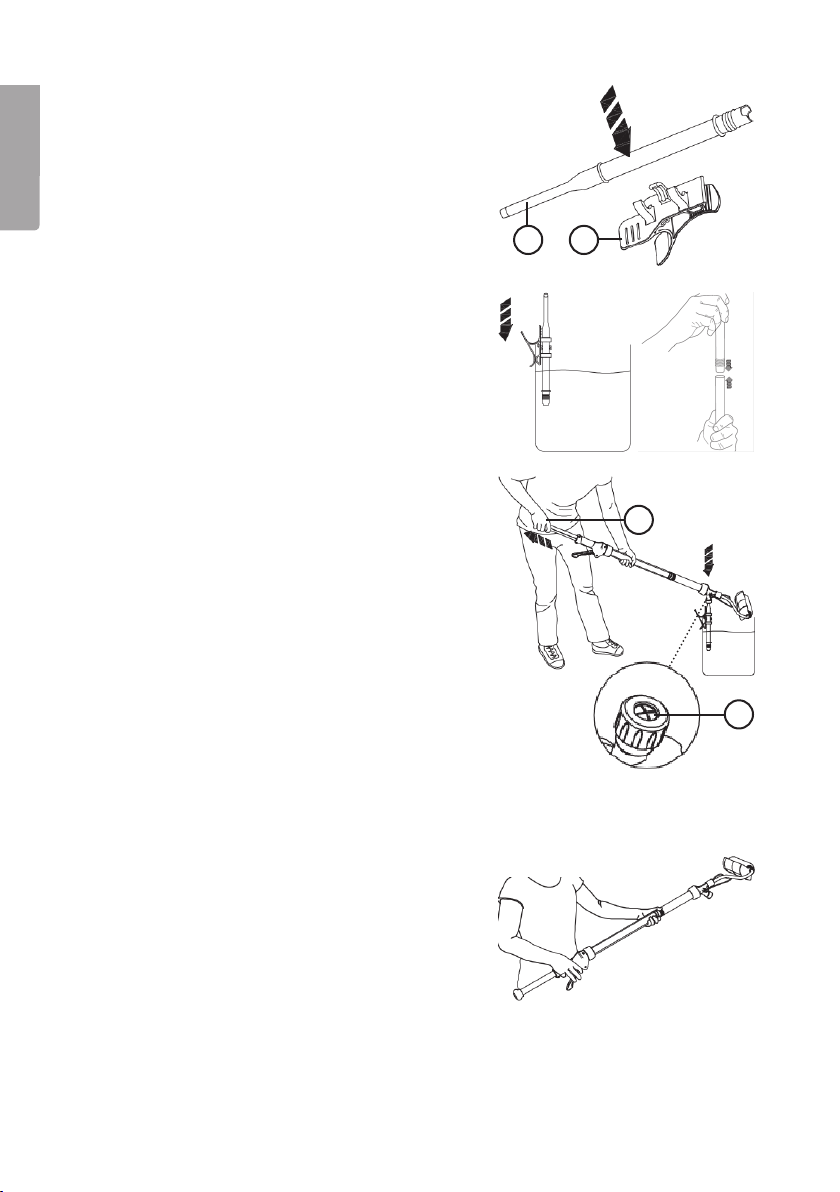
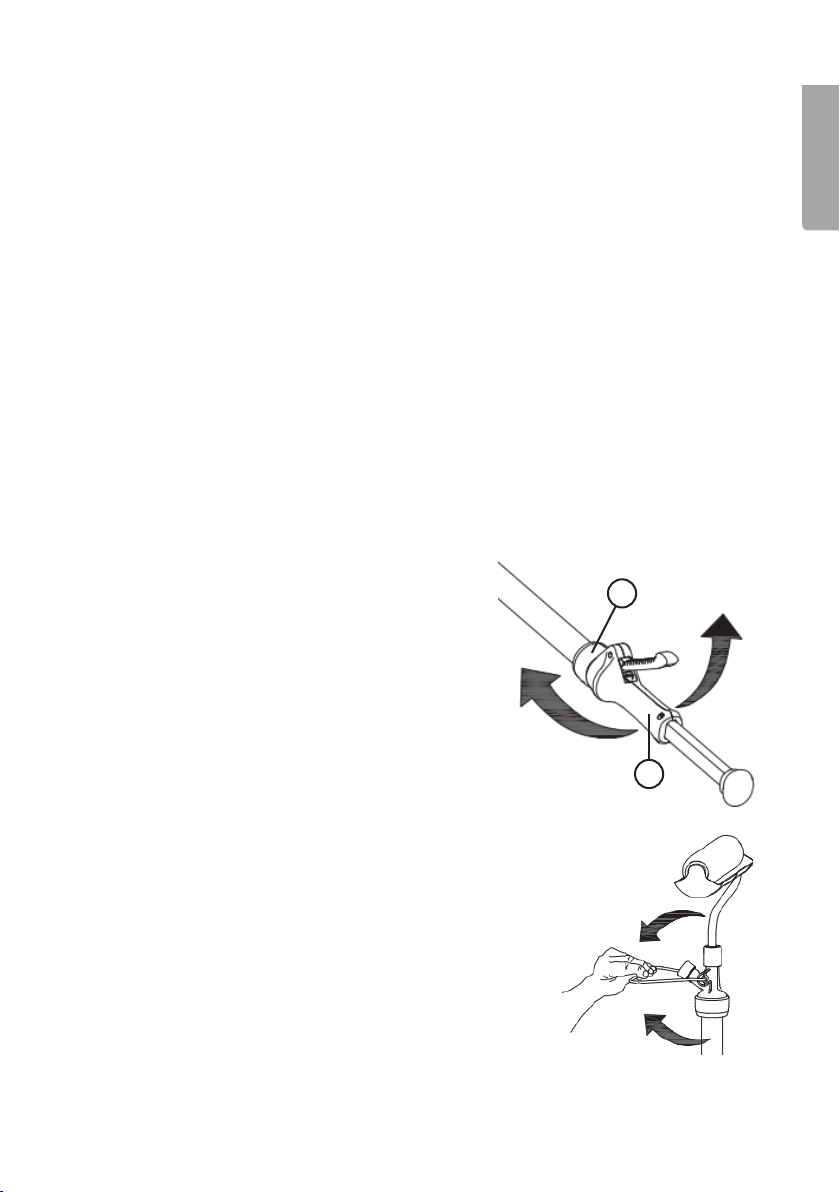
Handle rotation
Thehandle can be rotated in order to simplify
painting at difficult angles.
Loosen thelock collar (a), rotate thehandle (b)
to thedesired position and re-tighten.
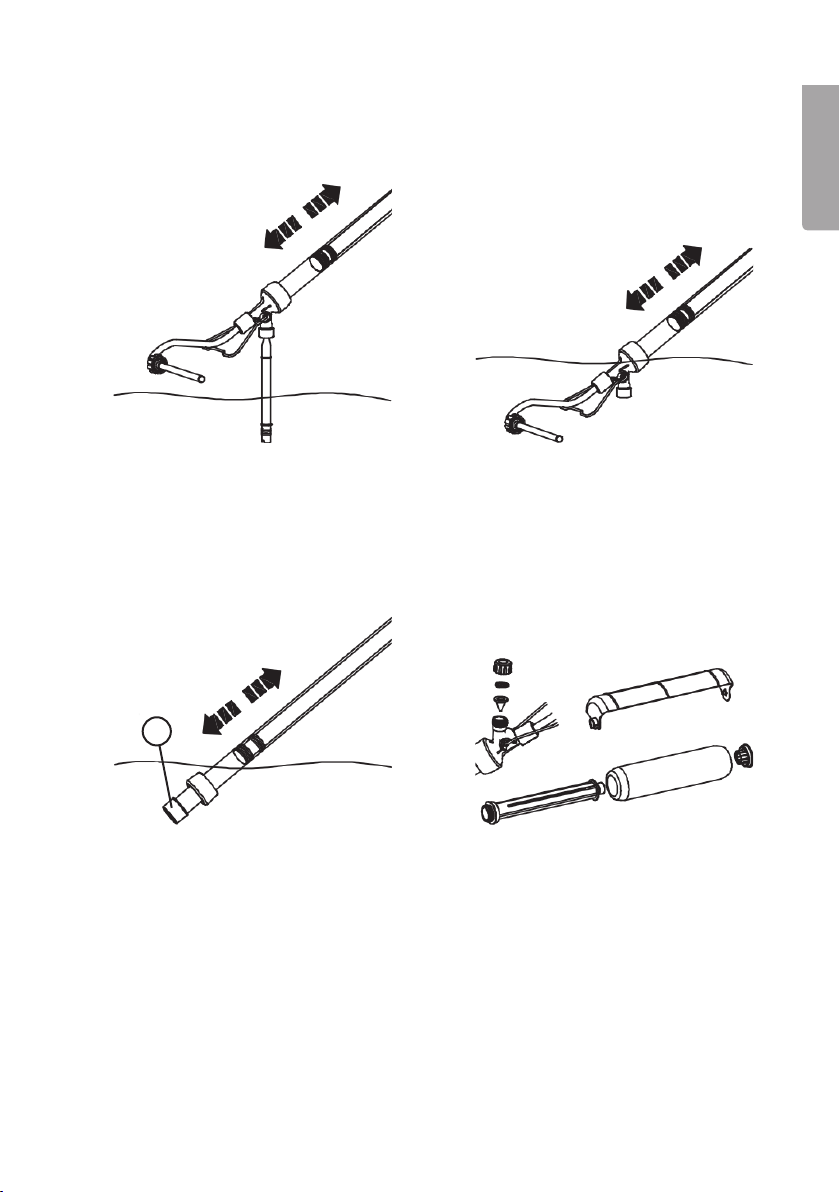
Kickstand
• Flip thekickstand out to allow theroller to rest when needed.
• Make sure that any surfaces where theroller is used are
covered with newspaper, plastic or similar protective material.
• Place some sort of drip protection underneath theroller
whenever it is resting on its kickstand to avoid accidental
spillage.
• Whenever resting theroller, pull thetrigger out abit in order
to ensure sure that no paint is accidentally fed to theroller.
• Fold in thekickstand whenever painting in order to
prevent it from getting in theway during painting.

8
English
a
Emptying thereservoir of excesspaint
Pull theplunger to draw excess paint from therollerhead. Handyhint! Plugging
thefill-vent with your finger will allow paint to be drawn more easily.
1. Set thefiller valve over thefill-tube
as if filling withpaint.
3. Remove theroller from theroller
frame. Use disposable gloves or
cover theroller with aplastic bag in
order to avoid soiling yourhands.
Scrape any excess paint from
theroller.
2. However, this time push theplunger
forward to empty thereservoir.
4. Unscrew thelock collar (a) and
remove theroller from theframe.
5. To remove theend cap, push
theroller frame further into theroller
to loosen theend cap and carefully
removeit.
6. Removing excess paint from
theremainingparts.

9
English
a
Cleaning
Water-solublepaint
1. Remove thefill-tube from its holder and insert it completely into thefill-vent.
2. Immerse thefill-tube into awarm
soapy water solution. Filland empty
thepaint reservoir about 5 times by
pulling theplunger in andout.
4. Remove thekickstand coupling
and submerge thepaint reservoir
end intowater. Filland empty it
until it is entirelyclean. Wipeoff any
remaining paint from theend of the
fill-tube which fits into the kickstand
coupling (a).
3. Remove thefill-tube and immerse
theend of thepaint reservoir
handle, kickstand coupling and
roller frame intowater. Filland
empty thepaint reservoir about
5 times by pulling theplunger in
andout.
5. Remove thevalve cap and clean
thenon-return valve and wiperseal.
Cleanany remaining parts when
needed.

10
English
a
Paint removal with solvents
1. Read thepaint manufacturer’s recommendations for proper cleaning procedures.
Forremoving water-soluble paints refer to theinstructionsabove.
2. Remember to dispose of any solvents properly once you have finished cleaning.
Care and maintenance
Lubrication
Note: Itis extremely important that theroller’s rubber seals are properly lubricated for
optimal performance, usingtheincluded lubricant.
1. Loosen thelock collar connecting
thetrigger grip and plunger to
thereservoir.
3. Lubricate theO-rings on thetip
of theplunger using theincluded
lubricant.
2. Remove thetrigger grip and
plunger from thereservoir.
4. Unscrew thevalve cap and
lubricate thenon-return valve and
wiperseal.
5. Lubricate therubber seal (a) on
therollercore.

11
English
Troubleshootingguide
Thepaint reservoir
is difficult tofill.
• Make sure that all parts are properly cleaned and
lubricated.
• Make sure that thefill-vent is fit snugly over thefill-tube.
• Make sure that theplunger’s O-rings are whole and well
lubricated.
Paint leaks from
thefill-vent.
• Make sure that all parts are properly assembled, whole,
cleaned and lubricated.
Disposal
This product should be disposed of in accordance with local regulations.
Ifyou are unsure how to proceed, contact your local council.
Specifications
Paint reservoir volume 540ml
Length 110cm

12
Svenska
Automatroller
Art.nr 40-9404 Modell PLD7060
Läs igenom hela bruksanvisningen före användning och spara den sedan för fram-
tidabruk. Vireserverar oss förev. text- och bildfel samt ändringar av tekniskadata.
Vid tekniska problem eller andra frågor, kontakta vår kundtjänst (se adressuppgifter
påbaksidan).
Säkerhet
• Använd inte automatrollern på annat sätt och för andra ändamål än vad som
beskrivs iden här bruksanvisningen.
• Använd endast vattenlöslig färg eller färg som inte kräver starkare lösningsmedel
än vanlig lacknafta. Använd heller aldrig någon form av färgborttagare tillsammans
med automatrollern. Detkan leda till skada på egendom, personskada eller till att
automatrollern förstörs.
• Läs alltid informationen som finns på färgburken innan arbetet påbörjas.
Ominte detta görs kan det leda till skada på egendom, personskada eller till att
automatrollern förstörs.
• Skydda ögon och hud och använd alltid andningsmask när du hanterar och
blandar färg, när automatrollern används och rengörs. Färgoch ångor från färg
kan leda till personskada.
• Använd endast automatrollern iväl ventilerade utrymmen.
• Rengör alltid automatrollen noggrant när du byter färgtyp.
• Använd endast tillbehör som rekommenderats av tillverkaren eller
försäljningsstället.
• Om reparationer utförts på automatrollern, använd endast tillbehör som
rekommenderats av tillverkaren eller försäljningsstället.
Vissa färger innehåller skadligaämnen. Använd skyddsutrustning som
handskar, andningsmasketc. Läsalltid informationen på färgbehållaren innan
arbetet påbörjas.
Obs! Detär mycket viktigt att instruktionerna iavsnittet Skötsel och underhåll -
Smörjning nedan följs för bästa funktion. Använd medföljandefett.
!

13
Svenska
a
Snabbguide
1. Skjut på rollern över rollerfästet och
skruva fast den med låsmuttern (a).
5. Fäst påfyllningsröret med hållaren
på färgburken.
3. Montera ihop handtaget, stödet
och rollerfästet med rollern.
7. Tryck in avtryckaren och släpp upp
den engång för att frigöra kolven,
dra sedan kolven bakåt för att fylla
påfärg.
2. Montera droppskyddet på rollern.
6. Smörj in påfyllningsröret med lite
fett och placera automatrollerns
påfyllningsventil på påfyllningsröret.
Setill att ventilen är helt påskjuten
påröret.
4. Tryck fast påfyllningsröret på
hållaren.
8. Tryck in avtryckaren för att trycka
fram kolven och fylla på färg
irollern.

14
Svenska
1
2
3
4
5
6
7
8
910
11
12
13
14
15
Automatrollernsdelar
9. Påbörja arbetet. 10. Låt automatrollern vila på stödet när
den inte används.

15
Svenska
ba c d
abce
f
d
1. Kolv
2. Färgrör
3. O-ringar
4. Backventil
5. Genomföring
6. Lock till påfyllningsventil
7. Rollerfäste
8. Rollerhållare
9. Roller
10. Låsbricka
11. Droppskydd
12. Slanganslutning (slang säljs separat)
13. Påfyllningsrör
14. Hållare för påfyllningsrör
15. Fett
Montering
1. Smörj in del (b) med medföljandefett.
2. Skjut på rollern (d) på rollerfästet (c).
3. Skruva fast rollern med låsmuttern (a).
4. Skjut in fästet (e) ikopplingsstycket (d) och
dra fast med muttern (f).
5. Försäkra dig om att o-ringen (c) (den sitter
ibotten på kopplingsstycket) sitter på plats
inne ikopplingsstycket och skjut in färgröret
(b) ikopplingsstycket.
6. Dra fast med låsmuttern (a).
7. Montera droppskyddet på rollern.

16
Svenska
a b
b
a
Påfyllning avfärg
1. Smörj in påfyllningsröret med lite fett och
tryck fast påfyllningsröret (a) på hållaren (b).
Målning
• Börja rolla och tryck in kolven eller avtryckaren
för att mata fram färg till rollern.
• När du tillfälligt lägger ifrån dig rollern, dra
tillbaka avtryckaren något för att undvika att
färg matas ut oavsiktligt av trycket.
2. Fäst hållaren med påfyllningsröret på
färgburken.
3. Om du använder enstor färgburk kan
påfyllningsröret behöva förlängas. Tryckfast
enslang med innerdiameter 3/4″på
påfyllningsrörets slanganslutning (12).
4. Håll automatrollern ica 45º vinkel och placera
automatrollerns påfyllningsventil (a) på påfyll-
ningsröret. Setill att ventilen är helt påskjuten
påröret.
5. Dra tillbaka kolven (b) för att fylla på färg
(det kan gå lite tungt). Närfärgröret är fullt
lyfter du försiktigt bort automatrollern från
påfyllningsröret.
6. Obs! Ominte färgröret blir fullt första gången
trycker du försiktigt tillbaka kolven och
kontrollerar att du håller automatrollern i45º
vinkel och att påfyllningsventilen är helt ner-
tryckt på påfyllningsröret. Drasedan tillbaka
kolven igen för att fylla påfärg.

17
Svenska
b
a
Obs!
• Rollern kan behöva fyllas med enstor mängd färg från första påfyllningen. Fyllpå
mer färg ifärgröret om det blir nödvändigt.
• Om du ska byta roller, tänk på att den måste vara perforerad för användning med
automatroller.
Tips!
• Avtryckaren behöver bara tryckas in när färg ska fyllaspå.
• Om färgen inte täcker när du rollar, mata fram merfärg.
• Om rollern glider ifärgen när du rollar, mata fram mindrefärg.
• För att undvika färgdropp, håll rollern irörelse när du matar fram färg med avtryckaren.
• Om du arbetar itrånga utrymmen, fyll inte färgröret helt, det gör att automatrollern
blir kortare och lättare att hantera.
• Linda in rollern ienplastpåse vid pauser iarbetet för att förhindra att färgen torkar.
• Täck in golv och andra ytor som behöver skyddas då du arbetar. Seockså till att
skydda de ytor där du hanterar och fyller påfärg.
Vrid handtaget
Handtaget kan vridas för att underlätta rollning
iolika vinklar.
Lossa låsmuttern (a), vrid handtaget (b) till
önskad vinkel och dra fast låsmutternigen.
Vikbartstöd
• Vik ut stödet och låt automatrollern vila på
det vid pauser iarbetet.
• Se till att skydda underlaget där automatrollern
placeras med tidningar, plastetc.
• Placera droppskyddet under rollern när den
ligger på stödet för att förhindra färgdropp.
• Dra tillbaka avtryckaren något för att undvika
att färg matas ut oavsiktligt av trycket.
• Vik ner stödet när du rollar så att det inte
hindrar arbetet.

18
Svenska
a
Tömning av överblivenfärg
Dra tillbaka kolven för att dra ut överbliven färg ur rollern. Tips! Sättettfinger för
påfyllningsventilen så följer färgen med lättare.
1. Placera påfyllningsventilen på
påfyllningsröret på samma sätt som
vid påfyllning avfärg.
3. Dra bort rollern från rollerhållaren.
Använd engångshandskar eller
dra enplastpåse över rollern för
att skydda händerna. Skrapa bort
överflödig färg från rollern.
2. Tryck in kolven helt ifärgröret för att
tömma det påfärg.
4. Skruva upp låsmuttern (a) och dra
av rollerhållaren från rollerfästet.
5. Demontera låsbrickan från rollern
genom att skjuta in rollerfästet
irollern och försiktigt trycka ut
låsbrickan ur rollern.
6. Ta bort överbliven färg från
alladelar.

19
Svenska
a
Rengöring
Vattenlösligfärg
1. Ta bort påfyllningsröret från hållaren och skjut in röret helt ipåfyllningsventilen.
2. Sänk ner påfyllningsröret iljummet
vatten med enmild tvållösning.
Fylloch töm färgröret ca 5 gånger
genom att dra kolven in ochut.
4. Ta bort kopplingsstycket med
rollerhållaren och sänk ner färgröret
ivattnet. Fylloch töm färgröret
tills det är heltrent. Torkabortev.
kvarvarande färg från kopplings-
styckets fäste (a).
3. Ta bort påfyllningsröret och sänk
ner färgröret med kopplingsstycket
och rollerhållaren ivattnet. Fylloch
töm färgröret minst 5 gånger
genom att dra kolven in ochut.
5. Skruva bort locket till påfyllnings-
ventilen och rengör backventilen
och gummigenomföringen. Rengör
alla övriga delar efterbehov.

20
Svenska
a
Färg som kräver lösningsmedel
1. Läs på färgens förpackning hur målarverktyg som använts på bästa sätt rengörs.
Seiövrigt anvisningen för vattenlöslig färgovan.
2. När du är klar, tänk på att göra dig av med lösningsmedlet på ettför miljön
lämpligtsätt.
Skötsel och underhåll
Smörjning
Obs! Detär mycket viktigt att automatrollerns gummitätningar smörjs för bästa funktion.
Använd medföljandefett.
1. Skruva loss låsmuttern som håller
handtaget och kolven till färgröret.
3. Smörj in o-ringarna längst fram på
kolven med det medföljande fettet.
2. Dra ut handtaget med kolven ur
färgröret.
4. Skruva av locket till
påfyllningsventilen och
smörj in backventilen och
gummigenomföringen.
5. Smörj in gummitätningen (a) på
rollerhållaren.
Table of contents
Languages:
Other Clas Ohlson Tools manuals

Clas Ohlson
Clas Ohlson 40-7366 User manual

Clas Ohlson
Clas Ohlson 3001 A User manual

Clas Ohlson
Clas Ohlson 40-8674 Guide

Clas Ohlson
Clas Ohlson HT-332 Series User manual

Clas Ohlson
Clas Ohlson NW-B10 User manual

Clas Ohlson
Clas Ohlson LX3210 User manual

Clas Ohlson
Clas Ohlson DY6600W20 User manual

Clas Ohlson
Clas Ohlson DP9300IBL User manual

Clas Ohlson
Clas Ohlson RP8031K6 User manual