8
FR / BE
1. Informations importantes
Avant d'utiliser votre casque pour la
première fois, veuillez lire attentivement les
consignes et informations suivantes.
Ce casque a été conçu pour le motocyclisme
et fabriqué conformément à l'état de l'art.
Bien que ce casque réponde à un niveau de
sécurité très élevé, l'utilisateur est exposé à
un risque de blessures en cas d'accidents
graves. Dans certains cas, il est possible que
le choc soit d'une force telle que le casque
ne puisse protéger son porteur efcacement
des traumatismes crâniens.
2. Remarques importantes
• Le casque doit bien tenir sur la tête et la
jugulaire doit être bien fermée.
• Ne portez pas d'écharpe ou autre couvre-
chef sous le casque.
• Assurez-vous que la circulation de l'air
n'est pas entravée.
• Veillez à ce que la visière soit toujours
propre et non rayée. Toute visière endom-
magée doit être immédiatement changée.
Vous avez la possibilité de commander
des visières de rechange à l'adresse du
S.A.V. indiquée. Les visières teintées ne
doivent pas être utilisées la nuit ou en cas
de mauvaises conditions de visibilité.
• Le casque a pour but de protéger la tête
en cas de choc. Cette protection n'est
plus garantie après un seul choc (même
léger). Par conséquent, le casque doit
être immédiatement changé après un
accident, même s'il ne présente pas de
dégâts apparents.
• Le casque ne doit pas être transporté en
étant suspendu au guidon ou autre élé-
ment du véhicule. Il doit être par ailleurs
tenu à l'écart de toutes pièces chauffantes
(p.ex. pot d'échappement).
• Ne nettoyez jamais le casque en utilisant
des solvants pétroliers ou des abrasifs,
ni à l'extérieur ni à l'intérieur. Utilisez
toujours des nettoyants au pH neutre.
Essuyez le casque à l'aide d'un chiffon
doux. Le rembourrage peut être nettoyé
avec une brosse souple et un peu de
savon.
• N'utilisez que des pièces de rechange
d'origine pour votre casque.
• An de garantir une protection sufsante,
ce casque doit être à la bonne taille et
être correctement attaché.
• Si le casque a reçu un choc violent, il doit
en tous les cas être remplacé !
Casque jet SP-603 MH 08
1. Informations importantes 08
2. Remarques importantes 08
3. Changer la visière 09
4. Système d'attache/fermeture de sécurité 09
5. Rembourrage intérieur 09
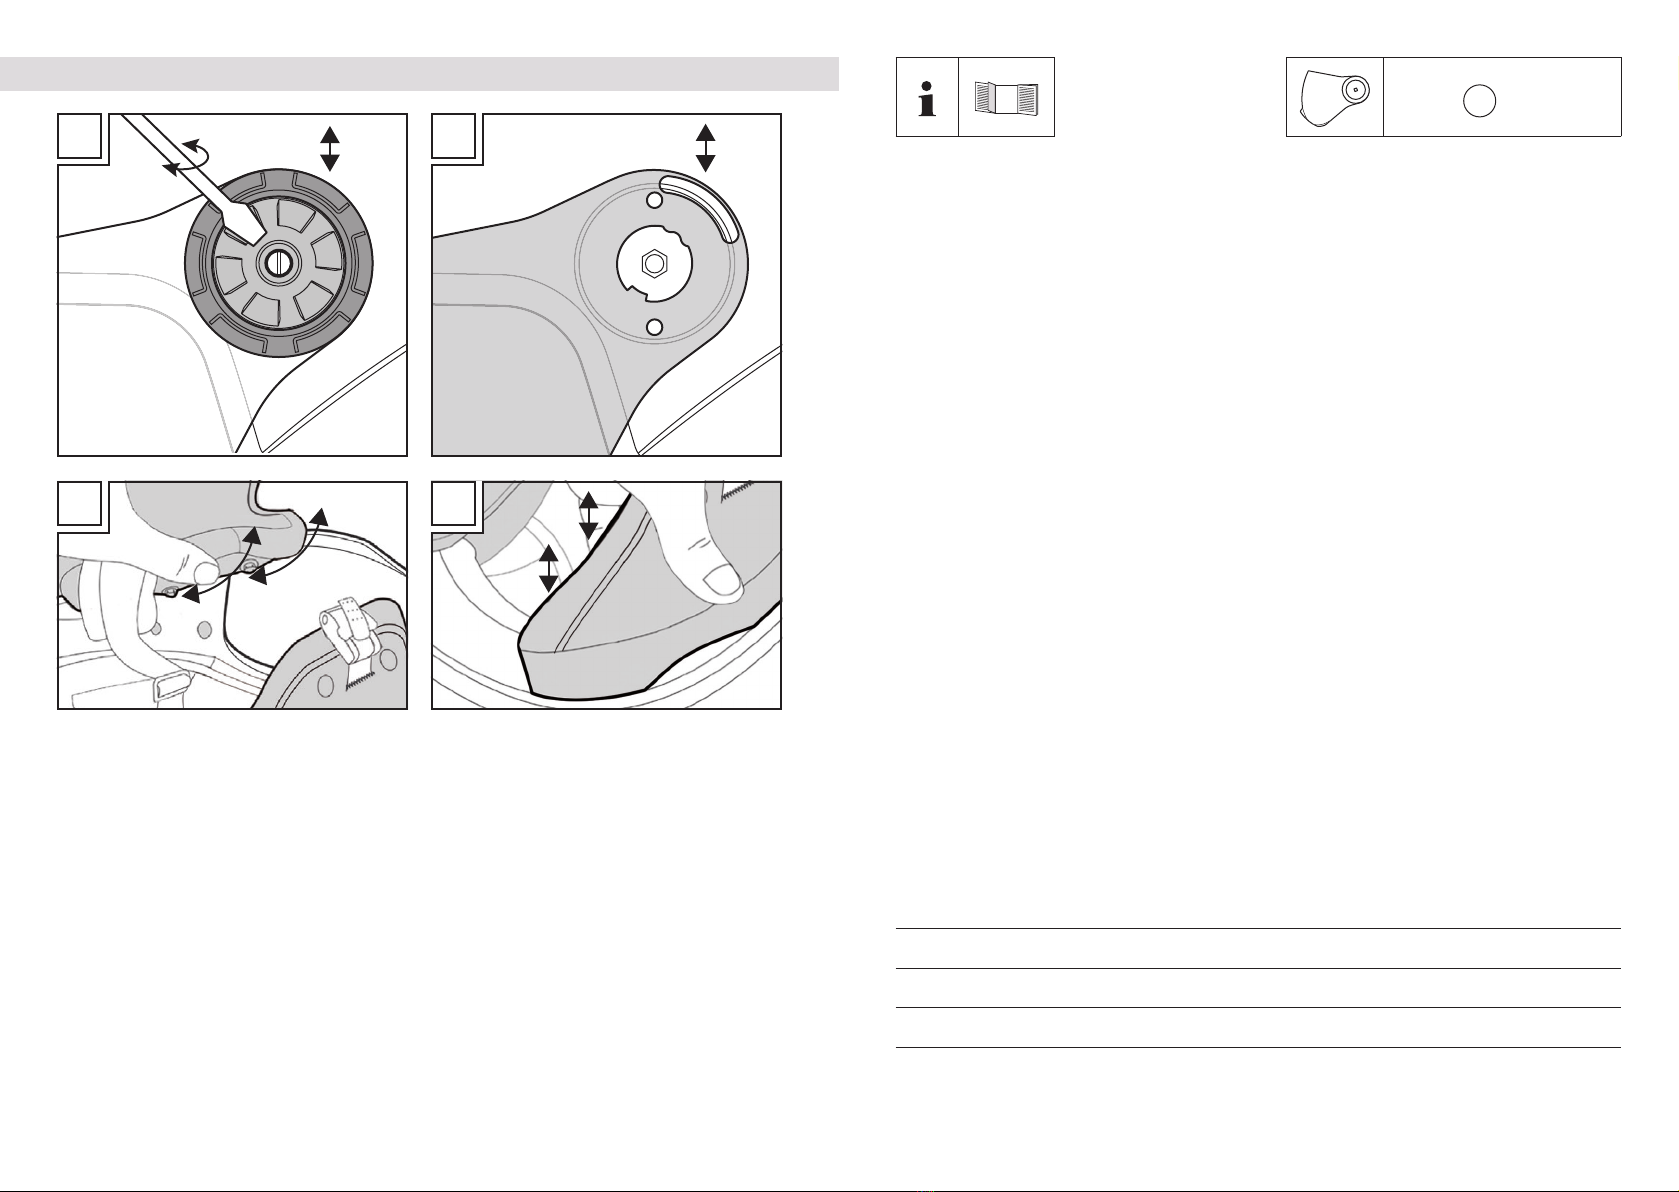
3. Changer la visière
Démontage de la visière:
• À l’aide d’un tournevis, desserrez la vis
du mécanisme de la visière(g A).
• Soulevez la visière avec précaution (g
B).
Répétez la procédure de l’autre côté du
casque.
Montage de la visière:
• Réinstallez la visière.
• À l’aide d’un tournevis, revissez entière-
ment le mécanisme. Répétez la procédure
de l’autre côté du casque (g A).
Répétez la procédure de l’autre côté du
casque.
ATTENTION: VÉRIFIEZ ENSUI-
TE QUE LA VISIÈRE EST BIEN
EN PLACE ET QU‘ELLE FONC-
TIONNE CORRECTEMENT !
4. Système d'attache/fermeture de
sécurité
Votre casque de moto est doté d'un système
d'attache efcace qui permet un ajustement
optimal.
Pour ajuster correctement la jugulaire, procé-
dez de la façon suivante :
• Mettez votre casque et insérez la
languette crantée dans le boîtier.
• La jugulaire doit être serrée contre le cou
et les joues.
• Le casque ne doit pas pouvoir être ôté
lorsque vous le faites glisser vers l'avant/
le haut en le prenant par le bord situé
au-dessus de la nuque. Si vous pouvez
ôter le casque alors que vous avez inséré
la languette dans le boîtier au maximum,
vous devez serrer la jugulaire plus ferme-
ment.
• Si la jugulaire est trop serrée, vous devez
la desserrer. La longueur de la jugulaire
doit être ajustée de manière à ce qu'au
moins 5 crans du système de verrouillage
soient enclenchés dans le boîtier.
• Pour ouvrir l'attache, enlevez la bande
en nylon rouge du boîtier tout en retirant
simultanément la languette du boîtier.
5. Rembourrage intérieur
• Pour ôter les mousses de joues du casque
de moto, défaites les boutons-poussoirs
selon la gure C. Puis retirez la languette
en plastique située entre la coque et le
corps du casque, cf. gure D.
• Pour remettre les mousses de joues en
place dans le casque, glissez la languette
en plastique entre la coque et le corps du
casque. Puis xez les mousses à l'aide
des boutons-poussoirs.
• Les coussins acoustiques peuvent être
retirés ou remplacés au moyen de la
fermeture-éclair.
Les pièces de rechange ainsi que les visières
transparentes et teintées peuvent être com-
mandées à l'adresse suivante :
SPEQ GmbH
Tannbachstr. 10 •D-73635 Steinenberg
Hotline: + 800 30 777 999
9
FR / BE