DÖRR LED-12 User manual

Bedienungsanleitung
DÖRR LED-12 & LED-16 Ringlicht
Bezeichnung der Bauteile
Wir beglückwünschen Sie zu Ihrem neuen DÖRR LED Ringlicht und danken für Ihr Vertrauen. Das Gerät wurde speziell für Digitalkameras entwickelt.
Es sorgt für eine schattenfreie Ausleuchtung im Makro- und Nahbereich. Dank Dauerlicht können Reexionen im Motiv erkannt und durch
Positionsänderung entfernt werden. Bitte lesen Sie diese Anleitung aufmerksam vor dem Gebrauch des Ringlichts.
Einlegen der Batterien
Das LED Ringlicht kann mit 4 Mignon 1,5V Batterien Typ AA oder mit auadbaren Akkus vom gleichen Typ betrieben werden.
1. Bitte entfernen Sie den Batteriefachdeckel an der Haupteinheit indem Sie ihn aufschieben.
2. Legen Sie die 4 frische Batterien bzw. Akkus ein und beachten Sie die Symbole im Batterieteil für die richtige Polung.
3. Schließen Sie den Batteriefachdeckel indem Sie ihn wieder zuschieben
4. Stellen Sie den Hauptschalter nun auf On/An. Die LEDs der Ringleuchte leuchten jetzt.
Hinweise:
• Bitte verwenden Sie immer nur Batterien oder Akkus von gleichem Typ, Hersteller und Kapazität.
• Mischen sie nie Batterien und Akkus miteinander
• Wenn Sie das LED Ringlicht längere Zeit nicht verwenden, so entfernen Sie bitte die Batterien aus dem Gerät.
Anbringen des LED Ringlichts an der Kamera
1. Schieben Sie zunächst die Haupteinheit auf den Blitzschuh Ihrer Kamera. Falls Ihre Kamera keinen Blitzschuh besitzen,
so verwenden Sie eine Blitzschiene (optionales Zubehör)
2. Legen Sie zum Befestigen des LED Ringlichts Ihre Kamera mit dem Filtergewinde nach oben auf eine feste und stabile Unterlage.
3. Halten Sie mit einer Hand die Kamera fest, mit der anderen setzen Sie das LED Ringlicht mit dem Gewinde gerade auf das
Filtergewinde Ihres Kamerobjektivs.
4. Schrauben Sie nun das Ringlicht in das Filtergewinde Ihres Kameraobjektivs. Drehen Sie dazu das Rändelrad im Uhrzeigersinn bis
das Ringlicht fest und richtig positioniert ist.
5. Bei abweichender Gewindegröße verwenden Sie bitte einen entsprechenden Adapterring.
Fotograeren mit dem LED-12 oder LED-16 Ringlicht
• SchaltenSieIhreKameraein,nachdemSiedasRinglichtanIhrerKamerabefestigthaben.
• SchaltenSiedasRinglichtein=Hauptschalterauf„on“.
• EmpfehlenswertistdasFotograerenmitZeitautomatik,dahierdieBlende-unddamitderSchärfenbereich-manuellvorgewähltwerdenkann.
• DasLEDRinglichtsorgtdurch12LEDs(ModellLED-12)bzw.16LEDs(ModellLED-16)füreinehelleundschattenfreieAusleuchtungim
Makro- und Nahbereich. Dank Dauerlicht können Reexionen im Motiv erkannt und durch Positionsänderung von Motiv und/oder
Kamera & Ringlicht entfernt werden.
• WirempfehleneineNutzungdesRinglichtsfürEntfernungenvonca.2,5cmbis1m.
Tipp: Je nach Motiv kann auch die seitliche Positionierung der Lichtquelle sinnvoll sein. Befestigen Sie dazu das Ringlicht auf einem
Makro-oderTischstativundrichtenSieesentsprechendaus.DasRinglichtbesitztanderUnterseiteeingenormtes1/4“Stativgewinde.
Technische Daten
Geeignet für: Digitale SLR und Kompaktkameras mit Filtergewinde
Farbtemperatur: 5500K (Tageslicht)
Lichtintensität: LED-12: 62 Lux/1m, LED-16: 64 Lux/1m
Energiequelle: 4 Mignon Akkus Typ AA oder Akkus vom gleichen Typ (nicht im Lieferumfang)
Betriebsdauer: Ca. 60 Minuten, abhängig von den verwendeten Batterien
Empfohlene Entfernungen: LED-12: ca. 2,5 cm bis 25 cm, LED-16: ca. 2,5 cm bis 1 m
Anschlussgewinde: LED-12: 52mm, Adapterringe für 55, 58 und 62 mm im Lieferumfang,
LED-16: 77mm, Adapterringe für 67, 72 und 82 mm im Lieferumfang
Abmessungen: Haupteinheit: 65x70x90 mm / LED-12 Ringlicht: 115 x 93 x 20 mm / LED-16 Ringlicht: 142 x 118 x 23 mm
Gewicht (ohne Batterien): LED-12: ca. 204 g / LED-16: ca. 223 g
www.doerrfoto.de
DÖRR GmbH •Postfach 1280 •89202 Neu-Ulm/Germany
Fon +49 731 97037-0 •Fax +49 731 97037-37
Haupteinheit
inklusive Anschlussringe
Hauptschalter
(Rückseite Haupteinheit)
LED Leuchte
Kontrollleuchte
(Rückseite Hautpeinheit)
Stativanschluss
Cd

Instruction Manual
DÖRR LED-12 & LED-16 Ring Light
Nomenclature
Thank you for your purchase of the DÖRR LED Ringlight. The ringlight has been specically developed for the use with digital cameras. It ensures shadow free
illumination for close-up and macro shots.The permanent light allows you to recognize reections and, if necessary to change the position of your object or your
camera. Please read these instructions carefully before using the ringlight.
Loading the Batteries
The LED Ring Light is operated by 4 AA Mignon 1,5V or by rechargeable batteries of the same type.
1. Remove the battery compartment lid of the control unit by sliding it o.
2. Insert 4 fresh batteries or rechargeable batteries. Please respect the polarity as indicated in the battery compartment.
3. Close the battery compartment by sliding the lid onto it.
4. Now turn the power switch on. The LEDs start glowing.
Notes:
• Makesuretoalwaysusebatteriesofthesamebrandandcapacity.
• Donotmixupbatterieswithrechargeablebatteries.
• Removethebatteriesifyoudonotplantousetheringlightforawhile.
Mounting the LED Ringlight on your Camera
1. First slide the control unit onto your camera’s hot shoe. If your camera does not boast of a hot shoe, you can use an optional accessory
rail to mount the unit.
2. Now put the camera back onto a rm support.
3. Hold your camera with one hand, while placing the LED ring light evenly onto the lter mount of your lens with your other hand.
4. Now screw the ring light onto the camera lens screwmount by turning the thumb wheel clockwise until the ring light is attached rmly.
5. If the size of the lter mount of your lens does not match with the ring light, use one of the supplied adapter rings.
Taking Pictures with the LED-12 or LED-16 Ring Light
• Switchyourcameraonafterhavingattachedtheringlight.
• TurntheringlightonbymovingthepowerswithtopositionON.
• Werecommendtotakethepicturesinapertureprioritymode,soyoucandenetheaperturemanuallyandthusselectthedesiredfocusrange.
• TheLEDringlightincorporates12LEDs(LED-12)or16LEDs(LED-16)forshadowfreeilluminationofmacroandclose-upshots.
The permanent light allows the recognition of reections. To eliminate them, you can change the position of your camera or of your object.
Note: Depending on your object, the laterial positioning of the LED ringlight can also be useful.
For this purpose mount the LED ring light onto a table tripod using the ¼” ttripod socket at the bottom o f he light.
Specications
Suitable for: D-SLR cameras and digital compact cameras with lter screw mount
Color Temperature: 5500K (daylight)
Light Intensity: LED-12: 62 Lux/1m, LED-16: 64 Lux/1m
Power Source: 4 x 1,5V AA Mignon or rechargeable batteries of the same type (not included)
Operation Time: approx. 60 min. with 1 set of fresh batteries, depending on battery type
Recommended Distance Range: LED-12: 2,5 cm to 25 cm, LED-16: 2,5 cm to 1 m
Connection Mount: LED-12: 52mm, adapter rings for 55, 58 and 62 mm included,
LED-16: 77mm, adapter rings for 67, 72 and 82 mm included
Measurements: Control unit: 65x70x90mm / LED-12 Ring light: 119x96x25mm / LED-16 Ring light: 115 x 93 x 20 mm
Weight w/o batteries: LED-12: app. 204 g / LED-16: app. 223 g
Specications are subject to change without notice.
www.doerrfoto.de
Cd
Control Unit
including Adapter Rings
Power Switch
(rear side control unit)
LED Light
LED
(rear side control unit)
Tripod Socket
DÖRR GmbH•P.O.Box1280•89202Neu-Ulm/Germany
Phone+4973197037-0•Fax+4973197037-37
export@doerrfoto.de•www.doerrfoto.de

www.doerrfoto.de
Cd
DÖRR GmbH•P.O.Box1280•89202Neu-Ulm/Germany
Phone+4973197037-0•Fax+4973197037-37
export@doerrfoto.de•www.doerrfoto.de
Руководство пользователя
Светодиодная кольцевая вспышка для макросъемки
DÖRR LED-12 и LED-16
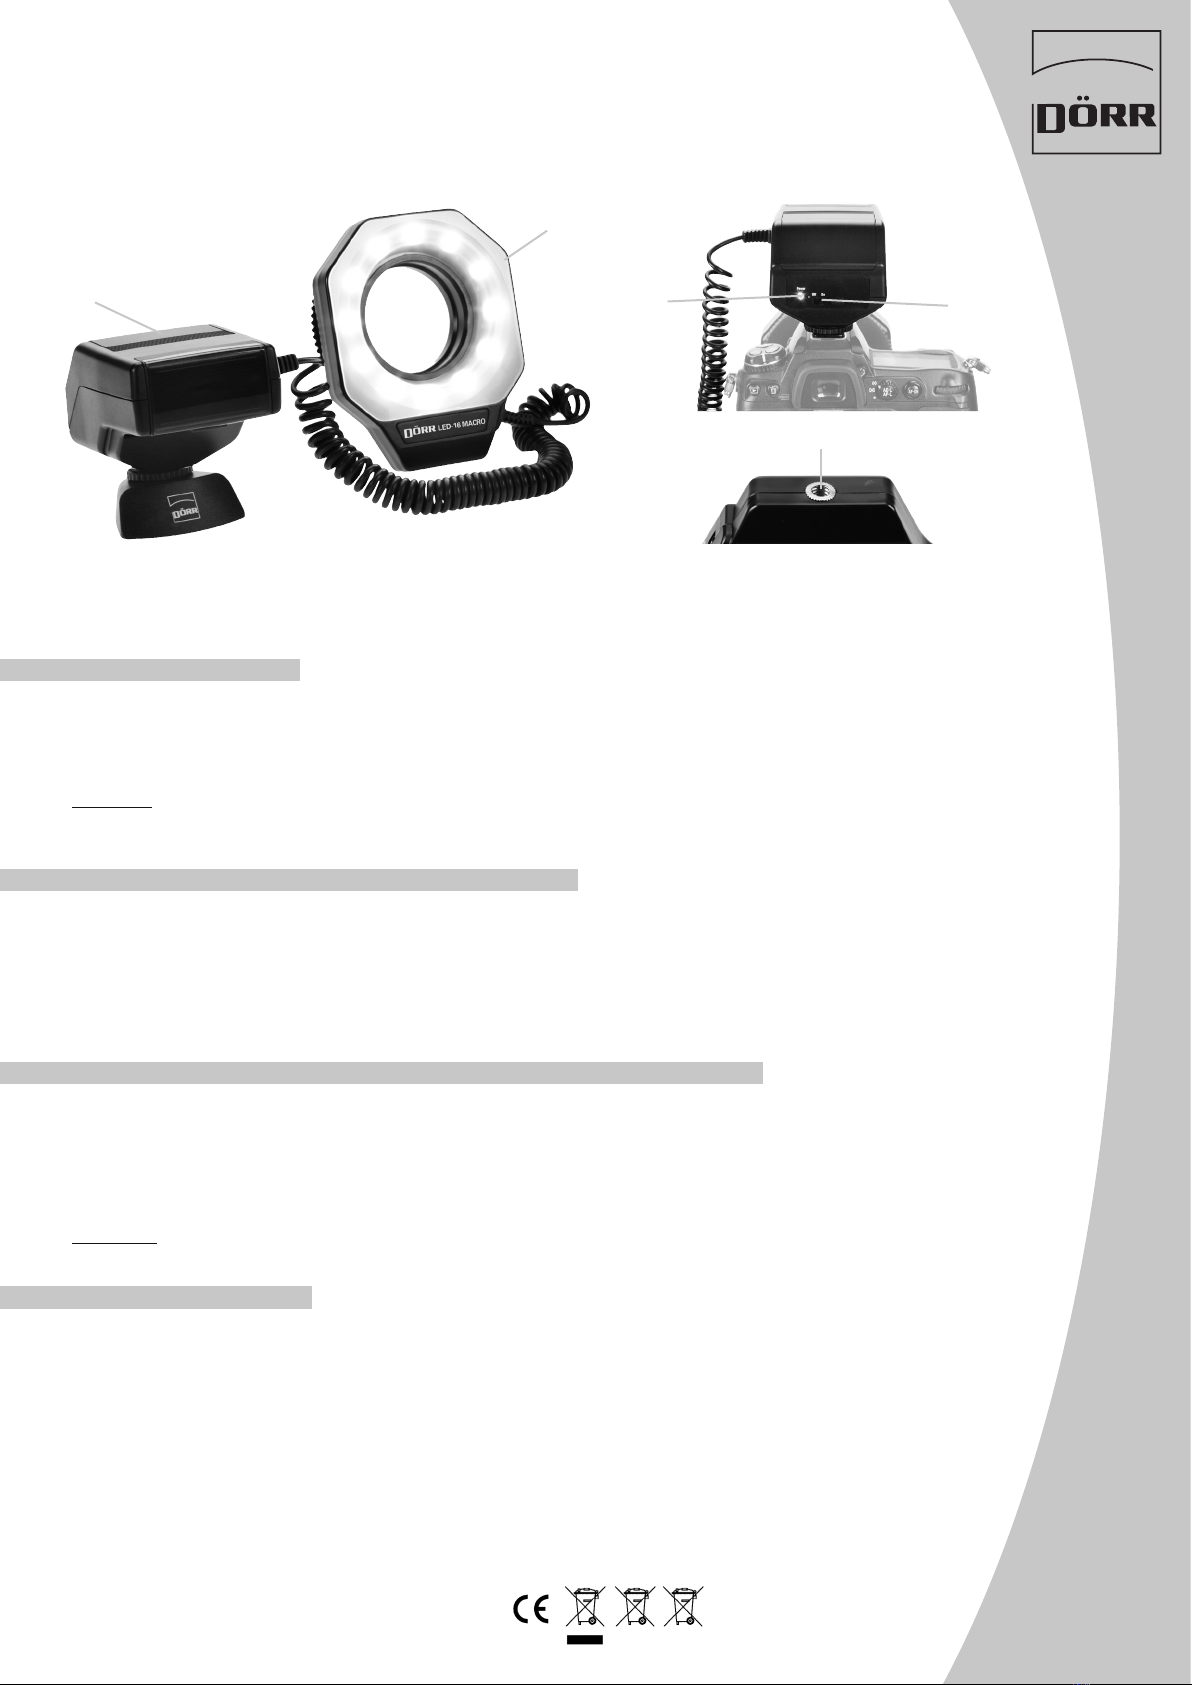
Описание компонентов вспышки
Блок управления
В комплект входят переходные кольца
Светодиод
Светодиод
(задняя сторона)
Гнездо для штатива
Выключатель
питания (задняя
сторона блока
управления)
Благодарим вас за покупку светодиодной кольцевой вспышки DÖRR. Эта кольцевая вспышка была разработана специально для использования с
цифровыми камерами. Она гарантирует освещение без теней при макросъемке и съемке крупным планом. Постоянный свет позволяет вам замечать
отражения и, при необходимости, менять положение объекта вашей съемки или вашей камеры. Пожалуйста, прочитайте внимательно данное
руководство пользователя перед началом работы с этой кольцевой вспышкой.
Установка батарей питания
Светодиодная кольцевая вспышка работает от 4 батареек типа миньон размера AA 1,5В или от аккумуляторов того же типа.
1. Снимите крышку отсека батарей питания на блоке управления, сдвинув ее.
2. Вставьте 4 новые батарейки или аккумулятора. Пожалуйста, соблюдайте полярность, как указано в отсеке для батарей питания.
3. Закройте отсек для батарей питания, задвинув его крышку.
4. Теперь включите питание. Светодиоды начнут загораться.
Примечания:
• Убедитесь, что используете батарейки одной марки и одинаковой мощности.
• Не используйте одновременно батарейки и аккумуляторы.
• Если вы в течение долгого времени не планируете использовать свою кольцевую вспышку, извлеките из нее батарейки.
Установка светодиодной кольцевой вспышки на вашу камеру
1. Сначала вставьте блок управления в контактный разъем «горячий башмак» на вашей камере. Если ваша камера не оснащена горячим
башмаком, вы можете использовать вспомогательный рельс, не входящий в комплектацию, для установки блока.
2. Теперь поставьте камеру обратно на прочную опору.
3. Удерживая вашу камеру одной рукой, другой рукой установите кольцевую светодиодную вспышку ровно на креплении для фильтра на
объективе .
4. Теперь привинтите кольцевую светодиодную вспышку на резьбовое крепление на объективе камеры, поворачивая по часовой стрелке
колесико с накаткой, пока кольцевая светодиодная вспышка не будет прочно закреплена.
5. Если размер крепления фильтра на вашем объективе не подходит для кольцевой светодиодной вспышки, используйте одно из переходных
колец, входящих в комплект.
Фотосъемка с использованием кольцевой светодиодной вспышки LED-12 илиLED-16
• Включите вашу камеру после того, как установите кольцевую светодиодную вспышку.
• Включите кольцевую вспышку, установив переключатель питания в положение ON.
• Мы рекомендуем вам делать снимки в режиме приоритета диафрагмы, чтобы вы вручную могли настроить диафрагму и таким
образом выбрать желаемое фокусное расстояние.
• Светодиодная кольцевая вспышка оснащена 12 светодиодами (LED-12) или 16 L светодиодами (LED-16) для освещения без теней
при макросъемке или съемке крупным планом. Постоянный свет позволяет вам замечать отражения. Для их устранения вы можете
изменять положение объекта вашей съемки или вашей камеры.
Примечание: В зависимости от объекта вашей съемки, вы можете использовать кольцевую светодиодную вспышку в боковом положении. Для
этого установите кольцевую светодиодную вспышку на настольный штатив, используя гнездо для штатива ¼”
снизу вспышки.
Технические характеристики
Подходит для: Цифровых зеркальных камер и цифровых компактных камер с резьбовым креплением для фильтра
Цветовая температура: 5500K (дневной свет)
Интенсивность света: LED-12: 62 лк/1м, LED-16: 64 лк/1м
Источник питания: 4 x 1,5В батарейки размера AA типа миньон или аккумуляторы того же типа (не входят в комплект)
Время работы: примерно. 60 мин. с 1 комплектом новых батареек, в зависимости от типа батареек
Рекомендуемый диапазон расстояний: LED-12: 2,5 см - 25 см, LED-16: 2,5 см - 1 м
Крепления : LED-12: 52мм, переходные кольца для 55, 58 и 62 мм входят в комплект
LED-16: 77мм, переходные кольца для 67, 72 м 82 мм входят в комплект
Размеры: блок управления: 65 x 70 x 90мм
Кольцевая светодиодная вспышка LED-12 : 119 x 96 x 25мм
Кольцевая светодиодная вспышка LED-16: 115 x 93 x 20 мм
Вес без батареек: LED-12: примерно 204 г / LED-16: примерно 223 г
Технические характеристики могут быть изменены без предварительного уведомления.

www.doerrfoto.de
Cd
DÖRR GmbH•P.O.Box1280•89202Neu-Ulm/Germany
Phone+4973197037-0•Fax+4973197037-37
export@doerrfoto.de•www.doerrfoto.de
Manuale d’istruzioni
DORR LUCE LED ANULARE 12 E 16
Nomenclatura
Unità di controllo
Anelli adattatori inclusi
Luce Led
Led (parte
posteriore)
Presa per treppiede
Grazie di aver acquistato il Dorr Led anulare. Questo luce anulare è stato progettato per l’utilizzo con fotocamere digitali. Garantisce una illuminazione
senza ombra per riprese ravvicinate e macro. La luce ssa vi permette di controllare i riessi e all’ occorrenza di cambiare la posizione del soggetto o della
fotocamera. Leggete attentamente l’istruzioni prima di utilizzare l’anello.
Inserimento delle batterie
L’illuminatore è alimentato da 4 AA mignon 1,5V o da batterie ricaricabili dello stesso tipo.
1. Per rimuoverlo, fate scorrere il coperchio delle batterie
2. Inserite 4 batterie nuove o 4 batterie ricaricabili cariche, rispettando le polarità come indicato nel vano batteria.
3. Chiudete il coperchio del vano batterie
4. Accendetel’illuminatoretramiteilpulsante“ON”.Iledsiilluminano.
Nota bene:
• Utilizzatesemprecontemporaneamentebatteriedellastessamarca.
• Nonutilizzatebatterienormaliinsiemeabatteriericaricabili
• Rimuovetelebatterieseaveteintenzionedinonutilizzarel’illuminatoreperunlungoperiododitempo.
Montaggio dell’anello LED
• Inserite l’unita di controllo sul contatto caldo della fotocamera. Se la vostra fotocamera non ha un contatto caldo potete utilizzare un slitta aggiuntiva.
• Posizionatelafotocamerasuunsupportostabile
• Montatel’illuminatoresull’innestoltridell’obiettivo.
• Perssarel’illuminatoresull’innestoltridell’obiettivo,avvitatelogirandolaghierainsensoorario
• Sel’innestoltridell’obiettivononècompatibileconl’anelloutilizzateunodeglianelliadattatoriindotazione.
Come scattare le fotograe con LED-12 o LED-16
• Accendetelafotocameradopoavermontatol’illuminatore.
• Accendetel’illuminatoretramiteilpulsante“ON”.
• E’consigliabilescattarelefotograeinmodalità“prioritàdidiaframma”,inmododapotersceglierel’aperturainbaseallaprofondità
di campo necessaria.
• L’illuminatoreincorpora12Leds(LED-12)o16Leds(LED-16)percreareunambientesenzaombraperripreseravvicinateemacro.
La luce ssa vi permette di controllare i riessi e all’ occorrenza di cambiare la posizione del soggetto o della fotocamera.
Nota bene: A secondo del soggetto, può essere utile posizionare lateralmente l’illuminatore. Per questo utilizzo è possibile utilizzare la presa per treppiede
alla base dell’illuminatore, e uno stativo da tavolo.
Speciche
Idoneo: Fotocamere D-SLR e fotocamera digitali compatte dotate di attacco ltri
Temperatura colore: 5500K (daylight)
Intensità Luce: LED-12: 62 Lux/1m, LED-16: 64 Lux/1m
Alimentazione: 4x1,5V AA mignon o batteria ricaricabili (non incluse)
Durata batteria: Circa 60 min. con un set di batterie nuove e a secondo del tipo di batteria utilizzata
Distanza consigliata: LED-12: 2,5 cm a 25cm/ LED-16: 2,5cm a 1 m
Montaggio di collegamento: LED-12: 52mm, anelli adattatori disponibili per 55, 58 e 62mm (inclusi)
LED-16: 77mm, anelli adattatori disponibili per 67, 72 e 82mm (inclusi)
Dimensioni : Unita di controllo: 65x70x90mm / LED-12: 119x93x20mm / LED-16: 115x93x20mm
Peso senza batterie: LED-12: circa 204g / LED-16: circa 223g
Le speciche sono soggette a variazioni senza preavviso.
Pulsante di
alimentazione
(parte posteriore
dell’unita di controllo)

www.doerrfoto.de
Cd
DÖRR GmbH•P.O.Box1280•89202Neu-Ulm/Germany
Phone+4973197037-0•Fax+4973197037-37
export@doerrfoto.de•www.doerrfoto.de
Manual de instrucciones
Anillo de luz LED-12 y LED-16 DÖRR
Nomenclatura
Unidad de control
Luz LED
Anillos adaptadores incluídos
LED (vista dorsal de la
unidad de control)
Botón de
encendido (vista
dorsal de la unidad
de control)
Rosca para trípode
Gracias por adquirir el anillo de luz LED DÖRR. Este anillo de luz ha sido desarrollado especícamente para su uso en cámaras digitales. Asegura una
iluminación libre de sombras en las fotografías de primeros planos y macro. Su luz permanente le permite descubrir reejos y, si es necesario, cambiar la
posición del objeto o de la cámara. Le rogamos que lea las instrucciones detenidamente antes de utilizarlo.
Carga de las pilas
El anillo de luz LED funciona con 4 pilas Mignon AA o con pilas recargables del mismo tipo.
1. Separe la tapa del compartimento de las pilas de la unidad de control con una leve presión para deslizarla.
2. Introduzca 4 pilas nuevas o pilas recargables. Respete la polaridad tal como se indica en el compartimento.
3. Vuelva a colocar la tapa deslizándola sobre el compartimento.
4. Pulse el botón de encendido. Las luces LED empiezan a iluminarse.
Notas:
• Utilicesiemprepilasdelamismamarcaycapacidad.
• Nomezclepilasnormalesconpilasrecargables.
• Extraigalaspilassinovaautilizarelanillodeluzduranteunciertotiempo.
Instalación del anillo de luz LED en la cámara
1. En primer lugar deslice la unidad de control en la zapata de la cámara. Si la cámara no dispone de zapata, puede utilizar un raíl accesorio
opcional para montar la unidad.
2. Ahora vuelva a colocar la cámara sobre una base sólida.
3. Sostenga la cámara con una mano y acto seguido con la otra mano coloque el anillo de luz LED equilibradamente sobre la montura para
ltros de la lente.
4. Enrosque el anillo de luz en la montura de la lente de la cámara girando en el sentido de las agujas del reloj hasta que quede sujeto rmemente.
5. Si el tamaño de la montura para ltros de su lente no encaja con el anillo de luz, utilice uno de los anillos adaptadores suministrados.
Cómo realizar fotografías con el anillo de luz LED-12 o LED-16
• Enciendalacámaradespuésdehaberlecolocadoelanillodeluz.
• EnciendalaluzdelanillodeslizandoelbotóndeencendidoalaposiciónON.
• Lerecomendamosquetomefotografíasenmododeprioridaddeapertura,paraasípoderdenirlaaperturamanualmenteypoderseleccionar
el rango focal que más le interese.
• ElanillodeluzLEDconstade12o16lucesLED(LED-12o(LED-16)quepermitenobtenerunailuminaciónlibredesombrasparaprimerosplanosy
fotografía macro. Su luz permanente permite descubrir reejos. Para eliminarlos puede cambiar la posición de la cámara o del objeto que va a
fotograar.
Nota:Dependiendodelobjeto,tambiénpuederesultarúltilcolocarelanillodeluzLEDlateralmente.Paraello,monteelanillodeluzLEDsobreuntrípode
de mesa utilizando el enganche de ¼”del trípode en la parte inferior de la luz.
Especicaciones
Adecuadopaara: cámarasdigitalesréexycompactasconmonturaparaltros
Temperatura color: 5500K (luz de día)
Intensidad: LED-12: 62 Lux/1m, LED-16: 64 Lux/1m
Fuente de alimentación: 4 pilas Mignon AA de 1,5 V o pilas recargables del mismo tipo (no incluídas)
Duración: aprox. 60 min. con 1 juego de pilas nuevas, dependiendo del tipo de pilas
Rango de distanciarecomendado: LED-12: de 2,5 a 25 cm, LED-16: de 2,5 cm a 1 m
Montura: LED-12: 52mm, anillos adaptadores de 55, 58 y 62 mm incluídos
LED-16: 77mm, anillos adaptadores de 67, 72 y 82 mm incluídos
Tamaño: Unidad de control: 65 x 70 x 90mm
Anillo de luz LED-12: 119 x 96 x 25mm / Anillo de luz LED-16: 115 x 93 x 20 mm
Peso sin pilas: LED-12: aprox. 204 g / LED-16: aprox. 223 g
Las especicaciones pueden cambiar sin previo aviso.

www.doerrfoto.de
Cd
DÖRR GmbH•P.O.Box1280•89202Neu-Ulm/Germany
Phone+4973197037-0•Fax+4973197037-37
export@doerrfoto.de•www.doerrfoto.de
Notice d’utilisation
DÖRR LED-12 et LED-16 Eclairage circulaire
Descriptif des composants
Unitécentrale
Eclairage par diodes LED
Bague de raccordement
Interrupteur principal
(face arrière)
Voyant de
contrôle
(face arrière)
Raccordementtrépied
Nousvousremercionsd’avoirchoisil’éclairagecirculaireLEDDÖRRetdelaconancequevousaccordezàlasociétéDÖRR.Cetappareilaspécialementété
conçupourlesappareilsphotonumériques.Ilpermetd’obteniruneexpositionexempted’ombrestantenmacroqu’engrosplans.Leuxdelumièrecontinu
faitressortirlesreetsdumotifetpermetleuraténuationparsimplechangementdeposition.Nousvousrecommandonsdeliresoigneusementcettenotice
d‘utilisationavantd’utiliserl‘éclairagecirculaire
Mise en place des piles
L’éclairagecirculaireLEDfonctionnesoitàpartirde4pilesMignon1,5VdetypeAA,soitàl’aidedebatteriesrechargeablesdumêmetype.
1. Veuillezenleverdecouvercledebatteriedel‘unitéprincipaleenlafaisantcoulisser.
2. Remettez4nouvellespilesoubatteriesenveillantàrespecterlapolaritéindiquéeparlessymbolessetrouvantdansleboîtier.
3. Refermez le couvercle de la batterie en le faisant coulisser.
4. Positionneralorsl‘interrupteurprincipalsurMarche/On.LesdiodesLEDdel‘éclairagecirculairesontalorsallumées.
Informations:
• Utilisezuniquementdespilesoubatteriesdemêmetype,demêmefabricantetdemêmepuissance.
• Nemélangezpasdespilesetdesbatteries.
• Sivousn‘utilisezpasvotreéclairagecirculairependantunelonguepériode,retirezlespilesoubatteriesdecelui-ci.
Miseenplacedel’éclairagecirculaireLEDsurlacaméra
1. Dansunpremiertemps,glissezl’unitécentralesurlesabotdeashdevotreappareilphoto.Sivotreappareilphotonepossèdepasdesabotde
ash, utilisez alors un rail de ash (disponible en option)
2. Pourbienxervotreéclairagecirculaire,poservotreappareilphotosurunsupportstableavecleletagedelaplatineltretournéeverslehaut.
3. Maintenirfermementl‘appareilphotod‘unemainetdel‘autre,positionnezl‘éclairagecirculaireLEDsurleletagedelaplatineltredel‘objectifde
l‘appareil photo.
4. Vouspouvezdèslorsvisservotreéclairagecirculairedanslaplatineltredel‘objectifdel‘appareilphoto.Pourcela,tournezlarouemoletéedansle
sensdesaiguillesd‘unemontrejusqu‘àcequevotreéclairagecirculairesoitcorrectementetfermementpositionné.
5. Encasdetailledeletagediérent,utilisezunebagued‘adaptationcorrespondante.
Prisedevueavecl’éclairagecirculaireLED-12ouLED-16
• Mettezvotreappareilphotoenmarcheaprèsavoirxél‘éclairagecirculairesurvotreappareilphoto.
• Mettezenmarchel‘éclairagecirculaireenmettantl‘interrupteurprincipalsur„on“.
• Ilestconseillédefairevosprisesdevueentempsdiéré,lafocaleetlamiseaupointpouvantsepréréglermanuellement.
• L‘éclairagecirculaireLEDfourniparses12LED(modèleLED-12)ouses16LED(modèleLED-16)unéclairageuniformeetexemptombresdansle
domainedelamacroetdesgrosplans.Leuxdelumièrecontinufaitressortirlesreetsdumotifetpermetleuraténuationparsimplechangement
depositiondel‘appareilphotoet/oudel‘éclairagecirculaire.
• Nousconseillonsidéalementunedistancede2,5cmà1mpourl‘utilisationdel‘éclairagecirculaireLED
Astuce:Selonlemotif,ilestpréférabledepositionnerlasourcedelumièredefaçonlatérale.Acetten,xezl‘éclairagecirculairesuruntrépiedde
macroousuruntrépieddetableetadaptezsonorientation.L‘éclairagecirculairedisposesursafaceinférieured‘unletagedetrépiednorméde¼“.
Donnéestechniques
Adaptépour: AppareilphotodigitalSLRetappareilphotocompactavecplatinedeltreletée
Températuredelumière: 5500K(lumièredujour)
Intensitédelumière: LED-12: 62 Lux/1m / LED-16: 64 Lux/1m
Alimentation: 4pilesMignondetypeAAoubatteriesrechargeablesdemêmetype(nonlivrées)
Duréedefonctionnement: environ60minutes,enfonctiondutypedebatteriesutilisées
Distancespréconisées: LED-12: env. 2,5 à 25 cm, LED-16: env. 2,5 cm à 1 m.
Filetage de raccordement: LED-12: 52mm, bagues d‘adaptation pour 55, 58 et 62 mm incluses dans la livraison
LED-16: 77mm, bagues d‘adaptation pour 67, 72 et 82 mm incluses dans la livraison
Dimensions: Unitécentrale: 65x70x90 mm / Eclairage circulaire LED-12: 115 x 93 x 20 mm
Eclairage circulaire LED-16: 142 x 118 x 23 mm
Poids (sans batteries): LED-12: env. 204 g / LED-16: env. 223 g
Las especicaciones pueden cambiar sin previo aviso.
This manual suits for next models
1
Table of contents
Languages:
Other DÖRR Lighting Equipment manuals

DÖRR
DÖRR Ultra 80 User manual

DÖRR
DÖRR SemiPro 160 User manual

DÖRR
DÖRR MVL-77 User manual

DÖRR
DÖRR FX-4555 BC User manual

DÖRR
DÖRR CL-1285 SOFT LIGHT User manual

DÖRR
DÖRR ML-2323 User manual

DÖRR
DÖRR SL-480 User manual

DÖRR
DÖRR FX-1520 DL User manual

DÖRR
DÖRR LT-2020 User manual

DÖRR
DÖRR VL-26 RGB User manual