Dienst Na Verkoop en Technische dienst:
Deze handleiding is beschikbaar op www.delabiebenelux.com
INSTALLATIE & ONDERHOUD
Het onderhoud dient te gebeuren met een zachte en vochtige doek of met courante reinigingsmiddelen.
Gebruik nooit zuren of schuurpoeders.
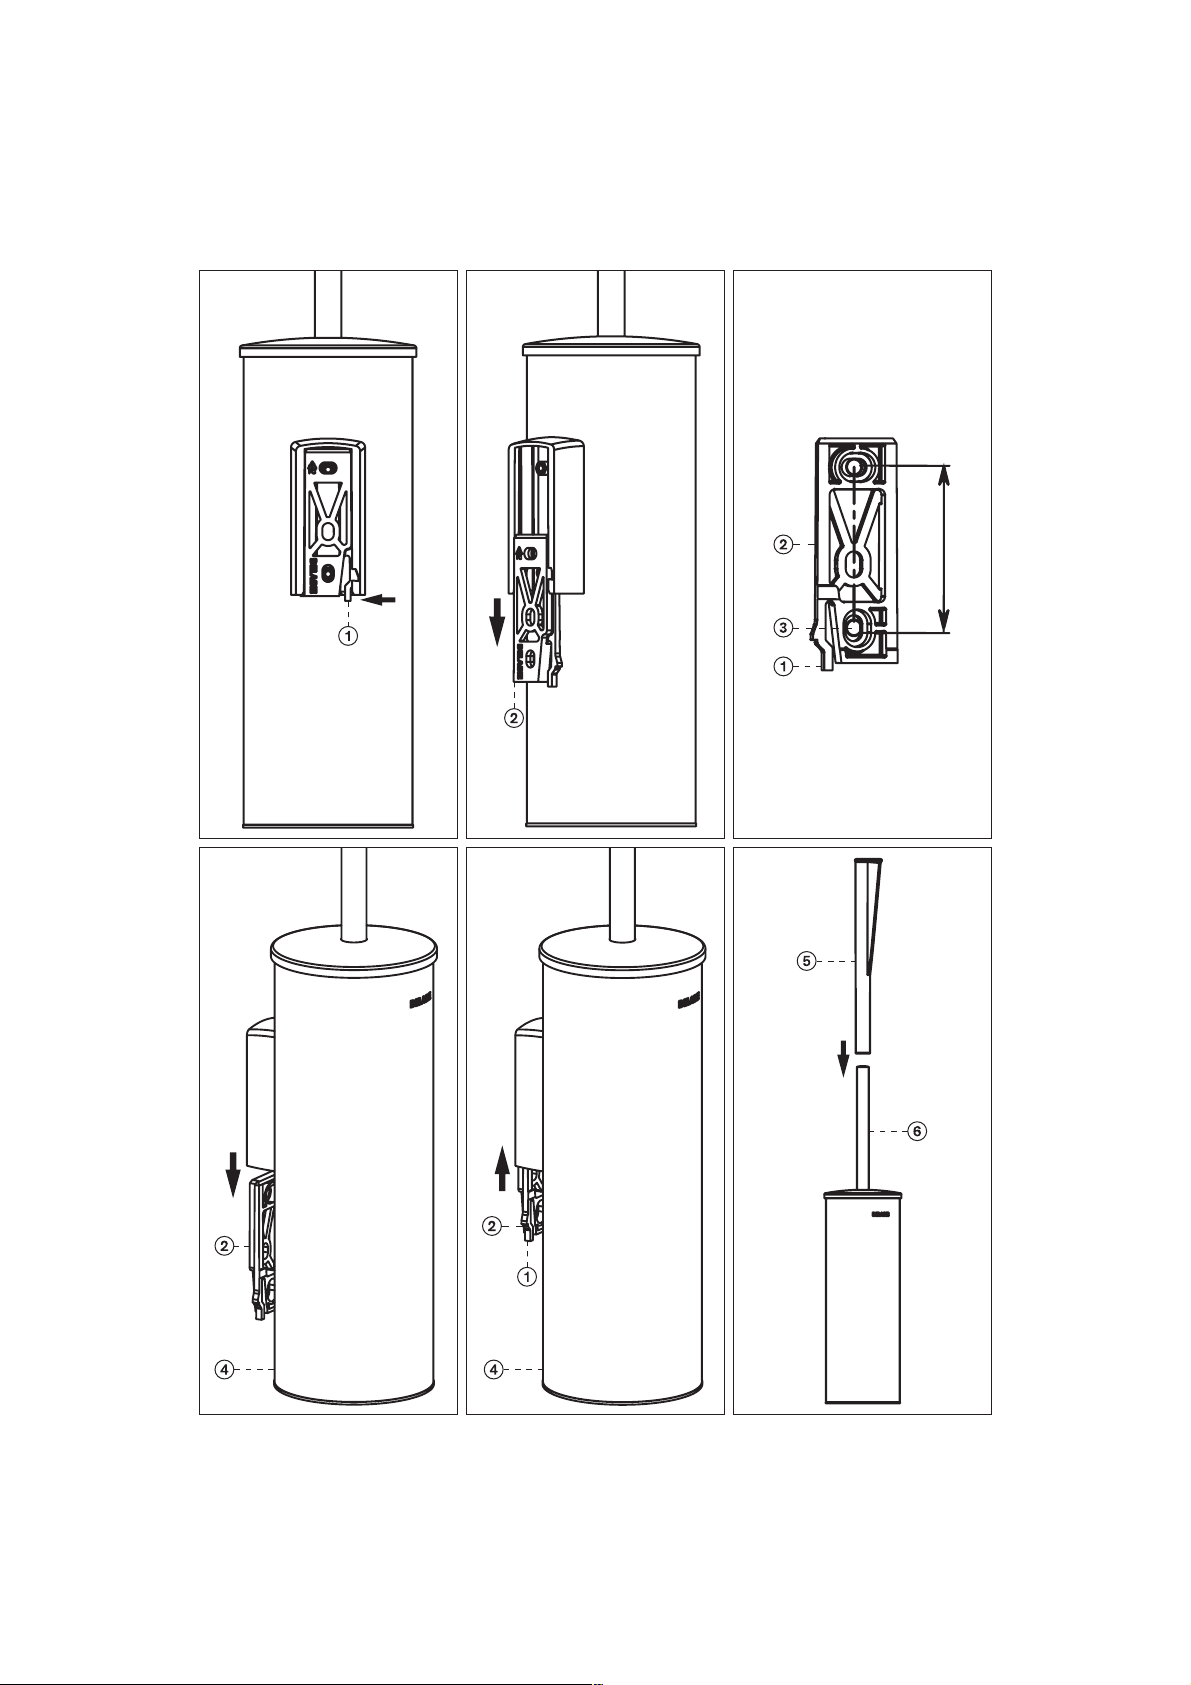
• Druk het lipje a in en verwijder de muurhouder door deze naar beneden te schuiven b(fig. A).
• Installeer de muurhouder bop de muur. Plaats c op een minimumhoogte van 150 mm (fig. B en C).
• Schuif het lichaam dvan de borstelhouder over de muurhouder b, tot je een "klik" hoort (fig. D).
Om het lichaam dterug los te klikken van de muur b, druk je het lipje ain en schuif je het lichaam d
naar boven (fig. E).
• Model met ergonomische hendel: Schuif de ergonomische hendel eover de greep f van de borstel (fig. F).
OBSŁUGA & CZYSZCZENIE
Czyszczenie za pomocąmiękkiej i wilgotnej szmatki lub za pomocąbieżących środków czyszczących i dezynfekujących.
Nie należy używaćśrodków na bazie kwasu lub proszku do szorowania.
• Nacisnąć na przycisk a następnie zsunąć mocowanie ścienne b(rys. A).
• Zamocowaćna ścianie mocowanie ścienne b. Minimalna wysokość c od posadzki = 150 mm (rys. B i C).
• Zsunąć w dółkorpus pojemnika d na mocowaniu ściennym b, ażdo „zatrzaśnięcia” (rys. D).
W celu zdjęcia korpusu dz mocowania ściennego bnacisnąć na przycisk ai wyciągnąć w górękorpus d(rys. E).
• Model z ergonomicznym uchwytem: wcisnąć ergonomiczny uchwyt e na trzon f szczotki (rys. F).
PL
PL
Serwis posprzedażowy i Pomoc techniczna:
Ulotka jest dostępna na stronie: www.delabie.pl
INSTALLATION & REINIGUNG
Reinigung mit einem weichen, feuchten Tuch oder gängigen Reinigungs- und Desinfektionsmitteln.
Keine säurehaltigen oder scheuernden Produkte verwenden.
• Drücken Sie auf die Entriegelung a und ziehen Sie den Wandflansch aus der Schutzabdeckung hervor b (Abb. A).
• Wandflansch b an der Wand befestigen. Empfohlene Mindestmontagehöhe 150 mm über OKFFB c
(Abb. B und C).
• Lassen Sie den Körper danschließend bis zum hörbaren Einrasten hinabgleiten, sodass der Wandflansch b
vollständig abgedeckt ist (Abb. D).
Zum Lösen des Körpers dvon der Befestigung b, einfach erneut die Entriegelung aeindrücken und Körper d
nach oben schieben (Abb. E).
• Modell mit ergonomischem Griff: Aufsatz eüber den Bürstengriff f stülpen (Abb. F).
DE
DE
Technischer Kundendienst:
Anleitung verfügbar unter: www.delabie.de
INSTALACIÓN & MANTENIMIENTO
El mantenimiento debe hacerse con un paño húmedo suave o con productos comunes de limpieza y desinfección.
No utilice productos ácidos ni polvo de fregar.
• Presione en la pestaña a y a continuación deslice sobre el soporte mural b(fig. A).
• Fijar a la pared el soporte mural b. Altura mínima de cal suelo = 150 mm (fig. B y C).
• Hacer deslizar para bajo el cuerpo d del escobillero sobre el soporte mural b, hasta que haga "clic" (fig. D).
Para retirar el cuerpo d del soporte mural b, presionar en la pestaña ay a continuación deslice sobre la parte
superior del cuerpo de lo escobillero d (fig. E).
• Modelo con mango largo ergonómico: montaje del mango largo ergonómico e en el mango fdel escobillero (fig. F).
Servicio postventa y Asistencia técnica:
Tel.: +33 (0)3 22 60 22 74 - e-mail: sav@delabie.fr
Esta instrucción está disponible en: www.delabie.es