manuals.online logo
Brands
  1. Home
  2. •
  3. Brands
  4. •
  5. DeLOCK
  6. •
  7. Media Converter
  8. •
  9. DeLOCK 62985 User manual

DeLOCK 62985 User manual

Declaration of conformity
Products with a CE symbol fulll the EMC directive (2014/30/EU) and
RoHS directive (2011/65/EU+2015/863+2017/2102), which were released by the
EU-comission.
The declaration of conformity can be downloaded here:
https://www.delock.de/produkte/G_62985/merkmale.html
WEEE-notice
The WEEE (Waste Electrical and Electronic Equipment)-directive, which became
e󰀨ective as European law on February 13th 2003, resulted in an all out change
in the disposal of disused electro devices. The primarily purpose of this directive
is the avoidance of electrical waste (WEEE) and at the same time the support of
recycling and other forms of recycling in order to reduce waste. The WEEE-logo
on the device and the package indicates that the device should not be disposed
in the normal household garbage. You are responsible for taking the disused
electrical and electronical devices to a respective collecting point. A separated
collection and reasonable recycling of your electrical waste helps handling the
natural resources more economical. Furthermore recycling of electrical waste is
a contribution to keep the environment and thus also the health of men. Further
information about disposal of electrical and electronical waste, recycling and
the collection points are available in local organizations, waste management
enterprises, in specialized trade and the producer of the device.
Cet appareil
se recycle
Points de collecte sur www.quefairedemesdechets.fr
EU Import: Tragant Handels- und Beteiligungs GmbH
Beeskowdamm 13/15, 14167 Berlin, Germany
Support Delock
If you have further questions, please contact our customer support
[email protected]
You can nd current product information on our homepage: www.delock.com
Final clause
Information and data contained in this manual are subject to change without notice
in advance. Errors and misprints excepted.
Copyright
No part of this user's manual may be reproduced, or transmitted for any purpose,
regardless in which way or by which means, electronically or mechanically, without
explicit written approval of Delock.
Edition: 04/2023
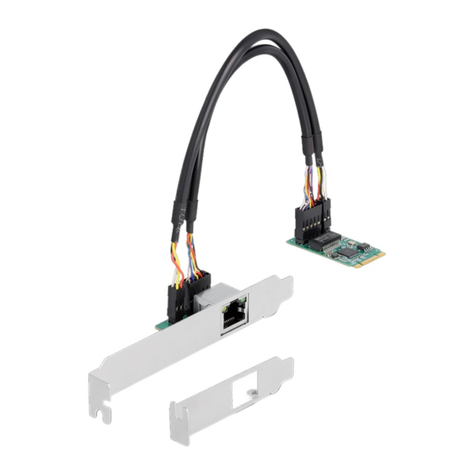
M.2 to 2.5 Gigabit LAN Converter
User manual
Mode d’emploi
Uživatelská příručka
Manuale utente
Manual de utilizare
Korisnički priručnik
Bedienungsanleitung
Manual del usuario
Instrukcja obsługi
Bruksanvisning
Használati utasítás
Εγχειρίδιο χρήστη
Product-No: 62985
User manual no: 62985-a
www.delock.com
English
Description
This converter by Delock expands the system by one RJ45 2.5 Gigabit LAN port.
NBASE-T for higher speed
Modern services and new technologies require higher bandwidths. NBASE-T
technology enables speeds of 1 Gbps and 2.5 Gbps with conventional networking
cables. The best possible transmission rate is set automatically.
Specication
• Connectors:
1 x M.2 key B+M male
1 x 2.5 Gigabit LAN RJ45 jack
• Chipset: Intel i225V
• Interface: PCIe 2.0
• Form factor: M.2 2280
• Suitable for M.2 slot with key M or B based on PCIe
• Data transfer rate:
Ethernet up to 10 Mbps (Half/Full Duplex)
Fast Ethernet up to 100 Mbps (Half/Full Duplex)
Gigabit Ethernet up to 1000 Mbps (Half/Full Duplex)
NBASE-T with up to 2.5 Gbps
• Compatible with:
IEEE 802.3: 10BASE-T
IEEE 802.3u: 100BASE-TX
IEEE 802.3ab: 1000BASE-T
• Supports PXE
• Supports 9k Jumbo Frames
• LED indicator for link and activity
• Dimensions (LxWxH): ca. 80 x 22 x 16 mm
System requirements
• Linux Kernel 5.15 or above
• Windows 10/10-64/11
• A free M.2 key B or key M slot
Package content
• Converter
• Screw
• User manual
Safety instructions
• Protect the product against moisture
• Avoid anti-static electricity when installing the product
Hardware Installation
Note:
Make sure your M.2 slot supports PCIe.
1. Install the M.2 converter into M free M.2 key M or key B slot.
2. Now you can plug a network cable into the RJ45 port.
Driver Installation
1. Switch on your computer.
2. The driver will be installed automatically. If this is not the case, please perform
the driver installation as follows:
3. Download the driver from the product page: https://www.delock.com/produkte/
G_62985/treiber.html.
4. Follow the instructions of the driver installation.
5. The driver will now be installed.
6. Click on "Finish".
7. Your computer will ask to reboot. Click "Yes" to restart the computer.
8. After restart you can start using the device immediately.
Conguration système requise
• Linux Kernel 5.15 ou version ultérieure
• Windows 10/10-64/11
• Un emplacement M.2 touche B ou touche M libre
Contenu de l’emballage
• Convertisseur
• Vis
• Mode d’emploi
Instructions de sécurité
• Protéger le produit contre l’humidité
• Evitez l’électricité électrostatique lorsque vous installez le produit
Installation matérielle
Remarque :
Assurez-vous que l'emplacement M.2 prend en charge PCIe.
1. Installer le convertisseur M.2 dans la clé M ou dans la fente B libre du M.2.
2. Maintenant, vous pouvez brancher un câble de réseau dans le port RJ45.
Installation du pilote
1. Allumez votre ordinateur.
2. Le pilote s’installe automatiquement. Si tel n’est pas le cas, veuillez e󰀨ectuer
l’installation du pilote comme suit :
3. Télécharger le driver depuis la page du produit : https://www.delock.com/
produkte/G_62985/treiber.html.
4. Suivez les instructions d’installation du pilote.
5. Le pilote va maintenant être installé.
6. Cliquez sur "Terminer".
7. Votre ordinateur demande à redémarrer. Cliquez sur "Oui" pour le redémarrer.
8. Après redémarrage vous pouvez immédiatement commencer à utiliser le
périphérique.
English
Deutsch
Français
Español
Systemvoraussetzungen
• Linux Kernel 5.15 oder höher
• Windows 10/10-64/11
• Ein freier M.2 Key B oder Key M Slot
Packungsinhalt
• Konverter
• Schraube
• Bedienungsanleitung
Sicherheitshinweise
• Produkt vor Feuchtigkeit schützen
• Vermeiden Sie antistatische Auadung beim Einbau des Produktes
Hardwareinstallation
Hinweis:
Achten Sie darauf, dass Ihr M.2 Slot PCIe unterstützt.
1. Installieren Sie den M.2 Konverter in einem freien M.2 Key M oder Key B Slot.
2. Stecken Sie nun ein Netzwerkkabel in die RJ45 Buchse.
Treiberinstallation
1. Schalten Sie den Computer ein.
2. Der Treiber wird automatisch installiert. Sollte das nicht der Fall sein, so
führen Sie die Installation wie folgt aus:
3. Laden Sie den Treiber von der Produktseite herunter: https://www.delock.de/
produkte/G_62985/treiber.html.
4. Folgen Sie nun den Anweisungen der Treiberinstallation.
5. Der Treiber wird nun installiert.
6. Klicken Sie auf "Fertig stellen".
7. Danach fragt der Rechner nach Neustart. Klicken Sie auf "Ja", um den
Rechner neu zu starten.
8. Nach dem Neustart können Sie das Gerät verwenden.
Requisitos del sistema
• Linux Kernel 5.15 o superior
• Windows 10/10-64/11
• Una ranura M.2 clave B o clave M disponible
Contenido del paquete
• Convertidor
• Tornillo
• Manual del usuario
Instrucciones de seguridad
• Proteja el producto contra el polvo
• Evite la electricidad antiestática al instalar el producto
Hardware Instalación
Nota:
Asegúrese de que la ranura M.2 admite PCIe.
1. Instale el convertidor M.2 en una llave M.2 libre M o llave en la ranura B.
2. Ahora puede conectar un cable de red al puerto RJ45.
Instalación del controlador
1. Encienda su PC.
2. El controlador se instalará automáticamente. Si no es así, instale el
controlador conforme al siguiente procedimiento:
3. Descargue el controlador desde la página del producto: https://www.delock.
com/produkte/G_62985/treiber.html.
4. Siga las instrucciones de instalación del controlador.
5. El controlador se instalará.
6. Haga clic en "Finalizar".
7. Su PC le pedirá reiniciarse. Haga clic en "Sí" para reiniciar el equipo.
8. Después del reinicio el dispositivo estará listo para su uso.
České
Polsku
Italiano
Svenska
Systémové požadavky
• Linux Kernel 5.15 nebo vyšší
• Windows 10/10-64/11
• Jeden volný slot M.2 key B nebo key M
Obsah balení
• Převodník
• Šroub
• Uživatelská příručka
Bezpečnostní pokyny
• Chraňte produkt před vlhkostí
• Při instalaci produktu se vyvarujte antistatické elektřině
Instalace hardware
Poznámka:
Ujistěte se, že váš slot M.2 podporuje PCIe.
1. Nainstalujte M.2 převodník do volného slotu M.2 key M nebo key B.
2. Nyní můžete připojit síťový kabel do portu RJ45.
Instalace ovladače
1. Zapněte počítač.
2. Ovladače budou nainstalovány automaticky. Pokud ne, proveďte instalaci
ovladačů manuálně dle následujících instrukcí:
3. Stáhněte si ovladač ze stránky produktu: https://www.delock.com/produkte/
G_62985/treiber.html.
4. Pokračujte podle instrukcí pro instalaci ovladače.
5. Ovladač bude nainstalován.
6. Klikněte na "Finish" (Ukončit).
7. Budete vyzvání k restartu počítače. Klikněte na "Yes" (Ano) pro provedení
restartu počítače.
8. Po restartu je možné disk ihned používat.
Requisiti di sistema
• Linux Kernel 5.15 o superiore
• Windows 10/10-64/11
• Uno slot M.2 chiave B o M disponibile
Contenuto della confezione
• Convertitore
• Vite
• Manuale utente
Istruzioni per la sicurezza
• Proteggere il prodotto dall'umidità
• Evitare l'elettricità antistatica durante l'installazione del prodotto
Installazione dell'hardware
Nota:
Assicurarsi che lo slot M.2 supporti PCIe.
1. Installare il convertitore M.2 in un M.2 con tasto M libero o slor del tasto B.
2. Ora è possibile collegare un cavo di rete nella porta RJ45.
Installazione del driver
1. Accendere il computer.
2. Il driver viene installato automaticamente. In caso contrario, e󰀨ettuare
l'installazione del driver come segue:
3. Scaricare il driver dalla pagina del prodotto: https://www.delock.com/produkte/
G_62985/treiber.html.
4. Attenersi alle istruzioni di installazione del driver.
5. Il driver a questo punto verrà installato.
6. Fare clic su "Fine".
7. Il computer richiederà di essere riavviato. Fare clic su "Sì" per riavviare il
computer.
8. Dopo il riavvio, è possibile iniziare ad utilizzare il dispositivo immediatamente.
Wymagania systemowe
• Linux Kernel 5.15 lub nowszy
• Windows 10/10-64/11
• Jedno wolne gniazdo M.2 z kluczem B lub M
Zawartość opakowania
• Konwerter
• Śruba
• Instrukcja obsługi
Instrukcje bezpieczeństwa
• Produkt należy zabezpieczyć przed wilgocią
• Podczas instalacji produktu należy unikać elektryczności statycznej
Instalacja sprzętu
Uwaga:
Upewnij się, że gniazdo M.2 obsługuje PCIe.
1. Zamontować konwerter M.2 w wolne gniazdo M.2 key M lub key B.
2. Możecie teraz podłączyć kabel sieciowy do gniazda RJ45.
Instalacja sterownika
1. Włącz komputer.
2. Sterownik powinien zostać zainstalowany automatycznie. jeśli nie, wykonaj
instalację sterownika w następujący sposób:
3. Pobrać sterownik ze strony produktu: https://www.delock.com/produkte/
G_62985/treiber.html.
4. Postępuj zgodnie z instrukcjami programu instalacyjnego.
5. Zostanie teraz zainstalowany sterownik.
6. Kliknij "Zakończ".
7. Komputer zapyta o ponowne uruchomienie. Kliknij "Tak", aby zrestartować
komputer.
8. Po restarcie można od razu rozpocząć korzystanie z urządzenia.
Systemkrav
• Linux Kernel 5.15 eller högre
• Windows 10/10-64/11
• En ledig M.2 B- eller M-nyckelplats
Paketets innehåll
• Omvandlare
• Skruv
• Bruksanvisning
Säkerhetsinstruktioner
• Skydda produkten mot fukt
• Undvik antistatisk elektricitet när du installerar produkten
Hårdvaruinstallation
Obs:
Se till att din M.2-kortplats stöder PCIe.
1. Installera M.2-omvandlaren i en ledig M.2 key M- eller key B-ingång.
2. Nu kan du ansluta en nätverkskabel till RJ45-ingången
Installation av drivrutiner
1. Slå på datorn.
2. Drivrutinen kommer att installeras automatiskt. Om detta inte är fallet, utför
installationen av drivrutinen enligt följande instruktioner:
3. Ladda ner drivrutinen från produktsidan: https://www.delock.com/produkte/
G_62985/treiber.html.
4. Följ instruktionerna för drivrutinsinstallation.
5. Nu installeras drivrutinen.
6. Klicka på "Finish" (Avsluta).
7. Din dator frågar dig om den ska starta om. Klicka på "Yes" (ja) för att starta
om datorn.
8. Efter omstart kan du börja använda enheten direkt.
Preduvjeti sustava
• Linux Kernel 5.15 ili noviji
• Windows 10/10-64/11
• Jedan slobodan M.2 utor s ključem B ili ključem M
Sadržaj pakiranja
• Pretvarač
• Vijak
• Korisnički priručnik
Sigurnosne upute
• Zaštitite proizvod od vlage
• Izbjegavajte statički elektricitet kod ugradnje proizvoda
Ugradnja hardvera
Napomena:
Provjerite podržava li M.2 utor PCIe.
1. Instalirajte pretvarač M.2 u slobodan M.2 utor sa zatikom M ili B.
2. Sada možete ukopčati mrežni kabel u priključak RJ45.
Instalacija upravljačkog programa
1. Uključite vaše računalo.
2. Upravljački program će se automatski instalirati. Ako to nije slučaj, molimo
provedite instalaciju upravljačkog programa na sljedeći način:
3. Preuzmite upravljački program sa stranice proizvoda: https://www.delock.com/
produkte/G_62985/treiber.html.
4. Slijedite upute za instalaciju upravljačkog programa.
5. Sada će se instalirati upravljački program.
6. Kliknite na "Finish" (Završi).
7. Vaše računalo će zatražiti da ponovno podizanje sustava. Kliknite "Da" radi
ponovnog pokretanja računala.
8. Nakon ponovnog pokretanja možete odmah početi koristiti uređaj.
Română
Magyar
Hrvatski
ελληνικά
Cerinte de sistem
• Linux Kernel 5.15 sau superior
• Windows 10/10-64/11
• O fantă M.2 cu cheie tip B sau cu cheie tip M liberă
Pachetul contine
• Convertizor
• Șurub
• Manual de utilizare
Instrucţiuni de siguranţă
• Protejaţi produsul împotriva umidităţii
• Evitaţi electricitatea antistatică atunci când instalaţi produsului
Instalarea componentelor hardware
Notă:
Asiguraţi-vă că fanta M.2 acceptă PCIe.
1. Instalați convertorul M.2 într-un slot liber M.2 cu cheie M sau B.
2. Acum puteți conecta un cablu de rețea în portul RJ45.
Instalarea driverului
1. Porniţi computerul.
2. Driverul se va instala automat. Dacă nu se întâmplă acest lucru, instalaţi
driverul după cum urmează:
3. Descărcați driverul de pe pagina produsului: https://www.delock.com/
produkte/G_62985/treiber.html.
4. Urmaţi instrucţiunile de instalare a driverului.
5. Driverul va  instalat acum.
6. Faceți clic pe "Finish" (Terminare).
7. Computerul dvs. va cere să reporniți. Faceți clic pe "Da" pentru a reporni
computerul.
8. După repornire, puteţi începe să utilizaţi dispozitivul imediat.
Rendszerkövetelmények
• Linux Kernel 5.15 vagy újabb
• Windows 10/10-64/11
• Egy szabad M.2 aljzat B vagy M nyílással
A csomag tartalma
• Átalakító
• Csavar
• Használati utasítás
Biztonsági óvintézkedések
• Óvja a terméket a nedvességtől.
• Kerülje az elektrosztatikus kisüléseket a termék üzembe helyezése közben
Hardvertelepítés
Megjegyzés:
Győződjön meg arról, hogy az M.2 aljzat támogatja a PCIe használatát.
1. Helyezze az M.2 átalakítót az M.2 M vagy B kulcs helybe.
2. Most bedughat egy hálózati kábelt az RJ45 portba.
Illesztőprogram telepítése
1. Kapcsolja be a számítógépet.
2. Az illesztőprogram telepítése automatikusan végbemegy. Ha ez nem történik
meg, telepítse az illesztőprogramot az alábbiak szerint:
3. Töltse le a meghajtó programot a termék weboldaláról: https://www.delock.
com/produkte/G_62985/treiber.html.
4. Kövesse az illesztőprogram telepítésének útmutatásait.
5. Megtörténik az illesztőprogram telepítése.
6. Kattintson a "Finish" (Befejezés) gombra.
7. A számítógép megerősítést kér, hogy megtörténjen-e az újraindítás.
Kattintson a "Yes" (Igen) gombra a számítógép újraindításához.
8. A rendszerindítást követően azonnal használatba veheti az eszközt.
Απαιτήσεις συστήματος
• Linux Kernel 5.15 ή νεότερο
• Windows 10/10-64/11
• Μια ελεύθερη υποδοχή M.2 key B ή key M
Περιεχόμενα συσκευασίας
• Μετατροπέας
• Βίδα
• Εγχειρίδιο χρήστη
Οδηγίες ασφάλειας
• Προστατεύστε το προϊόν από την υγρασία
• Αποφύγετε αντιστατικό ηλεκτρισμό όταν εγκαθιστάτε το προϊόν
Εγκατάσταση υλικού
Σημείωση:
Βεβαιωθείτε ότι η υποδοχή Μ.2 υποστηρίζει το PCIe.
1. Εγκαταστήστε τον μετατροπέα M.2 με μια ελεύθερη υποδοχή M.2 κλείδας M ή
B.
2. Τώρα μπορείτε να συνδέσετε ένα καλώδιο δικτύου στη θύρα RJ45.
Εγκατάσταση προγράμματος οδήγησης
1. Ενεργοποιήστε τον υπολογιστή σας.
2. Η εγκατάσταση του προγράμματος οδήγησης θα γίνει αυτόματα. Εάν όχι,
εκτελέστε την εγκατάσταση του προγράμματος οδήγησης με τον τρόπο που
ακολουθεί:
3. Κατεβάστε τον οδηγό από την ιστοσελίδα του προϊόντος: https://www.delock.
com/produkte/G_62985/treiber.html.
4. Ακολουθήστε τις οδηγίες εγκατάστασης του οδηγού.
5. Αυτή η μονάδα πλέον θα είναι εγκατεστημένη.
6. Κάντε κλικ στην επιλογή "Τέλος".
7. Θα ζητηθεί από τον υπολογιστή σας θα κάνετε επανεκκίνηση. Κάντε κλικ στο
"Yes" (Ναι) για επανεκκίνηση του υπολογιστή.
8. Μετά την επανεκκίνηση, μπορείτε να ξεκινήσετε να χρησιμοποιείτε τη συσκευή
αμέσως.

Other DeLOCK Media Converter manuals

DeLOCK 87768 User manual

DeLOCK

DeLOCK 87768 User manual

DeLOCK 62495 User manual

DeLOCK

DeLOCK 62495 User manual

DeLOCK 62500 User manual

DeLOCK

DeLOCK 62500 User manual

DeLOCK 64221 User manual

DeLOCK

DeLOCK 64221 User manual

DeLOCK 86440 User manual

DeLOCK

DeLOCK 86440 User manual

DeLOCK 61042 User manual

DeLOCK

DeLOCK 61042 User manual

DeLOCK 86215 User manual

DeLOCK

DeLOCK 86215 User manual

DeLOCK 61511 User manual

DeLOCK

DeLOCK 61511 User manual

DeLOCK 64198 User manual

DeLOCK

DeLOCK 64198 User manual

DeLOCK 91620 User manual

DeLOCK

DeLOCK 91620 User manual

DeLOCK 87805 User manual

DeLOCK

DeLOCK 87805 User manual

DeLOCK 64081 User manual

DeLOCK

DeLOCK 64081 User manual

DeLOCK 62510 User manual

DeLOCK

DeLOCK 62510 User manual

DeLOCK 87754 User manual

DeLOCK

DeLOCK 87754 User manual

DeLOCK 62848 User manual

DeLOCK

DeLOCK 62848 User manual

DeLOCK 95272 User manual

DeLOCK

DeLOCK 95272 User manual

DeLOCK 95232 User manual

DeLOCK

DeLOCK 95232 User manual

DeLOCK 88014 User manual

DeLOCK

DeLOCK 88014 User manual

DeLOCK 62687 User manual

DeLOCK

DeLOCK 62687 User manual

DeLOCK 62696 User manual

DeLOCK

DeLOCK 62696 User manual

DeLOCK 61971 User manual

DeLOCK

DeLOCK 61971 User manual

DeLOCK 62710 User manual

DeLOCK

DeLOCK 62710 User manual

DeLOCK 63343 User manual

DeLOCK

DeLOCK 63343 User manual

DeLOCK 62438 User manual

DeLOCK

DeLOCK 62438 User manual

Popular Media Converter manuals by other brands

Manhattan 308250 Quick install guide

Manhattan

Manhattan 308250 Quick install guide

NetSure UM1C48241500 user manual

NetSure

NetSure UM1C48241500 user manual

Avenview C-VGA-DVI user guide

Avenview

Avenview C-VGA-DVI user guide

Speco TVIUTPA user manual

Speco

Speco TVIUTPA user manual

MicroNet SP362B Series user manual

MicroNet

MicroNet SP362B Series user manual

Gefei MMIO DEMUX-HDSDI-4AES user manual

Gefei

Gefei MMIO DEMUX-HDSDI-4AES user manual

MTU K-1002-2 Hardware manual

MTU

MTU K-1002-2 Hardware manual

Miranda Kaleido-X (7RU) user manual

Miranda

Miranda Kaleido-X (7RU) user manual

GoMax Electronics MT-503A user manual

GoMax Electronics

GoMax Electronics MT-503A user manual

TR-Electronic Profibus 582 Series Assembly instructions

TR-Electronic

TR-Electronic Profibus 582 Series Assembly instructions

True blue power TC2000 Series Installation manual and operating instructions

True blue power

True blue power TC2000 Series Installation manual and operating instructions

Connect Research DNA4532 user manual

Connect Research

Connect Research DNA4532 user manual

Brainchild PC-W user manual

Brainchild

Brainchild PC-W user manual

Trycom Technology TRP-C08X user manual

Trycom Technology

Trycom Technology TRP-C08X user manual

Avenview SPLIT-3GHDSDI-4RS user guide

Avenview

Avenview SPLIT-3GHDSDI-4RS user guide

Pulsar DC/DC52230 quick start guide

Pulsar

Pulsar DC/DC52230 quick start guide

VISIO VSP 516 quick start

VISIO

VISIO VSP 516 quick start

Chromalox DirectConnect Installation and operating instructions

Chromalox

Chromalox DirectConnect Installation and operating instructions

manuals.online logo
manuals.online logoBrands
  • About & Mission
  • Contact us
  • Privacy Policy
  • Terms and Conditions

Copyright 2025 Manuals.Online. All Rights Reserved.