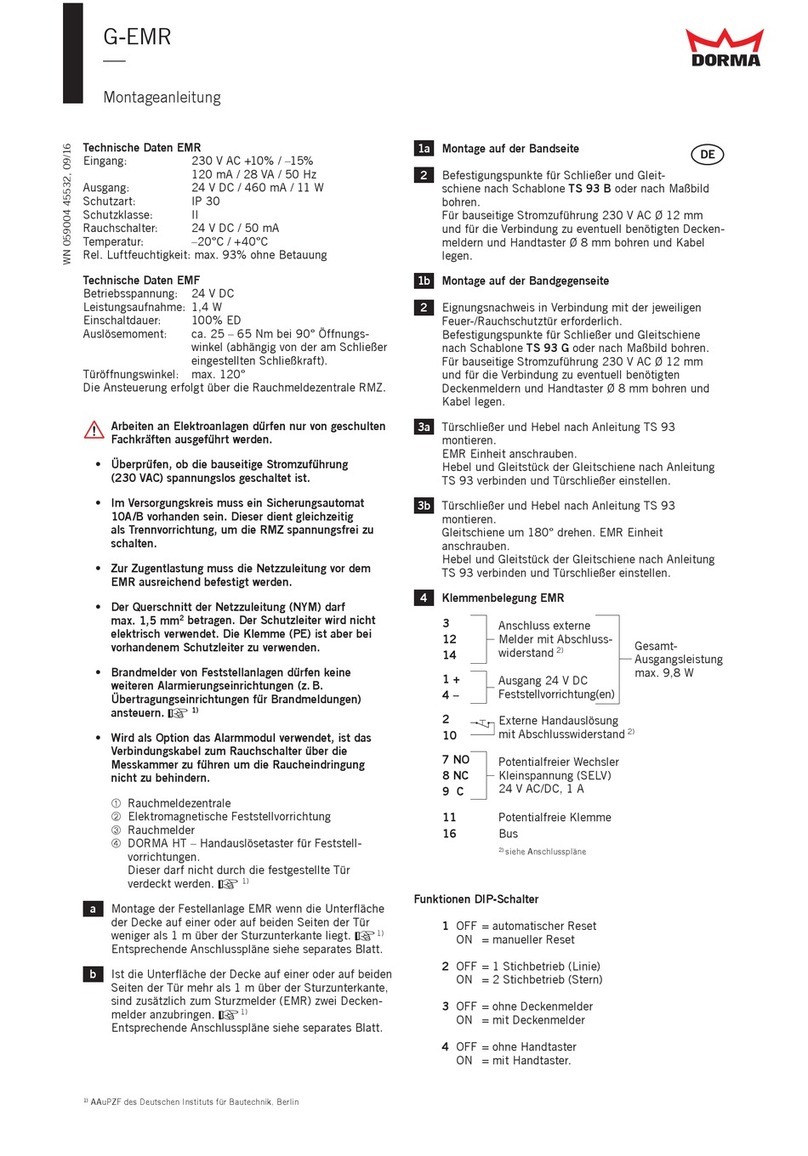
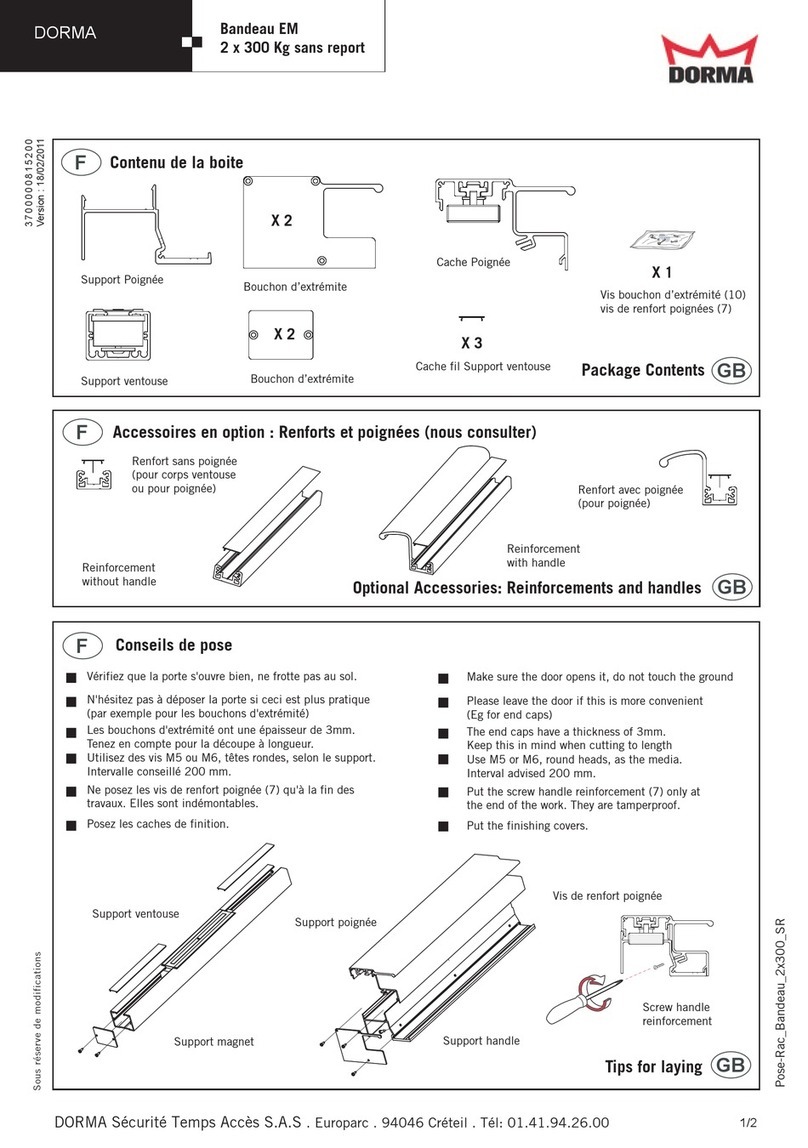
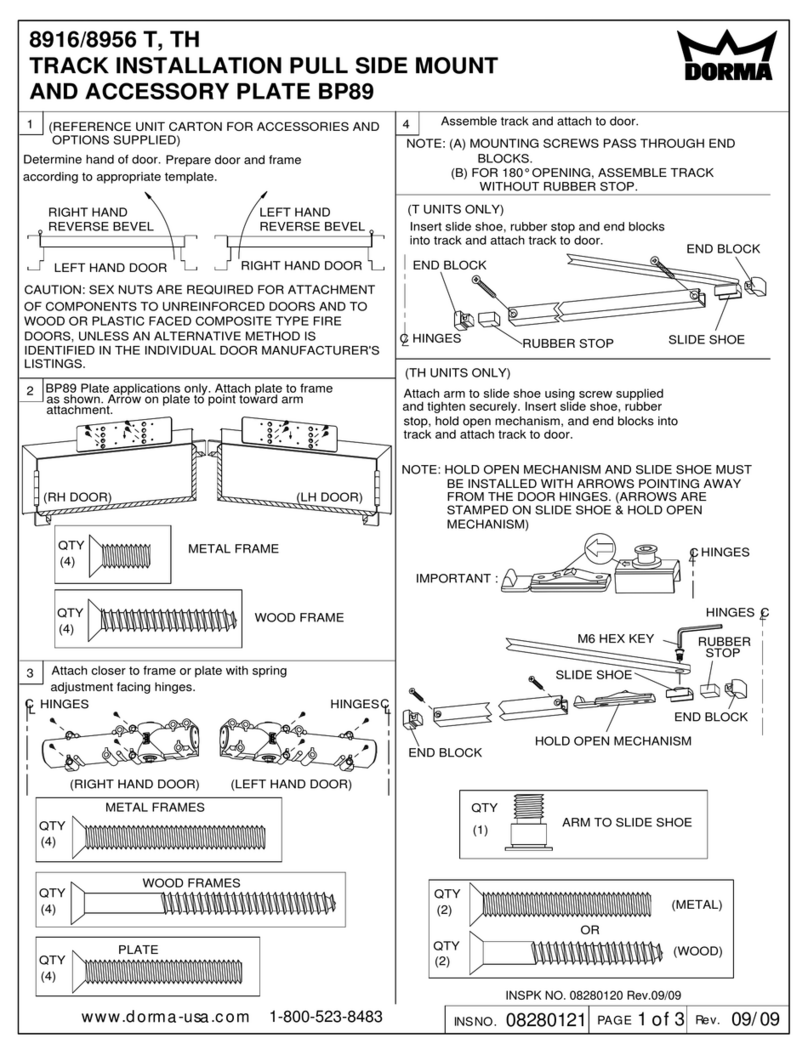
manuals.online logo
Brands
  1. Home
  2. •
  3. Brands
  4. •
  5. Dorma
  6. •
  7. Door Opening System
  8. •
  9. Dorma ES 200 User manual

Dorma ES 200 User manual

SST FLEX ES 200
—
SST FLEX ES 200
—
Montage- und Betriebsanleitung
Mounting instructions and Instruction manual
SST FLEX ES 200
—
Seite
1. Zu Ihrer Sicherheit 3 - 4
2. EG-Konformitätserklärung 7
3. Montage LM-Träger 8 - 9
4. Montage Seitenteil 10 - 16
5. Montage und Einstellung der Fahrflügel 17 - 23
6. Einstellung der Anlage 24 - 25
„Originalanleitung”
Page
1. For your safety 5 - 6
2. EC declaration of conformity 7
3. Mounting instruction of aluminum girder 8 - 9
4. Mounting instruction of side panel 10 - 16
5. Mounting instruction and adjustment of sliding panel 17 - 23
6. Adjustment of system 24 - 25
„Translation of the original documentation“
Inhalt / Contents
Wenn nicht anders angegeben, sind alle Maße in mm angegeben.
Unless otherwise specified, all measurements are in mm.
2 DORMA
SST FLEX ES 200
—
1. Zu Ihrer Sicherheit
Diese Dokumentation enthält wichtige Anweisungen für die
Montage. Lesen Sie diese Anweisungen, bevor Sie den
Break-out Beschlag ES 200 Anlagein eine montieren.
Für Ihre Sicherheit ist es wichtig, allen beiliegenden
Anweisungen Folge zu leisten.
Eine falsche Montage kann zu schwerwiegenden
Verletzungen führen.
Die Verwendung von Steuerelementen, Einstellungen oder
Verfahren, die in dieser Dokumentation nicht beschrieben
sind, können elektrische Schläge, Gefahren durch
elektrische Spannungen/Ströme und/oder Gefahren durch
mechanische Vorgänge verursachen.
Die Unterlagen sind aufzubewahren und bei einer
eventuellen Weitergabe der Anlage mit zu übergeben.
In dieser Anleitung benutztes Symbol
Achtung eist auf Gefahren hin, die zuw
Sachschäden, Personenschäden oder
zum Tod führen können.
Bestimmungsgemäßer Gebrauch
Die dientSST FLEX ES 200 ausschließlich zum Öffnen und
Schließen von Schiebetüren, die im Notfall durch
Aufschwenken der Türflügel annähernd die gesamte
Türbreite als Fluchtweg zur Verfügung stellen können.
Die ist nicht zur Verwendung anSST FLEX ES 200
Brandschutztüren und im Außenbereich geeignet.
Bei der Verwendung des Antriebs liegt dasES 200 Easy
zulässige Türflügelgewicht bei max. 1 x 100 kg oder
2 x 100 kg.
Bei der Verwendung des Antriebs liegt dasES 200
zulässige Türflügelgewicht bei max. 1 x 110 kg oder 2 x 110
kg. Die Türanlage ist zur Verwendung in Flucht- und
Rettungswegen geeignet.
Die maximale Kabellänge externer Komponenten darf 30 m
nicht übersteigen.
Haftungsbeschränkung
Das Produkt darf nur gemäß seiner bestimmungsgemäßen
Verwendung eingesetzt werden. Eigenmächtige Änderungen
am Produkt schließen jede Haftung durch die
DORMA Deutschland GmbH für daraus resultierende
Schäden aus. Für die Verwendung von Zubehör, das von
DORMA nicht freigegeben ist, wird keine Haftung
übernommen.
Sicherheitshinweise
Arbeiten an Elektroanlagen dürfen nur von geschulten
Fachkräften (Elektrikern) ausgeführt werden.
·Kinder nicht mit der Anlage oder fest montierten Regel-
und Steuereinrichtungen spielen lassen.
·Fernsteuerungen außerhalb der Reichweite von Kindern
halten.
·Führen Sie niemals Metallgegenstände in die Öffnungen
des Antriebs ein. Andernfalls besteht die Gefahr eines
elektrischen Schlags.
·Für Glastürflügel muss Sicherheitsglas verwendet werden.
Wichtige technische Daten
Spannungsversorgung 230 V AC
Bauseitige Absicherung 16 A
Betriebsgeräusch < 70 dB (A)
Allgemeines
Der neueste Stand der allgemein gültigen und länder-
spezifischen Normen, Gesetze, Richtlinien und Vorschriften
ist einzuhalten.
Risikobewertung
Der Hersteller (die Person, die den Einbau vornimmt) und
der Auftraggeber/Betreiber müssen bei der Planung der
Anlage gemeinsam eine individuelle Risikobewertung
durchführen.
Wir verweisen hierzu auf das zur Unterstützung der
Durchführung zur Verfügung stehende Formular
"Risikobewertung". Sie erhalten es unter dem Register
PRODUKTE www.dorma.deauf unserer Internetseite .
Gefahrenstellen an Schließkanten
An automatischen Türen können an den verschiedenen
Schließkanten Quetsch-, Scher-, Stoß- und
Einzugsgefahren bestehen.
Restrisiko
Je nach baulicher Gegebenheit, Türvariante und
Absicherungsmöglichkeit können Restgefahren (z. B.
Quetschen, kraftbegrenztes Anstoßen) nicht ausgeschlossen
werden.
Recycling und Entsorgung
Sowohl die ES 200 Easy mit Break-out Beschlag
oder als auchES 200 mit Break-out Beschlag
die Verpackung bestehen zum überwiegenden
Teil aus recyclefähigen Rohstoffen.
Die oderES 200 Easy mit Break-out Beschlag
wie auch dasES 200 mit Break-out Beschlag
Zubehör gehören nicht in den Hausmüll.
Sorgen Sie dafür, dass das Altgerät und ggf.
vorhandenes Zubehör ordnungsgemäß entsorgt
werden.
Beachten Sie dabei die geltenden nationalen gesetzlichen
Vorschriften.
Haupt-
schließkante
(HSK)
Neben-
schließkante
(NSK)
3DORMA
SST FLEX ES 200
—
1. Zu Ihrer Sicherheit
Sicherheit bei der Montage
·Der Arbeitsplatz ist gegen unbefugtes Betreten zu sichern.
Herunterfallende Teile oder Werkzeuge können zu
Verletzungen führen.
·Das Produkt muss vor Wasser und anderen Flüssigkeiten
geschützt werden.
·Befestigungsart und Befestigungsmittel, z. B. Schrauben
und Dübel, müssen auf jeden Fall den baulichen
Gegebenheiten angepasst werden (Stahlkonstruktion, Holz,
Beton usw.).
·Die hier beschriebene Montage ist ein Beispiel. Bauliche
oder örtliche Gegebenheiten, vorhandene Hilfsmittel oder
andere Umstände können eine andere Vorgehensweise
sinnvoll machen.
·Im Anschluss an die Montage sind die Einstellungen und
die Funktionsweise der Tür und der Schutzeinrichtungen
auf einwandfreien mechanischen Zustand zu überprüfen.
·Nur qualifizierte Fachleute dürfen das
Netzanschlussgehäuse öffnen.
·Vor Abnahme der Schutzhaube den Antrieb spannungsfrei
schalten. Netzstecker ziehen oder bei Festanschluss
Sicherung ausschalten.
·Fassen Sie das Netzkabel nur am Stecker und niemals am
Kabel an, um es aus der Steckdose zu ziehen.
Sicherheit bei der Inbetriebnahme
·Der Schutzleiter muss angeschlossen sein.
·Die Sicherheitssensorik muss angeschlossen sein
(siehe Inbetriebnahmeanleitung).
·Antriebseinheit und Fahrflügel sind korrekt miteinander
verbunden.
·Die Endanschläge sind so eingestellt, dass die Fahrflügel
bei max. Öffnungsweite die Endanschläge berühren. Die
Fahrflügel und die Standflügel dürfen bei geschlossener
Tür nicht mit den Dichtungsprofilen zusammenstoßen.
·Die Fahrflügel müssen leichtgängig sein.
·Die separat gelieferten Teile wie Programmschalter, NOT-
AUS-Schalter und Impulsgeber (Radarmelder,
NACHT/BANK-Schlüsseltaster) müssen montiert und
angeschlossen sein.
·Der Akku ist eingebaut (optional).
Überprüfung und Abnahme
Die Tür ist vor der ersten Inbetriebnahme und nach Bedarf,
jedoch mindestens einmal jährlich, von einem Sachkundigen
zu prüfen und ggf. zu warten.
Die Überprüfung und Abnahme müssen anhand des
Prüfbuchs von einer durch ausgebildeten PersonDORMA
durchgeführt werden.
Die Ergebnisse sind gemäß DIN 18650-2 zu dokumentieren
und für mindestens 1 Jahr durch den Betreiber
aufzubewahren.
Es empfiehlt sich, mit DORMA einen Wartungsvertrag
abzuschließen.
Einweisung:
Nach erfolgreicher Einstellung, Inbetriebnahme und
Funktionsprüfung der Türanlage ist die Bedienungsanleitung
dem Betreiber auszuhändigen und eine Einweisung
durchzuführen.
Wartung
Wartungsarbeiten dürfen nur im spannungsfreien Zustand
durchgeführt werden. Netzstecker ziehen oder bei
Festanschluss Sicherung ausschalten.
Türverhalten bei unterschiedlichen Witterungsverhältnissen
Die Sicherheitssensoren der Türanlage (Infrarot-
Lichtvorhänge) dienen der Absicherung des
Durchgangsbereichs. Höchste Priorität hat bei der
Einstellung der Empfindlichkeit der Sensoren der
Personenschutz. Insbesondere bei wechselnden
Witterungseinflüssen (Regen- oder Schneeschauern), bei
umherfliegendem Laub oder auch direkter
Sonneneinstrahlung auf reflektierenden Bodenbelägen kann
es sporadisch zu Fehldetektionen der Sensoren kommen.
Diese haben unter Umständen eine Öffnung der Tür von bis
zu 1 Minute zur Folge. Dieser Offenstand der Türanlage ist
durch eine Normvorgabe festgelegt und normal. Er dient der
Sicherheit der Türnutzer.
Pflege
Reinigungsarbeiten dürfen nur im spannungsfreien Zustand
durchgeführt werden. Netzstecker ziehen oder bei
Festanschluss Sicherung ausschalten.
Alle Oberflächen können mit einem feuchten Tuch und
handelsüblichen Reinigern gereinigt werden.
Scheuermittel sollten nicht verwendet werden, da sie die
Oberfläche beschädigen könnten.
Lassen Sie kein Wasser oder andere Flüssigkeiten auf oder in
den Antrieb gelangen.
Führen Sie niemals Metallgegenstände in die
Öffnungen am ein. Andernfalls besteht dieAntrieb
Gefahr eines elektrischen Schlag.
Verschleiß
Um ein einwandfreies Funktionieren der Anlage zu
gewährleisten, muss die Anlage jährlich geprüft werden.
Folgende Verschleißteile müssen geprüft und ggf.
ausgetauscht werden:
·Die Laufrollen alle 2 Jahre
·Der Akku alle 3 Jahre
·Die Gummi-Endanschläge bei jedem Servicecheck
·Die Laufschiene alle 5 Jahre
·Der Zahnriemen alle 1 000 000 Lastwechsel
·Die Bodengleiter bei jedem Servicecheck
·Die Bürsten (optional) bei jedem Servicecheck
·Die Fettung der Rollenschnäpper bei jedem Servicecheck
Es dürfen nur Originalersatzteile eingesetzt werden.
4 DORMA
SST FLEX ES 200
—
Safety instructions
Work on electrical equipment may only be performed
by properly qualified staff (electricians).
·Do not allow children to play with the door or its
adjustment and control devices.
·Keep remote controls out of reach of children.
·Never stick metal objects into the openings of the
operator, otherwise you might sustain an electric shock.
·Glass door leaves have to be made of safety glass.
Important technical data
Power supply 230 V AC
Fuse (by others) 16 A
Operating noise < 70 dB(A)
General
The latest versions of the common and country-specific
standards, laws, codes and regulations have to be observed.
Risk assessment
During the planning of the door system, the manufacturer
(the person installing the system) and the commissioner /
facility operator have to perform an individual risk
assessment (together).
Please refer to our homepage www.dorma.com and consider
the provided “risk assessment form” under forPRODUCT
further assistance when performing your individual risk
assessment.
Danger spots at closing edges
Automatic doors might cause hazards by crushing,
shearing, hitting and drawing-in at the different
closing edges.
Residual risk
Depending on the structural conditions, the prevailing door
version and the available safety equipment, residual risks
such as crushing and hitting (with a limited force) cannot be
excluded.
Recycling and disposal
Both the ES 200 with break-out fitting,Easy
ES 200 with break-out fitting and their packing
mainly consist of recyclable raw material.
The ES 200 with break-out fitting,Easy
ES 200 with break-out fitting and the respective
accessories must not be disposed of as domestic
waste.
Please ensure that the old appliance and the
respective accessories (if available) are properly
disposed of.
Please abide by the prevailing national statutory provisions.
1. For your safety
Main
closing edge
(HSK)
Secondary
closing edge
(NSK)
This documentation contains important information
regarding the mounting and the safe operation of the door
system.
Please read these instructions carefully before using the
break-out fitting ES 200 ES 200.with orEasy
It is important for your personal safety to abide by all
enclosed instructions.
An incorrectly performed installation might cause serious
injuries.
Using control elements, making adjustments or performing
procedures that are not described in this documentation
might cause electric shocks, danger caused by electric
voltage/current and/or danger due to mechanical incidents.
Please keep these documents for further reference and hand
them over to the person in charge in case the system is
transferred to another party.
Explanation of symbol
WARNING It indicates dangers that might cause
personal or material damage or even
kill people.
Intended application
The is only designed to open and closeSST FLEX ES 200
interior sliding doors that can provide almost the entire
width as an escape route in case of emergency by swinging
open the door leaves.
The is neither suitable for application atSST FLEX ES 200
fire doors (fire and smoke doors) nor at exterior doors.
If using the operator ES 200 Easy the admissible door panel
weight amounts up to 1 x 100 kg or 2 x 100 kg.
If using the operator ES 200 the admissible door panel
weight amounts up to 1 x 110 kg or 2 x 110 kg.
The door is suitable for application in escape routes.
The maximum cable length for external components must
not exceed 30 m.
Limitation of liability
The product may only be used according to its specified
intended application.
will not accept any liability forDORMA Deutschland GmbH
damage resulting from unauthorized modifications of the
product.
Furthermore components/accessories that have not been
approved by are exempted from liability.DORMA
5DORMA
SST FLEX ES 200
—
1. For your safety
Safety during mounting
·The working area has to be secured against unauthorized
access from other people. Falling items or tools might
cause injuries.
·The product has to be secured against water and other
liquids.
·In any case, the way of mounting and the mounting
equipment, for example screws and wall plugs, have to be
adequate with regard to the structural conditions (steel
structure, wood, concrete etc.).
·The mounting described herein is only an example.
Structural or local conditions, available tools or other
conditions might suggest a different approach.
·Following the successful installation of the system, the
settings and the proper function of the door and the
safety equipment have to be checked.
·Only specially qualified staff may open the power supply
housing.
·Disconnect the operator from power supply (de-energize
the system) before removing the cover of the power supply
housing. Remove mains plug or switch off fuse (in case of
permanent power supply).
·Always pull at the plug and never at the cable when
unplugging the power supply.
Safety during commissioning
·The protective earth conductor has to be connected.
·The safety sensors are to be connected (see
commissioning instructions).
·The operator and the active panels are properly linked.
·The end stops are adjusted so that the sliding panels
meet the end stops when the system is adjusted to its
maximum opening width. Furthermore the sealing profiles
of the active panels and the passive panels must not
collide while the door is closed.
·Ensure that the door leaves run smoothly.
·Separately supplied components such as the program
switch, the EMERGENCY OFF pushbutton and activators
(radar motion detectors, NIGHT-/BANK key switches)
have to be mounted and connected.The rechargeable
battery has been installed (optional).
Inspection and system approval
Before the first commissioning and depending on
requirements, however, at least once a year, the door has to
be inspected by a properly qualified technician and serviced
if required.
A person trained by has to perform the inspectionDORMA
and approve the system with the aid of the inspection book.
The respective results have to be documented in accordance
with DIN 18650-2 and the facility operator has to keep
these documents for at least 1 year.
We would recommend taking out a maintenance agreement
with DORMA.
Briefing:
Following the adjustment, commissioning and functional
testing of the door system, the operating instructions have
to be handed over to the facility operator and a briefing has
to be made.
Maintenance
The system has to be de-energized (disconnected from power
supply) before performing any kind of maintenance work.
Remove the power plug or switch off the fuse (in case of
permanent power supply).
Behavior of door system during varying weather conditions
The safety sensors (infrared light curtains) are designed to
safeguard the passage area. When it comes to adjusting the
sensitivity of the sensors, the protection of people always has
top priority. From time to time, changing climatic conditions
(such as rain or snow), flying leaves or direct sunlight
(reflected by certain floor finishes) may accidentally trigger
the sensors. As soon as the light curtains have been
triggered, the door may remain open for up to 1 minute – as
required by a certain standard. This is only a standard
procedure with the only purpose to protect the users of the
door system.
Care
The system has to be de-energized (disconnected from power
supply) before cleaning the system. Remove the power plug
or switch off the fuse (in case of permanent power supply).
You may clean all surfaces with a damp cloth and standard
commercial detergents.
You should not use scouring agents for cleaning purposes as
they might damage the surface finish.
Ensure that no water or other liquids drop on or into the
operator.
Never stick metal objects into the openings of the
operator otherwise you might sustain an electric shock.
Wear
The following wear parts must be checked in regular
intervals and be replaced if required in order to ensure the
smooth function of the unit:
• Track rollers: every 2 years
• Battery: every 3 years
• Rubber end stops: at every service check
• Track rail: every 5 years
• Toothed belt: every 1 000 000 opening/closing
cycle
• Floor guides: at every service check
• Brushes (optional): at every service check
•Greasing of roller catch: at every service check
Only use original spare parts.
6 DORMA
SST FLEX ES 200
—
Der Unterzeichner, der den nachstehenden Hersteller vertritt
DORMA Deutschland GmbH
DORMA Platz 1
58256 Ennepetal
erklärt hiermit, dass das Produkt
SST-G, SST-R, SST FLEX ES 200
in Übereinstimmung ist mit den Bestimmungen der in der
Anlage aufgeführten EG-Richtlinie(n) und dass die Normen
und/oder technischen Spezifikationen zur Anwendung gelangt
sind, die in der Anlage in Bezug genommen werden.
The undersigned representing the following manufacturer
DORMA Deutschland GmbH
DORMA Platz 1
58256 Ennepetal
Germany
declares that the product
SST-G, SST-R, SST FLEX ES 200
complies with the provisions of the EC Directive(s) specified
in the Appendix and that the standards and/or technical
specifications referred to in the Appendix were applied.
Richtlinie / Directive
2014/35/EU
Niederspannungsrichtlinie / Low Voltage Directive
X
2014/30/EU
Elektromagnetische Verträglichkeit / Electromagnetic compatibility
X
2006/42/EG
Maschinenrichtlinie / Machinery directive
Die technischen Unterlagen sind erhältlich beim Manager Productcompliance unter: /
The technical documentation is available from the Product Compliance Manager at:
[email protected]
Harmonisierte europäische Norm, nationale Regel / Harmonized European standard, national rule
X
EN 13849-1
X
EN 61000 - 3 - 2
X
EN ISO 12100
X
EN 61000 - 3 - 3
X
EN 16005
X
EN 61000 - 6 - 2
X
EN 61000 - 6 - 3
X
EN 60335 - 1
X
EN 60335-2-103
EN 60950 - 1
2. EG-Konformitätserklärung / EC declaration of conformity
Die vollständige EG-Konformitätserklärung zu diesem Produkt kann auf der Internetseite www.dorma.com eingesehen werden.
A complete version of the EC declaration of conformity is available at www.dorma.com.
Ennepetal, 20.07.2016
_______________________
Michael Hensel
Senior Vice President Region Germany
7DORMA
NSKNSK NSKNSKHSKHSK
BBAA
3. Montage LM-Träger / Mounting instruction of aluminum girder
SST-FLEX ZUSATZKIT (optional) / SST-FLEX ADDITIONAL KIT (optional)
(Art. 96000045)
Wichtiger Hinweis / Important remark
Bei 1-flügeligen Türen mit LW max. 1001 – 1250 mm und bei 2-flügeligen Türen mit LW max. 2001 – 2500 mm ist
die Montage des SST-FLEX ZUSATZKIT (optional) erforderlich. / The use of the SST-FLEX ADDITIONAL KIT (optional)
for single doors with LW max. 1001 – 1250 mm and double doors with LW max. 2001 – 2500 mm is necessary.
Ausführliche Informationen zur Montage finden Sie in der SST-FLEX ZUSATZKIT-Montageanleitung
(WN 058365) / For detailed information about the mounting, please read the SST-FLEX ADDITIONAL KIT mounting
instruction (company standard number 058365).
8 DORMA
SST FLEX ES 200
—
8
1 LM-Träger 200 mm
2 ES 200 Antriebsprofil
3 Kabelkanal U-Form
4 Scharnierprofil
5 Innenverkleidung 200 mm
6 Laufprofil mit Dämmlage
7 Abdeckprofil für LS-Kabel
8 U-Profil
5
3
24
1
6
7
1 Aluminum girder 200 mm
2 ES 200 operator profile
3 U-section cable trunking
4 Hinge profile
5 Internal cover 200 mm
6 Rail track profile with rubber strip
7 Cover profile for rail track cable
8 Channel section
8
55
42 min 50
78
LH + 128 (LM = 200)
12 mm
LH
1.
2.
3. 5.
4.
6.
max. 10
M6 x 20
DIN EN ISO 10642
XX
X = min. 40
M6 x 16
DIN EN ISO 10642
200
100
32
300
OKFOKF
4 x n
100
100
1
2
4
3
5
3. Montage LM-Träger / Mounting instruction of aluminum girder
Wichtiger Hinweis / Important remark
Ab einer LM-Träger-Länge von
4.200 mm wird empfohlen, den
Träger/das Antriebsprofil im Bereich
der HSK und bei Bedarf zusätzlich im
Bereich der NSK am Baukörper nach
oben abzufangen / For an aluminum
girder length of 4,200 mm or more it
is recommended to additionally
mount the girder/operator profile
upwards to the building structure
close to the HSK and if necessary
also close to the NSK.
9DORMA
SST FLEX ES 200
—
SST FLEX ES 200
—
NSKNSK NSKNSK
HSKHSK
BBAA
4. Montage Seitenteil / Mounting instruction of side panel
LH max : 2500 mm (Größere Höhen auf Anfrage. / Higher passage height on request.)
LW max : 1000 mm 1-flügelige Tür / single door
1001 – 1250 mm SST-FLEX ZUSATZKIT (optional), verwenden. /
Use . (Art. 96000045)SST FLEX ADDITIONAL KIT (optional)
2001 – 2500 mm SST-FLEX ZUSATZKIT (optional), verwenden. /
Use . (Art. 96000045)SST FLEX ADDITIONAL KIT (optional)
LW max : 2000 mm 2-flügelige Tür / double door
10 DORMA
A
4. Montage Seitenteil / Mounting instruction of side panel
1
11DORMA
SST FLEX ES 200
—
SST FLEX ES 200
—
48
Oberes Seitenteillager
Top side panel bearing
Bodenlager festsetzen:
markieren, bohren und verschrauben
Schrauben und Dübel sind nicht
im Lieferumfang enthalten!
Geeignete auf den Untergrund
abgestimmte Befestigungsmittel
verwenden!
Ausgleichsprofil
Adapter profile
oben / top
unten / bottom
Komplettes Seitenteil
Complete side panel
NSKNSK
2 3 4
5
4. Montage Seitenteil / Mounting instruction of side panel
Attachment of floor pivot set:
mark, drill and fix.
Screws and plugs are not
included in scope of delivery!
Please use suitable
fixing material according
to foundation!
Bodenlager
Floor pivot set
2.
2.
1.
12 DORMA
SST FLEX ES 200
—
9
7
Rastplatte / Pluger plate
Schnäpper / Latch bolt
8
M6
43
6
11
10
12
4. Montage Seitenteil / Mounting instruction of side panel
13
13DORMA
NSKNSK NSKNSK
4. Montage Seitenteil / Mounting instruction of side panel
18
1.
X
-0,5 / -0.5
Obere Drehlager / top pivot bearing
X-0,5 / -0.5
ø 3,5
ø 3.5
3.
2.
ø 2,8
ø 2.8
4.
3,2 mm Senkschraube
3.2 mm countersunk screw
300 300 300100
14
14 DORMA
SST FLEX ES 200
—
4. Montage Seitenteil / Mounting instruction of side panel
NSKNSK NSKNSK
(10 mm)
(10)
15
15DORMA
SST FLEX ES 200
—
23
21
19
17
15
13
11
9
7
5
3
1
27
25
24
22
20
18
16
14
12
10
8
6
4
2
28
26
1 2 9
7
3 24 25 26 27 28 29 30 31 32 33
34 35 36
1 2
ES 200 ES 200
25
Inbetriebnahme siehe Dokument:
Commissioning see document:
255166-02-6-50.
Inbetriebnahme siehe Dokument:
Commissioning see document:
255165-02-6-50.
Inbetriebnahme siehe Dokument:
Commissioning see document:
255165-02-6-50.
NSKNSK NSKNSKHSKHSK
16
ø 9,5
ø 9.5
ø 9,5
ø 9.5
4. Montage Seitenteil / Mounting instruction of side panel
Steuerung
Control unit
16 DORMA
SST FLEX ES 200
—
NSKNSK NSKNSK
HSKHSK
BBAA
5. Montage und Einstellung Fahrflügel / Mounting instruction and adjustment of sliding panel
LH max : 2500 mm (Größere Höhen auf Anfrage. / Higher passage height on request.)
LW max : 1000 mm 1-flügelige Tür / single door
1001 – 1250 mm SST-FLEX ZUSATZKIT (optional), verwenden. /
Use . (Art. 96000045)SST FLEX ADDITIONAL KIT (optional)
2001 – 2500 mm SST-FLEX ZUSATZKIT (optional), verwenden. /
Use . (Art. 96000045)SST FLEX ADDITIONAL KIT (optional)
LW max : 2000 mm 2-flügelige Tür / double door
17DORMA
SST FLEX ES 200
—
60
60
HSK
1
2
3
5. Montage und Einstellung Fahrflügel / Mounting instruction and adjustment of sliding panel
Schrauben und Dübel sind nicht
im Lieferumfang enthalten!
Geeignete auf den Untergrund
abgestimmte Befestigungsmittel verwenden!
Screws and plugs are not included
in scope of delivery!
Please use suitable fixing material
according to foundation!
oben / top
unten / bottom
Schiebeschwenkflügel
Break-out sliding door
Montage der Unterflurbodenführung, siehe Montageanleitung 057976-45532.
Installation of the floor-integrated guide rail, see mounting instruction 057976-45532.
18 DORMA
SST FLEX ES 200
—
4
5
5. Montage und Einstellung Fahrflügel / Mounting instruction and adjustment of sliding panel
19DORMA
SST FLEX ES 200
—
6
5. Montage und Einstellung Fahrflügel / Mounting instruction and adjustment of sliding panel
4,8
8
7
910
8
20 DORMA
SST FLEX ES 200
—

Other manuals for ES 200

2

Other Dorma Door Opening System manuals

Dorma TS93 GSR/EMF User manual

Dorma

Dorma TS93 GSR/EMF User manual

Dorma 8616 PH User manual

Dorma

Dorma 8616 PH User manual

Dorma 7300 Series User manual

Dorma

Dorma 7300 Series User manual

Dorma ITS 96 Manual

Dorma

Dorma ITS 96 Manual

Dorma CS 80 MAGNEO User manual

Dorma

Dorma CS 80 MAGNEO User manual

Dorma 7436 T User manual

Dorma

Dorma 7436 T User manual

Dorma 8900 DS User manual

Dorma

Dorma 8900 DS User manual

Dorma 8616 AF User manual

Dorma

Dorma 8616 AF User manual

Dorma 8616 S-IS User manual

Dorma

Dorma 8616 S-IS User manual

Dorma AS 350 User manual

Dorma

Dorma AS 350 User manual

Dorma SVP-S4 DCW Series User manual

Dorma

Dorma SVP-S4 DCW Series User manual

Dorma AGILE 150 User manual

Dorma

Dorma AGILE 150 User manual

Dorma ES 410 User manual

Dorma

Dorma ES 410 User manual

Dorma CD 80 User manual

Dorma

Dorma CD 80 User manual

Dorma 900S Series User manual

Dorma

Dorma 900S Series User manual

Dorma TS93-5 PKT 90/119 User manual

Dorma

Dorma TS93-5 PKT 90/119 User manual

Dorma G 93 SR-S User manual

Dorma

Dorma G 93 SR-S User manual

Dorma 8616 FH User manual

Dorma

Dorma 8616 FH User manual

Dorma 8916 JT User manual

Dorma

Dorma 8916 JT User manual

Dorma 8956 AF89 PD User manual

Dorma

Dorma 8956 AF89 PD User manual

Dorma 8600 EMR Series User manual

Dorma

Dorma 8600 EMR Series User manual

Dorma Manet User guide

Dorma

Dorma Manet User guide

Dorma ED 100 Installation and operation manual

Dorma

Dorma ED 100 Installation and operation manual

Dorma 8916 AF89 PFT User manual

Dorma

Dorma 8916 AF89 PFT User manual

Popular Door Opening System manuals by other brands

DITEC DAB105 quick reference

DITEC

DITEC DAB105 quick reference

Falcon RM70 installation instructions

Falcon

Falcon RM70 installation instructions

Eco FSA EFR TS-61 B Assembly instruction

Eco

Eco FSA EFR TS-61 B Assembly instruction

Assa Abloy Besam SW300 user manual

Assa Abloy

Assa Abloy Besam SW300 user manual

BEA ZENSAFE manual

BEA

BEA ZENSAFE manual

Assa Abloy Besam SL500 owner's manual

Assa Abloy

Assa Abloy Besam SL500 owner's manual

Richelieu LAMP LADH Installation instruction

Richelieu

Richelieu LAMP LADH Installation instruction

Synergy Hardware S500 Series Fixing instructions

Synergy Hardware

Synergy Hardware S500 Series Fixing instructions

GEZE Slimdrive EMD Replacement instructions

GEZE

GEZE Slimdrive EMD Replacement instructions

BEA 10LPR36-900 manual

BEA

BEA 10LPR36-900 manual

Assa Abloy Sargent Electroguard-59 80 Series Installation and wiring instructions

Assa Abloy

Assa Abloy Sargent Electroguard-59 80 Series Installation and wiring instructions

GILGEN doorboy DBL-W Assembly and operating instructions

GILGEN

GILGEN doorboy DBL-W Assembly and operating instructions

Eco FSA ECO SR-EFR Assembly instruction

Eco

Eco FSA ECO SR-EFR Assembly instruction

Pima 8841202 instruction manual

Pima

Pima 8841202 instruction manual

GEZE TS 5000 R-ISM/G quick start guide

GEZE

GEZE TS 5000 R-ISM/G quick start guide

GEZE Slimdrive EMD user manual

GEZE

GEZE Slimdrive EMD user manual

Von Duprin Quiet One 9847WDC installation instructions

Von Duprin

Von Duprin Quiet One 9847WDC installation instructions

DITEC DAS200 Technical manual

DITEC

DITEC DAS200 Technical manual

manuals.online logo
manuals.online logoBrands
  • About & Mission
  • Contact us
  • Privacy Policy
  • Terms and Conditions

Copyright 2025 Manuals.Online. All Rights Reserved.