EBL RM-72 User manual

PROFESSIONAL CARE
ON BATTERIES & CHARGERS
SINCE 1998
USER GUIDE

CONTENTS
Welcome Guide • English .......................................................... 01-10
Instructions de Bienvenue • Français ........................................ 11-20
Benutzerhandbuch • Deutschland ............................................. 21-30
Guía de Bienvenida • Español ................................................... 31-40
Guida di Benvenuto • Italiano .................................................... 41-50
取扱説明書 日本語 ..................................................................... 51-60

WELCOME GUIDE ●ENGLISH
IMPORTANT SAFEGUARDS
Read these instructions carefully and retain them for future use. If
this product is passed to a third party, then these instructions must be
included.
When using electrical devices, basic safety precautions should
always be followed to reduce the risk of fire, electric shock, and/or
injury to persons including the following:
SAVE THESE INSTRUCTIONS TO REDUCE THE RISK OF FIRE
OR ELECTRIC SHOCK, CAREFULLY FOLLOW THESE
INSTRUCTIONS.
●
01

TEST DATA
SPECIFICATIONS
Model
Input
Output Voltage
Output Current
Discharge Current
No-load Voltage
Battery Charging Rate
Charging Way
Size
Weight
RM-72
AC 100-240V 50/60Hz 0.5A
DC 1.2V
2000mA±200mA
500mA
5V
Up to 80%
Constant voltage and current
98mm x 68mm x 31.5mm
111g
02

CHARGING TIMES
WORKING & STORAGE CONDITION
Charging times are a guide only. Real charging time will vary depending
upon the brand, capacity and condition of battery being charged.
Battery
Size
(Ni-MH)
Related
Capacity
(mAh)
Battery
Number
(pcs)
Charging
Current
(mA)(Max)
Approximate
Charging Time
(Hrs)
AA
AAA
2300-2800 1-4
1-4
2000
2000
1.25-1.55
0.5-0.75
800-1100
Storage Temperature
Working Temperature
Surface Temperature
of Charger
Storage Humidity
Working Humidity
Surface Temperature
of Battery
-10°C~+55°C
5°C~40°C
35°C~60°C
≤85%
≤95%
25°C~60°C
03

HOW TO USE
Make sure the batteries are placed correctly, making the"+/-" poles
of the batteries are corresponding to the"+/-"of the charger.
Charging status: Independently show the charging status of each
battery in the form of battery icon.
Smart LCD display:
1.
2.
3.
USE STEPS
04
Using Instructions:4.
LCD
Indicator Keeping
Flashing
FullCharge
Status
Abnormal charging
(broken or
non-rechargeable
battery)
Charging Charging
Process
Fully
Charged
1. When one battery is fully
charged, it starts showing
“Full”;
2. All the batteries are fully
charged, “Charge”
disappears, “Full” displays.

2
3
05
Insert the battery, auto detect
Shows “Charge”
Battery bar displays by battery capacity
Enter Smart Charging
Shows “Charge”
Battery bars display by battery capacity and increase by grid
4Finish charging
Shows “Full”
Battery bars are all full display
Plug in the AC cable and power on
LCD screen lights up and shows every character on screen
Character disappears
1
CHARGE FUNCTION

06
2
3
Insert the battery, auto detect
Shows “Charge”
Battery bar displays by battery capacity
Touch button (short press 1s)
“Test” keeps flashing, “Discharge” displays
Battery capacity displays "0mAh"
4Discharging, measuring the current
capacity of the battery
“Test” keeps flashing, “Discharge” displays
Capacity increases gradually in units of 10mAh
Plug in the AC cable and power on
LCD screen lights up and shows every character on screen
Character disappears
1
DISCHARGE FUNCTION
Button

07
2Insert the battery, auto detect
Shows “Charge”
Battery bar displays by battery capacity
Finish discharging(Current capacity test)
“Test” & “Discharge” disappear
Display the current capacity of the battery, such as "1100mAh"
5
Plug in the AC cable and power on
LCD screen lights up and shows every character on screen
Character disappears
1
Long press the button 3-5s enter battery capacity test function
(The second long press 3-5s return to “Charge” )
“Test” keeps flashing, “Charge” displays
Battery bars display by battery capacity and increase by grid
3
BATTERY CAPACITY TEST FUNCTION
Button

08
5Discharging, measuring the current capacity of the battery
“Test” keeps flashing, “Discharge” displays
Capacity increases gradually in units of 10mAh
Finish discharging( Actual capacity test)
“Test” & “Discharge” disappear
Display the actual capacity of the battery, such as "1100mAh"
6
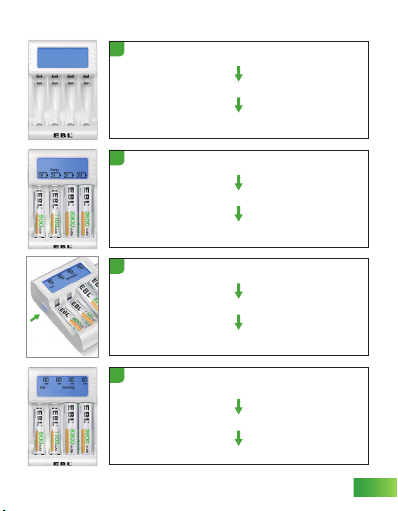
4All batteries are fully charged
“Test” keeps flashing, “Charge” disappears, “Full” displays
Automatically enters the sleep state for 20 minutes,
allowing the fully charged battery to cool down to normal
Automatically enter the discharge state

WARNINGS
TO AVOID PERSONAL INJURY AND PROPERTY
DAMAGE FROM, BUT NOT LIMITED TO, THE RISK
OF ELECTRIC SHOCK OR FIRE:
Turn off the charger and take the batteries out after charging is
completed.
DO NOT disassemble and reassemble the charger, or it may cause
short-circuit.
DO NOT charge batteries whose cover are damaged, or it may cause
short circuit and fire hazard.
DO NOT charge non-rechargeable batteries. It might cause battery
leakage, battery explosion, personal injuries, etc.
DO NOT put anything on the charger while charging batteries, it will
accumulate heat to cause fire hazard.
Indoor use only, keep it away from direct sunlight and moist/high-
temperature environment.
Children should not use this charger without any adult’s supervision.
Store this charger out of reach of children.
EBL RM-72 battery charger is ONLY designed for AA/AAA Ni-MH
rechargeable batteries. Please DO NOT put any other types of
batteries in this charger, especially alkaline batteries.
Please use the AC cable provided by EBL.
Please make sure the +/- pole of battery matches the +/- pole of
the charger correctly.
The charger can charge each battery independently.
When non-rechargeable batteries or broken batteries are put in,
the corresponding icon will flash all the time.
New battery will reach the best performance after using 3-5 times.
Battery power will lose because of long-time storage. Please charge
the battery fully if it is not used for a long time.
It’s normal that the battery becomes hot while charging. The
temperature will cool down to normal later, please feel free to
use it.
1.
2.
3.
4.
5.
6.
7.
8.
9.
10.
11.
12.
13.
14.
15.
16.
09

WARRANTY
10
WE PROVIDE 30 DAYS WORRY-FREE MONEY
BACK AND ONE YEAR LIMITED WARRANTY.
Our professional and friendly support team members will be here
offering hassle-free service for you 24hour*7days.
We will go on to provide sincere customer service and technical
support for you and hope you have a good experience with EBL.

INSTRUCTIONS DE BIENVENUE ●FRANÇAIS
PROTECTIONS SÉCURITAIRES IMPORTANTES
Lisez attentivement ces instructions et conservez-les pour une
utilisation future. Si ce produit est transmis à un tiers, ces instructions
doivent être incluses.
Lors de l’utilisation d’appareils électriques, des précautions de
sécurité de base doivent toujours être suivies pour réduire le risque
d’incendie, d’électrocution et/ou de blessures aux personnes, y compris
les éléments suivants:
CONSERVEZ CES INSTRUCTIONS POUR RÉDUIRE LE RISQUE
D’INCENDIE OU D’ÉLECTROCUTION, SUIVEZ ATTENTIVEMENT
CES INSTRUCTIONS.
●
11

DONNÉES D 'ESSAI
SPÉCIFICATIONS
Modèle
Entrée
Tension de Sortie
Courant de Sortie
Courant de Décharge
Consommation
d’Alimentation Sans Charge
Taux de Charge de La Pile
Manière de Charge
Dimension
Poids
RM-72
AC 100-240V 50/60Hz 0.5A
DC 1,2V
2000mA±200mA
500mA
5V
Jusqu’à 80%
Voltage et Courant Constant
98mm x 68mm x 31,5mm
111g
12

AA
AAA
2300-2800 1-4
1-4
2000
2000
1.25-1.55
0.5-0.75
800-1100
TEMPS DE CHARGE
CONDITION DE FONCTIONNEMENT ET DE STOCKAGE
Les temps de charge sont pour référence uniquement. Le temps de
charge réel varie en fonction de la marque, de la capacité et de l’état
de la pile en cours de charge.
Taille de
Pile
(Ni-MH)
Capacité
Connexe
(mAh)
Nombre
de Piles
(pcs)
Courant
de Charge
(mA)(Max)
Temps de Charge
Approximatif
(Heures)
Température de
Stockage
Température de
Fonctionnement
Température de
Surface du Chargeur
Humidité de
Stockage
Humidité de
Fonctionnement
Température de
Surface de la Pile
13
-10°C à +55°C
5°C à 40°C
35°C à 60°C
≤85%
≤95%
25°C à 60°C

COMMENT UTILISER
nsérez correctement la pile dans le chargeur en vous assurant que
le pôles +/- de la pile correspond au pôles +/- du chargeur.
État de Charge: Sous la forme d’une batterie, les icônes indiquent
indépendamment l’état de charge de chaque pile correspondante.
Écran LCD Intelligent:
1.
2.
3.
Instructions d’Utilisation:4.
ÉTAPES D'UTILISATION
14
Indicateur
à LCD Continuer
de clignoter
FullCharge
État
Charge Anormale
(la pile est
défectueuse ou
non-rechargeable)
Charge En Cours
de Charge
Chargée
Complète
1. Une fois une pile
complètement chargée,
il se montre «Full»;
2. Lorsque toutes les piles
complètement chargées:
«Charge» désapparaît,
et «Full» apparaît

2
3
15
Insérez la pile, détection automatique
Affiche «Charge»
Les barres de batterie s’affichent selon la capacité de pile
Passé à la Charge Intelligente
Affiche «Charge»
Les barres de batterie s’affichent selon la capacité de pile,
et s’augmente par grille
4Terminer la charge
Affiche «Full»
Les barres de batterie s’affichent pleinement
Branchez le câble AC et allumez
L’écran LCD s’allume et affiche chaque caractère sur l’écran
Les caractères disparaissent
1
FONCTION DE CHARGE

16
2
3
Insérez la pile, détection automatique
Affiche «Charge»
Les barres de batterie s’affichent selon la capacité de pile
Touchez le bouton (pressez brièvement 1s)
«Test» continue de clignoter, «Discharge» s’affiche
Affichage la capacité de la pile «0mAh»
4Décharge, mesurer la capacité actuelle de la pile
«Test» continue de clignoter, «Discharge» s’affiche
La capacité s’augmente progressivement par unités de 10mAh
Branchez le câble AC et allumez
L’écran LCD s’allume et affiche chaque caractère sur l’écran
Les caractères disparaissent
1
FONCTION DE DÉCHARGE
Bouton

17
2Insérez la pile, détection automatique
Affiche «Charge»
Les barres de batterie s’affichent selon la capacité de pile
FONCTION DE TEST DE CAPACITÉ DE LA PILE
Terminer la décharge (Test de capacité actuelle)
«Test» et «Discharge» disparaissent
Afficher la capacité actuelle de la pile, telle que «1100mAh»
5
Branchez le câble AC et allumez
L’écran LCD s’allume et affiche chaque caractère sur l’écran
Les caractères disparaissent
1
Appuyez longuement sur le bouton 3-5s pour passer à
la fonction de test de capacité de pile (La deuxième
longue pression de 3 à 5 secondes revient à «Charge»)
«Test» continue de clignoter, «Charge» s’affiche
Les barres de batterie s’affichent selon la capacité de pile,
et s’augmente par grille
3
Bouton

18
5Décharge, mesurer la capacité actuelle de la pile
«Test» continue de clignoter, «Discharge» s’affiche
La capacité s’augmente progressivement par unités de 10mAh
Terminer la décharge (Test de capacité réelle)
«Test» et «Discharge» disparaissent
Afficher la capacité actuelle de la pile, telle que «1100mAh»
6
4Toutes les piles sont complètement chargées
«Test» continue de clignoter, «Charge» disparaît,
«Full» s'affiche
Passé automatiquement en mode veille pendant 20 minutes,
permettant à la pile complètement chargée de se refroidir
à la normale.
Passé automatiquement en mode de décharge
Table of contents
Languages:
Other EBL Batteries Charger manuals