manuals.online logo
Brands
  1. Home
  2. •
  3. Brands
  4. •
  5. Enabling Devices
  6. •
  7. Toy
  8. •
  9. Enabling Devices Whirly Wheel 3094 User manual

Enabling Devices Whirly Wheel 3094 User manual

Other Enabling Devices Toy manuals

Enabling Devices Shelly Seahorse 4084 User manual

Enabling Devices

Enabling Devices Shelly Seahorse 4084 User manual

Enabling Devices Textured Talkable II User manual

Enabling Devices

Enabling Devices Textured Talkable II User manual

Enabling Devices Bump & Go Train 410 User manual

Enabling Devices

Enabling Devices Bump & Go Train 410 User manual

Enabling Devices Rain Drops 3065 User manual

Enabling Devices

Enabling Devices Rain Drops 3065 User manual

Enabling Devices Mini-Shooting Stars User manual

Enabling Devices

Enabling Devices Mini-Shooting Stars User manual

Enabling Devices 3934 User manual

Enabling Devices

Enabling Devices 3934 User manual

Enabling Devices 8086 User manual

Enabling Devices

Enabling Devices 8086 User manual

Enabling Devices Musical Merry-Go-Round User manual

Enabling Devices

Enabling Devices Musical Merry-Go-Round User manual

Enabling Devices Mini Popper 751 User manual

Enabling Devices

Enabling Devices Mini Popper 751 User manual

Enabling Devices 6470 User manual

Enabling Devices

Enabling Devices 6470 User manual

Enabling Devices My First Music Player 2209 User manual

Enabling Devices

Enabling Devices My First Music Player 2209 User manual

Enabling Devices Cheap Talk 8 Six Level User manual

Enabling Devices

Enabling Devices Cheap Talk 8 Six Level User manual

Enabling Devices Giggle Gang User manual

Enabling Devices

Enabling Devices Giggle Gang User manual

Enabling Devices 7570 User manual

Enabling Devices

Enabling Devices 7570 User manual

Enabling Devices Meowsic 1662 User manual

Enabling Devices

Enabling Devices Meowsic 1662 User manual

Enabling Devices 2001 User manual

Enabling Devices

Enabling Devices 2001 User manual

Enabling Devices Pony Pal 916 User manual

Enabling Devices

Enabling Devices Pony Pal 916 User manual

Enabling Devices 1690 User manual

Enabling Devices

Enabling Devices 1690 User manual

Enabling Devices 702 User manual

Enabling Devices

Enabling Devices 702 User manual

Enabling Devices Piano Puppy User manual

Enabling Devices

Enabling Devices Piano Puppy User manual

Enabling Devices Ring Around Bells Switch Toy User manual

Enabling Devices

Enabling Devices Ring Around Bells Switch Toy User manual

Enabling Devices 1203 User manual

Enabling Devices

Enabling Devices 1203 User manual

Enabling Devices Crawl About Dog User manual

Enabling Devices

Enabling Devices Crawl About Dog User manual

Enabling Devices Travelin' Turtle User manual

Enabling Devices

Enabling Devices Travelin' Turtle User manual

Popular Toy manuals by other brands

FUTABA GY470 instruction manual

FUTABA

FUTABA GY470 instruction manual

LEGO 41116 manual

LEGO

LEGO 41116 manual

Fisher-Price ColorMe Flowerz Bouquet Maker P9692 instruction sheet

Fisher-Price

Fisher-Price ColorMe Flowerz Bouquet Maker P9692 instruction sheet

Little Tikes LITTLE HANDIWORKER 0920 Assembly instructions

Little Tikes

Little Tikes LITTLE HANDIWORKER 0920 Assembly instructions

Eduard EF-2000 Two-seater exterior Assembly instructions

Eduard

Eduard EF-2000 Two-seater exterior Assembly instructions

USA Trains EXTENDED VISION CABOOSE instructions

USA Trains

USA Trains EXTENDED VISION CABOOSE instructions

Modellbau Laffont Z1601 Assembly instructions

Modellbau Laffont

Modellbau Laffont Z1601 Assembly instructions

NOCH 12905 instruction manual

NOCH

NOCH 12905 instruction manual

Eduard Ki-61-Id quick start guide

Eduard

Eduard Ki-61-Id quick start guide

Viessmann Vollmer 45616 Mounting instruction

Viessmann

Viessmann Vollmer 45616 Mounting instruction

Vollmer 42004 Mounting instruction

Vollmer

Vollmer 42004 Mounting instruction

Phoenix Model CLASSIC-EP instruction manual

Phoenix Model

Phoenix Model CLASSIC-EP instruction manual

H-KING Sopwith Camel British WW1 Fighter instruction manual

H-KING

H-KING Sopwith Camel British WW1 Fighter instruction manual

MODSTER Predator 4x4 Crawler user manual

MODSTER

MODSTER Predator 4x4 Crawler user manual

DHK Hobby 8136 User instruction manual

DHK Hobby

DHK Hobby 8136 User instruction manual

THUNDER TIGER Raptor 50 V2 kit manual

THUNDER TIGER

THUNDER TIGER Raptor 50 V2 kit manual

Timberkits Skateboarder instructions

Timberkits

Timberkits Skateboarder instructions

Hangar 9 Funtana 125 Assembly manual

Hangar 9

Hangar 9 Funtana 125 Assembly manual

manuals.online logo
manuals.online logoBrands
  • About & Mission
  • Contact us
  • Privacy Policy
  • Terms and Conditions

Copyright 2025 Manuals.Online. All Rights Reserved.

Photo. 1
Photo. 2
For Technical Support:
Call our Technical Service Department
Monday through Friday, 9 a.m. to 5 p.m. (EST)
1-800-832-8697
[email protected]
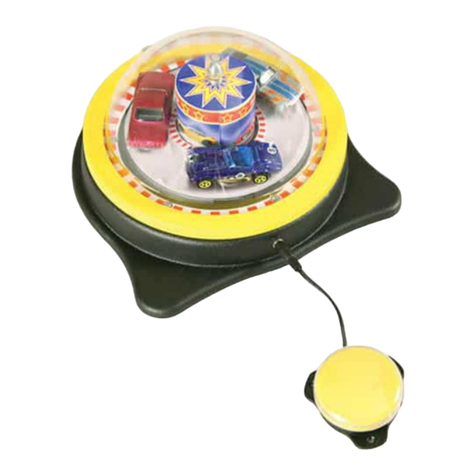
Whirly Wheel #3094
USER’S GUIDE
50 Broadway
Hawthorne, NY 10532
Tel. 914.747.3070 / Fax 914.747.3480
Toll Free 800.832.8697
www.enablingdevices.com
Classic science toy!
We’ve adapted this classic gyroscope toy so everyone can enjoy the
magnetic and centripetal forces at work with the Whirly Wheel.
Activate the wheel by pressing the switch and fun, lively music
plays while the gyro wheel moves up and down and around. Comes
with two gyro wheels with LED lights for an exciting light show.
Batteries on the LED lights can be removed to deactivate the lights
for individuals who are seizure prone. On/off volume control; base
is clampable. Size: 18"L x 8"W x 14"H. Requires 2 C Batteries.
Weight: 3 lbs.
Operation:
1. Whirly Wheel requires two C size batteries Use alkaline
batteries only (e.g. Duracell or Energizer brand). Do not use
rechargeable batteries or any other type of batteries because
they supply lower voltage and the unit will not perform properly.
Never mix old and new batteries together or different brands or
types together.
2. The battery compartment is located on the back of the unit. To
remove the battery compartment cover, unscrew the small
Phillips Head screw, and then slide the cover off. Install new
batteries, being careful to observe proper (+) & (-) battery
polarity. Replace cover and screw. Turn the On/Off/Volume
switch to On and adjust to desired level.
3. Connect the unit to any external capability switch via the jack,
located on the side of the unit. Whirly Wheel is equipped with a
1/8-inch jack, for use with capability switches with a 1/8-inch
plug. If you need to use a 1/4- to 1/8-inch adapter, it must be a
mono adapter, like our #1170, not stereo.
4. Make sure that the connections between the external capability
switch and the adapter (if applicable) and the jack on the Whirly
Wheel are plugged in all the way. There should be no gaps.
5. Whirly Wheel comes with two gyro wheels with LED lights for an
exciting light show. Batteries (Uses Three LR44 button type) on
the LED lights can be removed to deactivate the lights for
individuals who are seizure prone. To do this remove the 3
Phillips Head screws from the Gyro wheel (as shown in photo 1.
On back cover). Next lift cover off and remove batteries.
Replace cover and screws. When putting the cover back on
make sure to line up the grove or track so the cover seats
properly. Place one of the Gyro wheels on the metal rails as
shown in Photo. 2 on back cover.
6. Begin play by activating your external capability switch fun, lively
music plays while the gyro wheel moves up and down and
around. If the Gyro is moving to slow, release the switch and
press it again. The Gyro should now move faster. Release the
switch, and the music and rotation of the arm will stop. The
Gyro itself may still move for a short period of time. Great for
teaching cause and effect and eye tracking.
Troubleshooting:
Problem: The Whirly Wheel does not move and no music.
Action #1: Check batteries for proper installation and freshness.
Action #2: Try your external capability switch with another
toy/device to rule out the switch as the source of the problem.
Problem: The music does not play.
Care of Unit:
Whirly Wheel can be wiped clean with any household multi-purpose
cleaner and disinfectant.
Do not submerge the unit, as it will damage the contents and the
electrical components.
Do not use abrasive cleaners, as they will scratch the surface of the
unit.
Rev 10/10/17