manuals.online logo
Brands
  1. Home
  2. •
  3. Brands
  4. •
  5. Fanvil
  6. •
  7. IP Phone
  8. •
  9. Fanvil X210i User manual

Fanvil X210i User manual

Other manuals for X210i

1

Other Fanvil IP Phone manuals

Fanvil X3S/G User manual

Fanvil

Fanvil X3S/G User manual

Fanvil X301 User manual

Fanvil

Fanvil X301 User manual

Fanvil BW206 Operational manual

Fanvil

Fanvil BW206 Operational manual

Fanvil X5U V2 User manual

Fanvil

Fanvil X5U V2 User manual

Fanvil X3SG Pro User manual

Fanvil

Fanvil X3SG Pro User manual

Fanvil X7C User manual

Fanvil

Fanvil X7C User manual

Fanvil X3SP User manual

Fanvil

Fanvil X3SP User manual

Fanvil X5S User manual

Fanvil

Fanvil X5S User manual

Fanvil C58 User manual

Fanvil

Fanvil C58 User manual

Fanvil C62 User manual

Fanvil

Fanvil C62 User manual

Fanvil F52 User manual

Fanvil

Fanvil F52 User manual

Fanvil X6 User manual

Fanvil

Fanvil X6 User manual

Fanvil H5 User manual

Fanvil

Fanvil H5 User manual

Fanvil X7 User manual

Fanvil

Fanvil X7 User manual

Fanvil X7 User manual

Fanvil

Fanvil X7 User manual

Fanvil X3S Basic Quick guide

Fanvil

Fanvil X3S Basic Quick guide

Fanvil D800 User manual

Fanvil

Fanvil D800 User manual

Fanvil BW210 User manual

Fanvil

Fanvil BW210 User manual

Fanvil FNVL-X6 User manual

Fanvil

Fanvil FNVL-X6 User manual

Fanvil X6U User manual

Fanvil

Fanvil X6U User manual

Fanvil X210i User manual

Fanvil

Fanvil X210i User manual

Fanvil C600 User manual

Fanvil

Fanvil C600 User manual

Fanvil H3 User manual

Fanvil

Fanvil H3 User manual

Fanvil X3U User manual

Fanvil

Fanvil X3U User manual

Popular IP Phone manuals by other brands

Cortelco C62 VoIP Phone user guide

Cortelco

Cortelco C62 VoIP Phone user guide

VanillaIP Polycom IP300 user manual

VanillaIP

VanillaIP Polycom IP300 user manual

Yealink Yealink SIP-T22P Quick installation guide

Yealink

Yealink Yealink SIP-T22P Quick installation guide

Viking SR-IP product manual

Viking

Viking SR-IP product manual

Yealink VP59 Teams user guide

Yealink

Yealink VP59 Teams user guide

Panasonic KX-UT133-B Administrator's guide

Panasonic

Panasonic KX-UT133-B Administrator's guide

Avaya one-X 9600 Series overview

Avaya

Avaya one-X 9600 Series overview

AVA Enterprises B179 Installation and administration guide

AVA Enterprises

AVA Enterprises B179 Installation and administration guide

Cisco Unified 7900 Series System guide

Cisco

Cisco Unified 7900 Series System guide

Polycom SoundPoint IP 450 datasheet

Polycom

Polycom SoundPoint IP 450 datasheet

Cisco SPA-500 Series user guide

Cisco

Cisco SPA-500 Series user guide

IPitomy IP290 user manual

IPitomy

IPitomy IP290 user manual

Polycom SoundPoint IP 650 user guide

Polycom

Polycom SoundPoint IP 650 user guide

Proximus Maestro 3016 IP quick start guide

Proximus

Proximus Maestro 3016 IP quick start guide

Polycom IP 450 user guide

Polycom

Polycom IP 450 user guide

Snom 320 quick start guide

Snom

Snom 320 quick start guide

Avaya Integral 5 R3.0 user guide

Avaya

Avaya Integral 5 R3.0 user guide

Yealink Yealink SIP-T46G Guide

Yealink

Yealink Yealink SIP-T46G Guide

manuals.online logo
manuals.online logoBrands
  • About & Mission
  • Contact us
  • Privacy Policy
  • Terms and Conditions

Copyright 2025 Manuals.Online. All Rights Reserved.

Quick Installation Guide
Fanvil Technology Co., LTD.
www.fanvil.com
X210i
V1.1
- 4 -
Programmable keys
DSS keys :
Other keys :
1. You can also configure shortcuts for the navigation keys,
and which will be available in idle mode.
2. Press Menu > Basic > Keyboard, select among the
configurable items, and select your desired type and value,
press OK key.
1. You can use the phone web interface to configure the
keys of the main and secondary screen.
2. You can press any keys which is still blank or long press
the key that have configured, select a type and value,
press OK key.
3. Press Menu > Basic > Keyboard > DSS Key settings.
Select the key, type and value, press OK key.
Call forward
1. Press Menu > Features > Call Forward.
2. Select the line, the type of forward, enter the destination
number and status and press OK.
Phonebook
Access phonebook:
Add new entry:
1. Press Contact soft key, Press All Contacts or other group >
Press Add.
2. Enter name and number and press OK soft key.
1. Press Contact soft key or Menu > PhoneBook > Local
Contacts.
2. Select All Contacts or other group.
3. To dial an entry, press Dial soft key or pickup handset or
press or .
Call list
1. Press key or Menu > Call Log > Local Call Logs
2. Scroll through the list using
3. To dial an entry, press Dial soft key or pickup handset or
press or .
Call Mute
1. Press to Mute the microphone during the call.
2. Press again to un-mute the conversation.
Redial
Do not disturb
1. Press key > Move to the icon > OK key,
or Menu > Features > DND.
2. Select the Mode, and press OK soft key.
1. Press , redial a call number.
Voice message
1. To access your voice mailbox, press Voice message or
Menu > Message > Voice Message, number of messages will
be indicated if provided by your server or PBX.
2. Select the line and press Play to call.
Bluetooth
1. Press Menu > Basic > Bluetooth
2. Press ok to enter the bluetooth open interface.
After opening, press scan to display the list of bluetooth
scanned. Select any device and press connect.
Call transfer
Attended transfer:
Blind transfer:
1. Press key or Xfer soft key during the active conversation,
the call is put on hold.
2. Dial the second telephone number.
3. When the call is answered, then press key or
Xfer soft key to complete the operation.
1. Press key or Xfer soft key during the active conversation,
the call will be on hold.
2. Then enter the 2nd telephone number and press
key or Xfer soft key.
P/N:CJBA100020B0
Fanvil Technology Co., Ltd
Website: www.fanvil.com
EMail: [email protected] [email protected]
Tel: +86-755-2640-2199 Fax: +86-755-2640-2618
Add: 10/F Block A, Dualshine Global Science Innovation Center,
Honglang North 2nd Road, Bao'an District, Shenzhen, China
Screen icon
Packaging list
Keys features
Handset
Handset Cord
Stand
Ethernet Cord Quick Installation Guide
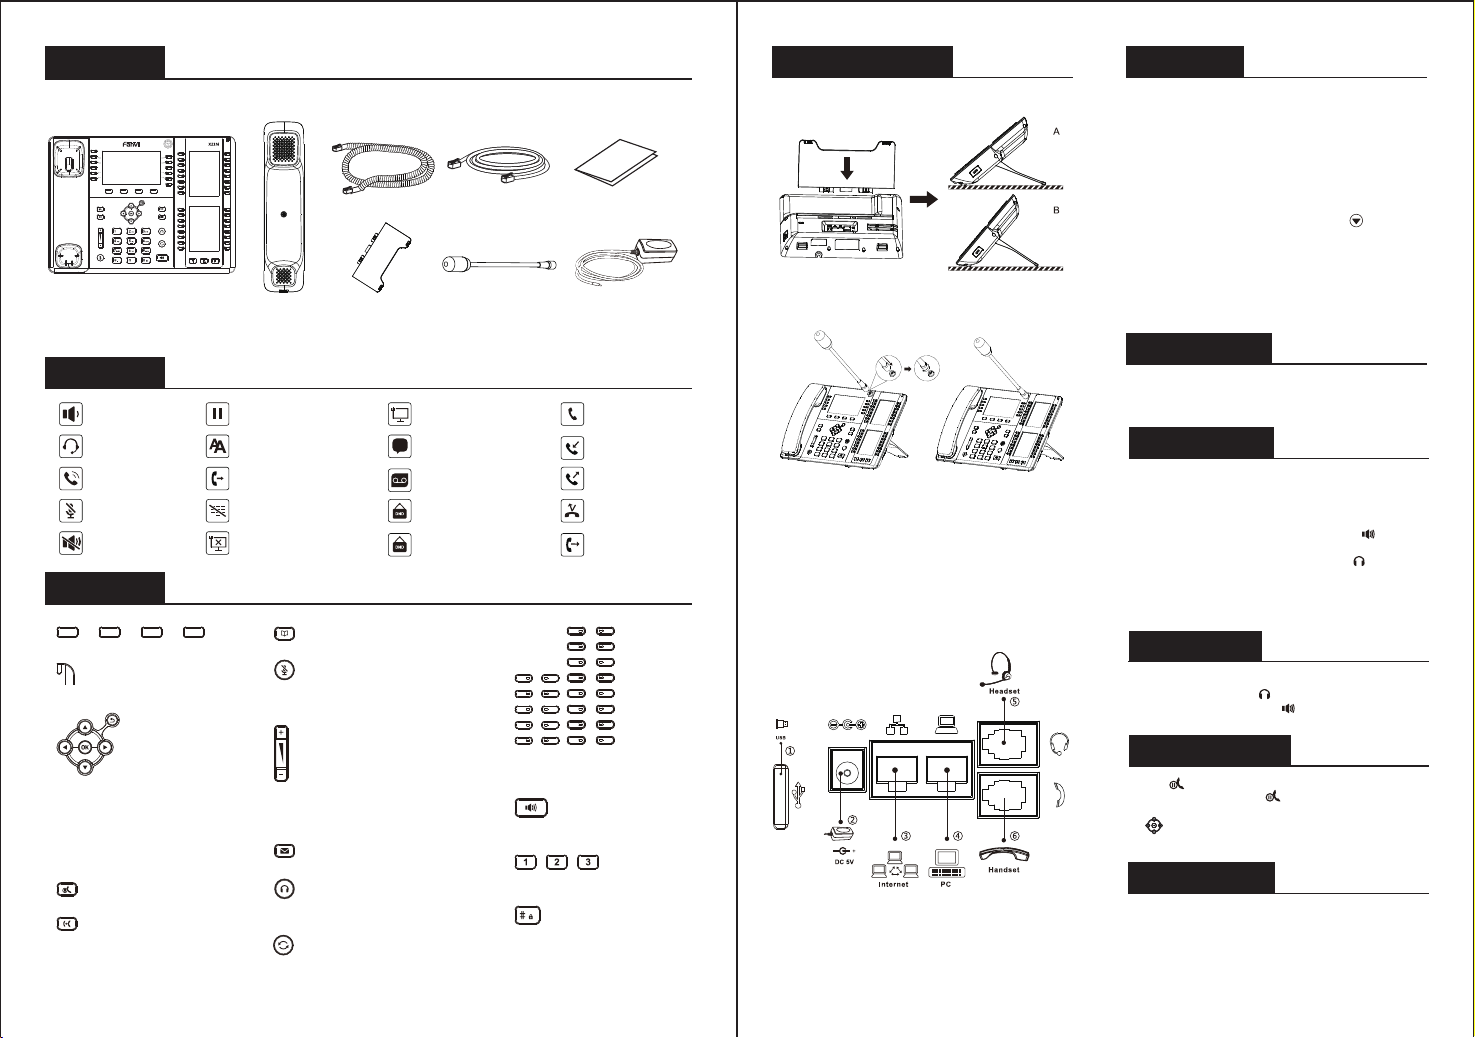
Installation the device
Bracket desktop installation
- 2 - - 3 -
Message waiting indicator
Left and right navigation keys,
Return key
Up navigation key, Shortcut to call log
Down navigation key, Shortcut to Status
OK key, Shortcut to Menu
Return key,Go back to the
previous directory
Hold key, Hold/Resume the call
In idle mode: ringer off
In communication mode:
mute/un-mute a call
In headset mode
In hands-free mode
In handset mode
Missed call(Status bar)
Mute activated
Auto-answering activated
Call is on hold
Call Forward activated
Internet is connected
Do not disturb activated(red)
Do not disturb disabled(Blue)
Dialed call
Received call
Ringer off Internet is disconnected
Keypad locked
New VM Messages
New SMS
In idle mode or during ringing:
increase or decrease ringer volume
In communication: increase or decrease
earpiece, headset or hands-free volume
Voice message key
Hands-free key,
Activate/deactivate hands free
IP Phone Power Adapter
(Optional)
Missed call(s)
Forward call
Headset key,
Activate/deactivate Headset
Redial key, Access to redial the last record
Long press to lock keypad.
Enter PIN to unlock keypad
(default 123)
Soft keys
DSS keys, It can be set as line
key/function key/speed dial
key, etc.
Call transfer key
Phonebook key
Page-Jump key, It can switch
the vice screen DSS pages
Connecting to the Device
Please connect power adapter, network, PC, handset, and headset
to the corresponding ports as described in below picture.
Configuration
Configuration via Phone
1. Press Menu > Advanced (Default password 123)
2. Select Network: To configure the Network Settings
(IPv4/IPv6/IPv4&IPv6, DHCP/Static/PPPoE)
3. 3. Select Accounts: To configure enable the account,
fill the SIP server address, port, user name, password etc.
Configuration via Web
1. Get the IP address from the phone: Press key,
or Menu > Status > IP.
2.2. Login: Input the IP address in the web browser. The PC
and phone should be in the same IP address segment(The
default username and password are both ‘admin’.)
3. Configure: Select network/Account etc, and fill the
relevant content.
① USB port: connect USB device (U disk, WIFI adapter)
② Power port: connect the power adapter.
③ Network port: connecting local area network or internet.
④ PC port: the network port connect to the computer.
⑤ Headset port: connect headset.
⑥ Handset port: connect IP Phone handset.
Language setting
1. Press Menu key > Basic > Language.
2. Select the desired language and press OK soft key.
Accepting a call
Putting a call on hold
3-party conference
1. Once in line with 1st caller, press Conference soft key,
1st caller is put on hold.
2. Then call the 2nd number.
3. After, 2nd call is established, press Conference soft key
to set up the conference.
1. With the handset: pick up the handset.
2. With a headset: press .
3. With the handsfree: press .
1. Press key or Hold soft key, caller is put on hold
2. To retrieve the call press key or Resume soft key.
Note: with more than one active call, select desired call with
the navigator keys and use the corresponding soft key to
hold or resume.
Making a call
1. Pre-dialing: enter the phone number and pick up the
handset.
2.Direct dialing: lift the handset and enter the phone
number.
3. Handsfree: enter phone number and press or vice
versa.
4. Headset: enter phone number and press or
vice versa.
5. Designated line: press line key, enter phone number
and press dial key.
Gooseneck MIC Gooseneck MIC installation
① After aligning the gooseneck microphone with the port,
load it and tighten the nut.