manuals.online logo
Brands
  1. Home
  2. •
  3. Brands
  4. •
  5. Fisher-Price
  6. •
  7. Toy
  8. •
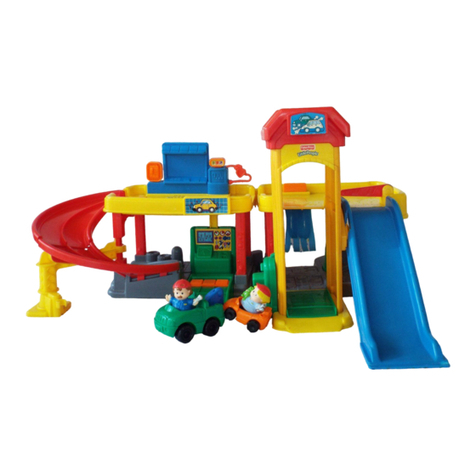
  9. Fisher-Price W2047 User manual

Fisher-Price W2047 User manual

www.fisher-price.com
W2047
• Please keep this instruction sheet for future
reference, as it contains important information.
• Requires two “AA” (LR6) alkaline batteries
(not included) for operation.
• Adult assembly is required.
• Required tool for battery installation:
Phillips screwdriver (not included).
• Leer y guardar estas instrucciones para futura
referencia, ya que contienen información de
importancia acerca de este producto.
• Funciona con 2 pilas alcalinas “AA” (LR6) x 1,5V
(no incluidas).
• Requiere montaje por un adulto.
• Herramienta necesaria para las pilas: desatornillador
de cruz (no incluido).
• LEA LAS INSTRUCCIONES ANTES DE USAR
ESTE PRODUCTO.
• Conserver ce mode d’emploi pour s’y référer en cas de
besoin car il contient des informations importantes.
• Fonctionne avec deux piles alcalines AA (LR6),
non fournies.
• Assemblage par un adulte requis.
• Outil nécessaire pour installer les piles : un tournevis
cruciforme (non fourni).
• Guarde estas instruções para futuras referências,
pois contêm informações importantes.
• Funciona com duas pilhas alcalinas AA (LR6),
não incluídas.
• A montagem deve ser feita por um adulto.
• Ferramenta necessária para a instalação das pilhas:
chave de fenda Phillips (não incluída).
• ATENÇÃO: A colocação e substituição das pilhas
devem ser realizadas por um adulto, utilizando
a ferramenta adequada para abrir e fechar
o compartimento de pilhas.
2
Assembled Parts Piezas ensambladas
Éléments à assembler Peças para Montagem
Tower
Torre
Tour
Torre
Base
Base
Base
Base
Support
Soporte
Support
Suporte
Lower Ramp
Rampa inferior
Rampe inférieure
Rampa inferior
Upper Ramp
Rampa superior
Rampe supérieure
Rampa superior
3
Assembly Montaje Assemblage Montagem
Base
Base
Base
Base
Tower
Torre
Tour
Torre
Support
Soporte
Support
Suporte
• Fit the tower into the base. Push to “snap” in place.
Hint: The tower is designed to fit into the base one way.
If it does not seem to fit, turn it around and try again!
• Ajustar la torre en la base. Presionar para ajustar la
torre en su lugar.
Atención: la torre está diseñada para ajustarse en la
base de una sola manera. Si no se ajusta, voltearla
e intentar de nuevo.
• Insérer la tour dans la base. Pousser pour
bien l’enclencher.
Remarque : La tour s’insère d’une seule façon dans
la base. Si elle ne semble pas s’installer correctement,
essayer dans l’autre sens!
• Encaixe a torre na base. Pressione para
encaixar adequadamente.
Dica: A torre encaixa-se na base em apenas um
sentido. Se a torre não puder ser encaixada,
vire e tente novamente!
• Fit the support into the base. Push to “snap” in place.
Hint: The support is designed to fit into the base one way.
If it does not seem to fit, turn it around and try again!
• Ajustar el soporte en la base. Presionar para ajustar
el soporte en su lugar.
Atención: el soporte está diseñado para ajustarse en
la base de una sola manera. Si no se ajusta, voltearlo
e intentar de nuevo.
• Insérer le support dans la base. Pousser pour
bien l’enclencher.
Remarque : Le support s’insère d’une seule façon dans
la base. S’il ne semble pas s’installer correctement,
essayer dans l’autre sens!
• Encaixe o suporte na base. Pressione para
encaixar adequadamente.
Dica: O suporte encaixa-se na base em apenas um
sentido. Se o suporte não puder ser encaixado,
vire e tente novamente!
1
2
1
1
4
1
3
Tab
Lengüeta
Languette
Lingueta
Lower Ramp
Rampa inferior
Rampe inférieure
Rampa inferior
1
4
• Fit the tab on each end of the upper ramp into the slot
in the support and the lower ramp.
• Push near each tab to “snap” in place.
• Introducir la lengüeta de cada extremo de la rampa
superior en la ranura del soporte y en la rampa inferior.
• Empujar cerca de cada lengüeta para ajustarla en
su lugar.
• Insérer la languette située à chaque extrémité de la
rampe supérieure dans la fente du support et de la
rampe inférieure.
• Appuyer près de chaque languette pour bien
enclencher la rampe supérieure.
• Encaixe as linguetas da rampa superior no buraco do
suporte e na rampa inferior.
• Pressione cada lingueta para encaixar corretamente.
Upper Ramp
Rampa superior
Rampe supérieure
Rampa superior
Support
Soporte
Support
Suporte
Lower Ramp
Rampa inferior
Rampe inférieure
Rampa inferior
A
B
• First, fit the tab on the end of the lower ramp into the
slot in the base A.
• Then, slide the socket on the center of the ramp onto
the tab on the back of the tower B.
• Push near each tab to “snap” in place.
• Primero, introducir la lengüeta del extremo de la
rampa inferior en la ranura de la base A.
• Luego, deslizar la conexión del centro de la rampa
hacia la lengüeta de la parte de atrás de la torre B.
• Empujar cerca de cada lengüeta para ajustar la
conexión en su lugar.
• Insérer d’abord la languette située à l’extrémité de la
rampe inférieure dans la fente de la base A.
• Ensuite, faire glisser l’ouverture située au centre de la
rampe sur la languette au dos de la tour B.
• Appuyer près de chaque languette pour bien
enclencher la rampe inférieure.
• Primeiro, encaixe a lingueta no final da rampa
inferior, no orifício da base A.
• Então, deslize a tomada no centro da rampa para
a lingueta na parte de trás da torre B.
• Pressione cada lingueta para encaixar corretamente.
5
Battery Installation Colocación de las pilas
Installation des piles Instalação das Pilhas
1,5V x 2
“AA” (LR6)
• Locate the battery compartment door on the back of
the tower.
• Loosen the screw in the battery compartment door
with a Phillips screwdriver. Remove the door.
• Insert two, new “AA” (LR6) alkaline batteries into the
battery compartment.
Hint: We recommend using alkaline batteries for
longer battery life.
• Replace the battery compartment door and tighten
the screw. Do not over-tighten.
• If this toy begins to operate erratically, you may need
to reset the electronics. Slide the power switch off
and then back on.
• When sounds from this toy become faint or stop,
it’s time for an adult to change the batteries.
• Localizar la tapa del compartimiento de pilas en la
parte trasera de la torre.
• Aflojar el tornillo de la tapa del compartimiento de
pilas con un desatornillador de cruz. Retirar la tapa
del compartimiento de pilas.
• Insertar 2 pilas nuevas alcalinas AA (LR6) x 1,5V en
el compartimiento.
Atención: se recomienda usar pilas alcalinas para una
mayor duración.
• Cerrar la tapa del compartimiento de pilas y apretar el
tornillo. No apretar en exceso.
• Si el juguete no funciona correctamente, restablecer
el circuito electrónico. Poner el interruptor de
encendido en apagado y nuevamente en encendido.
• Cuando los sonidos del juguete pierdan intensidad
o dejen de funcionar, es hora de sustituir las pilas.
• Repérer le compartiment des piles situé au dos de
la tour.
• Desserrer la vis du couvercle du compartiment
des piles avec un tournevis cruciforme.
Retirer le couvercle.
• Insérer deux piles alcalines AA (LR6) neuves dans le
compartiment des piles.
Remarque : Il est recommandé d’utiliser des piles
alcalines car elles durent plus longtemps.
• Remettre le couvercle du compartiment des piles
et serrer la vis. Ne pas trop serrer.
• Si le jouet ne fonctionne pas correctement,
il peut être nécessaire de réinitialiser le système
électronique. Pour ce faire, mettre l’interrupteur
à ARRÊT puis le remettre à MARCHE.
• Lorsque les sons faiblissent ou s’arrêtent, il est
temps pour un adulte de changer les piles.
• Localize o compartimento de pilhas na parte de trás
da torre.
• Solte o parafuso do compartimento de pilha/bateria
com a chave de fenda Phillips. Remova a tampa
do compartimento.
• Coloque 2 pilhas novas alcalinas AA no
compartimento de pilhas.
Dica: Recomendamos a utilização de pilhas alcalinas
para um efeito mais duradouro.
• Feche a tampa do compartimento de baterias e aperte
o parafuso. Não aperte muito.
• Se o brinquedo não estiver funcionando de maneira
adequada, você deve reiniciar a parte eletrônica.
Desligue o brinquedo e depois de alguns segundos,
ligue-o novamente.
• Quando as luzes e os sons enfraquecerem ou
deixarem de ser emitidos, é necessário um adulto
para trocar as pilhas.
ICES-003
This Class B digital apparatus complies with Canadian
ICES-003.
Operation is subject to the following two conditions: (1)
this device may not cause harmful interference and (2) this
device must accept any interference received, including
interference that may cause undesired operation.
NMB-003
Cet appareil numérique de la classe B est conforme
à la norme NMB-003 du Canada.
L’utilisation de ce dispositif est autorisée seulement
aux conditions suivantes: (1) il ne doit pas produire de
brouillage et (2) l’utilisateur du dispositif doit être prêt
à accepter tout brouillage radioélectrique reçu, même
si ce brouillage est susceptible de compromettre
le fonctionnement du dispositif.

Other Fisher-Price Toy manuals

Fisher-Price Thomas & Friends TRACK MASTER SKY-HIGH BRIDGE... User manual

Fisher-Price

Fisher-Price Thomas & Friends TRACK MASTER SKY-HIGH BRIDGE... User manual

Fisher-Price T6340 User manual

Fisher-Price

Fisher-Price T6340 User manual

Fisher-Price Ramps Around Garage B1832 User manual

Fisher-Price

Fisher-Price Ramps Around Garage B1832 User manual

Fisher-Price Dancin' Bandstand C6326 User manual

Fisher-Price

Fisher-Price Dancin' Bandstand C6326 User manual

Fisher-Price H5924c User manual

Fisher-Price

Fisher-Price H5924c User manual

Fisher-Price Surprise Sounds Fun Park LittlePeople B6313 User manual

Fisher-Price

Fisher-Price Surprise Sounds Fun Park LittlePeople B6313 User manual

Fisher-Price Code-a-pillar Classic User manual

Fisher-Price

Fisher-Price Code-a-pillar Classic User manual

Fisher-Price H1616 User manual

Fisher-Price

Fisher-Price H1616 User manual

Fisher-Price 72753 User manual

Fisher-Price

Fisher-Price 72753 User manual

Fisher-Price X9218 Datasheet

Fisher-Price

Fisher-Price X9218 Datasheet

Fisher-Price N3192 User manual

Fisher-Price

Fisher-Price N3192 User manual

Fisher-Price FXC59 User manual

Fisher-Price

Fisher-Price FXC59 User manual

Fisher-Price Laugh & Learn C6325 User manual

Fisher-Price

Fisher-Price Laugh & Learn C6325 User manual

Fisher-Price WRANGLER K4564 Use and care manual

Fisher-Price

Fisher-Price WRANGLER K4564 Use and care manual

Fisher-Price X4156 User manual

Fisher-Price

Fisher-Price X4156 User manual

Fisher-Price W9554 User manual

Fisher-Price

Fisher-Price W9554 User manual

Fisher-Price POWER WHEELS DOTA the EXPLORER J4030 Datasheet

Fisher-Price

Fisher-Price POWER WHEELS DOTA the EXPLORER J4030 Datasheet

Fisher-Price FHF75 User manual

Fisher-Price

Fisher-Price FHF75 User manual

Fisher-Price DHC27 User manual

Fisher-Price

Fisher-Price DHC27 User manual

Fisher-Price DYW53 User manual

Fisher-Price

Fisher-Price DYW53 User manual

Fisher-Price imaginext A NEW ADVENTURE EVERY TIME! User manual

Fisher-Price

Fisher-Price imaginext A NEW ADVENTURE EVERY TIME! User manual

Fisher-Price CGN60 User manual

Fisher-Price

Fisher-Price CGN60 User manual

Fisher-Price 71922 User manual

Fisher-Price

Fisher-Price 71922 User manual

Fisher-Price Color Me Gemz Belt Set N1128 User manual

Fisher-Price

Fisher-Price Color Me Gemz Belt Set N1128 User manual

Popular Toy manuals by other brands

FUTABA GY470 instruction manual

FUTABA

FUTABA GY470 instruction manual

LEGO 41116 manual

LEGO

LEGO 41116 manual

Little Tikes LITTLE HANDIWORKER 0920 Assembly instructions

Little Tikes

Little Tikes LITTLE HANDIWORKER 0920 Assembly instructions

Eduard EF-2000 Two-seater exterior Assembly instructions

Eduard

Eduard EF-2000 Two-seater exterior Assembly instructions

USA Trains EXTENDED VISION CABOOSE instructions

USA Trains

USA Trains EXTENDED VISION CABOOSE instructions

Modellbau Laffont Z1601 Assembly instructions

Modellbau Laffont

Modellbau Laffont Z1601 Assembly instructions

NOCH 12905 instruction manual

NOCH

NOCH 12905 instruction manual

Eduard Ki-61-Id quick start guide

Eduard

Eduard Ki-61-Id quick start guide

Viessmann Vollmer 45616 Mounting instruction

Viessmann

Viessmann Vollmer 45616 Mounting instruction

Vollmer 42004 Mounting instruction

Vollmer

Vollmer 42004 Mounting instruction

Phoenix Model CLASSIC-EP instruction manual

Phoenix Model

Phoenix Model CLASSIC-EP instruction manual

H-KING Sopwith Camel British WW1 Fighter instruction manual

H-KING

H-KING Sopwith Camel British WW1 Fighter instruction manual

MODSTER Predator 4x4 Crawler user manual

MODSTER

MODSTER Predator 4x4 Crawler user manual

DHK Hobby 8136 User instruction manual

DHK Hobby

DHK Hobby 8136 User instruction manual

THUNDER TIGER Raptor 50 V2 kit manual

THUNDER TIGER

THUNDER TIGER Raptor 50 V2 kit manual

Timberkits Skateboarder instructions

Timberkits

Timberkits Skateboarder instructions

Hangar 9 Funtana 125 Assembly manual

Hangar 9

Hangar 9 Funtana 125 Assembly manual

QModeling XP Series instruction manual

QModeling

QModeling XP Series instruction manual

manuals.online logo
manuals.online logoBrands
  • About & Mission
  • Contact us
  • Privacy Policy
  • Terms and Conditions

Copyright 2025 Manuals.Online. All Rights Reserved.