manuals.online logo
Brands
  1. Home
  2. •
  3. Brands
  4. •
  5. FLOS
  6. •
  7. Outdoor Light
  8. •
  9. FLOS IN VITRO 1 BOLLARD User manual

FLOS IN VITRO 1 BOLLARD User manual

Outdoor
IN VITRO
BY
STARC K
In Vitro
ITA. Gruppo di Rischio 1
UK. Risk Group 1
ESP. Grupo de riesgo 1
FR. Groupe de risque 1
DE. Gefahrgruppe 1
RU. Группа риска 1
ITA. Prima di effettuare qualsiasi
intervento sugli apparecchi to-
gliere l’alimentazione elettrica.
UK. Make sure there is no power
connected to the tting before
carrying out any maintenance.
ESP. Antes de manipular el apa-
rato, desconectar la alimenta-
ción eléctrica.
FR. Avant de procéder à toute
opération, toujours couper l’ali-
mentation électrique et s’assurer
qu’elle ne peut pas être rétablie
accidentellement.
DE. Vor Durchführung sämtlicher
Arbeiten an der Leuchte, ist der
Netzstecker vom Stromanschluss
zu trennen.
R U . Убедитесь, что осветительный
прибор не подключен к источнику
питания, прежде чем начать любые
ремонтные действия.
OFF
ITA. Il modulo LED contenuto in
questo apparecchio di illumi-
nazione può essere sostituito
esclusivamente dal costruttore.
Per un’eventuale sostituzione,
si prega contattare il proprio ri-
venditore.
UK. The LED module contained
in this luminaire shall be repla-
ced by the manufacturer only.
For further information, please
contact your supplier.
ESP. El módulo led contenido en
esta luminaria solo podrá ser
reemplazado por el fabricante.
Para más información por favor
contacte con el proveedor.
FR. La source lumineuse LED
de cet appareil peut être rem-
placée seulement par le con-
structeur. Merci de contacter
votre revendeur.
DE. Das LED-Modul in dieser
Leuchte enthalten darf nur vom
Hersteller ersetzt werden. Für wei-
tere Informationen, wenden Sie
sich bitte an Ihren Lieferanten.
RU. Светодиодный модуль
светильника должен быть заменен
только производителем. За
дополнительной информацией
просим обратиться к Вашему
поставщику.
Outdoor
ITA. Predisporre 20-30 cm di
ghiaia, poi riempirlo di acqua e
assicurarsi che esca tutta entro
30 minuti. In caso contrario è
obbligatorio un sistema di dre-
naggio supplementare (es.tubo
drenaggio per applicazioni in
cemento).
UK. Place the luminaire on a 20-
30 cm drainage layer (gravel)
and ll it with water. If after 30 mi-
nutes water is still in the luminaire
it is compulsory to integrate an
additional draining system (e.g.
drain pipe).
ESP. Disponer una capa de 20-
30 cms de grava para drenaje,
posteriormente llenar el oricio
de agua y asegurarse que se
evacúe toda en 30 minutos. En
caso contrario es obligatorio un
sistema de drenaje adicional
(por ejemplo tubo de drenaje
en aplicaciones en cemento).
FR. Installez l’appareil sur un
drainage de 20-30cm de pro-
fondeur et remplissez-le avec de
l’eau. Si après 30 minutes l’eau
est encore dans l’appareils, l’in-
stallation de l’appareil nécessite
d’un drainage supplémentaire.
DE. 20-30 cm Kiesbett vorsehen,
dann mit Wasser füllen und si-
cherstellen, dass das Wasser
innerhalb 30 Minuten abläuft.
Sollte das Wasser nicht ablau-
fen, muss eine Drainagesystem
installiert werden (z.B. ein Drai-
nagerohr bei Anwendungen im
Zement).
RU. Поместите светильник на 20-
30 см в углубление, заполненное
дренажом (гравием) и заполните
его водой. Если через 30 минут
вода все еще будет на поверхности
светильника, то необходимо
обеспечить дополнительное
водоотведение (например,
установить сливную трубку).
20-30
20-30
ITA. Non installare il prodotto in
caso di pioggia, nebbia o forte
umidità.
UK. Do not install the luminaire
in case of rain, fog or intense
humidity.
ESP. No instalar el producto en
caso de lluvia, niebla o situacio-
nes de alta humedad.
FR. N’installez pas l’appareil en
présence de pluie, brouillard ou
humidité intense.
DE. Die Leuchte nicht bei Regen,
Nebel oder hoher Luftfeuch-
tigkeit installieren.
RU. Не проводите установку
светильника в дождь, туман и при
повышенной влажности.
ITA. E’ obbligatorio che l’instal-
lazione e la messa in servizio
dell’apparecchio venga effettua-
ta da personale qualicato nel ri-
spetto delle norme impiantistiche
nazionali vigenti. Non aprire l’ap-
parecchio in caso di guasto ma
contattare l’assistenza.
UK. Connection and mainte-
nance of the luminaire must be
carried out by trained and quali-
ed staff only in compliance with
national safety regulations.Do not
open the product in case of failure
but contact the support service.
ESP. Es obligatorio que la instala-
ción y la puesta en servicio de
la luminaria las realice personal
cualicado que respete los regla-
mentos de seguridad nacionales
vigentes. No abra la luminaria en
caso de avería; póngase en con-
tacto con el servicio técnico.
FR. Il est impératif que l’installation
et la mise en service de l’appareil
soient effectuées par un profes-
sionnel qualié, conformément à
la réglementation nationale en
matière de sécurité. En cas de
panne, ne pas ouvrir l’appareil
mais contacter le service d’assi-
stance.
DE. Die Installation und die Inbe-
triebnahme des Geräts müssen
von qualiziertem Personal gemäß
den geltenden nationalen Vor-
schriften für den Anlagenbau dur-
chgeführt werden.
Bei Störungen darf das Gerät nicht
geöffnet werden.Wenden Sie sich
im Störfall an den Kundendienst.
RU. Установка и подключение
устройства должны выполняться
квалифицированным персоналом
в соответствии с действующими
нормами по безопасности.
Не открывайте изделие в случае
повреждение, свяжитесь с
поддержкой.
In Vitro
ITA. E’ consigliabile, nelle appli-
cazioni soggette agli agenti at-
mosferici, utilizzare del grasso al
silicone sui letti delle viti di chiu-
sura dell’apparecchio per facili-
tarne le manutenzioni future.
UK. For an easy maintenance
(unscrewing) of the luminaire we
recommend protecting screws
threads with silicone grease be-
fore exposure to weather.
ESP. Para facilitar el manteni-
miento, en instalaciones expue-
stas a agentes atmosféricos,
se recomienda impregnar de
grasa siliconada las roscas de
los tornillos de cierre del aparato.
FR. Pour une bonne maintenan-
ce des appareils exposés aux
agents atmosphériques, il est
recommandable de protéger
les lets des vis par de la graisse
silicone.
DE. Zur Vereinfachung der
Wartung wird empfohlen, die
Silikonplättchen, die sich auf
dem Gewinde der Verschluss-
Schrauben benden, mit Fett
einzureiben.
RU. Для упрощения сборки
мы рекомендуем использовать
защитную винтовую резьбу с
силиконовой смазкой, что должно
предотвратить негативное
воздействие окружающей среды.
SILICONE
SILICONE
GREASE
GREASE
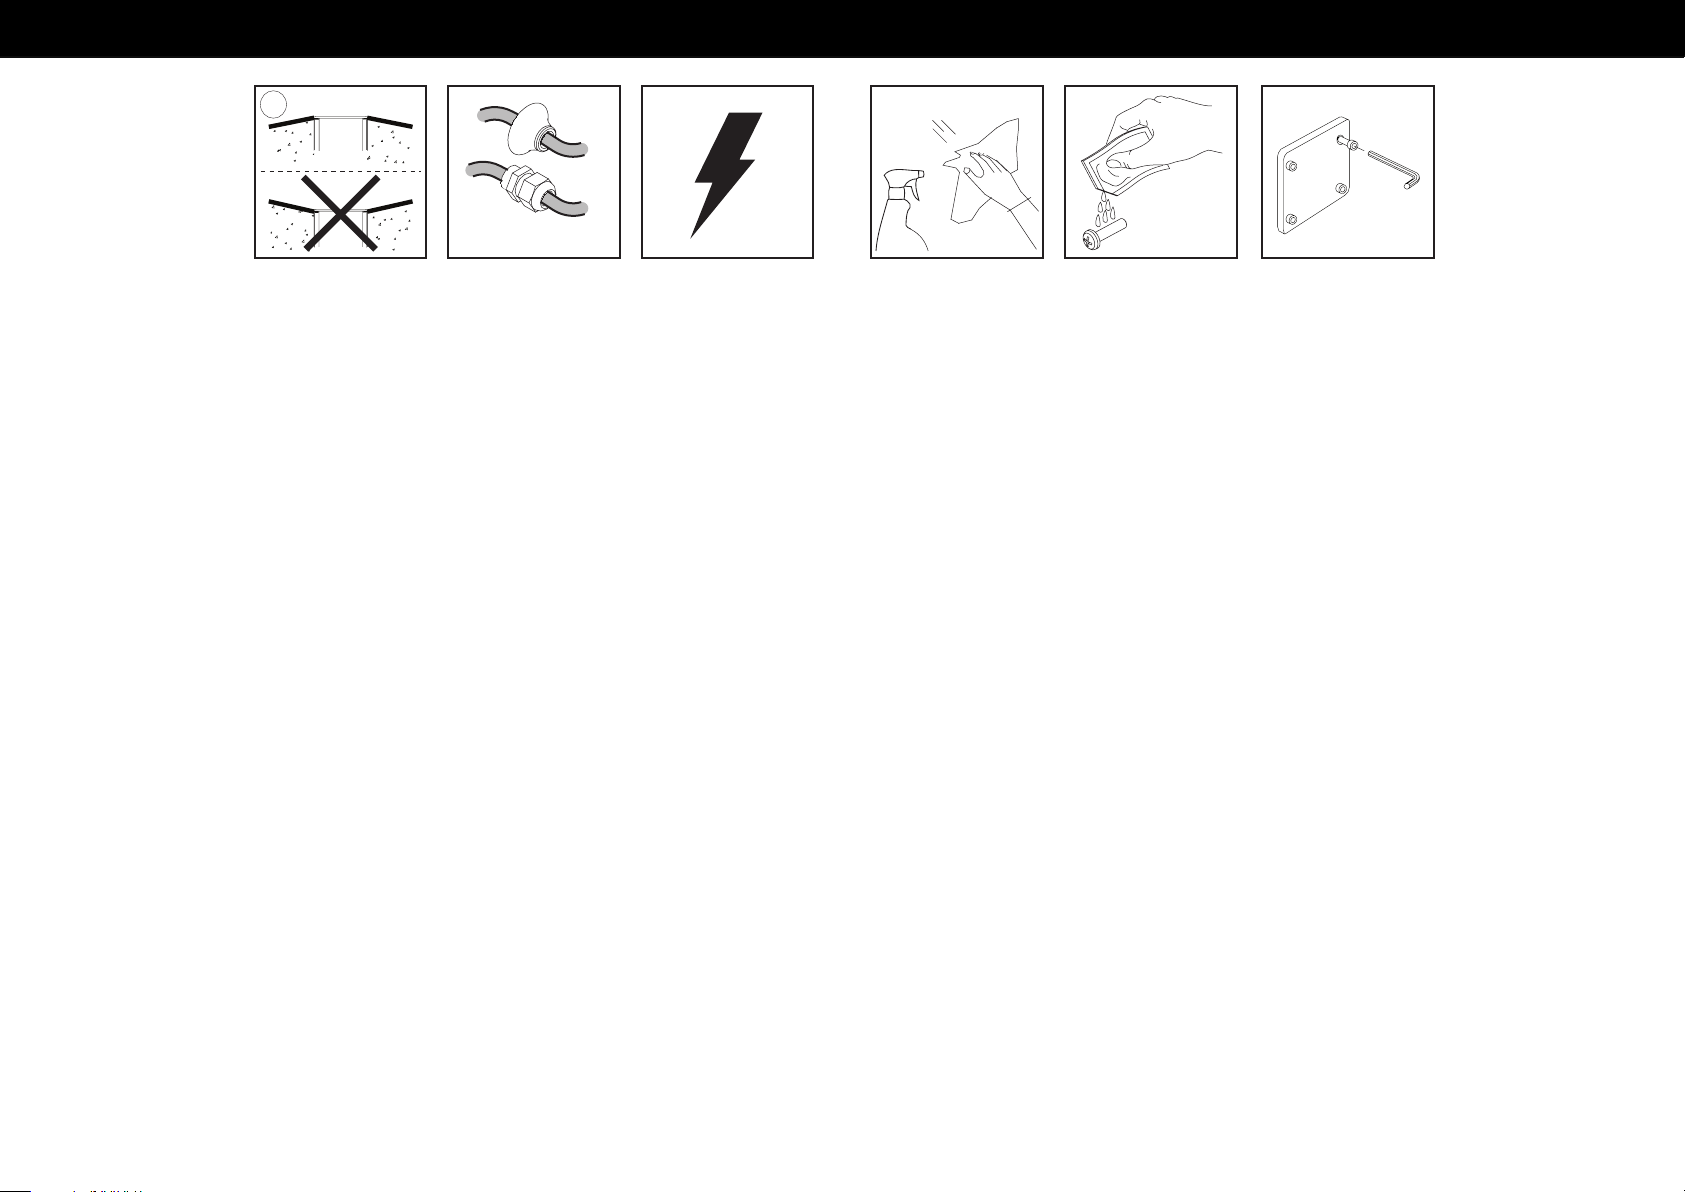
ITA. Bloccare e sbloccare le viti
di chiusura con sequenza alter-
nata.
UK. Tighten and release screws
alternately or crosswise.
ESP. Apretar y aojar los tornillos
de cierre de modo alterno.
FR. Vissez et dévissez les vis en
diagonale.
DE. Verschlußschrauben über
Kreuz öffnen und schließen.
RU. Закручивайте и выкручивайте
винты не сразу до конца, а
постепенно поочередно или крест-
накрест.
1
3
2
4
ITA. Pulire periodicamente gli
apparecchi per rimuovere gli
accumuli di sporco che si depo-
sitano sulle griglie e nella testa
delle viti. Pulire le parti in acciaio
utilizzando appositi detergenti.
Per la pulizia dell’apparecchio
utilizzare un panno morbido e
detergente neutro.
UK. Keep the luminaire clean to
prevent dirt deposit on frames
and screws’ head. On steel parts
use dedicated cleaners only.Use
a soft cloth and neutral soap to
clean the device.
ESP. Limpiar periódicamente los
aparatos para retirar la acumu-
lación de sedimentos deposita-
dos sobre los aros y las cabezas
de los tornillos.Limpiar las partes
de acero utilizando el detergen-
te adecuado. Utilícese un paño
suave y un detergente neutro
para limpiar el producto.
FR. Nettoyez l’appareil périodi-
quement pour éviter l’oxidation
de la collerette et des vis. Net-
toyez les parties en acier avec
des produits spéciques. Utiliser
un chiffon doux et un détergent
neutre pour le nettoyage de
l’appareil.
DE. Die Leuchten regelmäßig
vom Schmutz befreien, der
sich auf den Rastern und den
Schraubenköpfen ansammelt.
Edelstahlteile nur mit dafür geei-
gneten Mitteln reinigen. Das
Gerät mit einem weichen Tuch
und neutralem Reinigungsmittel
reinigen.
RU. Содержите светильник в
чистоте, избегайте накопления
грязи на рамке и головках винтов.
Для стальных деталей используйте
только соответствующие средства.
Используйте мягкую ткань и
нейтральное моющее средство для
очистки прибора.
ITA. Evitare l’installazione in aval-
lamenti o in punti di ristagno
d’acqua.
UK. To avoid water stagnation
do not place the box for installa-
tion on hollow areas.
ESP. Evitar la instalación en de-
presiones del terreno o en pun-
tos de acumulación de agua.
FR. An d’éviter que l’eau sta-
gne, placez la boîte sur une sur-
face plane et non creuse.
DE. Die Installation in hügeligem
Untergrund oder bei Wasseran-
sammlungen vermeiden.
RU. Для избежания застоя воды
не устанавливайте монтажную
коробку в низинах.
OK
ITA. I componenti elettronici in-
stallati negli apparecchi sono
protetti da sovratensioni.
Per raggiungere una protezione
addizionale raccomandiamo
dei dispositivi di protezione sup-
plementari.
UK. The electronic components
installed in the luminaire are pro-
tected against overvoltage.
To achieve greater device pro-
tection we recommend addi-
tional overvoltage protection
components.
ESP. Los componentes electróni-
cos instalados en la luminaria
están protegidos contra sobre-
tensiones.
Para obtener una protección
superior, recomendamos el uso
de dispositivos de protección
adicionales.
FR. Les composants électroni-
ques installés dans les appareils
sont protégés contre les surten-
sions.
Pour obtenir une protection sup-
plémentaire, nous recomman-
dons d’ajouter des dispositifs de
protection supplémentaires.
DE. Die in den Geräten installier-
ten elektronischen Komponen-
ten sind gegen Überspannung
geschützt.
Für einen höheren Schutzgrad
empfehlen wir zusätzliche
Schutzvorrichtungen.
RU. Электронные компоненты,
установленные в устройстве,
защищены от избыточного
напряжения.
Для достижения более высокой
защиты рекомендуются
дополнительные компоненты
защиты от избыточного
напряжения.
ITA. Utilizzare un cavo di alimen-
tazione con tipologia idonea
(cavi essibili HAR H05/07 RN-F o
idonei per l’utilizzo all’esterno): i
cavi rigidi possono compromet-
tere la tenuta attraverso il pressa-
cavo/passacavo.
UK. Use a suitable type of power
supply cable (HAR H05 / 07 RN-F
exible cables or suitable for
outdoor use): rigid cables can
compromise the seal through
the cable gland.
ESP. Utilice un cable de alimen-
tación del tipo adecuado (ca-
bles exibles HAR H05/07 RN-F o
adecuados para uso en exterio-
res): los cables rígidos pueden
poner en peligro la estanquei-
dad a través del prensaestopas/
pasacables.
FR. Utiliser un câble d’alimenta-
tion approprié (câbles exibles
HAR H05 / 07 RN-F ou adaptés
pour une utilisation en extérieur):
les câbles rigides peuvent com-
promettre l’étanchéité à travers
le presse-étoupe / passe-câble.
DE. Verwenden Sie ein geeigne-
tes Netzkabel (exible Kabel
HAR H05/07 RN-F oder Kabel,
die für den Einsatz im Freien
geeignet sind): starre Kabel
können die Dichtheit durch
die Kabelverschraubung/-dur-
chführung beeinträchtigen.
RU. Использовать провод питания
того же типа (гибкий провод HAR
H05/07 RN-F или аналогичный для
внешнего использования): жесткие
провода могут создать затор в
кабельном вводе/канале.
<
<
H
H
A
A
R
R
>
>
H
H
0
0
5
5
/
/
0
0
7
7
R
R
N
N
-
-
F
F
In Vitro
ITA. Durante il montaggio e la
manutenzione degli apparecchi
è necessario prestare partico-
lare attenzione a non danneg-
giare la verniciatura a polvere.
Un danno combinato all’azione
dell’acqua potrebbe provocar-
ne la corrosione.
I prodotti chimici danneggiano
la protezione anticorrosione.
UK. During the installation and
the maintenance of the xtures
it is IMPORTANT to be careful and
avoid damages on the paint co-
ating. Damages on the coating
exposed to outdoor conditions
or water, could cause corrosion.
Chemical substances affect the
anticorrosion covering protec-
tion.
ESP. Durante el montaje y el
mantenimiento de los dispositi-
vos, es preciso tener un cuida-
do especial para no dañar el
revestimiento de la pintura en
polvo. Un daño al revestimiento
combinado con la exposición
en el exterior o con el efecto del
agua, podría causar corrosión.
Los productos químicos dañan
la protección anticorrosión.
FR. Lors de l’installation et de
l’entretien des appareils, il est
IMPORTANT de veiller à ne pas
endommager le revêtement de
peinture. Les dommages sur le
revêtement exposé aux condi-
tions extérieures et l’action de
l’eau peuvent provoquer la cor-
rosion. Les produits chimiques
affectent la protection anticor-
rosion.
DE. Bei der Montage und der
Wartung der Geräte muss da-
rauf geachtet werden, dass
die Pulverbeschichtung nicht
beschädigt wird. Eine Beschädi-
gung kann in Kombination mit
der Wirkung von Wasser zu einer
Korrosion führen. Die chemi-
schen Produkte beschädigen
den Korrosionsschutz.
RU. Во время сборки и
обслуживания приборов
необходимо соблюдать особую
осторожность, чтобы не повредить
порошковое окрашивание.
Повреждение покрытия в сочетании
с воздействием воды может вызвать
коррозию. Химические вещества
повреждают антикоррозионную
защиту.
ITA. Nessuna parte dell’appa-
recchio, deve stare a contatto
diretto con sostanze chimiche
aggressive (es. fertilizzanti, diser-
banti, calce).
UK. Keep away from aggressive
agents and chemical substan-
ces (e.g. fertilizer, weed-killer,
lime).
ESP. Ninguna parte del aparato
debe estar en contacto directo
con el terreno o con sustancias
químicas agresivas (fertilizantes,
herbicidas,cal, etc).
FR. Gardez l’appareil à l’abri
de toute substance chimique
agressive (engrais, désherbant,
chaux).
DE. Die Leuchte darf nicht mit
chemischen oder aggressiven
Substanzen (wie z.B. Dünge-
mittel, Unkrautvertilgungsmittel,
Kalk) in Kontakt kommen.
RU. Необходимо избегать
агрессивных веществ. При
установке внешние детали
светильника должны быть
защищены от прямого контакта
с агрессивными и химическими
веществами (удобрения,
гербициды, лимон и т.д.).
NO
ITA. Sostituire il vetro/diffusore
con ricambio originale FLOS in
caso di rottura.
UK. In case of break of the
glass/diffuser use original FLOS
spare parts only.
ESP. En caso de rotura del cri-
stal/difusor, substituirlo por re-
cambios originales FLOS.
FR. Remplacez le verre/diffuseur
cassé par des pièces de rechan-
ge originales FLOS.
DE. Defekte gläser/diffusor
durch original FLOS Ersatzteile
ersetzen.
RU. Производите замену разбитого
стекла FLOS только оригинальными
запасными частями.
ITA. Alte temperature ambientali
provocate da condizioni clima-
tiche estreme o da altre fonti di
calore riducono la durata e l’ef-
cienza della componentistica o
del modulo LED.
UK. High environmental tem-
peratures caused by extreme
weather conditions or other
heat sources reduce the durabi-
lity and efciency of the compo-
nents or LED module.
ESP. Las altas temperaturas
ambiente provocadas por con-
diciones climáticas extremas u
otras fuentes de calor reducen
la duración y la eciencia de los
componentes o del módulo LED.
FR. Les températures environne-
mentales élevées causées par
des conditions météorologiques
extrêmes ou d’autres sources de
chaleur réduisent la durabilité et
l’efcacité des composants ou
du module LED.
DE. Hohe Umgebungstempera-
turen, die durch extreme Witte-
rungsverhältnisse oder andere
Wärmequellen verursacht wer-
den,reduzieren die Lebensdauer
und Efzienz der Komponenten
oder des LED-Moduls.
RU. Высокая температура воздуха,
вызванная экстремальными
климатическими условиями или
другими источниками тепла,
сокращает срок службы и снижает
эффективность компонентов
светодиодного модуля.
In Vitro
ITA. Per tutti gli apparecchi di illuminazione deve essere effettuata a cadenza programmata la manutenzione dell’installa-
zione (norme CEI 64-8 ) che deve prevedere le seguenti operazioni:
- Vericare il serraggio delle viti che ssano le varie parti dell’apparecchio;
- Vericare l’integrità di tutti i pressacavi e dei cavi;
- Vericare il serraggio dei pressacavi;
- Vericare l’integrità e l’elasticità delle guarnizioni che non devono risultare danneggiate;
- In caso di componenti danneggiati essi vanno sostituiti prima di rimettere in servizio l’apparecchio utilizzando solo ricambi
originali.
Si consiglia di effettuare controlli ad ogni sostituzione di lampada o almeno ogni anno, scegliendo il periodo più breve in relazio-
ne al tipo di impianto.
E’ vietato l’uso improprio dell’apparecchio o ogni manomissione del prodotto o modica non autorizzata dalla casa costruttrice
(in caso contrario decade ogni forma di garanzia e responsabilità).
Nel caso in cui ARES dia il consenso al reso degli apparecchi per il controllo,essi dovranno essere restituiti lasciando un pezzo di
cavo di alimentazione di 10/20 cm uscente dall’apparecchio.
UK.All luminaires have to undergo regular maintenance (CEI 64-8 standards) according to the following steps:
- Check the fastening of the screws.
- Inspect cables and cable glands for any possible damage.
- Check the fastening of cable glands.
- Check if seals are in working order.
- Defect or damaged components must be replaced before switching the luminaire on. Use original spare parts only.
It is important to carry out luminaire maintenance at each bulb substitution or at least once per year.
Any improper use or installation, any tampering or any unauthorised modication of the luminaire causes the immediate expiry of
the warranty on the luminaire and of any claim against the manufacturer.
Should Ares allow the return of a luminaire for technical inspection or tests, they must be returned with a piece of wiring cable
(10-20cm connected to the luminaire).
ESP. Para todos los aparatos de iluminación,debe programarse un mantenimiento de la instalación (Norma CEI 64-8) que
prevee las siguientes operaciones:
- Vericar el par de apriete de los tornillos que jan las diferentes partes del aparato.
- Vericar la integridad de todos los prensaestopas y de los cables.
- Vericar el par de apriete del prensaestopas.
- Vericar la integridad y elasticidad de las juntas de goma. En ningún momento pueden estar dañadas.
- En caso de componentes dañados, se substituirán siempre por recambios originales antes de volver a poner en servicio el
aparato.
Se aconsejan controles en cada substitución de la lámpara o al menos una vez al año,lo que antes suceda, en función del tipo
de instalación.
Está prohibido el uso inadecuado del aparato, manipulación del producto o modicación no autorizada del cuerpo constructi-
vo (en caso contrario decaerá la garantía y responsabilidad por parte de ARES).
En el caso de que ARES acepte una devolución del aparato para su examen, se deberán enviar dejando un trozo de cable de
la alimentación saliendo del aparato de al menos 10/20 cms.
FR. Programmez régulièrement l’entretien des appareils (CEI 64-8) selon les étapes suivantes:
- Controlez le serrage des vis.
- Contrôlez l’intégrité du câble et du presse-étoupe.
- Controlez le serrage du presse-étoupe.
- Contrôlez l’intégrité des joints.
- Avant d’allumer l’appareil remplacez tous composants endommagés par des pièces de rechange originales.
Effectuez l’entretien de l’appareil après chaque remplacement de l’ampoule ou au moins une fois par an.
La garantie perd toute validité en cas d’utilisation ou installation inexacte ou de modication non autorisée de l’appareil.
En cas de retour de l’appareil pour contrôle technique,après autorisation de Ares,veuillez le rendre avec un morceau de câble
de 10-20cm connecté à l’appareil.
DE. Bei allen Leuchten gilt es, in festgelegten Rhytmen,Installationswartungen durchzufürhen (Norm CEI 64-8). Diese bein-
halten folgenden Aktionen:
- Prüfen der Anzugskraft der Schrauben, die die einzelnen Teile der Leuchte verbinden.
- Überprüfen der Kabelklemmen und Kabel auf Defekte.
- Anzugskraft der Kabelklemmen prüfen.
- Prüfen der Unversehrtheit und Elastizität der Dichtungen,sie dürfen nicht gequetscht sein.
- Beschädigte Komponenten durch Originalteile austauschen, bevor die Leuchte erneut in Betrieb genommen wird.
Es wird empfohlen, bei jedem Leuchtmitteltausch oder wenigstens einmal pro Jahr, die Kontrolle durchzuführen. Bei Leuchtmitteln
mit kürzerer Lebensdauer genügt hingegen eine jährliche Durchsicht.
Missbräuchliche Verwendung, jegliche Produktfälschung oder Änderungen, die vom Hersteller nicht genehmigt wurden, sind
verboten (dies entgegengesetzt verfällt jede Garantie und Haftung).
Im Reklamationsfall müssen die Leuchten mit einem 10-20 cm langen Stück montiertem Stromkabel zurück geschickt werden,
sofern Ares seine Zustimmung zum Retournieren gibt und sie überprüft.
RU. Все светильники должны подвергаться регулярному обслуживанию (стандарт CEI 64-8) согласно следующим пунктам:
-Проверьте, достаточно ли плотно закручены винты.
-Осмотрите кабели и кабельные входы на возможные повреждения.
-Проверьте, достаточно ли плотно затянуты кабельные вводы.
-Проверите, на своих ли местах находятся прокладки и изоляция.
-Поврежденные или неисправные детали должны быть заменены до включения светильника. Используйте только оригинальные запасные
части.
Важно выполнять осмотр светильника при каждой замене лампы или, по крайней мере, один раз в год.
Любые неправильные установка или использование, любые манипуляции или несанкционированное изменение прибора являются основанием
для немедленного снятия прибора с гарантии и отказа заводом в удовлетворении любых претензий.
В случаях если ARES позволил вернуть светильник для технической инспекции или тестов, он должен быть возвращен с кабелем питания (не
менее 10-20 см соединенные со светильником).
In Vitro
- Stagno alla polvere e protetto contro forti getti d’acqua/ondate
IP66
- Apparecchio di classe I
- Protezione contro gli urti IK10
- Marcatura
- Dust-tight and totally protected against water from waves
and powerful water jets IP66
- Class I light xture
- Protection against impact IK10
- Marking
- Estanco al polvo y protegido contra potentes chorros de
agua IP66
- Luminaria de classe I
- Protección contra impactos IK10
- Marcado
- Etang aux poussières et totalement protégé contre les jets et
vagues d’eau IP66
- Appareil de classe I
- Protection contre les impacts IK10
- Marquage
- Staubdicht und geschützt gegen starkes Strahlwasser IP66
- Schutzklasse I
- Stoßfestigkeitsgrad IK10
- Kennzeichnung
-Полностью пыленепроницаемый и защищенный от сильных
водяных струй и сильных морских волн. IP66
-светильник Class I
-Защита от ударов класс защиты IK10
-Маркировка
IN VITRO BOLLARD
220÷240V/50-60Hz
Total power 11W
CLASS I
LED EDGE LIGHTING
2700K_3000K
Integral electronic power supply
IN VITRO WALL
220÷240V/50-60Hz
Total power 11W
CLASS I
LED EDGE LIGHTING
2700K_3000K
Integral electronic power supply
IN VITRO CEILING
220÷240V/50-60Hz
Total power 13W
CLASS I
LED EDGE LIGHTING
2700K_3000K
Integral electronic power supply
IN VITRO SUSPENSION
220÷240V/50-60Hz
Total power 13W
CLASS I
LED EDGE LIGHTING
2700K_3000K
Integral electronic power supply
IP66 IK10
ITA. La sicurezza dell’apparecchio è garantita solo rispet-
tando le normative europee del settore elettrico e le istru-
zioni contenute in questa scatola: pertanto è necessario
conservarle. Il rispetto di queste istruzioni è fondamentale
per il corretto funzionamento dell’apparecchio e dell’im-
pianto.
UK. For safety to be assured, the tting has to be installed
and used properly, in compliance with EU Regulations and
Directives on electrical and electronic equipments and
with the mounting instructions included in the present box:
please keep this instruction data sheet for future reference.
ESP. La seguridad del aparato se garantiza únicamente re-
spetando las normativas europeas del sector eléctrico y
las instrucciones contenidas en esta caja, por lo tanto es
necesario conservarlas. La observación de estas instruc-
ciones es fundamental par el correcto funcionamiento del
aparato y de la instalación.
FR.La sécurité de l’appareil ne peut être assurée que par un
strict respect des Normatives Européennes sur les équipe-
ments éléctriques et des instructions suivantes. Gardez ces
istructions pour des consultations ultérieures.
DE. Die Leuchtensicherheit ist nur gewährleistet, wenn die
europäischen Normen des Elektroniksektors und die hier
beigelegte Montageanleitung befolgt werden. Aus diesem
Grund sollte sie aufbewahrt werden. Die Beachtung der
Anleitung ist Voraussetzung für die einwandfreie Funktion
der Leuchte und der Installation.
R U . Для соблюдения мер безопасности убедитесь, что прибор
будет установлен и использоваться согласно настоящей
инструкции в соответствии с нормами и правилами ЕС по
электричеству и электрооборудованию. Пожалуйста, сохраните
инструкцию для будущих обращений.
In Vitro Bollard
+
+
OPTION 1 tasselli, viti - bolts and screws
OPTION 2 con cassaforma - with box for ground installation
cod. F018Z000000
In Vitro Bollard: OPTION 1
INSTALLAZIONE E FISSAGGIO A TERRA - GROUND INSTALLATION
In Vitro Bollard: OPTION 1 / 2
OPZIONI DI MONTAGGIO - INSTALLATION OPTION
1
3
6
4
OK
CLICK
5
2
NON INCLUSI
NOT INCLUDED
ø8,5 qt.4 54
25
5,2
10,8
25
54
cavo
cable
ø20,5
In Vitro Bollard
In Vitro Bollard: OPTION 2
ORIENTAMENTO LAMPADA - LAMP ORIENTATION
In Vitro Bollard: OPTION 1 / 2
CABLAGGIO - WIRING
6
4
OK
1
CLICK
In Vitro Bollard: OPTION 2
INSTALLAZIONE E FISSAGGIO A TERRA - GROUND INSTALLATION
cod. F018Z000000
3
22.5°
45°
2
5
ø185
ø7 qt.8
<HAR> H05/07 RN-F
7<Ø<12 mm cable
3G1,5mm
/
5G1,5mm

<HAR> H05/07 RN-F | 7<Ø<12 mm cable
LIVELLO 0
LEVEL 0
20/30
4mm max
4mm max
2D(−)
CONNECTOR INCLUDED (DALI / 1...10V)
CONNECTOR INCLUDED (ON-OFF)
1D(+)
5N
3L4
immagine indicativa - image representative
camminamento - walkway
LIGHT
LIGHT
LIGHT
LIGHT
cod.F018Z000000
2NC
1NC
5N
3L4
In Vitro Wall
CLICK
OK
ø8,5 qt.4
2
1
3
6
95
95
4
5
In Vitro Wall
CABLAGGIO - WIRING
In Vitro Wall
FISSAGGIO A PARETE - INSTALLATION ON WALL
5,2
10,8
cavo
cable
ø20,5
<HAR> H05/07 RN-F
7<Ø<12 mm cable
3G1,5mm
/
5G1,5mm

4mm max
4mm max
2D(−)
CONNECTOR INCLUDED (DALI / 1...10V)
CONNECTOR INCLUDED (ON-OFF)
1D(+)
5N
3L4
immagine indicativa - image representative
2NC
1NC
5N
3L4
In Vitro Ceiling
CLICK
4
In Vitro Ceiling
CABLAGGIO - WIRING
In Vitro Ceiling
FISSAGGIO A SOFFITTO - INSTALLATION ON CEILING
1
OK
ON-OFF
DALI / 1...10V
2
3
ø123
cavo
cable
ø7 qt.4
5
6
<HAR> H05/07 RN-F
7<Ø<12 mm cable
3G1,5mm

<HAR> H05/07 RN-F
7<Ø<12 mm cable
5G1,5mm

N N
LL
3
N
1
2
L
N
D +
D −
In Vitro Suspension
In Vitro Suspension
FISSAGGIO A SOSPENSIONE - INSTALLATION ON SUSPENSION
3
1
ø123
cavo
cable
ø7 qt.4
In Vitro Suspension
CABLAGGIO - WIRING
4
OK
5
6
2
ON-OFF
DALI / 1...10V
<HAR> H05/07 RN-F
7<Ø<12 mm cable
3G1,5mm

<HAR> H05/07 RN-F
7<Ø<12 mm cable
5G1,5mm

N N
LL
3
N
1
2
L
N
D +
D −
MARRONE
BROWN
ROSSO
RED
BLU
BLUE
NERO
BLACK
CLICK
A
B
A
B
−
−
+
+
In Vitro
RAEE-WEEE
ITA. Direttiva 2002/96/CE riuti di apparacchiature elettriche ed elettroniche /RAEE:
Informazioni agli utenti: ai sensi dell-articolo 13 del Decreto legislativo 25 Luglio del 2005,n.151 “Attuazione delle Direttive
2002/95/CE, 2002/96/CE e 2003/108/CE, relative alla riduzione dell’uso di sostanze pericolose nelle apparecchiature elettri-
che ed elettroniche,nonché allo smaltimento dei riuti”questo prodotto e conforme.
Il simbolo del cassonetto barrato riportato sull’apparecchiatura o sulle sua confezione indica che il prodotto alla ne della
propria vita utile deve essere raccolto separatamente dagli altri riuti. L’utente dovra’ pertanto conferire l’apparecchiatura giunta
a ne vita agli idonei centri di raccolta differenziata dei Riuti Elettronici ed Elettrotecnici, oppure riconsegnarla al rivenditore al
momento dell’acquisto di una nuova apparecchiatura di tipo equivalente, in ragione di uno a uno.L’adeguata raccolta diffe-
renziata per l’avvio successivo dell’apparecchiatura dismessa al riciclaggio, al trattamento ed allo smaltimento ambientalmente
compatibile contribuisce ad evitare possibili effetti negativi sull’ambiente e sulla salute e favorisce il rimpiego e/o riciclo dei
materiali di cui è composta l’apparecchiatura.Lo smaltimento abusivo del prodotto da parte dell’utente comporta l’applicazione
delle sanzioni amministrative previste dalla norma vigente.
UK. Directive 2002/96/EC (Waste Electrical and Electronic Equipment - WEEE):
Information for users.
This product complies with EU Directive 2002/96/EC.The crossed-out wastebasket symbol on the appliance means that at the
end of its usefull lifespan,the product must be disposed of separataly from ordinary household wastes.The user is responsible for
delivering the appliance to an appropriate collection facility at the end of its useful lifespan.Appropriate separate collection to
permit recycling, treatment and environmentally compatible disposal helps prevent negative impact on the environment and
human health and promotes recycling of the materials making up the product.For more informantion on available collection
facilities,contact your local waste collection service or the shop where you boughl this appliance.
ESP. Información al consumidor: En relación a la Directiva ,2002/95/CE, 2002/96/CE e 2003/108/CE, relativas a la reduc-
ción del uso de sustancias peligrosas en el aparellaje eléctrico y electrónico, así como del reciclaje de los mismos.
Este producto es conforme con la Directiva EU 2002/96/CE.El simbolo de la papelera barrada situado sobre el aparato indica
que este producto, al nal de su vida útil, debe ser tratado separadamente de los residuos domésticos. El usuario es responsa-
ble de la entrega del aparato al nal de su vida útil a los centros de recogida autorizados. El adecuado proceso de recogida
autorizados. El adecuado proceso de recogida diferenciada permite dirigir el aparato desechado al reciclaje,a su tratamiento y
a su desmanteilamento de una forma compatible con el medio ambiente, contribuyendo a evitar los posibles efectos negativos
sobre el ambiente y la salud, favoreciendo el reciclaje de los materiales de los que está compuesto el producto.Para informa-
ción más detallada inherente a los sistemas de recogida o al establecimiento donde se adquirió el producto.
FR. Directive 2002/96/CE (Déchets d’équipements électriques et électroniques - DEEE):
Informations aux utilisateurs.
Ce produit est conforme à la Directive ED 2002/96/CE.Le symbole de la corbeille barrée reporté sul l’appareil indique que ce
dernier doit être éliminé à part lorsqu’il n’est plus utilisable et non pas avec les ordures ménagéres. L’utilisateur a la responsabilité
de porter l’appareil hors d’usage à un centre de ramassage spécialisé. Le tri approprié des déchets permet d’acheminer l’ap-
pareil vers le recyclage, le traitement et l’élimination de façon écologiquement compatible. Il contribute à éviter les effets négatif
possibles sur l’environnement et sur la santé, tout en favorisant le recyclage des matériaux dont est constitué le produit. Pour avoir
des informations plus détaillées sur les systèmes de ramassage disponibles,s’adresser au service local d’élimination des déchets
ou au revendeur.
DE. Richtlinie 2002/96/EU (Elektro- un Elektronik- Aitgeräte - WEEE):
Benutzerinformationen.
Dieses Produkt entspricht der EURichtlinie 2002/96/EU.Das Symbol des auf dem Gerät dargesteliten, durchgestrichenen
Korbesgibt an , dass das Produkt am Endeseiner Nutzungsdauer gesondert vomHausmüll zu behandein ist.Am Ende der
Nutzungsdauer ist der Benutzer für die Überantwortung des Geräts an geeignete Sammelstellen verantwortlich. Die angemessene,
getrennte Müllsammlung zwecks umweltkompatibler Behandlung und Entsorgung für den anschließenden Recyclingbeginn des
nicht mehr verwendetent.Geräts trägt zur Vermeidung möglicher schädlicher Wirkungen auf Umwelt und Gesundheit bei und
begunstigt das Recycling der Materialien,aus denen das Produkt zusammengesetzt ist.Für nähere informationen bezüglich der
zur Verfügung stehenden Sammelsysteme,weden Sie sich bitte an den örtlichen Müllentsorgungsdienst order an das Geschäft,in
dem der Kauf getäligt worden ist.
This information only applies to customers in the European Union, according to Directive 2002/96/EC of the European
parliament and of the council of 27 January 2003 on waste electrical and electronic equipment (WEE) and legislation
transposing and implementing it into the various national legal systems.
www.flos.com
MV 1101612.01 Rev12-20

This manual suits for next models

5

Other FLOS Outdoor Light manuals

FLOS OK F4640009 User manual

FLOS

FLOS OK F4640009 User manual

FLOS Walkstick Pipe 1 User manual

FLOS

FLOS Walkstick Pipe 1 User manual

FLOS In Vitro Unplugged User manual

FLOS

FLOS In Vitro Unplugged User manual

FLOS SERENA F6582054 User manual

FLOS

FLOS SERENA F6582054 User manual

FLOS Last Order User manual

FLOS

FLOS Last Order User manual

FLOS NOCTAMBULE F User manual

FLOS

FLOS NOCTAMBULE F User manual

FLOS TILEE User manual

FLOS

FLOS TILEE User manual

FLOS TOIO User manual

FLOS

FLOS TOIO User manual

FLOS JASPER MORRISON GLO-BALL F Series User manual

FLOS

FLOS JASPER MORRISON GLO-BALL F Series User manual

FLOS ARES Pan User manual

FLOS

FLOS ARES Pan User manual

FLOS SERENA F6582030 User manual

FLOS

FLOS SERENA F6582030 User manual

FLOS SUPERARCHIMOON OUTDOOR User manual

FLOS

FLOS SUPERARCHIMOON OUTDOOR User manual

FLOS GAKU User manual

FLOS

FLOS GAKU User manual

FLOS Michael Anastassiades COPYCAT F1952030 User manual

FLOS

FLOS Michael Anastassiades COPYCAT F1952030 User manual

FLOS CHRYSALIS User manual

FLOS

FLOS CHRYSALIS User manual

FLOS MILE BOLLARD 1 600 MONO User manual

FLOS

FLOS MILE BOLLARD 1 600 MONO User manual

FLOS SUPERLOON User manual

FLOS

FLOS SUPERLOON User manual

FLOS GLO-BALL BASIC User manual

FLOS

FLOS GLO-BALL BASIC User manual

FLOS Landlord User manual

FLOS

FLOS Landlord User manual

FLOS 45 ADJ User manual

FLOS

FLOS 45 ADJ User manual

FLOS KELVIN LED F3301030 User manual

FLOS

FLOS KELVIN LED F3301030 User manual

FLOS ARIETTE 2 User manual

FLOS

FLOS ARIETTE 2 User manual

FLOS BELLHOP User manual

FLOS

FLOS BELLHOP User manual

FLOS IPNOS User manual

FLOS

FLOS IPNOS User manual

Popular Outdoor Light manuals by other brands

LUCIDE COMBO-LED 27874/45/30 quick start guide

LUCIDE

LUCIDE COMBO-LED 27874/45/30 quick start guide

HOLOPHANE Dorchester Installation and maintenance instructions

HOLOPHANE

HOLOPHANE Dorchester Installation and maintenance instructions

Strand Leko 64506-001 manual

Strand

Strand Leko 64506-001 manual

HEPER ZEROX S Hybrid Installation & maintenance instructions

HEPER

HEPER ZEROX S Hybrid Installation & maintenance instructions

Satco Products Nuvo 60/879 Assembly instruction

Satco Products

Satco Products Nuvo 60/879 Assembly instruction

Heitronic Juna 35201 Installation and operating instructions

Heitronic

Heitronic Juna 35201 Installation and operating instructions

urban ambiance UQL1249 installation instructions

urban ambiance

urban ambiance UQL1249 installation instructions

Quoizel WVR9007A installation guide

Quoizel

Quoizel WVR9007A installation guide

SLV ESKINA 1002907 instruction manual

SLV

SLV ESKINA 1002907 instruction manual

Artemide TOLOMEO XXL manual

Artemide

Artemide TOLOMEO XXL manual

Davey Lighting 7679 instruction manual

Davey Lighting

Davey Lighting 7679 instruction manual

SWITCH MADE COVEX 300 user manual

SWITCH MADE

SWITCH MADE COVEX 300 user manual

Intermatic AL385 Assembly procedures

Intermatic

Intermatic AL385 Assembly procedures

BEGA 84292 Installation

BEGA

BEGA 84292 Installation

Hornbach 10599710 quick start guide

Hornbach

Hornbach 10599710 quick start guide

Tracon Electric STLT2W user manual

Tracon Electric

Tracon Electric STLT2W user manual

Steren LAM-745 manual

Steren

Steren LAM-745 manual

JONATHAN Y JYL2047A quick start guide

JONATHAN Y

JONATHAN Y JYL2047A quick start guide

manuals.online logo
manuals.online logoBrands
  • About & Mission
  • Contact us
  • Privacy Policy
  • Terms and Conditions

Copyright 2025 Manuals.Online. All Rights Reserved.