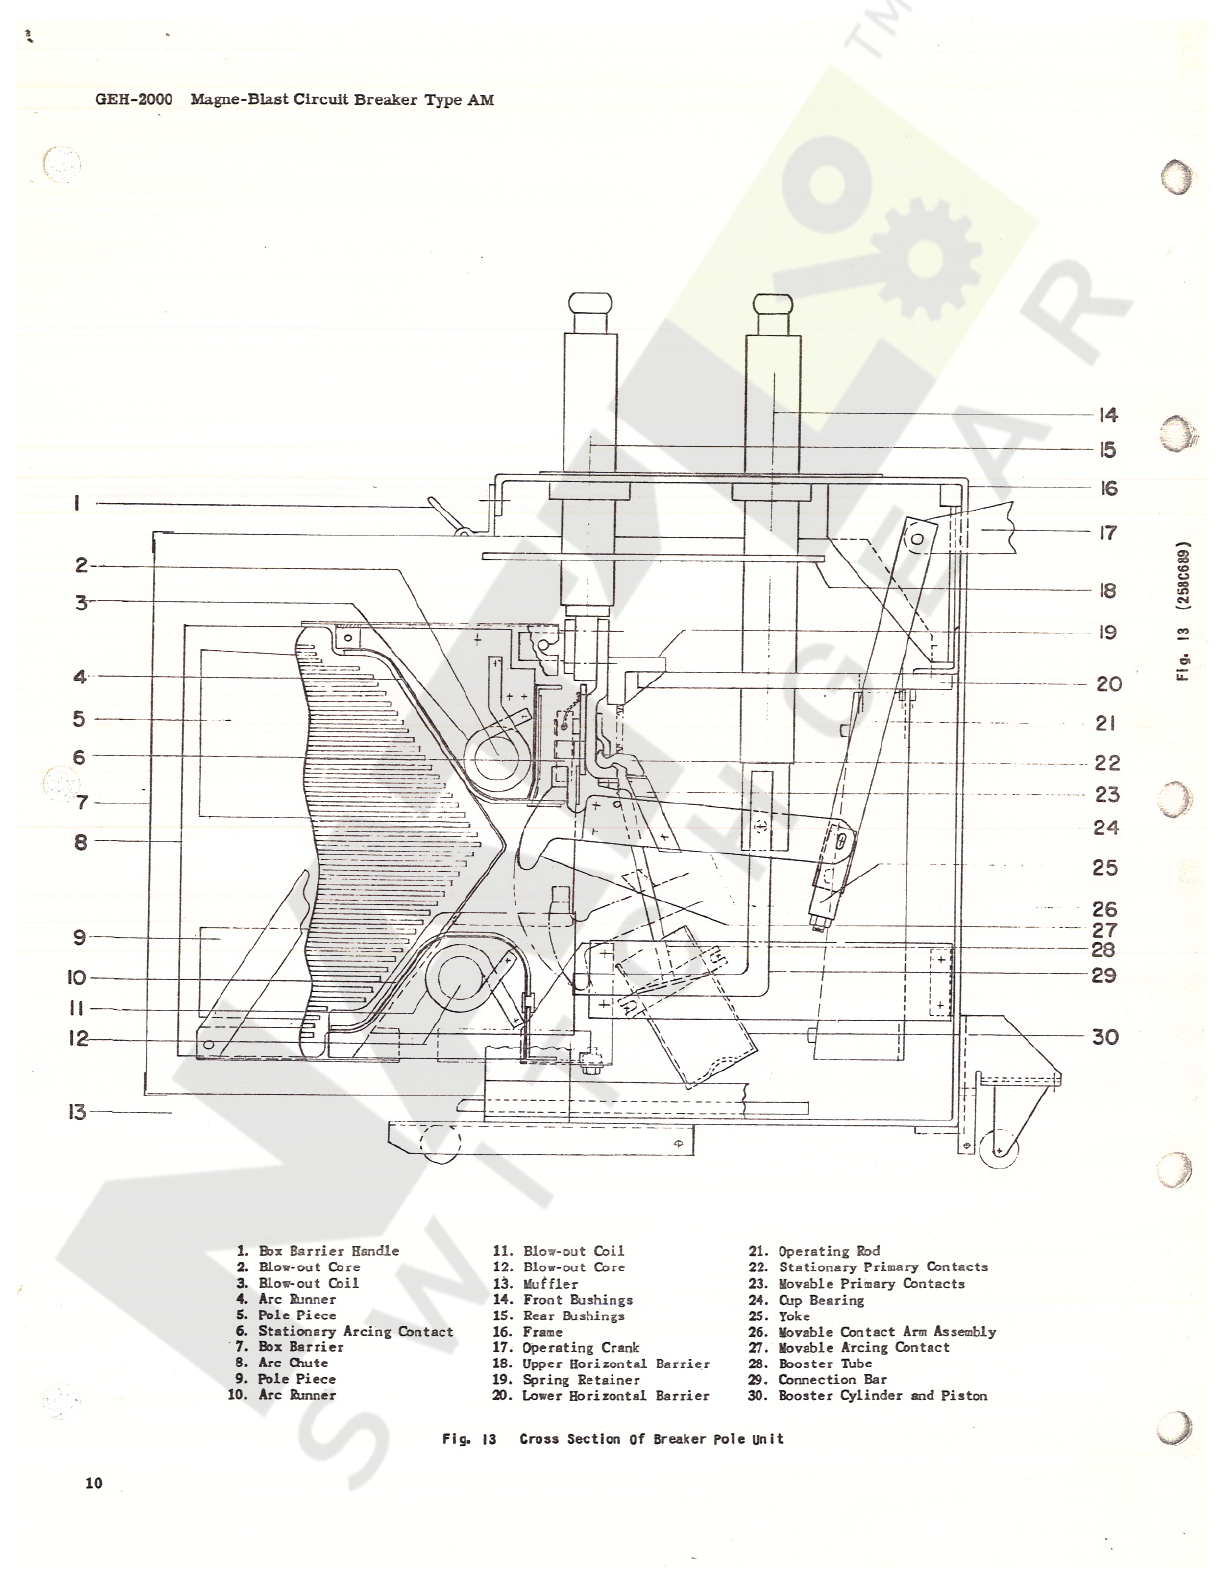
GE AM-2.4/4.16-100/150- 3 User manual

GEH
-
2000
B
INSTRUCTIONS
AND
RENEWAL
PARTS
(
SUP
ERSEDE
9
SEH
-
2000
A
)
v
.
s
Types
AM
-
2.4
/
4.16
-
100
/
150
-
3
AM
-
2.4
/
4.16
-
100
/
150
A
-
3
AM
-
2.4
/
4.16
-
150
/
250
-
3
AM
-
2.4
/
4.16
-
150
/
250
A
-
3
IVlth
MS
-
13
Mechanism
eOECTSHTS
3
INTRODUCTION
RECEIVING
,
HANDLING
AND
STORAGE
3
.
.
.
3
DESCRIPTION
.
.
.
4
INSTALLATION
.
..
.
.
9
OPERATION
.
.
11
MAINTENANCE
..
..
•
•
..
18
RENEWAL
PARTS
.
.
.
• •
MEDIUM
VOLTAGE
SWITCHGEAR
DEPARTMENT
wm
L
GENERAL
PHILADELPHIA
,
P A
.
Courtesy of NationalSwitchgear.com

%
GEH
-
2000
Circuit
Breaker
Type
AM
T
1
*
A
1
C
I
i
,
4
in
CM
r
-
o
CM
o
CO
W
&
MM
cn
u
_
LJCGT
;
1
.
Secondary
Coupler
J
2
.
Auxiliary
Switch
3
.
Position
Indicator
4
.
Opening
Spring
Unit
5
.
Operation
Counter
6
.
Manual
Trip
'
#
7
.
Control
Device
8
.
Control
Device
Plunger
Guide
9
.
Closing
Solenoid
10
.
Plunger
Interlock
(
Optional
)
:
J
_
4
>
£
v
/
.
-
_
ni
V
smsamiai
rSi
—
itw
j
»
»
-
,
7
~
^
.
/
S
’
’
,
y
S
A
A
;
-
:
rl
“
'
fL
t
A
_
8
WK
r
,
;
i
:
-
rh
j
.
'
"
;
-
;
--
'
*
1
/
-
•
V
-
i
o
f
-
-
»
T
?
-
*
7
~
;
I
|
;
•
i
i
i
t
_
i
-
Fig
.
I
MS
-
13
Operating
Mechanise
wrmw
*
B
:
v
-
-
f
‘
ML
.
-
-
s
:
a
IMi
mmm
00
00
s
:
-
-
r
-
8
;
-
A
-
f
’
.
'
J
=
s
'
l
-
Si
f
.
CM
C
?
i
V
'
&
LS
-
!
mm
L
.
•
•
vV
-
•
.
v
3
ST
w
rtiL
«
«
:
»
J
'
3
XH
-
<
-
12
.
-
Y
5
#
/
CC
S
>
‘
v
-
;
^
O
2
CM
CM
if
§
4
®
>
3
3
.
Handle
4
.
Release
Valve
1
.
Closing
Armature
2
.
Maintenance
Operating
Device
Method
of
Mounting
Maintenance
Operating
Device
Fig
.
2
2
Courtesy of NationalSwitchgear.com

MAGNE
-
BLAST
CIRCUIT
BREAKER
TYPE
AM
-
2.4
/
4.16
WITH
MS
-
13
MECHANISM
c
INTRODUCTION
interrupted
in
air
by
sufficiently
elongating
and
cooling
it
.
This
is
accomplished
by
means
of
a
strong
magnetic
field
that
lengthens
the
arc
and
forces
it
into
in
-
timate
contact
with
cool
dielectric
mater
-
given
on
the
nameplate
.
Since
this
book
is
written
to
cover
several
ratings
of
breakers
that
are
of
the
same
general
design
,
all
instructions
will
be
of
a
gen
-
eral
character
and
all
illustrations
will
be
typical
,
unless
otherwise
specified
.
The
Magne
-
blast
Circuit
Breaker
is
the
removable
interrupting
element
for
use
in
vertical
-
lift
metal
-
clad
switchgear
,
to
pro
-
vide
reliable
control
and
protection
of
power
systems
.
Among
the
many
advantages
of
metal
-
clad
switchgear
are
added
protection
to
equipment
and
personnel
,
compactness
,
simplified
installation
and
reduced
mainte
-
nance
.
In
keeping
with
these
features
the
Magne
-
blast
breakers
are
designed
for
in
-
terchangeability
and
manueverability
,
to
-
gether
with
reliability
and
low
maintenance
requirements
.
The
Magne
-
blast
Circuit
Breaker
oper
-
ates
on
the
principle
that
an
arc
can
be
ial
.
v
The
AM
-
2.4
/
4.16
Magne
-
blast
Break
-
er
is
available
in
a
number
of
current
and
voltage
ratings
.
Refer
to
the
breaker
nameplate
for
the
complete
rating
inform
-
ation
of
any
particular
breaker
.
The
short
circuit
conditions
to
be
imposed
on
the
breaker
must
not
exceed
its
rating
,
nor
should
it
be
called
upon
to
operate
at
voltages
or
currents
greater
than
those
PROPER
INSTALLATION
AND
MAIN
-
TENANCE
ARE
NECESSARY
TO
INSURE
CONTINUED
SATISFACTORY
OPERATION
OF
THE
BREAKER
.
The
following
instruc
-
tions
will
provide
complete
infomation
for
placing
the
magne
-
blast
breaker
in
ser
-
vice
and
for
maintaining
satisfactory
operation
.
RECEIVING
,
HANDLING
AND
STORAGE
Loose
parts
associated
of
the
breaker
,
with
the
breaker
are
always
included
in
the
same
crate
.
Check
all
parts
against
the
packing
list
to
be
sure
that
no
parts
have
been
overlooked
.
heaters
are
in
operation
to
prevent
condensation
.
2
.
The
breaker
should
be
stored
in
a
clean
location
,
free
from
corrosive
gases
or
fumes
;
particular
care
should
be
taken
to
protect
the
equipment
from
moisture
and
cement
dust
,
as
this
com
-
bination
has
a
very
corrosive
effect
on
many
parts
.
3
.
Machined
parts
of
the
operating
mech
-
anism
,
etc
.
,
should
be
coated
with
a
heavy
oil
or
grease
to
prevent
rusting
.
If
the
breaker
is
stored
for
any
length
of
time
,
it
should
be
inspected
periodically
to
see
that
rusting
has
not
started
and
to
insure
good
mechanical
condition
.
Should
the
breaker
be
stored
under
unfavorable
atmospheric
conditions
,
steps
should
be
taken
to
dry
out
the
breaker
before
it
is
placed
in
service
.
RECEIVING
AND
HANDLING
Each
breaker
is
carefully
inspected
and
packed
by
workmen
experienced
in
the
nroper
handling
and
packing
of
electrical
quipment
.
Immediately
upon
receipt
of
the
circuit
breaker
,
an
examination
should
be
made
for
any
damage
sustained
in
tran
-
sit
.
If
injury
or
rough
handling
is
evident
,
a
damage
claim
should
be
filed
immediately
with
the
transportation
company
and
the
nearest
General
Electric
Sales
Office
should
be
notified
.
STORAGE
It
is
recommended
that
the
breaker
be
put
into
service
immediately
in
its
per
-
manent
location
.
If
this
is
not
possible
,
the
following
precautions
must
be
taken
to
insure
the
proper
storage
of
the
breaker
:
1
.
The
breaker
should
be
carefully
pro
-
tected
against
condensation
,
preferably
by
storing
it
in
a
warm
dry
room
,
since
water
absorption
has
an
adverse
effect
on
the
insulation
parts
.
Circuit
break
-
ers
for
outdoor
metal
-
clad
switchgear
should
be
stored
in
the
equipment
only
when
power
is
available
and
the
It
is
expected
that
due
care
will
be
exer
-
cised
during
the
unpacking
and
installation
of
the
breaker
so
that
no
damage
will
occur
from
careless
or
rough
handling
,
or
from
exposure
to
moisture
or
dirt
A
nail
puller
should
be
used
to
open
the
crates
,
and
care
should
be
exercised
to
prevent
tools
from
striking
either
the
crate
or
any
part
DESCRIPTION
give
high
speed
closing
and
opening
.
The
closing
operation
is
controlled
by
the
control
device
(
7
)
.
The
control
device
also
per
-
mits
trip
free
operation
(
tripping
the
break
-
er
at
any
time
during
the
closing
operation
)
.
prevents
solenoid
pumping
(
reclosing
)
after
a
trip
free
operation
.
For
AC
closing
operation
,
rectifiers
mounted
elsewhere
in
the
metal
-
clad
unit
are
used
to
supply
the
direct
current
on
which
the
closing
coil
operates
.
The
breaker
can
be
opened
elec
-
trically
,
by
remote
control
,
or
manually
,
by
means
of
the
manual
trip
device
(
6
)
.
All
secondary
connections
from
the
breaker
to
the
metal
-
clad
unit
are
made
through
the
coupler
(
1
)
.
The
magne
-
blast
breaker
is
composed
of
two
major
parts
,
the
breaker
element
and
the
operating
mechanism
.
The
breaker
element
comprises
three
similar
pole
units
,
each
pole
unit
consisting
of
main
and
arc
-
ing
contacts
,
an
interrupter
,
and
an
enclos
-
ing
box
barrier
that
segregates
the
inter
-
rupting
units
from
each
other
to
provide
insulation
between
phases
as
well
as
from
each
phase
to
ground
.
The
primary
con
-
nections
to
the
associated
metal
-
clad
equipment
are
made
through
the
primary
disconnect
studs
.
The
MS
-
13
operating
mechanism
shown
in
Fig
.
1
is
of
the
solenoid
type
designed
to
A
positive
interlock
and
interlock
switch
are
provided
between
the
breaker
and
metal
-
clad
unit
to
prevent
the
raising
or
lowering
of
the
breaker
in
the
unit
while
in
the
closed
position
and
to
prevent
a
closing
operation
when
the
breaker
is
not
in
either
the
fully
raised
or
lowered
position
.
A
plunger
type
interlock
can
also
be
provided
to
prevent
the
closing
of
two
adjacent
breakers
at
the
same
time
or
to
operate
an
additional
auxiliary
switch
mounted
in
the
metal
-
clad
unit
.
and
The
operating
mechanism
used
on
those
breakers
designed
for
MI
-
6
metal
-
clad
These
instructions
do
not
purport
to
cover
all
details
or
variations
in
equipment
nor
to
provide
for
every
possible
contingency
to
be
met
in
connection
with
installation
,
operation
or
maintenance
.
Should
further
information
be
desired
or
should
particular
problems
arise
which
are
not
covered
sufficiently
for
the
purchaser
'
s
purposes
,
the
matter
should
be
referred
to
the
General
Electric
Company
.
3
Courtesy of NationalSwitchgear.com

GEH
-
2000
Magne
-
Blast
Circuit
Breaker
Type
AM
equipment
differs
somewhat
from
those
de
-
signed
for
M
-
26
equipment
but
its
operation
principally
the
same
.
This
mechanism
is
ntrolled
by
a
relay
scheme
mounted
in
the
metal
-
clad
unit
and
a
cut
-
off
switch
located
on
the
breaker
instead
of
the
control
device
.
Two
seven
terminal
secondary
couplers
also
replace
the
one
sixteen
terminal
coup
-
ler
.
The
positive
interlock
between
the
breaker
and
metal
-
clad
unit
is
replaced
with
a
trip
interlock
that
trips
the
mech
-
anism
before
raising
or
lowering
of
the
breaker
can
be
accomplished
.
A
fork
-
type
lever
can
be
furnished
to
operate
an
aux
-
iliary
switch
mounted
in
the
metal
-
clad
unit
.
For
detailed
explanation
of
the
opera
-
tion
of
the
breaker
and
mechanism
refer
to
the
section
OPERATION
.
I
5
A
i
V
+
O
"
.
1
MiN
16
16
22
S I
3
3
\
>
\
/
4
4
\
5
5
6
6
cc
ac
(
O
CJ
CC
to
eg
1
.
Stationary
pritnary
Contacts
2
.
Movable
Primary
Contacts
3
.
Buffer
Block
4
.
Stationary
Arcing
Contacts
Fig
.
3
Contact
Adjustaents
5
.
Movable
Arcing
Contacts
6
.
Upper
Arc
Runner
eo
oi
LL
.
INSTALLATION
The
following
instructions
explain
the
necessary
steps
to
be
taken
before
the
breaker
is
placed
in
the
metal
-
clad
unit
.
'
"
Ms
includes
a
complete
check
of
all
of
breaker
adjustments
,
in
addition
to
uiorough
inspection
.
For
final
installa
-
tion
instructions
refer
to
any
issue
of
the
Metal
-
clad
Switchgear
Instruction
Book
,
GEH
-
1802
.
Reference
should
also
be
made
to
the
connection
diagram
that
is
furnished
with
each
unit
.
upper
arc
runner
(
6
)
without
touching
.
All
adjustments
should
be
checked
not
only
during
the
initial
installation
of
the
breaker
but
also
during
periodic
inspec
-
V
PRIMARY
CONTACT
GAP
tioas
and
whenever
it
becomes
necessary
to
repair
or
replace
parts
that
have
become
worn
or
defective
while
in
service
.
The
following
adjustments
are
listed
in
the
order
in
which
they
are
to
be
checked
.
First
,
however
,
remove
the
breaker
from
the
metal
-
clad
unit
and
remove
the
box
barrier
and
the
mechanism
cover
.
Refer
to
Fig
.
4
.
With
the
breaker
closed
,
press
the
manual
trip
button
allowing
the
breaker
to
trip
open
normally
.
Do
not
force
the
contacts
open
wider
by
hand
.
The
gap
between
the
stationary
primary
contacts
(
5
)
and
the
movable
primary
contact
(
6
)
should
be
3
-
13
/
16
"
+
1
/
8
"
-
3
/
16
"
.
To
change
this
gap
,
loosen
the
check
nut
(
25
)
,
Fig
.
5
,
and
turn
the
adjusting
nut
(
26
)
on
stud
(
9
)
.
Screwing
the
adjusting
nut
down
will
decrease
the
primary
contact
gap
.
Tighten
the
check
nut
and
remeasure
the
contact
gap
(
close
and
trip
the
breaker
before
checking
the
measurement
)
.
\
PRIMARY
CONTACT
WIPE
DO
NOT
WORK
ON
EITHER
THE
BREAKER
OR
THE
MECHANISM
WHILE
IN
THE
CLOSED
POSITION
UNLESS
THE
PROP
AND
TRIP
LATCH
HAVE
BEEN
SECURELY
WIRED
OR
BLOCKED
TO
PRE
-
VENT
ACCIDENTAL
TRIPPING
.
When
the
breaker
Is
closed
,
as
shown
in
Fig
.
3
,
the
stationary
primary
contacts
(
1
)
.
should
rise
5
/
16
"
+
0
-
l
/
l
6
"
.
To
obtain
this
adjustment
,
open
the
breaker
and
,
referring
to
Fig
.
4
,
loosen
the
check
-
TRm
T
ATPH
U
/
TDI
?
nut
(
4
)
and
turn
the
adjusting
nut
(
3
)
.
DA
1
L
WIPE
Screwing
up
on
the
adjusting
nut
will
de
-
Refer
to
Fig
.
5
.
The
wipe
of
the
trip
crease
the
primary
contact
wipe
,
down
will
latch
(
4
)
on
the
trip
roller
(
6
)
should
be
from
increase
it
.
Tighten
the
check
nut
,
close
3
/
16
"
to
1
/
4
"
.
This
can
be
measured
by
the
breaker
and
recheck
the
wipe
.
With
putting
a
film
of
grease
on
the
latch
(
4
)
,
the
primary
contact
wipe
correctly
ad
-
closing
the
breaker
part
way
,
and
trip
-
justed
.
the
clearance
between
the
contact
ping
.
The
mechanism
has
the
proper
trip
(
7
)
and
the
buffer
block
should
be
latch
wipe
when
the
latch
rests
against
the
1
/
16
"
or
greater
(
as
shown
in
Fig
.
3
)
stop
pin
(
5
)
.
No
adjustment
is
provided
and
when
the
breaker
is
fully
closed
.
a
visual
inspection
is
usually
all
that
is
required
.
If
this
setting
is
not
correct
,
look
for
insufficient
travel
of
the
trip
shaft
(
3
)
.
ADJUSTMENTS
Although
the
breaker
has
been
com
-
pletely
adjusted
and
tested
at
the
factory
,
it
is
possible
that
unusually
rough
handling
during
transportation
may
have
caused
some
loosening
or
disturbance
of
parts
of
the
apparatus
.
It
is
therefore
advisable
to
review
all
adjustments
before
placing
the
breaker
in
service
,
making
readjustments
wherever
necessary
.
arm
ARCING
CONTACT
WIPE
Refer
to
Fig
.
3
.
Close
the
breaker
until
the
arcing
contacts
just
touch
.
This
can
be
determined
with
the
use
of
a
circuit
ISM
IN
THE
CLOSED
POSITION
,
KEEP
continuity
tester
such
as
a
light
indication
FINGERS
CLEAR
OF
THE
LINKAGE
,
AS
or
bell
set
In
this
position
,
the
gap
between
ACCIDENTAL
TRIPPING
CAN
CAUSE
SE
-
the
stationary
primary
contacts
(
1
)
and
the
VERE
INJURY
,
movable
primary
contact
(
2
)
should
be
5
/
16
”
or
greater
.
This
setting
has
been
PROP
CLEARANCE
made
in
the
factory
and
no
adjustment
is
provided
.
A
wipe
of
less
than
5
/
16
"
is
usually
an
indication
that
the
arcing
con
-
closed
as
far
as
possible
with
the
mainte
-
tacts
need
to
be
replaced
.
When
making
nance
device
,
the
clearance
between
the
this
check
,
also
see
that
the
movable
arcing
closing
pin
(
10
)
and
the
prop
(
15
)
should
contact
(
5
)
passes
through
the
slot
in
the
be
l
/
32
"
to
3
/
32
"
.
Measure
the
prop
A
maintenance
operating
device
is
pro
-
vided
for
operation
of
the
breaker
during
these
adjustment
checks
.
Mount
the
device
as
shown
in
Fig
.
2
,
and
turn
the
release
valve
(
4
)
firmly
to
the
right
.
To
close
the
breaker
,
operate
the
handle
(
3
)
with
a
pump
-
ing
motion
.
By
turning
the
release
valve
(
4
)
to
the
left
,
the
closing
armature
will
return
to
its
normal
position
.
Electrical
operation
must
not
be
attempted
until
the
breaker
has
been
operated
manually
through
complete
stroke
several
times
and
1
installation
inspection
has
been
com
-
WHEN
WORKING
ON
THE
MECHAN
-
Refer
to
Fig
.
5
.
With
the
breaker
pieced
.
4
Courtesy of NationalSwitchgear.com

Magne
-
Blast
Circuit
Bre
Type
AM
GEH
-
2000
clearance
with
a
feeler
gage
to
determine
whether
or
not
an
adjustment
should
be
ade
,
and
if
so
,
exactly
how
much
adjust
-
ent
will
be
required
.
To
make
the
ad
-
justment
,
it
will
first
be
necessary
to
open
the
breaker
and
remove
the
maintenance
operating
device
.
Remove
the
stop
nuts
(
22
and
24
)
being
careful
not
to
drop
the
armature
(
21
)
.
Lower
the
armature
from
the
mechanism
and
remove
the
two
set
screws
(
19
)
.
Remove
the
closing
plunger
(
17
)
from
the
armature
and
add
or
subtract
the
necessary
thickness
of
shims
(
20
)
to
give
the
required
adjustment
,
then
replace
the
closing
plunger
,
screwing
it
down
against
the
shims
.
Using
a
small
drill
,
spot
the
closing
plunger
through
the
set
screw
hole
.
Replace
the
set
screws
.
To
remount
the
armature
on
the
breaker
,
compress
the
piston
ring
(
18
)
.
After
reassembly
,
re
-
mount
the
maintenance
closing
device
and
check
the
adjustment
.
CLOSING
PLUNGER
CLEARANCE
Refer
to
Fig
.
5
.
With
the
breaker
in
the
open
position
,
the
clearance
between
the
closing
plunger
roller
(
14
)
should
be
obtain
this
clearance
,
the
nuts
(
22
)
two
armature
guide
bolts
(
23
)
n
raised
or
lowered
.
Both
nuts
should
be
moved
the
same
amount
.
After
making
an
adjustment
,
close
and
open
the
breaker
and
recheck
the
plunger
clearance
.
Repeat
the
adjustment
if
necessary
.
\
o
2
00
‘
175
i
and
the
closing
16
"
to
3
/
16
"
.
To
i
on
the
may
be
o
QO
1
.
Operating
Rod
2
.
Operating
Rod
Pin
3
.
Adjusting
Nut
4
.
Check
Nut
5
.
Stationary
Primary
Contacts
6
.
Movable
Primary
Contacts
7
.
Contact
Ana
8
.
Yoke
=
t
ct
u
.
Adjustable
Coupling
for
Making
Primary
Contact
Wipe
Adjustment
Fig
.
4
1
.
Main
Oper
.
Shaft
2
.
llain
Crank
3
.
Trip
Shaft
4
.
Trip
Latch
5
.
Trip
Latch
Stop
6
.
Trip
Roller
7
.
Position
Indicator
8
.
Clevis
9
.
Adjustable
Stud
10
.
Closing
Pin
11
.
Opening
Spring
Housing
12
.
Opening
Spring
,
Inner
13
.
Opening
Spring
,
Outer
14
.
Closing
Roller
15
.
Prop
16
.
Closing
Coil
17
.
Closing
Plunger
18
.
Piston
Ring
19
.
Set
Screw
20
.
Shims
21
.
Closing
Armature
22
.
Stop
Nuts
23
.
Armature
Guide
Bolts
24
.
Stop
Nuts
25
.
Check
Nut
26
.
Adjusting
Nut
co
s
2
04
5
to
6
u
.
To
20
Y
/
/
//
/
/
/
/
/
A
/
/
//
//
//
A
21
22
23
24
Fig
.
5
Cross
Section
of
MS
-
13
Meehan
iso
5
.
t
Courtesy of NationalSwitchgear.com

<
I
2
3
I
4
5
^
1
.
Back
Auxiliary
Switch
2
.
Mounting
Screw
^
3
.
Top
Auxiliary
Switch
4
.
Plunger
5
.
Operating
Arm
6
.
Trip
Lever
7
.
Plunger
Guide
6
J
|
8
1
.
Interlock
Shaft
2
.
Latch
Check
Switch
Am
*
^
-
3
.
Latch
Checking
Switch
4
.
Trip
Shaft
5
.
Interlock
Switch
Am
v
.
6
.
Interlock
Switch
Control
Device
*
in
as
far
as
possible
.
In
this
position
the
clearance
between
the
switch
plunger
(
2
)
and
the
adjustment
screw
(
3
)
should
be
not
more
than
1
/
32
”
.
If
adjustment
is
neces
-
sary
,
add
or
remove
washers
(
4
)
as
re
-
quired
.
AUXILIARY
DEVICES
Plunger
Interlock
(
AM
-
2.4
/
4.16
-
100
/
150
-
3
and
150
/
250
-
3
)
Fig
.
6
Interlock
Switch
and
Latch
Checking
Switch
Refer
to
Fig
.
9
.
With
the
breaker
in
the
open
position
,
the
vertical
distance
"
A
"
from
the
top
of
the
interlock
bolt
(
2
)
to
the
bottom
of
the
elevating
bar
(
13
)
should
be
15
-
19
/
32
"
±
1
/
16
"
.
To
change
this
ad
-
justment
add
or
remove
washers
(
3
)
.
INTERLOCK
SWITCH
WIPE
Referring
to
Fig
.
6
,
rotate
the
interlock
shaft
(
1
)
manually
clockwise
to
release
the
interlock
switch
arm
(
3
)
.
The
point
at
which
the
contacts
make
can
be
determined
with
a
circuit
continuity
tester
such
as
a
light
indicator
or
bell
set
.
To
obtain
ad
-
justment
on
the
interlock
switch
(
6
)
,
bend
the
interlock
switch
arm
(
3
)
.
The
roller
and
crank
on
the
interlock
switch
(
6
)
should
have
1
/
32
"
to
1
/
16
"
overtravel
after
final
adjustment
.
CONTROL
DEVICE
ADJUSTMENT
Latch
Checking
Switch
Wipe
Auxiliary
Switch
Linkage
(
Furnished
Special
on
AM
-
2.4
/
4.16
-
100
/
Referring
to
Fig
.
6
,
rotate
the
trip
shaft
(
5
)
manually
clockwise
to
release
the
latch
checking
switch
arm
(
2
)
.
The
point
at
which
the
contacts
make
can
be
determined
with
a
circuit
continuity
tester
such
as
a
light
indicator
or
bell
set
.
To
obtain
adjustment
on
the
latch
checking
switch
(
4
)
,
bend
the
latch
checking
switch
arm
(
2
)
.
The
roller
and
crank
on
the
latch
checking
switch
(
4
)
should
have
1
/
32
to
1
/
16
overtravel
after
final
adjustment
150
A
-
3
and
-
150
/
25
QA
-
3
)
Refer
to
Fig
.
10
.
With
the
breaker
in
the
open
position
,
the
distance
from
the
center
line
of
the
front
bushings
(
1
)
to
the
center
of
the
slot
in
the
fork
lever
(
2
)
should
be
12
-
9
/
32
"
as
shown
.
To
change
this
setting
,
loosen
the
locking
bolts
(
3
)
and
move
the
fork
level
in
the
proper
direction
.
Tighten
the
lock
bolts
.
FINAL
INSPECTION
AND
TEST
1
.
For
ease
in
reviewing
the
adjustments
,
the
following
are
recapitulated
:
a
.
Primary
contact
wipe
:
5
/
16
"
+
0
-
1
/
16
"
.
Referring
to
Fig
.
7
,
measure
the
over
-
travel
of
the
two
auxiliary
switch
plungers
.
Manually
operate
the
control
device
by
pressing
the
operating
arm
(
5
)
the
full
extent
of
travel
to
the
rear
.
With
the
device
in
this
position
further
depress
the
plunger
(
4
)
on
the
top
auxiliary
switch
(
3
)
.
The
gap
between
the
plunger
and
operating
arm
should
be
1
/
32
"
or
greater
.
To
increase
the
overtravel
,
loosen
the
screws
(
2
)
and
move
the
switch
toward
the
rear
of
the
mounting
plate
.
Tighten
the
screws
and
recheck
the
adjustment
.
Impact
Trip
,
Current
Trip
,
Capacitor
Trip
,
and
Undervoltage
Trip
Devices
Fig
.
9
shows
the
necessary
settings
that
are
to
be
checked
when
these
devices
are
furnished
.
The
amount
of
wipe
between
the
trip
roller
(
16
)
and
the
trip
latch
(
15
)
should
be
3
/
32
"
to
5
/
32
"
.
This
can
be
altered
by
changing
the
number
of
shims
under
the
block
against
which
the
trip
plate
(
14
)
stops
.
In
order
to
trip
properly
,
the
clearance
between
the
trip
bolt
(
11
)
and
the
trip
plate
*
(
9
)
should
be
1
/
32
"
to
1
/
16
"
.
This
can
be
far
m
In
a
similar
manner
,
check
the
over
-
travel
on
the
back
auxiliary
switch
(
1
)
.
i
9
2
altered
by
releasing
the
check
nut
and
|
screwing
the
trip
bolt
(
11
)
in
or
out
of
the
i
reset
arm
(
8
)
.
^
"
'
•
2
*
When
an
undervoltage
device
is
fur
-
nished
check
the
clearance
between
the
f
?
*
'
.
trip
hammer
(
19
)
and
the
trip
plate
(
14
)
,
gy
with
the
undervoltage
coil
energized
.
This
clearance
should
be
1
/
32
"
to
1
/
16
"
and
can
be
altered
by
removing
the
connecting
pin
at
either
end
of
the
adjusting
rod
assembly
(
20
)
,
and
turning
the
clevis
at
that
end
.
&
3
BEFORE
MANUALLY
OPERATING
THE
CONTROL
DEVICE
,
MAKE
CERTAIN
THAT
ALL
CONTROL
POWER
TO
THE
BREAKER
HAS
BEEN
DISCONNECTED
.
MANUAL
OPERATION
OF
THE
CONTROL
DEVICE
WITH
CONTROL
POWER
CON
-
NECTED
WILL
ENERGIZE
THE
CLOSING
COIL
AND
PRODUCE
A
CLOSING
OPERA
-
TION
.
4
g
ry
*
:
cm
«
3
5
H
£
a
&
.
r
CUT
-
OFF
SWITCH
ADJUSTMENTS
(
AM
-
2.4
/
4.16
-
100
/
150
A
-
3
,
-
150
/
250
A
-
3
)
Refer
to
Fig
.
8
.
With
the
breaker
in
he
open
position
,
the
clearance
between
he
switch
plunger
and
the
adjusting
screw
is
obtained
by
pushing
the
switch
plunger
(
2
)
-
1
.
Cut
-
off
Switch
2
.
Switch
Plunger
3
.
Adjusting
Bolt
4
.
Washers
5
.
Lever
Ann
After
checking
all
the
mechanical
ad
-
justments
as
outlined
above
,
operate
the
devices
manually
to
make
certain
that
they
trip
and
reset
properly
.
Fig
.
8
Cut
-
off
Switch
Adjustments
6
Courtesy of NationalSwitchgear.com

rA
*
to
2
’
'
A
«
2
37
si
3
V
4
'
V
/
*
M
/
4
X
3
Magne
-
Blast
Circuit
Breaker
Type
AM
GEH
-
2000
2
3
!
'
>
1
1
.
Front
Disconnect
Stud
2
.
Plunger
Interlock
Bolt
3
.
Washers
4
.
Connecting
Rod
5
.
Reset
Plate
6
.
Reset
Roller
7
.
Main
Operating
Shaft
8
.
Reset
Arts
9
.
Trip
Plate
10
.
Spring
11
.
Trip
Bolt
12
.
Clevis
13
.
Elevating
Bar
14
.
Impact
Trip
Plate
15
.
Trip
Latch
16
.
Trip
Roller
17
.
Trip
Armature
18
.
Trip
Lever
19
.
Undervoltage
Trip
Hamer
20
.
Adjusting
Rod
21
.
Manual
Trip
Button
22
.
Trip
Setting
Plate
23
.
Undervoltege
Device
{
!
4
-
3
.
14
15
&
i
*
16
i
•
nTO
*
17
18
\
&
o
IS
!
C
HTO
;
C
.
0
20
10
m
i
o
11
-
o
c
2
2
12
-
23
X
X
13
=
f
S
as
to
i
at
Fig
.
9
Adjustments
On
Current
Trip
Device
and
Undervoltage
Trip
Device
,
Show
With
The
Breaker
In
The
Closed
Position
c
*
u
_
2
3
4
5
6
4
.
See
that
all
bearing
surfaces
of
the
mechanism
have
been
lubricated
.
Refer
to
the
section
on
LUBRICATION
.
5
.
Operate
the
breaker
slowly
with
the
maintenance
closing
device
and
note
that
there
is
no
excessive
binding
or
friction
and
that
the
breaker
can
be
moved
to
the
fully
opened
and
fully
closed
positions
.
6
.
See
that
any
place
where
the
surface
of
the
paint
has
been
damaged
during
installation
is
repainted
immediately
.
HI
-
POTENTIAL
TEST
If
the
breaker
had
been
stored
for
a
long
period
of
time
,
it
is
recommended
that
the
insulation
be
checked
before
the
breaker
is
placed
in
service
.
A
standard
60
cycle
high
potential
test
at
14
,
000
volts
RMS
will
normally
indicate
whether
the
breaker
is
satisfactory
for
service
.
With
the
breaker
contacts
in
the
fully
opened
position
,
apply
the
high
potential
to
each
terminal
of
the
breaker
individually
for
one
minute
with
all
other
terminals
and
the
breaker
frame
grounded
.
After
high
potential
tests
are
made
on
organic
insulating
materials
,
these
materials
should
be
inspected
for
visible
leakage
current
paths
,
and
necessary
action
must
be
taken
to
replace
insulation
that
may
have
been
affected
by
moisture
absorption
.
The
high
potential
test
is
also
recommended
for
breakers
which
have
been
removed
from
service
and
stored
over
an
extended
period
of
time
under
unfavorable
atmospheric
conditions
.
I
1
.
Front
Bushing
2
.
Fork
Lever
3
.
Locking
Bolts
4
.
Pin
5
.
Link
6
.
Rod
i
i
,
s
V
CO
I
\
f
OJ
n
i
If
f
8
f
\
<
£
>
O
ai
Fig
.
10
Auxiliary
Switch
Linkage
u
_
b
.
Arcing
contact
wipe
:
5
/
16
”
or
greater
(
gap
at
primary
contacts
)
.
c
.
Primary
contact
gap
:
3
-
13
/
16
+
1
/
8
"
-
3
/
16
"
.
d
.
Trip
latch
wipe
:
3
/
16
"
to
1
/
4
"
with
trip
latch
resting
against
stop
pin
.
1
/
16
"
±
1
/
32
"
.
1
/
16
"
k
.
Impact
trip
roller
wipe
:
1
/
8
"
t
1
/
32
"
.
l
.
Impact
trip
bolt
clearance
:
3
/
64
"
±
1
/
64
"
.
m
.
Undervoltage
trip
hammer
clear
-
1
/
64
"
.
n
.
Plunger
interlock
(
100
/
150
-
3
and
150
/
250
-
3
)
:
15
-
19
/
32
"
+
1
/
16
"
.
ance
:
3
/
64
"
+
e
.
Prop
clearance
:
f
.
Closing
plunger
clearance
:
to
3
/
16
”
.
g
.
Interlock
switch
wipe
:
1
/
16
"
min
.
o
.
Auxiliary
switch
linkage
(
100
/
150
A
-
3
and
150
/
250
A
-
3
)
:
12
-
9
/
32
"
.
2
.
Check
all
nuts
,
washers
,
bolts
,
cotter
pins
,
and
terminal
connections
for
tightness
.
h
.
Control
device
switch
overtravel
:
1
/
32
"
min
.
i
.
Cut
-
off
switch
overtravel
:
1
/
32
"
max
.
j
.
Latch
checking
switch
wipe
:
1
/
16
"
min
.
AUXILIARY
DEVICES
3
.
Inspect
all
wiring
to
make
sure
that
no
damage
has
resulted
during
in
-
stallation
,
and
test
for
possible
grounds
or
short
circuits
.
On
breakers
that
are
equipped
with
auxiliary
devices
such
as
a
current
trip
,
undervoltage
trip
or
capacitor
trip
,
the
device
should
be
checked
for
proper
7
•
i
Courtesy of NationalSwitchgear.com

GEH
-
2000
Magne
-
Blast
Circuit
Breaker
Type
AM
electrical
operation
.
The
current
trip
de
-
vice
should
trip
the
breaker
at
3
amperes
.
The
undervoltage
trip
device
should
trip
the
breaker
when
the
control
voltage
drops
below
30
to
60
%
of
rated
voltage
,
and
it
should
pick
up
at
80
%
of
the
control
volt
-
age
or
less
.
An
adjustment
plate
is
pro
-
vided
on
the
front
of
the
undervoltage
trip
device
as
an
aid
in
obtaining
the
desired
setting
.
NOTE
:
When
checking
the
pick
-
up
value
of
the
undervoltage
device
,
apply
a
voltage
equal
to
80
%
of
normal
control
voltage
to
the
undervoltage
device
coil
.
The
device
should
pick
up
at
this
value
.
Do
not
increase
the
voltage
gradually
on
this
coil
as
it
will
overheat
the
coil
,
producing
a
false
reading
,
,
and
may
damage
the
coil
if
excessive
over
-
heating
occurs
.
The
capacitor
trip
should
be
capable
of
tripping
the
breaker
as
late
as
25
seconds
after
the
control
voltage
is
removed
.
If
the
auxiliary
devices
do
not
perform
in
accordance
with
these
specifications
,
a
careful
examination
should
be
made
for
defective
parts
.
CONTROL
POWER
CHECK
After
the
breaker
has
been
closed
and
opened
slowly
several
times
with
the
maintenance
closing
device
,
and
the
mech
-
anism
adjustments
checked
as
described
above
,
the
operating
voltages
should
be
checked
at
the
closing
coil
and
trip
coil
terminals
.
For
electrical
operation
of
the
breaker
,
the
control
power
may
be
either
an
alternating
or
direct
current
source
.
The
operating
ranges
for
the
closing
and
tripping
voltages
are
given
on
the
breaker
nameplate
.
Ordinarily
,
standard
ranges
apply
which
are
as
follows
:
4
5
6
CM
8
8
oi
u
_
%
1
.
Shunting
and
Anti
-
Pusnp
Switch
*
2
.
Seal
-
in
Switch
*
*
3
.
Operating
Coil
4
.
Crank
5
.
Stationary
Contact
Assembly
6
.
Movable
Contact
Assembly
7
.
Arm
8
.
Arc
Chute
9
.
Trip
Lever
10
.
Plunger
Guide
Fig
.
II
Control
Device
CLOSING
RANGE
NOMINAL
VOLTAGE
TRIPPING
RANGE
125
V
.
d
-
C
250
V
.
d
-
c
230
V
.
a
-
c
90
-
130
V
.
d
-
c
180
-
260
V
.
d
-
c
190
-
250
V
.
a
-
c
70
-
140
V
.
d
-
c
140
-
280
V
.
d
-
c
190
-
250
V
.
a
-
c
CO
§
8
When
repetitive
operation
is
re
-
NOTE
:
quired
from
a
direct
current
source
,
the
closed
circuit
voltage
at
the
closing
coil
should
not
exceed
115
V
.
d
-
c
and
230
V
.
d
-
c
at
the
nominal
voltages
of
125
V
.
d
-
c
and
250
V
.
d
-
c
respectively
.
CO
9
i
10
CM
I
I
ca
For
a
-
c
operation
,
two
copper
-
oxide
rectifiers
,
mounted
elsewhere
in
the
metal
-
clad
unit
,
are
used
.
A
tapped
resistor
is
provided
in
each
rectifier
circuit
to
control
the
d
-
c
voltage
.
The
resistor
setting
should
be
adjusted
so
that
the
closed
circuit
volt
-
age
at
the
breaker
closing
coil
terminals
is
110
to
120
volts
d
-
c
.
Where
repetitive
operation
is
set
at
105
to
(
2
u
_
13
14
required
,
the
voltage
should
be
115
volts
d
-
c
.
/
V
/
/
A
Resistor
Setting
,
Ohms
*
a
-
c
Volts
(
Closed
Circuit
)
Winter
Summer
1
/
4
0
190
-
196
194
-
206
204
-
216
214
-
226
224
-
236
234
-
246
244
-
250
1
.
Main
Crank
2
.
Trip
Latch
3
.
Trip
Roller
4
.
Closing
Roller
5
.
Piston
Ring
6
.
Closing
Armature
7
.
Armature
Guide
Bolts
8
.
Spring
Retainer
9
.
Opening
Spring
,
Inner
10
-
Opening
Spring
,
Outer
11
.
Closing
Pin
12
.
Prop
13
.
Closing
Coil
14
.
Qosing
Plunger
Rod
1
/
2
0
1
/
4
1
/
2
1
/
4
3
/
4
1
/
2
1
1
-
1
/
4
1
-
1
/
4
3
/
4
1
*
a
-
c
Volts
as
measured
across
the
rec
-
tifier
and
a
-
c
series
resistor
.
Fig
.
12
Cross
Section
of
MS
-
13
Operating
Mechanism
in
the
Open
position
8
Courtesy of NationalSwitchgear.com

Magne
-
Blast
Circuit
Breaker
Type
AM
GEH
-
2000
The
a
guide
•
articular
combination
of
ambient
temper
-
ture
and
a
-
c
supply
voltage
.
Summer
set
-
tings
are
used
where
ambient
temperatures
are
normally
above
freezing
(
32
°
F
)
.
It
is
necessary
to
use
winter
settings
where
the
ambient
temperature
may
drop
to
20
°
F
or
less
at
any
time
,
explanation
of
copper
-
oxide
rectifiers
for
circuit
breaker
application
,
refer
to
In
-
struction
Book
GEI
-
11306
.
preceding
tabulation
is
included
as
for
adjusting
the
resistors
for
the
and
read
the
d
-
c
voltage
at
the
closing
coil
terminals
.
relay
to
de
-
energize
the
circuit
.
required
to
close
simultaneously
,
the
closed
circuit
voltage
at
the
closing
coil
of
each
breaker
must
fall
within
the
specified
limits
.
Release
the
closing
DO
NOT
MAINTAIN
VOLTAGE
ON
THE
CLOSING
COIL
ANY
LONGER
THAN
THE
FEW
SECONDS
REQUIRED
TO
READ
THE
VOLTMETER
.
These
coils
are
designed
for
intermittent
operation
and
will
be
damaged
by
prolonged
current
flow
.
Electrical
closing
or
opening
is
ac
-
complished
by
merely
energizing
the
closing
or
trip
coil
circuit
.
Control
switches
are
provided
for
this
purpose
on
the
metal
-
clad
unit
.
It
is
also
possible
to
trip
the
breaker
manually
by
pressing
the
manual
trip
button
(
6
)
,
Fig
.
1
.
For
a
more
detailed
If
the
closed
circuit
voltage
at
the
ter
-
minals
of
the
closing
coil
does
not
fall
in
the
specified
range
,
proceed
as
follows
:
To
check
the
d
-
c
voltage
at
the
closing
coil
terminals
,
proceed
as
follows
:
When
all
the
foregoing
inspection
de
-
tails
have
been
checked
,
the
breaker
may
be
safely
placed
in
service
.
Before
the
breaker
is
finally
raised
into
position
in
the
metal
-
clad
unit
,
rub
a
small
amount
of
G
.
E
.
Contact
Lubricant
D
50
H
28
on
the
silvered
portion
of
the
breaker
studs
to
form
a
thin
coating
for
contacting
purposes
.
1
.
a
-
c
control
power
source
-
Decrease
the
series
resistance
to
increase
the
d
-
c
voltage
,
or
increase
the
series
re
-
sistance
to
decrease
the
d
-
c
voltage
.
Recheck
voltage
at
the
closing
coil
.
2
.
d
-
c
control
power
source
-
Check
volt
-
age
at
the
source
of
power
and
line
drop
between
the
power
source
and
breaker
.
1
.
Mechanism
with
a
control
device
,
Fig
.
Close
the
breaker
by
manually
operating
the
control
device
.
Hold
the
contacts
in
the
closed
position
and
read
the
d
-
c
voltage
at
the
closing
coil
ter
-
minals
.
release
the
control
device
.
11
.
To
de
-
energize
the
circuit
,
NOTE
:
This
breaker
mechanism
com
-
bination
is
designed
only
for
electrical
closing
when
in
use
.
NEVER
ATTEMPT
MANUAL
CLOSING
WITH
THE
BREAKER
IN
SERVICE
,
for
under
such
conditions
,
sufficient
closing
force
and
speed
cannot
be
applied
.
2
.
Mechanism
with
cut
-
off
switch
,
Fig
.
8
.
Close
the
breaker
by
manually
oper
-
ating
the
control
relay
located
in
the
metal
-
clad
unit
.
Hold
the
relay
closed
When
two
or
more
breakers
,
operating
from
the
same
control
power
source
,
are
OPERATION
CLOSING
OPERATION
the
trip
coil
,
the
trip
plunger
rotates
the
trip
latch
(
2
)
,
Fig
.
12
,
causing
the
oper
-
ating
mechanism
linkage
to
collapse
.
The
energy
stored
in
the
opening
springs
(
9
and
10
)
is
thus
released
,
opening
the
breaker
.
During
this
operation
,
the
trip
coil
circuit
is
de
-
energized
,
and
upon
completion
of
the
opening
operation
,
the
operating
mechan
-
ism
is
returned
to
its
normal
position
,
ready
for
closing
.
allowing
the
armature
to
return
by
gravity
to
its
original
position
.
The
control
device
plunger
also
mechanically
trips
the
seal
-
in
switch
,
de
-
energizing
the
control
device
coil
if
the
closing
control
switch
is
not
closed
.
If
the
closing
control
switch
is
held
in
the
closed
position
throughout
and
after
the
breaker
closing
operation
,
the
control
de
-
vice
linkage
will
remain
picked
up
and
be
unable
to
reset
to
prepare
for
another
breaker
closing
operation
.
This
arrange
-
ment
insures
that
"
pumping
"
of
the
breaker
will
not
occur
during
a
trip
-
free
oper
-
ation
.
The
closing
operation
of
the
breaker
is
primarily
controlled
by
the
control
device
,
Fig
.
11
,
mounted
on
the
operating
chanism
.
The
closing
sequence
is
in
-
ated
from
a
control
switch
mounted
on
the
door
of
the
metal
-
clad
unit
or
at
a
.
re
-
mote
operating
station
.
Operation
of
the
closing
control
switch
energizes
the
pick
-
up
coil
of
the
control
device
.
As
the
control
device
closes
,
seal
-
in
contacts
shunt
the
closing
control
switch
to
allow
the
opening
of
the
closing
control
switch
contacts
without
affecting
the
overall
closing
operation
.
This
type
of
arrangement
assures
complete
clos
-
ing
of
the
breaker
with
only
momentary
contact
of
the
closing
control
switch
.
As
the
breaker
opens
,
the
main
con
-
tacts
part
first
,
shunting
the
current
through
the
arcing
contacts
.
An
arc
forms
as
the
arcing
contacts
part
.
See
Fig
.
13
.
As
the
movable
arcing
contact
(
27
)
is
withdrawn
through
the
slot
in
the
arc
runner
,
the
upper
end
of
the
arc
is
transferred
to
the
upper
arc
runner
(
4
)
.
To
assist
the
interruption
at
this
point
,
a
stream
of
air
is
emitted
from
the
booster
tube
(
28
)
and
forces
the
arc
onto
the
lower
arc
runner
(
10
)
.
Estab
-
lishment
of
the
arc
on
the
runners
auto
-
matically
inserts
the
blowout
coils
into
the
circuit
,
introducing
a
magnetic
field
between
the
pole
pieces
which
tends
to
draw
the
arc
away
from
the
arcing
contacts
.
The
250
MVA
interrupter
contains
one
upper
mag
-
netic
blowout
coil
and
one
lower
blowout
coil
,
each
individually
connected
in
series
with
its
respective
arc
runner
.
The
arc
is
forced
outward
along
the
diverging
arc
runners
by
the
magnetic
field
.
The
operating
sequence
for
breakers
designed
for
MI
-
6
metal
-
clad
equipment
is
similar
to
that
described
above
except
that
a
relay
mounted
elsewhere
in
the
metal
-
clad
unit
replaces
the
control
device
.
Also
,
a
cut
-
off
switch
(
Fig
.
8
)
is
used
to
replace
the
mechanical
trip
arrange
-
ment
of
the
control
device
.
The
cut
-
off
switch
energizes
an
auxiliary
relay
to
de
-
energize
the
main
relay
.
The
closing
speed
of
the
arcing
contact
should
be
7
to
10
feet
per
second
for
the
100
/
150
MVA
breakers
and
9
to
12
feet
per
second
for
the
150
/
250
MVA
breakers
with
rated
closed
circuit
voltage
at
the
closing
coil
terminals
,
the
average
speed
of
the
movable
arcing
contact
from
a
point
1
"
before
the
tip
is
tangent
to
the
lower
surface
of
the
upper
arc
runner
to
the
tangent
position
.
those
Operation
of
the
control
device
ener
-
gizes
the
breaker
closing
coil
by
closing
the
main
control
device
contacts
(
5
and
6
)
,
Fig
.
11
.
Once
the
control
device
contacts
are
picked
up
,
they
are
electrically
held
in
the
closed
position
until
the
breaker
closing
operation
is
completed
.
Energizing
the
breaker
closing
coil
raises
the
armature
(
6
)
,
Fig
.
12
which
in
turn
lifts
the
closing
roller
(
4
)
through
plunger
(
14
)
.
is
transmitted
through
the
mechanism
link
-
age
and
rotates
the
main
crank
(
1
)
,
closing
the
breaker
contacts
.
As
the
armature
reaches
the
end
of
its
travel
,
the
prop
(
12
)
rotates
beneath
the
pin
(
11
)
latching
the
breaker
in
the
closed
position
.
During
the
operation
,
the
opening
springs
(
9
are
compressed
in
readiness
for
an
This
motion
These
speeds
represent
closing
and
10
)
opening
operation
.
Air
trapped
above
the
armature
acts
as
a
dashpot
to
absorb
the
energy
of
the
mechanism
as
it
approaches
the
end
of
its
stroke
.
At
the
same
time
,
the
arc
is
being
forced
into
the
arc
chute
(
8
)
which
is
com
-
posed
of
a
series
of
gradually
interleaving
insulating
fins
.
These
fins
,
which
project
alternately
from
the
two
opposite
inner
surfaces
of
the
chute
,
elongate
the
arc
into
a
gradually
deepening
serpentine
path
,
so
that
the
electrical
resistance
in
the
paUi
of
the
arc
is
rapidly
increased
and
the
heat
from
the
arc
is
absorbed
.
The
increased
resistance
reduces
both
the
magnitude
and
OPENING
OPERATION
An
electrical
opening
operation
is
in
-
itiated
by
energizing
the
trip
coil
.
This
is
accomplished
either
by
actuating
the
opening
control
switch
on
the
metal
-
clad
unit
or
by
a
combination
of
relays
and
cur
-
rent
devices
used
to
detect
a
fault
on
the
load
side
of
the
breaker
.
By
energizing
Slightly
before
tlje
mechanism
latches
,
control
device
plunger
(
5
)
,
Fig
.
23
,
lanically
trips
the
main
control
device
.
acts
,
de
-
energizing
the
closing
coil
and
9
i
i
i
t
Courtesy of NationalSwitchgear.com

t
%
GEH
-
2000
Magne
-
Blast
Circuit
Breaker
Type
AM
14
15
16
I
—
17
$
2
-
<
0
O
3
18
CM
5
19
CO
©
1
u
.
-
20
4
21
5
-
2 2
6
23
24
8
25
26
—
27
9
28
29
10
L
.
+
.
W
II
\
I
30
12
I
\
I
I
x
I
rw
]
I
13
I
J
-
f
\
o
/
Operating
Rod
Stationary
Primary
Contacts
Movable
Primary
Contacts
Cup
Bearing
Yoke
Movable
Contact
Arm
Assembly
Movable
Arcing
Contact
Booster
Tube
Connection
Bar
Booster
Cylinder
and
Piston
21
.
11
.
Blow
-
out
Coil
12
.
Blow
-
out
Core
13
.
Muffler
14
.
Front
Bushings
15
.
Rear
Bushings
16
-
Frame
17
.
Operating
Crank
18
.
Upper
Horizontal
Barrier
19
.
Spring
Retainer
20
.
Lower
Horizontal
Barrier
Box
Barrier
Handle
Blow
-
out
Core
Blow
-
out
Coil
Arc
Runner
Pole
Piece
Stationary
Arcing
Contact
Box
Barrier
Arc
Chute
Pole
Piece
Arc
Runner
1
.
22
.
2
.
23
.
3
.
24
.
4
.
25
.
S
.
26
.
6
.
27
.
7
.
28
.
8
.
29
.
9
.
30
.
10
.
Fig
.
13
Cross
Section
Of
Breaker
Pole
Unit
10
Courtesy of NationalSwitchgear.com

Magne
-
Blast
Circuit
Breaker
Type
AM
GEH
-
2000
the
phase
angle
of
the
current
,
early
current
zero
the
arc
path
and
the
gases
produced
by
the
arc
so
cooled
that
the
arc
cannot
re
-
establish
itself
,
and
interruption
occurs
.
TRIP
FREE
OPERATION
and
at
an
is
so
long
cedure
except
that
instead
,
of
energizing
the
trip
circuit
,
the
manual
trip
(
6
)
,
Fig
.
1
,
is
used
.
c
If
the
trip
coil
circuit
is
energized
while
the
breaker
is
closing
,
the
trip
plunger
will
force
the
trip
latch
(
2
)
,
Fig
.
12
,
away
from
the
trip
roller
(
3
)
causing
the
mecha
-
nism
linkage
to
collapse
and
the
breaker
to
re
-
open
.
The
closing
armature
(
6
)
com
-
pletes
its
closing
stroke
,
but
the
closing
coil
is
de
-
energized
at
the
end
of
the
stroke
,
and
the
armature
is
returned
to
its
original
position
by
gravity
.
The
opening
speed
of
the
arcing
con
-
tact
should
be
12
to
18
feet
per
second
at
rated
control
voltage
.
This
speed
repre
-
sents
the
average
speed
over
3
”
from
the
point
when
the
tip
on
the
movable
arcing
contact
is
tangent
to
the
lower
surface
of
the
upper
runner
.
The
150
MVA
interrupter
Is
essentially
the
same
as
the
250
MVA
interrupter
except
that
it
utilizes
the
magnetic
elements
in
the
upper
runner
only
.
Manual
tripping
follows
the
same
pro
-
MAINTENANCE
Dependable
service
and
safer
power
equipment
are
contingent
upon
the
unfailing
performance
of
the
power
circuit
breaker
.
To
maintain
such
service
,
it
is
recommend
-
ed
that
a
definite
inspection
and
main
-
tenance
schedule
be
set
up
and
followed
,
as
serious
shutdowns
can
often
be
avoided
by
locating
potential
sources
of
trouble
in
an
early
stage
.
A
periodic
lubrication
of
parts
subject
to
wear
is
also
vitally
im
-
portant
for
the
successful
operation
of
the
breaker
.
3
.
BUSHINGS
AND
INSULATION
The
surface
of
the
Self
-
X
bushings
should
be
kept
clean
and
unmarred
to
prevent
moisture
absorption
.
If
the
insulation
sur
-
face
should
become
damaged
,
it
should
be
sanded
and
cleaned
,
and
should
be
refinished
with
either
clear
varnish
(
GE
-
1170
)
or
clear
*
Glyptal
resin
(
GE
-
1202
)
.
Allow
to
dry
smooth
and
hard
.
All
other
insulation
parts
on
the
breaker
should
be
kept
clean
and
dry
.
Smoke
or
dust
collected
between
inspection
periods
should
be
wiped
off
,
and
if
dampness
is
apparent
,
heaters
should
be
installed
to
insure
dryness
.
If
the
arc
chute
has
suffered
any
mechanical
injury
due
to
dropping
or
accidental
striking
,
resulting
in
the
actual
breaking
off
of
fins
,
replace
-
ment
of
the
chute
will
be
necessary
.
BREAKER
CONTACTS
By
removing
the
box
barrier
the
mov
-
able
and
stationary
primary
contacts
and
the
movable
arcing
contacts
can
be
in
-
spected
.
The
stationary
arcing
contacts
can
be
inspected
only
after
removing
the
arc
chute
assembly
,
as
explained
under
REPAIR
AND
REPLACEMENT
.
If
the
con
-
tacts
are
burned
or
pitted
,
they
should
be
made
smooth
with
a
fine
file
.
After
completing
inspection
of
the
con
-
tacts
,
check
the
contact
adjustments
as
specified
under
INSTALLATION
,
ADJUST
-
MENTS
.
BEFORE
ANY
MAINTENANCE
WORK
IS
PERFORMED
,
MAKE
CERTAIN
THAT
ALL
CONTROL
CIRCUITS
ARE
OPENED
AND
THAT
THE
BREAKER
IS
REMOVED
FROM
THE
METAL
-
CLAD
UNIT
.
DO
NOT
WORK
ON
THE
BREAKER
OR
MECHA
-
NISM
WHILE
IN
THE
CLOSED
POSITION
UNLESS
THE
PROP
AND
TRIP
LATCH
HAVE
BLOCKED
TO
PREVENT
ACCIDENTAL
TRIPPING
.
LUBRICATION
In
order
to
maintain
reliable
operation
it
is
important
that
all
circuit
breakers
be
properly
lubricated
at
all
times
.
During
assembly
at
the
factory
,
all
bearing
sur
-
faces
,
machined
surfaces
,
and
all
other
parts
of
the
breaker
and
mechanism
subject
to
wear
have
been
properly
lubricated
using
the
finest
grade
of
lubricants
avail
-
able
.
However
,
even
the
finest
oils
and
greases
have
a
tendency
to
oxidize
with
age
,
as
evidenced
by
hardening
and
darken
-
ing
in
color
.
Elimination
of
the
hardened
lubricant
is
essential
for
the
proper
opera
-
tion
of
circuit
breakers
.
Also
frequent
operation
of
the
breaker
causes
the
lubri
-
cant
to
be
forced
out
from
between
the
bearing
surfaces
.
A
simple
lubrication
will
often
clear
up
minor
disturbances
which
might
be
mistakenfor
more
serious
trouble
.
BEEN
SECURELY
WIRED
OR
MECHANISM
PERIODIC
INSPECTION
The
frequency
of
periodic
inspection
should
be
determined
by
each
operating
company
on
the
basis
of
the
number
of
operations
(
including
switching
)
,
the
magni
-
tude
of
currents
interrupted
,
and
any
un
-
usual
operations
which
occur
from
time
to
time
.
Operating
experience
will
soon
establish
a
maintenance
schedule
which
will
give
assurance
of
proper
breaker
con
-
dition
.
tion
of
fault
duty
and
repetitive
operation
is
encountered
,
an
inspection
is
recom
-
mended
after
any
severe
fault
operation
.
The
following
instructions
list
the
main
points
to
be
included
in
an
inspection
,
and
a
number
of
general
recommendations
.
ARC
CHUTES
It
is
not
necessary
to
inspect
the
arc
chutes
unless
there
is
evidence
of
damage
or
if
the
arc
chutes
are
removed
for
any
reason
.
When
inspecting
an
arc
chute
,
it
should
be
disassembled
and
the
following
points
noted
:
Scale
formed
over
the
surface
of
the
arc
chute
must
not
be
removed
,
but
loose
particles
collected
in
the
chute
should
be
blown
out
.
2
.
Cracks
which
have
formed
in
the
fins
of
the
arc
chute
are
to
be
expected
in
ceramic
materials
of
this
type
when
subjected
to
the
severe
heat
of
an
arc
.
These
cracks
do
not
interfere
with
the
operation
of
the
device
in
any
way
and
should
be
disregarded
.
A
careful
inspection
should
be
made
to
check
for
loose
nuts
or
bolts
and
broken
retaining
rings
.
All
cam
,
roller
,
and
latch
surfaces
should
be
inspected
for
any
evidence
of
damage
or
excessive
wear
.
Lubricate
the
mechanism
as
outlined
below
,
then
,
using
the
maintenance
operating
de
-
vice
,
open
and
close
the
breaker
several
times
to
make
certain
that
the
mechanism
operates
freely
throughout
its
entire
stroke
.
Check
the
mechanism
adjustments
as
speci
-
fied
under
INSTALLATION
,
ADJUST
-
MENTS
.
Check
all
terminal
connections
.
On
installations
where
a
combina
-
Alternative
Lubrication
(
Requires
Disassembly
)
Lubrication
at
Maintenance
Period
Part
Ground
surfaces
such
as
cams
,
rollers
,
latches
,
etc
.
Sleeve
Bearings
(
Mechanism
and
Breaker
linkage
)
Wipe
clean
and
apply
D
50
H
15
.
Wipe
clean
and
apply
D
50
H
15
.
Very
light
application
of
light
machine
oil
SAE
-
20
or
-
30
.
Remove
pins
and
links
and
clean
as
per
the
following
cleaning
instructions
.
Apply
D
50
H
15
liberally
.
Clean
as
per
the
following
cleaning
instructions
and
repack
with
D
50
H
15
.
Wipe
clean
and
apply
D
50
H
28
.
Removable
Seal
and
Open
Type
Ball
,
Roller
and
Needle
Bearings
Silver
Plated
Contacts
and
Primary
Disconnect
Studs
.
Light
application
of
light
machine
oil
SAE
-
20
or
-
30
.
1
.
Wipe
clean
and
apply
D
50
H
28
.
Wipe
clean
and
apply
D
50
H
15
.
(
No
lubrication
is
required
on
the
loose
rings
between
bush
-
ing
and
contact
arm
)
.
Cup
Bearing
No
lubrication
re
-
quired
.
Fig
.
14
Lubrication
Chart
11
Reg
.
Trade
-
Mark
of
General
Electric
Co
.
Courtesy of NationalSwitchgear.com

GEH
-
2000
Magne
-
BIast
Circuit
Breaker
Type
AM
If
it
is
desirable
to
leave
the
5
.
Damaged
control
device
coil
.
REMEDY
:
Replace
damaged
coil
.
6
.
Damaged
closing
coil
.
REMEDY
:
Replace
damaged
coil
.
Esso
Anti
-
7
.
Defective
cut
-
off
switch
,
latch
-
check
-
ing
switch
,
or
interlock
switch
.
REMEDY
:
Replace
defective
switch
.
8
.
Blown
fuse
in
closing
circuit
.
REMEDY
:
Replace
blown
fuse
after
determining
cause
of
failure
.
9
.
Faulty
connections
in
closing
circuit
.
REMEDY
:
Repair
broken
or
loose
wires
and
see
that
all
binding
screws
are
tight
.
10
.
Insufficient
control
voltage
caused
by
excessive
drop
in
leads
.
REMEDY
:
Install
larger
wires
and
improve
electrical
contact
at
connec
-
tions
.
A
definite
lubrication
schedule
should
be
set
up
taking
into
consideration
the
fre
-
quency
of
operation
of
the
breaker
and
local
conditions
.
Until
such
a
schedule
is
worked
out
,
the
breaker
should
be
lubricated
at
each
periodic
inspection
and
also
whenever
it
is
overhauled
,
in
accordance
with
the
lubrication
chart
,
Fig
.
14
.
It
is
also
recom
-
mended
that
all
circuit
breakers
be
operated
!
at
regular
intervals
to
insure
the
user
that
the
equipment
is
operating
freely
.
The
lubrication
chart
(
Fig
.
14
)
is
divided
into
two
methods
of
lubrication
.
The
first
method
outlines
the
maintenance
lubrication
which
should
be
performed
at
the
time
of
periodic
maintenance
,
and
re
-
quires
no
disassembly
.
The
second
method
outlines
a
lubrication
procedure
similar
to
that
performed
on
the
breaker
at
the
factory
,
but
should
be
used
only
in
case
of
a
general
overhaul
or
disassembly
for
other
reasons
,
or
if
the
operation
of
the
breaker
becomes
slower
.
hours
.
bearings
in
the
alcohol
for
a
longer
time
,
an
inhibited
alcohol
such
as
is
used
for
anti
-
freeze
should
be
used
.
Even
then
the
bearings
should
be
removed
from
the
alcohol
within
twenty
-
four
hours
.
Freeze
and
Du
Pont
Zerone
are
satis
-
factory
for
this
purpose
,
against
the
toxic
effects
of
the
alcohol
must
be
exercised
by
wearing
rubber
gloves
and
by
using
the
alcohol
in
a
well
ventilated
room
;
excessive
exposure
to
the
fumes
is
sometimes
unpleasant
to
personnel
.
Wash
-
ing
the
bearings
in
light
oil
and
draining
should
follow
immediately
then
apply
the
lubricant
.
-
J
Precautions
TROUBLE
SHOOTING
Failure
of
a
breaker
to
operate
properly
will
generally
fall
within
three
general
classes
:
Failure
to
trip
,
failure
to
close
or
latch
closed
,
and
overheating
,
following
is
a
brief
outline
showing
parti
-
cular
types
of
distress
that
might
be
en
-
countered
,
together
with
suggestions
for
remedying
the
trouble
:
FAILURE
TO
TRIP
The
11
.
Insufficient
control
voltage
caused
by
poor
regulation
(
a
-
c
control
)
.
REMEDY
:
Install
larger
control
transformer
.
Check
rectifier
to
be
sure
it
is
delivering
adequate
d
-
c
supply
.
Mechanism
binding
or
sticking
caused
OVERHEATING
by
lack
of
lubrication
.
REMEDY
:
Lubricate
complete
mecha
-
1
.
nism
.
General
Electric
Lubricant
D
50
H
15
and
D
50
H
28
are
available
in
1
/
4
#
collapsible
tubes
.
It
is
so
packaged
to
insure
cleanliness
and
to
prevent
oxidation
.
METHOD
OF
CLEANING
BEARINGS
1
.
Wherever
cleaning
is
required
,
as
in
-
dicated
in
the
lubrication
chart
,
the
follow
-
ing
procedures
are
recommended
:
Sleeve
Bearings
Poor
condition
of
contacts
due
to
lack
of
attention
after
severe
duty
or
too
frequent
operation
.
REMEDY
:
burned
and
pitted
contacts
.
(
Contacts
should
be
reconditioned
very
carefully
and
only
when
absolutely
necessary
)
.
Contacts
not
properly
aligned
or
ad
-
justed
.
REMEDY
:
Check
all
adjustments
in
accordance
with
INSTALLATION
,
AD
-
JUSTMENTS
.
2
.
Mechanism
binding
or
sticking
caused
by
being
out
of
adjustment
.
REMEDY
:
Check
all
mechanism
ad
-
justments
,
latches
,
stops
,
auxiliary
devices
,
etc
.
,
in
accordance
with
IN
-
STALLATION
,
ADJUSTMENTS
.
Ex
-
*
2
.
amine
latch
and
roller
surfaces
for
corrosion
.
Recondition
or
replace
The
pins
should
be
removed
and
all
old
oxidized
grease
removed
by
immersion
in
clean
petroleum
solvent
or
similar
cleaner
.
DO
NOT
USE
CARBON
-
TETRACHLORIDE
.
Wipe
the
bearing
clean
.
Apply
a
small
amount
of
G
.
E
.
Lubricant
D
50
H
15
to
the
entire
surface
of
the
bearing
and
pin
just
before
reassembling
.
3
.
Damaged
trip
coil
.
REMEDY
:
Replace
damaged
coil
.
Blown
fuse
in
trip
circuit
.
REMEDY
:
Replace
blown
fuse
after
determining
cause
of
failure
.
Faulty
connections
in
trip
circuit
.
REMEDY
:
Repair
broken
or
loose
4
.
wires
and
see
that
all
binding
screws
are
tight
.
Damaged
or
dirty
contacts
in
trip
circuit
.
REMEDY
:
Recondition
or
replace
con
-
tacts
.
3
.
Breaker
kept
closed
or
open
for
too
long
a
period
.
REMEDY
:
Operate
breaker
more
often
to
wipe
contacts
clean
.
Replace
con
-
tacts
if
necessary
.
Overloading
.
REMEDY
:
Replace
breaker
with
one
of
adequate
rating
for
present
or
future
load
,
or
re
-
arrange
circuits
so
as
to
remove
excess
load
.
4
.
Removable
Seal
and
Open
Type
Ball
,
Roller
and
Needle
Bearings
The
bearings
should
be
first
removed
from
the
mechanism
and
disassembled
by
the
removal
of
the
seals
or
inner
race
in
the
case
of
needle
bearings
.
They
should
then
be
placed
in
a
container
of
clean
petroleum
solvent
or
similar
cleaner
.
DO
NOT
USE
CARBON
-
TETRACHLORIDE
.
If
the
grease
in
the
bearings
has
become
badly
oxidized
it
may
be
necessary
to
use
alcohol
(
type
used
for
thinning
shellac
)
to
remove
it
.
Ordinarily
,
by
agitating
the
bearings
in
the
cleaning
solution
,
and
using
a
stiff
brush
to
remove
the
solid
particles
,
the
bearings
can
be
satisfactorily
cleaned
.
Do
not
handle
the
bearings
with
bare
hands
as
deposits
from
the
skin
onto
the
bearings
are
inducive
to
corrosion
.
If
the
bearings
are
touched
,
the
contamination
can
be
re
-
moved
by
washing
in
alcohol
.
After
the
bearings
have
been
thoroughly
cleaned
,
spin
them
in
clean
new
light
machine
oil
until
the
cleaner
or
solvent
is
entirely
removed
.
Allow
this
oil
to
drain
off
and
then
repack
them
immediately
with
G
.
E
.
Lubricant
D
50
H
15
being
sure
all
metal
parts
are
greased
.
The
removable
seals
should
then
be
replaced
.
5
.
6
.
5
.
Primary
connections
of
inadequate
ca
-
pacity
.
REMEDY
:
Increase
size
or
number
of
conductors
or
remove
excess
current
.
FAILURE
TO
CLOSE
OR
LATCH
CLOSED
1
.
Mechanism
binding
or
sticking
caused
g
by
lack
of
lubrication
.
REMEDY
:
Lubricate
complete
mecha
-
nism
.
2
.
Mechanism
binding
or
sticking
caused
7
.
by
being
out
of
adjustment
.
REMEDY
:
Check
all
mechanism
ad
-
justments
,
latches
,
stops
,
auxiliary
devices
,
etc
.
,
in
accordance
with
IN
-
STALLATION
,
ADJUSTMENTS
.
Ex
-
amine
latch
and
roller
surfaces
for
corrosion
.
Control
device
sticking
or
not
oper
-
ating
properly
.
REMEDY
:
Check
and
adjust
control
device
,
or
replace
.
4
.
Damaged
or
dirty
contacts
in
control
circuit
,
including
control
device
.
REMEDY
:
Recondition
or
replace
con
-
tacts
.
Loose
connections
or
terminal
con
-
nections
.
REMEDY
:
Tighten
.
Ambient
temperature
too
high
.
REMEDY
:
Relocate
in
a
cooler
place
,
or
arrange
some
means
of
cooling
.
REPAIR
AND
REPLACEMENT
The
following
information
covers
in
detail
the
proper
method
of
removing
vari
-
ous
parts
of
the
breaker
in
order
to
make
*
any
necessary
repairs
.
This
section
in
-
cludes
only
those
repairs
that
can
be
made
at
the
installation
on
parts
of
the
breaker
that
are
most
subject
to
damage
or
wear
.
IMPORTANT
:
UPON
COMPLETION
OF
ANY
REPAIR
WORK
,
ALL
BREAKER
AND
MECHANISM
ADJUSTMENTS
MUST
BE
3
.
If
it
becomes
necessary
to
clean
the
bearings
in
alcohol
(
shellac
thinner
)
be
sure
the
alcohol
is
perfectly
:
lean
,
and
do
not
allow
the
bearings
to
remain
in
the
alcohol
more
than
a
few
NOTE
:
12
Courtesy of NationalSwitchgear.com

(
8
wO
*
u
.
t
3
.
13
3
1
.
Sear
Eushing
2
.
Supporting
Bolt
3
.
Upper
Mounting
Support
4
.
Stationary
Arcing
Contact
Assenbiy
5
.
Movable
Arcing
Contact
6
.
Assembly
Eolts
7
.
Brace
for
Arc
Chute
8
.
Arc
Chute
Mounting
Bracket
9
.
Lower
Supporting
Bolt
10
.
Lower
Mounting
Support
Fig
.
15
Arc
Chute
Partially
Removed
Shov
-
ing
Accessibility
of
Arcing
Contacts
14
to
/
/
.
7
1
u
_
15
ts
&
.
16
8
9
.
Asscshly
Balt
10
.
Upper
Counting
Support
11
.
Assembly
Bolt
and
Molded
Cap
12
.
Side
Shield
13
.
Asscssbly
Bolt
14
.
Lower
Mounting
Support
15
.
Assembly
Bolts
16
.
Assembly
Bolts
1
.
Assembly
Bolts
end
folded
Caps
2
.
Assembly
Bolts
3
.
Upper
Pole
Piece
4
.
Assembly
Bolt
5
.
Side
Brace
6
.
Lower
Pole
Piece
7
.
Assembly
Bolt
8
.
Lower
Brace
*
Refer
to
the
section
on
IN
-
CHECKED
.
STALLATION
,
paying
particular
attention
to
ADJUSTMENTS
and
FINAL
INSPECTION
.
ARC
CHUTE
Fig
.
16
Arc
Chute
Assembly
Complete
To
remove
an
arc
chute
,
first
open
the
breaker
and
remove
the
box
barrier
(
7
)
,
Fig
.
13
.
Loosen
the
two
upper
supporting
bolts
(
2
)
,
Fig
.
15
,
and
the
one
lower
sup
-
porting
bolt
(
9
)
using
a
3
/
4
"
wrench
.
By
raising
the
complete
arc
chute
assembly
about
3
/
8
"
and
sliding
it
toward
the
rear
of
the
breaker
it
can
be
removed
as
shown
in
Fig
.
15
.
To
disassemble
the
arc
chute
after
it
has
been
removed
from
the
breaker
,
pro
-
ceed
as
follows
:
1
.
Remove
the
assembly
bolts
(
7
,
9
,
11
and
13
)
,
Fig
.
16
.
2
.
Remove
the
side
brace
and
pole
piece
assembly
(
5
)
,
Fig
.
16
.
3
.
To
remove
the
upper
mounting
support
(
10
)
,
Fie
.
16
,
remove
the
assembly
bolts
(
1
)
and
connection
screw
(
2
)
,
Fig
.
18
.
4
.
Remove
the
assembly
bolts
(
16
)
,
Fie
.
16
to
remove
the
lower
brace
(
8
;
.
5
.
Remove
the
lower
mounting
support
(
14
)
,
Fig
.
16
,
by
removing
the
assembly
bolts
(
15
)
and
the
connection
nut
(
9
)
,
Fig
.
18
.
6
.
At
this
point
the
fiber
side
shields
(
6
)
,
Fig
.
18
,
the
upper
arc
runner
assembly
(
4
)
and
lower
arc
runner
assembly
(
7
)
can
be
removed
.
7
.
Further
disassembly
of
both
the
upper
and
lower
arc
runner
assemblies
can
be
done
by
removing
the
various
screws
and
1
/
4
"
assembly
bolts
(
not
illustrated
)
as
shown
in
Fig
.
17
.
8
.
The
arc
chute
sides
(
6
)
,
Fig
.
17
,
can
be
separated
by
removal
of
assembly
bolts
(
2
and
4
)
,
Fig
.
16
.
Reassemble
the
arc
chute
in
the
reverse
order
.
The
following
items
should
be
noted
during
reassembly
:
1
.
Equally
space
the
fins
of
the
arc
chute
sides
before
bolting
together
.
2
.
Check
to
insure
that
electrical
connec
-
tions
to
the
blowout
coils
are
tight
.
3
.
When
reassembling
the
arc
runner
as
-
semblies
,
check
that
the
spacers
(
1
and
13
)
,
Fig
.
17
,
are
correctly
installed
.
4
.
Before
bolting
the
upper
mounting
sup
-
port
in
place
,
make
certain
that
the
upper
arc
runner
assembly
is
tight
against
the
arc
chute
side
so
that
the
gap
between
the
upper
insulation
(
7
)
,
Fig
.
17
,
and
the
arc
chute
side
(
6
)
is
a
minimum
.
5
.
Make
certain
that
the
electrical
con
-
nections
(
2
and
9
)
,
Fig
.
18
,
are
tight
.
To
reassemble
the
arc
chute
to
the
breaker
,
proceed
as
follows
:
1
.
Rest
the
lower
mounting
support
(
10
)
on
the
arc
chute
mounting
bracket
(
8
)
as
shown
in
Fig
.
15
.
2
.
Slide
the
arc
chute
forward
and
lift
it
slightly
to
engage
the
supporting
bolts
(
2
)
,
Fig
.
15
,
in
the
slots
of
the
upper
mounting
support
(
3
)
.
3
.
Tighten
the
supporting
bolts
(
2
and
9
)
,
Fig
.
15
.
the
electrical
and
mechanical
connec
-
tions
between
the
bushing
and
the
arc
runners
.
4
.
Check
that
the
movable
arcing
contact
(
5
)
,
Fig
.
3
,
passes
through
the
slot
in
the
upper
arc
runner
(
6
)
without
touch
-
These
bolts
serve
as
both
ing
.
13
Courtesy of NationalSwitchgear.com

GEH
-
2000
Magne
-
Blast
Circuit
Breaker
Type
AM
8
r
*
.
8
o
ac
I
"
*
CJ
u
.
to
cs
r
-
8
§
00
1
.
Upper
Arc
Runner
Spacers
2
.
Upper
Arc
Runner
Assembly
3
.
Blowout
Core
4
.
Blo
’
cout
Coil
5
.
Insulation
6
.
Upper
Arc
Runner
7
.
Arc
Chute
Side
8
.
Upper
Insulation
9
.
Lower
Arc
Runner
10
.
Blowout
Coil
11
.
Blowout
Core
12
.
Lower
Arc
Runner
Assembly
13
.
Lower
Coil
Connection
14
.
Lower
Arc
Runner
Spacers
CP
.
U
-
1
.
Upper
Mounting
Support
2
.
Connection
Bolt
3
.
Upper
Elo
-
sout
Coil
4
.
Upper
Arc
Runner
Assembly
5
.
Upper
Arc
Runner
6
.
Side
Shield
7
.
Lower
Arc
Runner
Assembly
8
.
Lower
Coil
Connection
9
.
Connection
Nut
10
.
Lover
Mounting
Support
•
Fig
.
17
Arc
Chute
Asseably
with
Side
Removed
Fig
.
18
Front
View
Arc
Chute
Asseably
2
.
Remove
the
cup
bearing
(
3
)
and
the
pin
(
2
)
Fig
.
4
.
3
.
When
reassembling
,
first
insert
the
piston
assembly
(
10
)
,
Fig
.
21
,
into
the
booster
cylinder
and
reassemble
the
cup
bearing
(
3
)
.
4
.
Replace
pin
(
2
)
,
Fig
.
nection
bar
(
9
)
,
Fig
.
21
.
F
.
After
disassembly
and
reassembly
of
any
contacts
,
check
all
contact
adjust
-
ments
as
described
under
INSTALLA
-
TION
,
ADJUSTMENTS
.
spring
compression
(
Fig
.
20
A
)
.
Turn
handle
(
2
)
in
clockwise
direc
-
tion
to
compress
contact
spring
(
Fig
.
20
B
)
.
Hold
spring
firmly
in
yoke
on
spring
compressor
to
pre
-
vent
the
spring
from
slipping
out
of
the
compressor
.
Place
washer
(
not
shown
)
on
guide
on
top
of
spring
,
place
top
of
guide
into
hole
in
spring
retainer
(
4
)
and
the
round
end
of
spring
out
in
primary
finger
Hold
spring
assembly
firmly
in
place
and
remove
spring
compressor
.
CONTACTS
3
.
Open
the
breaker
and
remove
the
box
barrier
and
arc
chutes
as
previously
des
-
cribed
.
To
remove
the
contacts
,
proceed
as
follows
:
A
.
Stationary
Arcing
Contacts
(
10
)
Fig
.
19
1
.
Disconnect
the
contact
braids
from
contact
fingers
by
removing
two
bolts
(
8
)
,
Fig
.
19
.
2
.
Grasp
the
lower
end
of
the
contact
fingers
with
pliers
and
pull
contact
assembly
downward
to
remove
from
stud
assembly
.
3
.
To
disassemble
braids
from
stud
assembly
,
remove
one
bolt
(
5
)
.
4
.
To
disassemble
stud
assembly
from
contact
support
,
remove
two
bolts
5
.
Reassemble
in
the
reverse
order
.
B
.
Stationary
Primary
Contacts
(
9
)
,
Fig
.
20
1
.
Compress
the
contact
spring
(
6
)
.
2
.
Remove
spring
and
spring
guide
(
1
)
.
3
.
Raise
the
contact
finger
to
clear
the
primary
contact
stop
plate
(
8
)
and
lift
the
finger
out
of
contact
support
(
7
)
.
finger
at
a
time
.
To
replace
the
Stationary
Primary
Con
-
tacts
:
1
.
Place
the
finger
(
9
)
on
contact
sup
-
port
(
7
)
so
that
it
is
retained
by
stop
plate
(
8
)
.
2
.
Open
spring
compressor
(
3
)
and
as
-
semble
spring
guide
,
spring
and
4
,
and
con
-
4
.
guide
in
cut
(
Fig
.
20
C
)
.
5
.
BUSHINGS
C
.
Movable
Arcing
Contact
(
7
)
,
Fig
.
21
.
1
.
Remove
the
assembly
bolts
(
8
)
.
2
.
Reassemble
in
reverse
order
.
IMPORTANT
:
DO
NOT
REMOVE
ALL
SEX
BUSHINGS
AT
ONCE
.
The
bushings
have
been
carefully
aligned
with
the
breaker
frame
,
during
assembly
at
the
factory
,
and
it
is
important
that
this
alignment
be
maintain
-
ed
to
facilitate
installation
of
the
breaker
in
the
metal
-
clad
unit
.
It
is
therefore
recom
-
mended
that
the
bushings
be
removed
and
reassembled
one
at
a
time
.
Also
,
before
removing
any
one
bushing
,
measure
the
distance
from
that
particular
bushing
to
ad
-
jacent
bushings
in
both
directions
,
so
that
it
may
be
re
-
installed
in
the
same
location
.
It
is
also
possible
to
remove
and
re
-
assemble
three
bushings
at
one
time
.
If
this
is
preferred
,
alignment
of
the
bushings
may
be
accomplished
by
placing
the
breaker
in
a
de
-
energized
spare
metal
-
clad
unit
before
tightening
the
bushing
mounting
bolts
.
This
must
be
done
before
the
arc
chutes
are
re
-
installed
(
6
)
.
D
.
Movable
Primary
Contacts
(
5
)
,
Fig
.
21
.
(
1200
Amp
.
Breaker
)
1
.
Remove
the
nuts
from
assembly
bolts
(
6
)
.
2
.
Remove
the
primary
contacts
and
spacers
(
not
illustrated
)
.
3
.
Reassemble
in
reverse
order
.
(
2000
Amp
.
Breaker
)
1
.
Remove
the
nuts
from
assembly
bolts
(
6
)
.
2
.
Remove
the
connection
bar
(
9
)
.
3
.
Remove
the
cup
bearing
(
3
)
.
4
.
Spread
the
contact
arms
(
4
)
and
remove
the
primary
contacts
(
5
)
.
5
.
Reassemble
in
the
reverse
order
.
Remove
one
contact
E
.
Contact
Blade
Assembly
(
4
,
5
,
7
)
,
Fig
.
21
1
.
Remove
the
connection
bar
(
9
)
.
14
Courtesy of NationalSwitchgear.com

*
To
replace
the
bushing
,
proceed
as
follows
:
V
.
Rear
Bushing
Open
the
breaker
and
remove
the
box
barrier
and
arc
chutes
as
already
described
.
Remove
the
upper
and
lower
horizontal
barriers
(
4
and
5
)
,
Fig
.
22
.
Remove
the
four
bolts
(
3
)
at
the
mount
-
ing
flange
of
the
rear
bushing
being
removed
and
lower
the
bushing
assem
-
bly
.
Referring
to
Fig
.
20
,
disassemble
the
primary
contact
springs
(
6
)
as
pre
-
viously
described
.
Disassemble
the
spring
retainer
(
4
)
by
removing
mounting
bolts
(
5
)
.
Referring
to
Fig
.
19
,
disassemble
the
contact
support
(
4
)
and
arc
chute
mount
-
ing
bracket
(
2
)
by
removing
two
bolts
(
3
)
.
Reassemble
in
the
reverse
order
.
The
arc
chute
mounting
bracket
(
2
)
is
not
symmetrical
and
must
be
assembled
correctly
to
orient
the
arc
chute
properly
on
the
breaker
.
The
longest
projection
of
the
bracket
should
be
toward
the
lower
end
of
the
bushing
.
1
.
?
o
CM
2
.
CM
o
CO
3
.
S
4
.
5
.
6
.
7
.
10
an
=
J
-
s
1
.
Fear
Ashing
2
.
Guide
and
Support
for
Arc
Chute
3
.
Bolts
for
Contact
Support
4
.
Contact
Support
5
.
Bolt
for
Flexible
Braid
6
.
Mounting
Bolt
7
.
Flexible
Braid
8
.
Connection
Bolt
9
.
Stud
for
Mounting
Arcing
Fingers
10
.
Stationary
Arcing
Contact
Assembly
11
.
Spring
Baffle
1
.
Contact
Springs
2
.
Stationary
Primary
Contacts
3
.
Qjp
Bearing
4
.
Contact
Arm
5
.
Movable
Primary
Contacts
6
.
Assembly
Bolts
7
.
Movable
Arcing
Contact
8
.
Assembly
Bolts
9
.
Connection
Bar
10
.
Piston
Assembly
Front
Bushing
8
1
.
Open
the
breaker
and
remove
the
box
barrier
and
arc
chutes
as
already
des
-
cribed
.
Remove
the
upper
and
lowrer
horizontal
barriers
(
4
and
5
)
,
Fig
.
22
.
Remove
the
connection
bar
(
9
)
,
Fig
.
21
,
and
cup
bearing
(
3
)
.
Remove
the
four
bolts
at
the
mounting
flange
of
the
front
bushing
being
re
-
moved
,
and
lower
the
bushing
.
O
'
u
.
2
.
3
.
4
.
c
Fig
.
19
Rear
Bushing
Assembly
Fig
.
21
Removal
of
Contacts
5
.
When
reassembling
,
first
mount
the
bushing
and
assemble
the
cup
bearing
(
3
)
and
contact
arm
(
4
)
,
Fig
.
21
.
Check
all
contact
adjustments
as
out
-
lined
unaer
INSTALLATION
,
ADJUST
-
MENTS
.
if
6
.
CO
—
I
co
/
:
CM
§
CM
CTI
u
_
=
f
o
9
CM
CM
s
CM
CM
1
.
Front
Bushing
2
.
Bear
Bushing
3
.
Mounting
Bolts
4
.
Upper
Horizontal
Barrier
5
.
Lower
Horizontal
Barrier
*
1
.
Spring
Guide
2
.
Handle
for
Spring
Compressor
3
.
Spring
Compressor
4
.
Spring
Retainer
5
.
Assembly
Bolt
for
Spring
Retainer
6
.
Spring
7
.
Contact
Support
8
.
Stop
Plate
9
.
Stationery
Primary
Contact
Fingers
u
.
Rear
View
of
Breaker
with
One
Arc
Chute
Removed
Fig
.
22
Fig
.
20
Method
of
Installing
Primary
Contact
Springs
Using
a
Spring
Compressor
15
*
Courtesy of NationalSwitchgear.com

GEH
-
2000
Magne
-
Blast
Circuit
Breaker
Type
AM
CLOSING
COIL
The
closing
coil
is
contained
within
the
solenoid
pot
(
1
)
,
Fig
.
23
.
To
remove
the
closing
coil
,
proceed
as
follows
:
1
.
Open
the
breaker
.
2
.
Remove
the
two
closing
coil
leads
(
10
)
.
Remove
the
terminal
board
(
2
)
from
the
solenoid
pot
and
let
it
hang
by
the
wires
.
Also
,
remove
the
wire
cleat
band
(
3
)
.
o
Remove
the
stop
nuts
(
7
and
12
)
on
guide
studs
(
11
)
,
lower
the
armature
plate
(
6
)
and
control
device
trip
plunger
(
5
)
.
Note
:
For
ease
in
removing
the
closing
coil
and
bottom
plate
(
step
5
)
the
armature
and
plunger
assembly
can
be
removed
from
the
mechanism
by
removing
the
four
bolts
on
the
under
side
of
the
armature
plate
.
Loosen
the
four
nuts
under
the
bottom
plate
(
4
)
approximately
1
/
2
"
.
Support
the
bottom
plate
with
a
rope
sling
or
hoist
and
remove
the
two
rear
nuts
.
3
.
4
.
LO
=
r
o
CN
CN
o
CO
Remove
the
nuts
(
8
)
at
the
top
of
the
front
studs
.
This
permits
the
bottom
plate
,
closing
coil
,
solenoid
pot
(
1
)
and
control
device
plunger
guide
(
9
)
to
be
removed
.
5
.
CO
C
«
J
cn
u
_
To
reassemble
,
first
place
the
closing
coil
and
spacers
on
the
bottom
plate
(
4
)
.
Raise
into
position
,
inserting
the
control
device
plunger
guide
(
9
)
and
compressing
the
piston
ring
on
the
upper
pole
piece
.
Tilt
the
bottom
plate
downward
and
replace
the
solenoid
pot
(
1
)
and
two
front
studs
and
nuts
(
8
)
.
6
.
7
.
1
.
Solenoid
Pot
v
.
2
.
Terminal
Board
3
.
Secondary
Wire
Cleats
4
.
Bottom
Plate
5
.
Control
Device
Trip
Plunger
Rod
6
.
Guide
Studs
7
.
Closing
Armature
8
.
Stop
Nuts
9
.
Front
Stud
Nuts
10
.
Plunger
Guide
11
.
Closing
Coil
Leads
12
.
Stop
Nuts
Tighten
the
four
nuts
under
the
bottom
plate
taking
special
precaution
to
center
the
closing
coil
around
the
pole
piece
.
If
the
closing
coil
is
not
firmly
held
in
place
,
add
spacers
above
the
closing
coil
.
8
.
ao
CN
P
"
o
Fig
.
23
Closing
Solenoid
Assenbly
CN
8
=
-
Replace
the
control
device
trip
plunger
(
5
)
and
armature
(
6
)
.
9
.
CN
cn
Li
-
10
.
Recheck
the
mechanism
adjustments
as
explained
under
INSTALLATION
,
ADJUSTMENTS
.
TRIP
COIL
To
replace
the
potential
ti
‘
.
p
coil
(
3
)
,
Fig
.
25
,
proceed
as
follows
:
Open
the
breaker
and
remove
the
opening
spring
unit
(
2
)
,
Fig
.
24
,
by
removing
the
pivot
pins
(
1
and
3
)
.
Disconnect
the
two
trip
coil
lead
wires
(
4
)
,
Fig
.
25
.
Remove
the
two
mounting
bolts
(
2
)
and
the
trip
coil
support
(
1
)
.
Remove
the
trip
coil
(
3
)
.
After
reassembling
(
in
the
reverse
order
)
check
the
primary
contact
gap
adjustment
as
explained
under
INSTAL
-
LATION
,
ADJUSTMENTS
.
1
.
2
.
3
.
4
.
1
.
Pivot
Pin
2
.
Opening
Spring
Unit
3
.
Pivot
Pin
5
.
Fig
.
24
Opening
Spring
Assembly
16
Courtesy of NationalSwitchgear.com

INTERLOCK
SWITCH
To
remove
the
interlock
switch
(
3
)
Fig
.
6
,
remove
the
two
mounting
screws
(
4
)
and
disconnect
the
lead
wires
.
Re
-
assemble
in
the
reverse
order
and
check
the
switch
adjustments
as
explained
under
-
INSTALLATION
,
ADJUSTMENTS
.
LATCH
CHECKING
SWITCH
To
remove
the
latch
checking
switch
(
6
)
,
Fig
.
6
,
(
when
furnished
)
,
remove
the
two
mounting
screws
(
8
)
and
disconnect
the
lead
wires
.
Reassemble
in
the
reverse
order
and
check
the
switch
adjustments
as
explained
under
INSTALLATION
,
ADJUST
-
MENTS
.
cs
(
0
2
o
CO
in
Oi
cn
u
_
CUT
-
OFF
SWITCH
To
remove
the
cut
-
off
switch
(
1
)
,
Fig
.
8
,
remove
the
two
mounting
bolts
and
disconnect
the
lead
wires
,
sembling
,
check
the
cut
-
off
switch
adjust
-
ment
as
explained
under
INSTALLATION
,
ADJUSTMENTS
.
When
reas
-
3
.
Trip
Coil
2
.
Mounting
Bolt
*
s
4
.
Trip
Coil
Leads
Fig
.
25
Potential
Trip
Coil
:
17
t
Courtesy of NationalSwitchgear.com

*
GEH
-
2000
Magne
-
Blast
Circuit
Breaker
Type
AM
RENEWAL
PARTS
The
listed
terms
"
right
”
and
"
left
"
apply
when
facing
the
solenoid
mechanism
end
of
the
breaker
.
Note
:
ORDERING
INSTRUCTIONS
1
.
ALWAYS
SPECIFY
THE
COMPLETE
NAMEPLATE
DATA
OF
BOTH
THE
BREAKER
AND
THE
MECHANISM
.
2
.
SPECIFY
THE
QUANTITY
,
CATALOG
NUMBER
(
IF
LISTED
)
,
REFERENCE
NUMBER
(
IF
LISTED
)
,
AND
DESCRIPTION
OF
EACH
PART
ORDERED
,
AND
THIS
BULLETIN
NUMBER
.
3
.
STANDARD
HARDWARE
,
SUCH
AS
SCREWS
,
BOLTS
,
NUTS
,
WASHERS
,
ETC
.
,
IS
NOT
LISTED
IN
THIS
BULLETIN
.
SUCH
ITEMS
SHOULD
BE
PURCHASED
LOCALLY
.
4
.
FOR
PRICES
,
REFER
TO
THE
NEAREST
OFFICE
OF
THE
GENERAL
ELECTRIC
COMPANY
.
ILLUSTRATION
REFERENCE
Page
Arc
Chute
Control
Device
for
All
Mechanisms
Cross
-
sections
-
Type
AM
2.4
/
4.16
-
3
Impact
Trip
Device
for
All
Mechanisms
Interlock
Plunger
Maintenance
Closing
Device
Movable
Contact
Arm
Assembly
MS
-
13
Mechanism
-
Cross
-
section
,
Details
,
Spring
Asm
.
MS
-
13
Mechanism
,
Front
View
,
Right
and
Left
Side
View
MS
-
13
Mechanism
,
with
Current
Trip
,
Partial
View
Rear
Bushing
Assembly
Secondary
Disconnect
Device
and
Mechanism
Parts
Undervoltage
Device
FIG
.
27
FIG
.
38
FIG
.
26
FIG
.
37
FIG
.
30
FIG
.
34
FIG
.
29
FIG
.
31
FIG
.
32
FIG
.
35
FIG
.
28
FIG
.
33
FIG
.
36
22
32
20
31
25
0
)
29
24
27
28
30
23
29
30
18
Courtesy of NationalSwitchgear.com

Magne
-
Blast
Circuit
Breaker
Type
AM
GEH
-
2000
PARTS
RECOMMENDED
FOR
NORMAL
MAINTENANCE
\
In
the
tabulation
below
are
listed
the
parts
of
those
breakers
which
are
usually
recommended
for
stock
for
normal
maintenance
.
Other
parts
are
listed
on
the
following
pages
.
«
CAT
.
NO
.
FOR
TYPE
AM
-
4.16
-
(
MVA
)
-
3
NO
.
PER
BREAKER
FIG
.
REF
.
RATING
IN
AMPS
RATING
IN
MV
A
NO
.
NO
.
DESCRIPTION
J
26
1
263
B
293
P
-
2
258
C
616
P
-
9
236
C
791
P
-
8
236
C
791
P
-
8
6496488
P
-
3
236
C
790
G
-
9
6591644
P
-
7
6591644
P
-
8
6591644
P
-
7
6591644
P
-
8
6591644
P
-
7
6591644
P
-
8
414
A
180
6509787
P
-
1
6445087
6557243
P
-
1
6557243
P
-
2
6557243
P
-
2
258
C
616
P
-
13
258
C
616
P
-
6
414
A
116
P
-
4
421711
407193
383
A
932
P
-
1
414
A
116
P
-
2
414
A
117
P
-
1
281
B
708
G
-
4
236
C
791
G
-
4
6375521
G
-
2
6375521
G
-
6
6375521
G
-
l
6375521
G
-
2
6174582
G
-
l
6174582
G
-
2
6174582
G
-
14
6174582
G
-
10
6275070
G
-
l
6275070
G
-
2
6275070
G
-
3
6275017
G
-
19
6275017
G
-
20
6275017
G
-
33
6174599
G
-
2
6174599
G
-
6
6275017
G
-
19
6275017
G
-
20
6275017
G
-
33
All All
3
Booster
cylinder
Upper
runner
insulation
Primary
contact
finger
Primary
contact
finger
Movable
arcing
contact
Stationary
arcing
contact
asm
.
Primary
contact
mov
.
Primary
contact
mov
.
Primary
contact
mov
.
Primary
contact
mov
.
Primary
contact
mov
.
Primary
contact
mov
.
Primary
contact
finger
spring
Primary
contact
finger
spring
Buffer
Clamp
for
buffer
Clamp
for
buffer
Clamp
for
buffer
Lower
barrier
Lower
barrier
Insulating
plate
Insulating
cap
Washer
Lower
shield
Insulation
Upper
insulation
Operating
rod
Flex
.
Conn
.
Closing
coil
(
125
V
.
d
-
c
Closing
coil
(
125
V
.
d
-
c
Closing
coil
(
250
V
.
d
-
c
Closing
coil
(
250
V
.
d
-
c
.
Potential
trip
coil
(
125
V
.
d
-
c
Potential
trip
coil
(
250
V
.
d
-
c
Potential
trip
coil
(
230
V
.
a
-
c
Potential
trip
coil
(
48
V
.
d
-
c
)
Potential
trip
coil
(
24
V
.
d
-
c
)
Potential
trip
coil
(
48
V
.
d
-
c
)
Potential
trip
coil
(
32
V
.
d
-
c
)
UVD
Coil
(
125
V
.
d
-
c
)
UVD
Coil
(
250
V
.
d
-
c
)
UVD
Coil
(
230
V
.
a
-
c
)
Current
trip
coil
(
3
Amp
.
Capacitor
trip
coil
(
230
V
.
a
-
c
Control
device
coil
(
125
V
.
d
-
c
'
Control
device
coil
(
250
V
.
d
-
c
(
Control
device
coil
(
230
V
.
a
-
c
,
cont
.
)
Control
device
coil
(
230
V
.
a
-
c
)
int
.
)
27
130
All
All
6
600
/
1200
1200
/
2000
28
165
150
12
28
165
250
24
29
211
All
All
3
156
28
All
All
3
100
/
150
100
/
150
150
/
250
150
/
250
600
/
1200
600
/
1200
29
212
3
29
212
3
29
212
6
1200
29
212
6
1200
29
212
All
2000
6
29
212
All
2000
6
600
/
1200
1200
/
2000
28
160
150
12
28
160
250
24
28
159
All
All
3
600
/
1200
28
168
150
6
168
28
150
2000
6
1200
/
2000
28
168
250
6
27
132
150
All
6
27
132
250
All
6
28
158
All
All
3
27
131
All Ail
12
27
A
250
j
All
12
27
126
250
All
6
27
117
All
All
3
27
118
All
6
All
?
26
7
All
3
AH
28
155
All
All
3
261
f
30
250
All
1
30
261
150
All
1
30
261
250
All
1
30
261
150
All
1
32
370
All
All
1
32
370
All
All
1
32
370
All
AH
1
32
370
All
All
1
32
370
All
1
All
370
32
All
1
All
370
32
All
1
All
663
36
All
All
1
36
663
All
All
1
36
663
All
All
1
37
738
All
3
All
a
-
c
37
738
All
1
All
38
753
All
1
AU
38
753
All All
1
38
753
All
All
1
38
753
All
6275017
G
-
34
All
1
*
Not
shown
.
19
.
*
Courtesy of NationalSwitchgear.com

*
GEH
-
2000
Magne
-
Blast
Circuit
Breaker
Type
AM
e
H
9
8
15
S
l
8
STij
!
CN
I
\
ID
CM
8
Cn
U
_
>
*
o
13
-
’
MR
as
*
i
A
I
+
QT
.
'
'
\
\
*
\
iw
2
—
0
100
I
^
I
l
210
\
V
ylyL
-
\
•
ra
-
.
i
»
11
CO
t
7
i
CM
I
/
7
Li
<
£
>
CM
'
I
\
c
i
i
—
z
r
r
/
!
!
on
•
*
>
i
k
-
-
'
!
-
•
:
U
.
CTj
5
n
1 5
6
1 2
3
4
19
32
J
22
22
23
*
/
24
*
-
ND
27
R
,
CM
cr
.
r
-
25
27
c
_
>
CO
CM
SECTIONS
"
AA
"
*
7
<
o
31
28
cs
TOPff
OTP
TO
on
26
30
U
-
(
2000
AMP
)
(
1200
AMP
)
Fig
.
26
Cross
-
sections
Type
AH
2.4
/
4.16
-
3
20
Courtesy of NationalSwitchgear.com
This manual suits for next models
3
Table of contents
Other GE Circuit Breaker manuals