GE ImageQuant LAS 4000 User manual

GE Healthcare
ImageQuant™ LAS 4000
User Manual


Table of Contents
51 Introduction ......................................................................................................................................................
51.1 Important user information ............................................................................................................................................
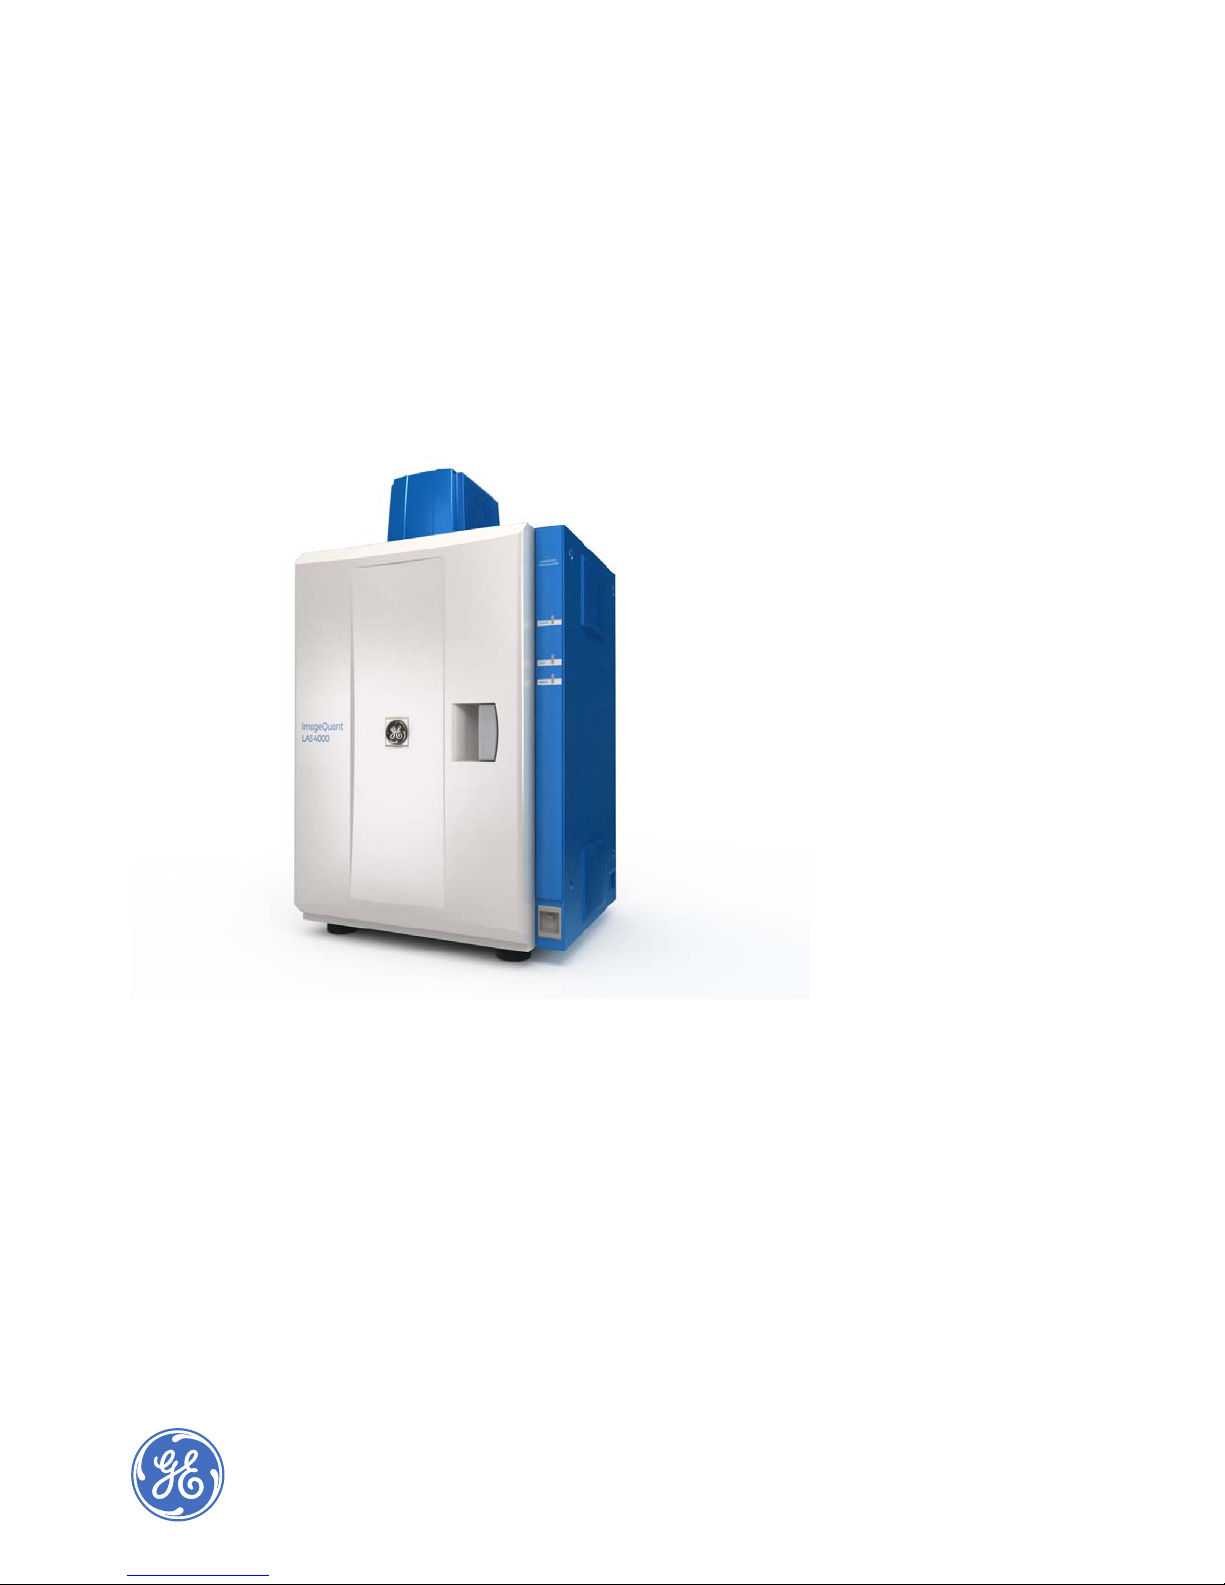
102 The ImageQuant LAS 4000 .............................................................................................................................
102.1 The ImageQuant LAS 4000 exterior ...........................................................................................................................
112.2 Inside the ImageQuant LAS 4000 ................................................................................................................................
122.3 Connections ...........................................................................................................................................................................
142.4 Parts and accessories .......................................................................................................................................................
173 Exchanging accessory parts ..........................................................................................................................
173.1 Changing or installing a filter .........................................................................................................................................
183.2 Installing or exchanging the lens .................................................................................................................................
193.2.1 Removing the LAS High Sens. lens ............................................................................................................................
223.2.2 Installing the LAS High Sens. lens ..............................................................................................................................
243.2.3 Removing the wide view lens ......................................................................................................................................
253.2.4 Installing the wide view lens ........................................................................................................................................
273.3 Changing the light sources .............................................................................................................................................
283.3.1 Changing the UV transilluminator or white light table .....................................................................................
293.3.2 Changing the Epi lights ...................................................................................................................................................
324 Operating the ImageQuant LAS 4000 ..........................................................................................................
324.1 Layout of the ImageQuant LAS 4000 Control Software ....................................................................................
334.2 Preparation for exposure .................................................................................................................................................
344.3 Calibration ..............................................................................................................................................................................
344.4 Placing the sample .............................................................................................................................................................
374.5 Exposing chemiluminescent samples .......................................................................................................................
424.6 Exposing fluorescent samples (EtBr) ..........................................................................................................................
474.7 Exposing fluorescence (Epi illumination) ..................................................................................................................
514.8 Exposing dye stained samples and films (White Epi light) ...............................................................................
554.9 Exposing dye stained samples and films (Trans illumination) ........................................................................
594.10 Exposing consecutively (Increment) ...........................................................................................................................
644.11 Exposing repeatedly (Repetition) ..................................................................................................................................
694.12 Printing exposed images .................................................................................................................................................
704.13 Saving exposed images ...................................................................................................................................................
724.14 Ending the session ..............................................................................................................................................................
734.15 Exposing large sample using wide view lens .........................................................................................................
784.16 Creating a new method and performing flat frame calibration ...................................................................
805 Software reference guide ...............................................................................................................................
805.1 Exposure type .......................................................................................................................................................................
815.2 Exposure time .......................................................................................................................................................................
825.3 Add digitization image ......................................................................................................................................................
835.4 Program settings .................................................................................................................................................................
845.5 Focusing ..................................................................................................................................................................................
855.6 Start ...........................................................................................................................................................................................
ImageQuant LAS 4000 User Manual 28-9607-42 AB 3
Table of Contents

905.7 Sensitivity/Resolution ........................................................................................................................................................
915.8 Method/Tray position ........................................................................................................................................................
945.9 File menu .................................................................................................................................................................................
955.10 Edit menu ................................................................................................................................................................................
1035.11 View menu ..............................................................................................................................................................................
1045.12 Option menu ..........................................................................................................................................................................
1045.12.1 CCD Calibration ..................................................................................................................................................................
1055.12.2 Flat Frame Calibration ....................................................................................................................................................
1065.12.3 Method Setting ...................................................................................................................................................................
1075.13 Help menu ..............................................................................................................................................................................
1096 Installing ImageQuant LAS 4000 Control Software ...................................................................................
1096.1 Installation sequence ........................................................................................................................................................
1096.2 Install ImageQuant LAS 4000 Control Software under Windows XP ..........................................................
1136.3 Install ImageQuant LAS 4000 Control Software under Windows Vista .....................................................
1187 Uninstalling and upgrading ImageQuant LAS 4000 Control Software ..................................................
1208 After-sales service ...........................................................................................................................................
1208.1 Warranty .................................................................................................................................................................................
1208.2 Repairs .....................................................................................................................................................................................
121A Appendix ............................................................................................................................................................
121A.1 Glossary ...................................................................................................................................................................................
122A.2 Quick-reference functions ...............................................................................................................................................
125A.3 Detection Reagents and corresponding settings ................................................................................................
127A.4 Main specifications .............................................................................................................................................................
132A.5 Minimum computer requirements ..............................................................................................................................
133A.6 Service report fax sheet ...................................................................................................................................................
4 ImageQuant LAS 4000 User Manual 28-9607-42 AB
Table of Contents

1 Introduction
The ImageQuant LAS 4000
The ImageQuant LAS 4000 is a camera system for producing digital images of gel or membrane samples
or films. It is used together with the ImageQuant LAS 4000 Control Software to:
•Expose chemiluminescent samples or membranes.
•Expose fluorescent samples using epi (incident) or trans (transmitted) light sources, for example
gels stained by ethidium bromide (EtBr).
The ImageQuant LAS 4000 can be supplied with NIR, Red, Green, Blue and UV epi lights.
•Expose dye-stained gels and membranes or films using epi or trans illumination.
•Expose a sample repeatedly, incrementally or by programming exposure schemes.
Purpose of this manual
The ImageQuant LAS 4000 User Manual provides detailed instructions on using the ImageQuant LAS
4000 and outlines the functions of the ImageQuant LAS 4000 Control Software.
Note: Be sure to refer also to the manual Getting Started with ImageQuant LAS 4000 for
regulatory information, specifications and the troubleshooting guide.
1.1 Important user information
Read this before using the ImageQuant LAS 4000
All users must read the safety instructions in Getting started with ImageQuant LAS 4000 before installing,
using or maintaining the equipment.
Do not operate the ImageQuant LAS 4000 in any other way than described in the user documentation.
Otherwise, you may be exposed to hazards that can lead to personal injury and you may cause damage
to the equipment.
ImageQuant LAS 4000 User Manual 28-9607-42 AB 5
1 Introduction

Intended use
The ImageQuant LAS 4000 is a camera system that produces digital images of chemiluminescent,
dyed or fluorescent gels and membranes. The ImageQuant LAS 4000 is intended for research use only,
and shall not be used in any clinical procedures, or for diagnostic purposes.
Safety notices
The user documentation contains WARNINGS, CAUTIONS and NOTICES concerning the safe use of the
product. See definitions below.
Warnings
WARNING
WARNING indicates a hazardous situation which, if not avoided, could result in death
or serious injury. It is important not to proceed until all stated conditions are met
and clearly understood.
Cautions
CAUTION
CAUTION indicates a hazardous situation which, if not avoided, could result in minor
or moderate injury. It is important not to proceed until all stated conditions are met
and clearly understood.
Notices
NOTICE
NOTICE indicates instructions that must be followed to avoid damage to the product
or other equipment.
Regulations and standards - supplementary
information
This equipment conforms to the regulations and standards described below.
EMC VCCI Class A Conformance
FCC Part 15B Class A
ICES-003 Class A
IEC 61326-1: 2005
EN 61326-1: 2006
6 ImageQuant LAS 4000 User Manual 28-9607-42 AB
1 Introduction
1.1 Important user information

Safety UL61010-1: second edition
CAN/CSA-C22.2 No. 61010-1, second edition
IEC61010-1: 2001, second edition
IEC61010-2-081, first edition
EN 61010-1: 2001
EN 61010-2-081: 2002
Laser USA 21 CFR, Chapter I, Subchapter J, Part 1040.10 Laser Products
IEC 60825-1: 2001
EN 60825-1: 1994+A11: 1996+A2: 2001
CE LV Directive 2006/95/EC (as amended)
EMC Directive 2004/108/EC (as amended)
Machinery Directive 2006/42/EC
Note: This equipment has been tested and found to comply with the limits for a Class A digital
device, pursuant to Part 15 of the FCC Rules. These limits are designed to provide
reasonable protection against harmful interference when the equipment is operated in
a commercial environment. This equipment generates, uses, and can radiate radio
frequency energy and, if not installed and used in accordance with the instruction manual,
may cause harmful interference to radio communications. Operation of this equipment
in a residential area is likely to cause harmful interference in which case the user will be
required to correct the interference at his own expense.
This Class A digital apparatus complies with Canadian ICES-003. Cet appareil numérique
de la classe A conforme à la norme NMB-003 du Canada.
Note: This is a class A product. In a domestic environment this product may cause radio
interference in which case the user may be required to take adequate measures.
Information for traceability
GE HealthcareManufacturer:
See back coverContact information:
Power cable
1In Japan and North America:
Do not use cables other than the power cable that comes with the equipment.
2In EU countries:
The cable is given the following CEE Certification Number.
116773 ASCDEMKO6522-1570-8035/AIGVDE
93.6830.04-KCS/LBKEMA9449029SEMKO
8652CEBECP94102620NEMKO
0204-515-00OVE179615-02EI (FIMKO)
ImageQuant LAS 4000 User Manual 28-9607-42 AB 7
1 Introduction
1.1 Important user information

Mercury-containing products label
CAUTION
Ultraviolet ray lamps in this product contain mercury, which must be
recycled or disposed of in accordance with local, state, or federal laws.
LED safety
This product is categorized as a class 1 laser (LED) device (IEC60825-1+A2:2001).
LED light sources
Class 1Wavelength 630nmRed Epi light
Class 1Wavelength 520nmGreen Epi light
Class 1Wavelength 460nmBlue Epi light
Wavelength 630,RGB module
Class 1520 and 460nm
Class 1MWavelength 365nmUV Epi light
Class 1Wavelength 710nmNIR Epi light
Class 1Wavelength 470-740nmWhite Epi light
CAUTION
Do not look at the light directly through optical instruments.
CAUTION
If the door is opened and the interlock is cancelled, class 1 laser (LED) will be emitted.
CAUTION
Use of controls or adjustments or performance of procedures other than those
specified in the user documentation may result in hazardous radiation exposure.
Notes and tips
Note: A Note is used to indicate information that is important for trouble-free and optimal use
of the product.
TIP: A tip contains useful information that can improve or optimize your procedures.
8 ImageQuant LAS 4000 User Manual 28-9607-42 AB
1 Introduction
1.1 Important user information

Typographical conventions
Software items are identified in the text by bold italic text. A colon separates menu levels, thus File:Open
refers to the Open command in the File menu. Hardware items are identified in the text by bold text
(e.g., Power switch).
ImageQuant LAS 4000 User Manual 28-9607-42 AB 9
1 Introduction
1.1 Important user information

2 The ImageQuant LAS 4000
This chapter describes the features and part names of the ImageQuant LAS 4000 hardware, and the
connectors that connect the various parts of the equipment.
2.1 The ImageQuant LAS 4000 exterior
6
7
1
2
3
4
5
DescriptionNamePart
CCD cooling and image data outputCamera head1
Status lightsIndicator panel2
Lights when the power is onPower LED3
Lights when an exposure is in progressBusy LED4
Lights when an error is detectedError LED5
Power ONI
Power OFFO
Power switch6
Dark boxIntelligent dark box (IDX)7
10 ImageQuant LAS 4000 User Manual 28-9607-42 AB
2 The ImageQuant LAS 4000

2.2 Inside the ImageQuant LAS 4000
1
2
3
5
6
7
8
4
9
DescriptionNamePart
Connects the epi light to the IDXEpi light connector1
NIR Epi light (710 nm)Epi light source2
Red Epi light (630 nm)
Green Epi light (520 nm)
Blue Epi light (460 nm)
RGB Module (Epi light with red, green and blue LEDs)
UV Epi light (365 nm)
White Epi light
Supports the sampleSample tray3
Moves the sample to the selected tray positionLifting table4
F0.85/43 mm LAS High Sens. lens, orLens5
F1.8/24 mm wide view lens
Connects lens to IDXLens connector6
ImageQuant LAS 4000 User Manual 28-9607-42 AB 11
2 The ImageQuant LAS 4000
2.2 Inside the ImageQuant LAS 4000

DescriptionNamePart
Used to hold filters selected in the control software. The follow-
ing filters are commonly used:
Automatic filter changer7
IR785 Alexa (filter for NIR LED)
R670 Cy5 (filter for red LED)
575DF20 Cy3 (filter for green LED)
605DF40 EtBr (filter for detecting EtBr)
510DF10 (filter for detecting GFP)
Y515 (filter for blue LED)
L41 UV (filter for UV LED)
Connects the UV transilluminator or White light table to IDXTrans light source connec-
tor
8
312 nm UV transilluminatorTrans light source9
White light table
Note: Do not use connectors other than those supplied for the Epi light sources.
Note: Do not connect cables other than those supplied to the lens.
Note: Do not connect anything other than the transmitted light sources to the transmitted light
source connector.
2.3 Connections
Camera head
2
1
NameNo.
Camera cable1
USB cable2
Note: Do not connect cables other than the camera cable supplied with the equipment.
12 ImageQuant LAS 4000 User Manual 28-9607-42 AB
2 The ImageQuant LAS 4000
2.2 Inside the ImageQuant LAS 4000

Note: Do not disconnect the camera cable other than when removing the camera head.
LAS High Sens. lens
High Sens. lens cable
A cable used for connecting the LAS High Sens. lens and the IDX.
Make sure that the cable is securely connected.
Note: •Never remove the cable except when replacing the lens.
•Be sure to turn off the equipment before replacing the lens.
Epi lights
Connector on Epi light source
Figure 2.1: Incident (Epi) light source
connector (rear)
The Epi light sources illuminate the object to be imaged from the
upper right and upper left.
The connector is connected to the Epi light source connector inside
the IDX.
Epi light source connector
Figure 2.2: Inside the instrument
A connector used for connecting the Epi light source. Power is
supplied to the Epi light source through this connector.
Note: •The Epi light sources for the right and left sides are different. Attach the appropriate
source on respective sides.
•The connector will be connected when the Epi light source is inserted. Make sure
that the connector is securely connected. See Section 3.3.2 Changing the Epi lights,
on page 29.
•Be sure to use Epi light sources of the same type for the right and left sides other-
wise an incorrect image will be obtained.
•Do not insert any connector other than those for the Epi light sources.
ImageQuant LAS 4000 User Manual 28-9607-42 AB 13
2 The ImageQuant LAS 4000
2.3 Connections

USB cable
USB cable
Analysis PC ImageQuant LAS 4000
Connects ImageQuant LAS 4000
and the analysis PC. Read data will
be sent from ImageQuant LAS 4000
to the analysis PC through the USB
cable. USB 2.0 is supported.
Connect one end with the Image-
Quant LAS 4000 camera head USB
connector, and the other to a USB
port of the analysis PC.
Note: •Use the USB cable supplied with the equipment.
•Do not connect the instrument and the PC via a USB hub.
•Do not connect USB equipment other than ImageQuant LAS 4000 to the PC. Simi-
larly, do not use other USB equipment connected to the PC while ImageQuant LAS
4000 is in use. This may result in the loss of image data.
•The PC must be certified according to UL60950-1 (UL listed) and IEC60950-1.
2.4 Parts and accessories
F0.85 43mm LAS high sensitivity lens
Epi tray
14 ImageQuant LAS 4000 User Manual 28-9607-42 AB
2 The ImageQuant LAS 4000
2.3 Connections

Cal plate GR (Pink) Cal plate DI
Cal plate FL (Green)
NP tray
White trans tray UV trans tray
White light table
Gel sheet
UV transilluminator
F-mount adapter
F1.8 24mm wide view lens
ImageQuant LAS 4000 User Manual 28-9607-42 AB 15
2 The ImageQuant LAS 4000
2.4 Parts and accessories

Green Epi light (520 nm), set of twoBlue Epi light (460 nm), set of two Red Epi light (630nm), set of two
RGB module, Epi lights, set of two
NIR Epi light (710 nm), set of twoUV Epi light (365 nm), set of two
Filters:
Y515 filter (Y515)
GFP detection filter (510DF10/GFP)
EtBr detection filter (605DF40/EtBr)
Cy3 detection filter (575DF20/Cy3)
Cy5 detection filter (R670BP/Cy5)
Alexa Fluor 750 detection filter (IR785/Alexa)
Ultraviolet protection filter (L41/UV)
Note: •The combined accessories and light source vary depending on the system that you
purchase.
•Make sure to retain the caps and filter cases.
•Store the incident (Epi) light sources in a container box.
•The UV trans tray will degrade after many UV illuminations. It can be used up to
approximately 1000 times if each exposure time is 1 second. New trays can be
purchased separately.
16 ImageQuant LAS 4000 User Manual 28-9607-42 AB
2 The ImageQuant LAS 4000
2.4 Parts and accessories

3 Exchanging accessory parts
3.1 Changing or installing a filter
Optical filters are installed in the filter turret localted under the lens inside the IDX. This section describes
how to install or change a filter on the filter turret.
Install a filter in the filter turrent and register it in the ImageQuant LAS 4000 Control Software as follows:
3
2, 5
6
4
1Ensure that the camera head and PC are connected. Turn on the instrument and the PC, and start
the ImageQuant LAS 4000 Control Software.
2Close the instrument door
ImageQuant LAS 4000 User Manual 28-9607-42 AB 17
3 Exchanging accessory parts

3Select Filter Customization in the Option menu in the ImageQuant LAS 4000 Control Software
main window.
4Click the Filter down button.
The filter changer is lowered.
5Open the instrument door.
6Turn the filter changer so the desired position is easily accessible. If a filter is already in place at
this position, unscrew it carefully and put it back in its cover.
7Screw the new filter into place.
8Select the appropriate filter from the drop-down list and click the OK button.
Note: The filter changer returns to the original position when you click the Start,Focusing or
Method/Tray position buttons.
3.2 Installing or exchanging the lens
Two lenses can be used with the ImageQuant LAS 4000, an F0.85 43mm LAS High Sens. lens, and an
optional F1.8 24mm wide view lens. The wide view lens can image samples up to 250 x 250 mm in size.
For all other applications, the LAS High Sens. lens is recommended. This section describes how to install
or exchange the lenses.
18 ImageQuant LAS 4000 User Manual 28-9607-42 AB
3 Exchanging accessory parts
3.1 Changing or installing a filter

F1.8 24mm wide view lensF0.85 43mm LAS High Sens. lens
3.2.1 Removing the LAS High Sens. lens
1Close the instrument door. If the power is turned off and the filter changer is down, proceed to step
4.
2Select Option:Lens Exchange.
A message is displayed.
3Click OK.
4
Turn off the instrument using the power switch.
ImageQuant LAS 4000 User Manual 28-9607-42 AB 19
3 Exchanging accessory parts
3.2 Installing or exchanging the lens
3.2.1 Removing the LAS High Sens. lens

5Loosen and remove the lens hood, then place the lens cap over the lens.
Lens hood
Lens cap
6Disconnect the lens cable connector by rotating the knurling ring.
Connector of the lens cable
Knurling ring
7Turn the lens slightly to the left and loosen it while pushing the lens release lever.
Lens release lever
20 ImageQuant LAS 4000 User Manual 28-9607-42 AB
3 Exchanging accessory parts
3.2 Installing or exchanging the lens
3.2.1 Removing the LAS High Sens. lens
Other manuals for ImageQuant LAS 4000
1
Table of contents
Other GE Laboratory Equipment manuals

GE
GE AxiChrom 50 User manual

GE
GE ImageQuant LAS 4000 User manual

GE
GE AKTA pilot 600 User manual

GE
GE MicroCal iTC200 User manual

GE
GE akta start User manual

GE
GE MS-PoE User manual

GE
GE LOGIQ S7 Expert User manual

GE
GE Whatman Mini-UniPrep G2 User manual

GE
GE Autosampler User manual

GE
GE AKTAprocess User manual