manuals.online logo
Brands
  1. Home
  2. •
  3. Brands
  4. •
  5. Georgia Pacific
  6. •
  7. Dispenser
  8. •
  9. Georgia Pacific enMotion 52065 User manual

Georgia Pacific enMotion 52065 User manual

The enMotion® Automated Touchless Counter
Mount Soap Dispenser is easy to install, easy to
clean, and easy to use. The touchless dispenser
helps to reduce the spreading of germs and
bacteria.
For questions regarding this dispenser or for
replacement parts, please call: 1-866-HELLOGP
(1-866-435-5647).
Visit gppro.com to learn more about all of our
products and solutions.
REFERENCE GUIDE: 52065, 52065KB
Welcome | ¡Bienvenido! | Bienvenue
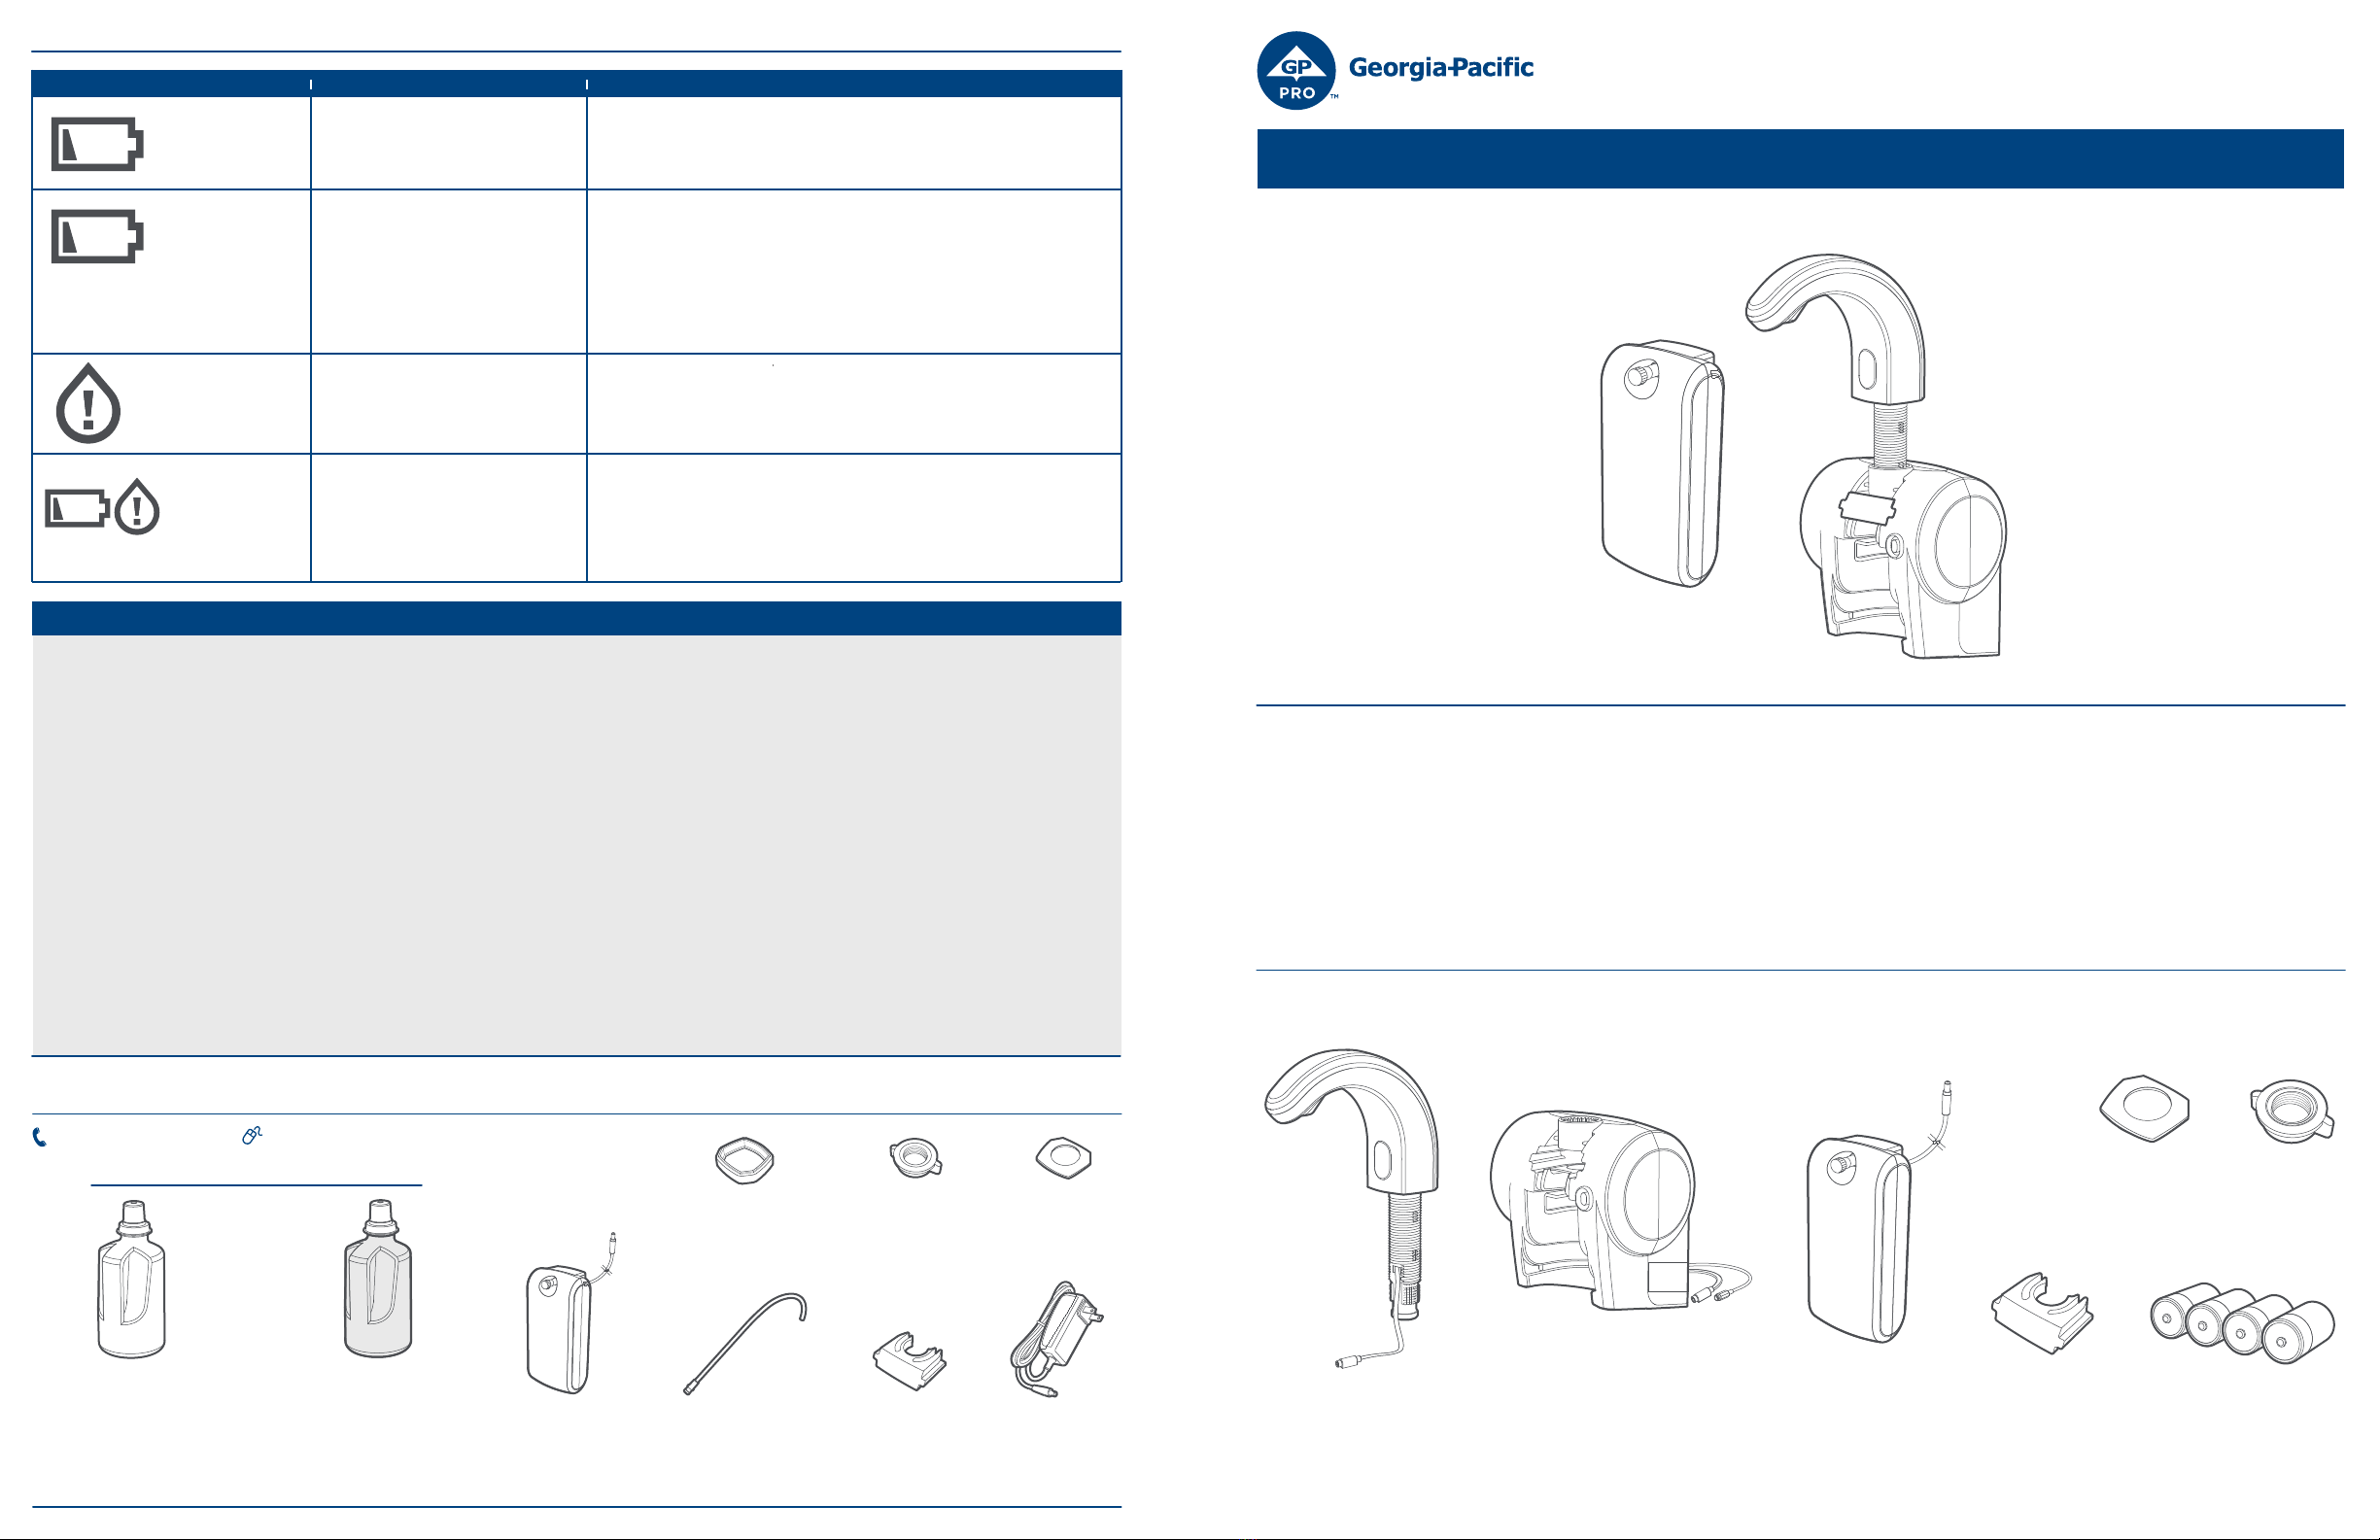
What’s In The Box | Qué hay en la caja | Contenu de la boîte
Replacement Parts & Accessories | Piezas de Repuesto y Accesorios | Pièces de Remplacement et Accessoires
© 2018 GP PRO. All rightsreserved.
enMotion® Automated Touchless Counter Mount Soap Dispenser
D-100162 REV B
D-cell battery (x4)
Batería de celda (x4)
Pile D (x 4)
Wing Nut
Tuerca mariposa
Écrou à oreilles
Gasket
Junta
Joint d’étanchéité
Locking Clip
Gancho de seguridad
Attache
Spout Assembly
Montaje del surtidor
Ensemble de bec verseur
Motor Assembly
Montaje del motor
Ensemble de moteur
Battery Pack
Paquete de baterías
Bloc-piles
Indicator
Meaning Significado SignificationIndicator Indicador Voyant Action Acción Mesure à prendre
Maintenance Indicators | Indicadores de Mantenimiento | Voyants D’entretien
Wing Nut
(50473)
Tuerca Mariposa
Écrou à Oreilles
Gasket
(50472)
Junta
Joint D’étanchéité
AC Adapter
(50476)
Adaptador de CA
Bloc D’alimentation
Externe
Locking Clip
(50471)
Gancho de Seguridad
Attache
Refill Delivery Tube
(50475)
Tubo de Salida de Repuesto
Tube de Distribution
de Recharge
Fragrance Free Gentle
Foam Soap with Moisturizers
(42717)
Jabón de Espuma Suave Sin
Fragancia y Con Humectantes
Savon Moussant Doux Avec
Hydratants, Sans Parfum
Tranquil Aloe® Gentle
Foam Soap with Moisturizers
(42718)
Jabón de Espuma Suave Tranquil
Aloe® con Humectantes
Savon Woussant Doux Avec
Hydratants, Tranquil Aloe®
-
Battery Disposal | Desecho de Baterías | Élimination des Piles
Battery Handling and Disposal
1. Keep in original packaging until ready
for use.
2. Remove batteries from device when not
in use for an extended period of time.
3. Never disassemble batteries.
4. Chemicals inside batteries can be
dangerous if swallowed or exposed to skin.
5. Avoid mechanical or electrical abuse.
6. Keep away from children.
7. Batteries are not designed to be recharged.
8. Avoid extreme temperatures.
9. Do not incinerate, since batteries may
explode at excessive temperatures.
10. Do not dispose of large amounts of
batteries as it creates a safety risk.
11. Dispose of accumulated batteries in
accordance with appropriate federal, state,
and local regulations.
12. Do not mix old and new batteries or
non-rechargeable and rechargeable
batteries.
Manipulation et Élimination des Piles
1. Les garder dans l’emballage d’origine jusqu’à
’utilisation
2. Retirer les piles de l’appareil lorsqu’il ne sert
pas pendant une longue période de temps.
3. Ne jamais démonter une pile.
4. Les produits chimiques à l’intérieur de la pile
peuvent être dangereux en cas d’ingestion
ou lors d’exposition sur la peau.
5. Éviter les abus mécaniques ou électriques.
6. Garder loin des enfants.
7. Les piles ne sont pas conçues pour être
rechargées.
8. Éviter les températures extrêmes.
9. Ne pas incinérer, puisque les piles peuvent
éclater à des températures excessives.
10. Ne pas jeter de grandes quantités de piles,
car cela crée un danger pour la sécurité.
11. Jeter les piles accumulées conformément
aux réglementations fédérales, étatiques et
locales appropriées.
12. Ne pas mélanger les piles neuves et
anciennes ou des piles non rechargeables et
rechargeables.
Manejo y Desecho de Baterías
1. Mantenga en el empaque original hasta al
momento de usar.
2. Retire la batería del dispositivo cuando no
se utilice por un período prolongado.
3. Nunca desarme la batería.
4. Los químicos dentro de la batería pueden
ser peligrosos si se ingieren o se exponen a
la piel.
5. Evite el abuso mecánico o eléctrico.
6. Mantenga lejos de los niños.
7. La batería no está diseñada para recargarse.
8. Evite las temperaturas extremas.
9. No incinere, ya que la batería puede
explotar a temperaturas excesivas.
10. No deseche grandes cantidades de
baterías, ya que provocan un riesgo de
seguridad.
11. Deseche las baterías acumuladas de
acuerdo con las regulaciones federales,
estatales y locales pertinentes.
12. No mezcle las baterías viejas con las
nuevas o las recargables con las no
recargables.
Refills
Battery Pack
(50477)
Paquete de Baterías
Bloc-Piles
1-866-435-5647 www.gppro.com
Spacer
(50474)
Espaciador
Cale D’espacement
Remove & reinsert refill then disconnect the power and reconnect after 5
seconds.
Quite y vuelva a insertar el repuesto; luego, desconecte la electricidad y
vuelva a conectarla después de cinco segundos.
Retirez la bouteille de recharge, puis réinsérez-la. Débranchez l’alimentation
électrique pendant 5 secondes, puis rebranchez-la.
Loosen battery pack thumb screw and remove the cover. Replace 4 D cell
batteries and re-attach cover. Hand tighten thumb screw.
Afloje el tornillo manual del paquete de baterías y quite la tapa. Reemplace
las 4 baterías de celda y coloque nuevamente la tapa. Ajuste el tornillo
manual.
Desserrez la vis à serrage à main du bloc-piles et retirez le couvercle.
Remplacez les quatre piles D et fermez le couvercle. Serrez la vis à la main.
Plan to replace batteries during next service interval.
Planifique reemplazar las baterías durante el próximo intervalo de
mantenimiento.
Prévoyez de remplacer les piles pendant le prochain intervalle de service.
The batteries are depleted. Unit will
not run.
La batería se ha agotado. La unidad
no funcionará.
Les piles sont épuisées. Le distribu-
teur ne fonctionnera pas.
The batteries are running low.
La batería se está agotando.
Les piles sont faibles.
Replace soap refill bottle.
Reemplace la botella de jabón de repuesto.
Remplacez la bouteille de recharge de savon.
Soap level is low.
El nivel de jabón es bajo.
Le niveau du savon est bas.
yellow solid
amarillo continuo
jaune fixe
red blinking
rojo intermitente
rouge clignotant
red solid
rojo continuo
rouge fixe
both blinking
ambos intermi-
tentes
deux voyants
clignotent
System fault.
Falla del sistema.
Erreur système.
El dispensador de jabón automático para fijar en
superficies enMotion® es fácil de instalar, de
limpiar y de usar. El dispensador automático
ayuda a reducir la propagación de gérmenes y
bacterias.
Si tiene preguntas con respecto a este dispensa-
dor o necesita piezas de repuesto, llame al
1-866-HELLOGP (1-866-435-5647).
Visite gppro.com para conocer más sobre todos
nuestros productos y soluciones.
Le distributeur de savon automatique sans contact
monté sur comptoir enMotion® est facile à installer,
à entretenir et à utiliser. Un distributeur sans
contact permet de réduire la propagation de
germes et de bactéries.
Pour toute question concernant ce distributeur ou
pour les pièces de rechange, veuillez composer le :
1 866 HELLOGP (1 866 435-5647).
Veuillez consulter le site gppro.com pour en savoir
plus sur
Installation | Instalación |Installation Installation | Instalación |Installation
Operation | Funcionamiento |Fonctionnement
1a
1
7
2
3
2
3
4
6
5
New Installation
Choose the location for the dispenser on either side of the faucet. Prior to drilling, check for any obstructions
below the sink, including any drains, sink bowl or water lines. Mark the center of the desired spout location
no more than 3.3” from edge of sink bowl. Drill a 1” diameter hole into the countertop. Then clean the
counter surface at that location
Instalación nueva
Elija la ubicación para el dispensador en cualquier costado del grifo. Antes de perforar, busque
cualquier obstrucción debajo del lavamanos, incluso en los desagües, la cubeta del lavamanos o las
tuberías de agua. Marque el centro de la ubicación deseada para el surtidor a no más de 3.3” del borde
de la cubeta del lavamanos. Perfore un orificio de 1” de diámetro en el mostrador. Luego, limpie la
superficie en esa ubicación.
Nouvelle installation
Choisissez l’emplacement du distributeur d’un côté ou de l’autre du robinet. Avant de percer le trou,
vérifiez qu’il n’y a pas d’obstacles sous le lavabo comme des tuyaux, la cuve de l’évier ou les conduites
d’eau. Marquez le centre de l’emplacement désiré. Ce centre doit être à une distance maximale de 8,38 cm
(3,3 po) du bord du lavabo. Percez un trou d’un diamètre de 2,54 cm (1 po) dans le comptoir. Ensuite,
nettoyez la surface du comptoir à cet endroit.
Feed the wiring harness through the gasket. Slide the gasketonto the stem until it reaches the base of the
unit and align it so it fits in the recess at the base of the spout.
Introduzca el conjunto de cables a través de la junta. Deslice la junta por el cuerpo hasta que llegue a la
base de la unidad y alinéela para que se inserte en la cavidad de la base del surtidor.
Faites passer le faisceau électrique dans le joint d’étanchéité. Faites passer la tige dans le joint jusqu’à ce
que celui-ci atteigne la base du distributeur. Alignez le joint pour qu’il se place dans l’évidement à la base
du bec verseur.
Insert spoutassembly through the hole in the countertop and feed the spout cable through the wing nut.
Thread the wing nut onto the stem and hand tighten until gasket is compressed and is tight against the
countertop.
Pase el montaje del surtidor por el orificio en la parte superior del mostrador e introduzca el cable
del surtidor por la tuerca mariposa. Enrosque la tuerca mariposa sobre el cuerpo y ajústela manual-
mente hasta que la junta se comprima y se ajuste contra la parte superior del mostrador.
Insérez l’ensemble de bec verseur à travers le trou du comptoir et faites passer le câble du bec à travers
l’écrou à oreilles. Enfilez la tige dans l’écrou à oreilles et serrez-le à la main jusqu’à ce que le joint
d’étanchéité soit
Orient the motor assembly with the open area pointing toward the room for ease of inserting the refill.
Move the spout cable out of the way while sliding the motor assembly onto the stem as far as possible.
Insert the locking clip until it clicks into place.
Oriente el montaje del motor con el área abierta hacia la habitación para facilitar la instalación del
repuesto. Aparte el cable del surtidor mientras desliza el montaje del motor por el cuerpo tanto
como sea posible. Inserte el gancho de seguridad hasta que se ajuste y haga clic.
Orientez l’ensemble de moteur de façon à ce que son ouverture soit face à la salle pour faciliter
l’insertion des recharges. Écartez le câble du bec tout en insérant l’ensemble de moteur sur la tige
aussi loin que possible. Insérez l’attache jusqu’à ce qu’un déclic se fasse entendre.
Connect the spout cable in the stem to the matching cable from the motor assembly behind the motor
assembly.
Conecte el cable del surtidor que sale del cuerpo con el cable conector del montaje del motor,
que se encuentra en la parte posterior de este.
Branchez le câble du bec dans la tige au câble correspondant de l’ensemble de moteur derrière
celui-ci.
Secure the battery pack to the wall using screws, foam tape or other method appropriate to the type of
wall. Insert the 4 D cell batteries into the front cover of the battery pack. Replace the battery pack cover
by inserting the bottom edge and hand tighten the thumb scew. For best life, use the fresh batteries
provided with the dispenser.
Fije el paquete de baterías a la pared usando tornillos, cinta adhesiva de espuma u otro método que
sea adecuado para el tipo de pared. Introduzca las 4 baterías de celda en la tapa frontal del
paquete de baterías. Reemplace la tapa del paquete de baterías introduciendo el borde inferior y
ajustando el tornillo manual. Para una mayor duración, use las baterías nuevas que vienen con el
dispensador.
Fixez le bloc-piles au mur au moyen de vis, d’isolant adhésif ou d’une autre méthode appropriée au
type du mur. Insérez les quatre piles D dans le devant du bloc-piles. Replacez le couvercle du
bloc-piles en insérant son extrémité inférieure et serrez la vis de serrage à la main. Pour une durabilité
plus longue, utilisez les piles neuves fournies avec le distributeur.
Connect the battery pack power cord to the motorassembly power cord.
Conecte el cable de alimentación del paquete de baterías con el cable de alimentación del montaje
del motor.
Branchez le câble d’alimentation du bloc-piles au câble d’alimentation de l’ensemble de moteur.
Remove and discard the cap from the top of the refill. Remove the delivery tube from the side of the
bottle and insert the blue colored end of the tube into the blue cylinder on top of the bottle. Press in
until you feel a click.
Quite y deseche la tapa de la parte superior del repuesto. Quite el tubo de salida del costado de
la botella e introduzca el extremo de color azul del tubo en el cilindro azul de la parte superior de
la botella. Presione hasta oír un clic.
Retirez le capuchon du dessus de la bouteille de recharge. Retirez le tube de distribution du côté de
la bouteille et insérez l’extrémité bleue du tube dans le cylindre bleu sur la bouteille. Poussez jusqu’à
ce que vous entendiez un déclic.
Feed the delivery tube up through the spout assembly (entry at blue colored area) and push the neck
of the refill bottle into the receiving area, until you feel a click.
Introduzca el tubo de salida hacia arriba por el montaje del surtidor (entrada en el área de color
azul) y empuje el cuello de la botella de repuesto en el área de recepción, hasta que oiga un clic.
Faites passer le tube de distribution dans l’ensemble de bec vers le haut (par l’entrée bleue) et
poussez le goulot de la bouteille dans l’entrée jusqu’à ce que vous entendiez un déclic.
The dispenser will automatically detect when a full refill has been inserted. You can also manually
reset the low soap indicator light by pressing the button.
El dispensador detectará de manera automática cuando se haya insertado un repuesto lleno.
También puede restablecer manualmente la luz indicadora de nivel bajo de jabón al presionar el
botón.
Le distributeur détectera automatiquement qu’une recharge pleine a été insérée. Vous pouvez
également réinitialiser le voyant du niveau de savon bas en appuyant sur le bouton.
Prime the dispenser by placing your hand under the spout, repeatedly activating, until afull dose of
soap is dispensed. New installations may require 4-5 activations before soap is dispensed.
Pruebe el dispensador al colocar su mano debajo del surtidor, activándolo reiteradamente, hasta
que dispense una medida completa de jabón. Las instalaciones nuevas pueden requerir de cuatro
a cinco activaciones para dispensar jabón.
Préparez le distributeur en plaçant votre main sous le bec pour l’activer plusieurs fois jusqu’à ce
qu’une dose entière de savon soit distribuée. Un distributeur nouvellement installé peut nécessiter
jusqu’à quatre ou cinq activations jusqu’à ce que le savon soit distribué.
1b
If Replacing an Existing Dispenser
Remove the existing components, both above and below the counter. Discard partially drained batteries. 
Verify the size of the existing counter hole is between 15/16” and 1-1/8” in diameter and the center of the
hole is no more than 3.3” away from the edge of the sink. Then clean the counter surface at that location.
Si se reemplaza un dispensador actual
Quite los componentes actuales que están tanto arriba como abajo de la superficie. Deseche las
baterías parcialmente descargadas.
Verifique que el tamaño del orificio de la superficie actual tenga entre 15”/16” y 1-1/8” de diámetro, y
que el centro del orificio no esté a más de 3.3” del borde del lavamanos. Luego, limpie la superficie en
esa ubicación.
En cas de remplacement du présent distributeur
Retirez les pièces actuelles sur le comptoir et en dessous. Mettez les piles utilisées de côté.
Assurez-vous que la taille du trou actuel du comptoir a un diamètre entre 2,38 cm (0,94 po) et 2,86 cm
(1,13 po) et que son centre se trouve à une distance maximale de 8,38 cm (3,3 po) du bord du lavabo.
Ensuite, nettoyez la surface du comptoir à cet endroit.
3.3”
max
1”

This manual suits for next models

1

Other Georgia Pacific Dispenser manuals

Georgia Pacific enMotion User manual

Georgia Pacific

Georgia Pacific enMotion User manual

Georgia Pacific 56767A User manual

Georgia Pacific

Georgia Pacific 56767A User manual

Georgia Pacific enMotion User manual

Georgia Pacific

Georgia Pacific enMotion User manual

Georgia Pacific GP PRO Dixie Ultra SmartStock Tri-Tower User manual

Georgia Pacific

Georgia Pacific GP PRO Dixie Ultra SmartStock Tri-Tower User manual

Georgia Pacific enMotion 59466A User manual

Georgia Pacific

Georgia Pacific enMotion 59466A User manual

Georgia Pacific SofPull User manual

Georgia Pacific

Georgia Pacific SofPull User manual

Georgia Pacific SoftPull mini User manual

Georgia Pacific

Georgia Pacific SoftPull mini User manual

Georgia Pacific 54010 User manual

Georgia Pacific

Georgia Pacific 54010 User manual

Georgia Pacific enMotion 52057KB User manual

Georgia Pacific

Georgia Pacific enMotion 52057KB User manual

Georgia Pacific ActiveAire 56764 User manual

Georgia Pacific

Georgia Pacific ActiveAire 56764 User manual

Georgia Pacific Cormatic User manual

Georgia Pacific

Georgia Pacific Cormatic User manual

Georgia Pacific PRO enMotion 59466A User manual

Georgia Pacific

Georgia Pacific PRO enMotion 59466A User manual

Georgia Pacific enMotion 10 User manual

Georgia Pacific

Georgia Pacific enMotion 10 User manual

Georgia Pacific Compact Quad 56743A User manual

Georgia Pacific

Georgia Pacific Compact Quad 56743A User manual

Georgia Pacific 53052 User manual

Georgia Pacific

Georgia Pacific 53052 User manual

Georgia Pacific Pacific Blue Ultra 59590 User manual

Georgia Pacific

Georgia Pacific Pacific Blue Ultra 59590 User manual

Georgia Pacific GP PRO 59488A User manual

Georgia Pacific

Georgia Pacific GP PRO 59488A User manual

Georgia Pacific SofPull mini User manual

Georgia Pacific

Georgia Pacific SofPull mini User manual

Georgia Pacific enMotion 59498A User manual

Georgia Pacific

Georgia Pacific enMotion 59498A User manual

Georgia Pacific enMotion User manual

Georgia Pacific

Georgia Pacific enMotion User manual

Georgia Pacific Professional 54338A User manual

Georgia Pacific

Georgia Pacific Professional 54338A User manual

Georgia Pacific GP PRO enMotion 59762 User manual

Georgia Pacific

Georgia Pacific GP PRO enMotion 59762 User manual

Georgia Pacific GP PRO Pacific Blue Ultra 56602A User manual

Georgia Pacific

Georgia Pacific GP PRO Pacific Blue Ultra 56602A User manual

Georgia Pacific enMotion 52052 User manual

Georgia Pacific

Georgia Pacific enMotion 52052 User manual

Popular Dispenser manuals by other brands

RCBS 98941 Product instructions

RCBS

RCBS 98941 Product instructions

Kimberly-Clark PROFESSIONAL ICON user guide

Kimberly-Clark PROFESSIONAL

Kimberly-Clark PROFESSIONAL ICON user guide

Genius Ideas 051138 manual

Genius Ideas

Genius Ideas 051138 manual

Global Industrial 641519 Assembly instructions

Global Industrial

Global Industrial 641519 Assembly instructions

APW Wyott Lowerator L-10 Specifications

APW Wyott

APW Wyott Lowerator L-10 Specifications

Fast & Fluid Management Harbil HA180 Operating and safety manual

Fast & Fluid Management

Fast & Fluid Management Harbil HA180 Operating and safety manual

SAGRA DCD-150 instruction manual

SAGRA

SAGRA DCD-150 instruction manual

Miele professional DOS-Modul G 60 Fitting instructions

Miele professional

Miele professional DOS-Modul G 60 Fitting instructions

Stalgast 468001 user manual

Stalgast

Stalgast 468001 user manual

U-Line H-1132 instructions

U-Line

U-Line H-1132 instructions

InSinkErator C1300 owner's manual

InSinkErator

InSinkErator C1300 owner's manual

lancer 4400 Series installation guide

lancer

lancer 4400 Series installation guide

Stoelting O111-I2F Operator's manual

Stoelting

Stoelting O111-I2F Operator's manual

Silver King SKCRM2P Technical manual

Silver King

Silver King SKCRM2P Technical manual

Hampton Research HR8-162 user guide

Hampton Research

Hampton Research HR8-162 user guide

Hewi 950 Installation and operating instructions

Hewi

Hewi 950 Installation and operating instructions

Morphy Richards Redefine 131000 instruction manual

Morphy Richards

Morphy Richards Redefine 131000 instruction manual

Stern TUBULAR Installation and maintenance guide

Stern

Stern TUBULAR Installation and maintenance guide

manuals.online logo
manuals.online logoBrands
  • About & Mission
  • Contact us
  • Privacy Policy
  • Terms and Conditions

Copyright 2025 Manuals.Online. All Rights Reserved.