1.
2.
3.
4.
5.
6.
7.
8.
1.
2.
3.
4.
5.
6.
7.
8.
1.
2.
3.
4.
5.
6.
7.
8.
floor | piso |plancher
Installation Location | Sitio de instalación | Emplacement de l'installation Optional Mounting Bracket Installation | Instalación del soporte de montaje opcional | Installation
du support de montage en option
Standard Installation | Instalación estándar | Installation standard
*1.
2.
3.
4.
5.
*1.
2.
3.
4.
5.
*1.
2.
3.
4.
5.
SKU 54025 - Twin Only | Modelo doble
únicamente | Double uniquement
click
clic
clic
7-9”
min: 1.5”
Clearance for Lid Opening
Espacio para abrir la tapa
Dégagement pour
l'ouverture du couvercle
SKU 54019 SKU 54025
.25” (6mm)
33-36”
1
2
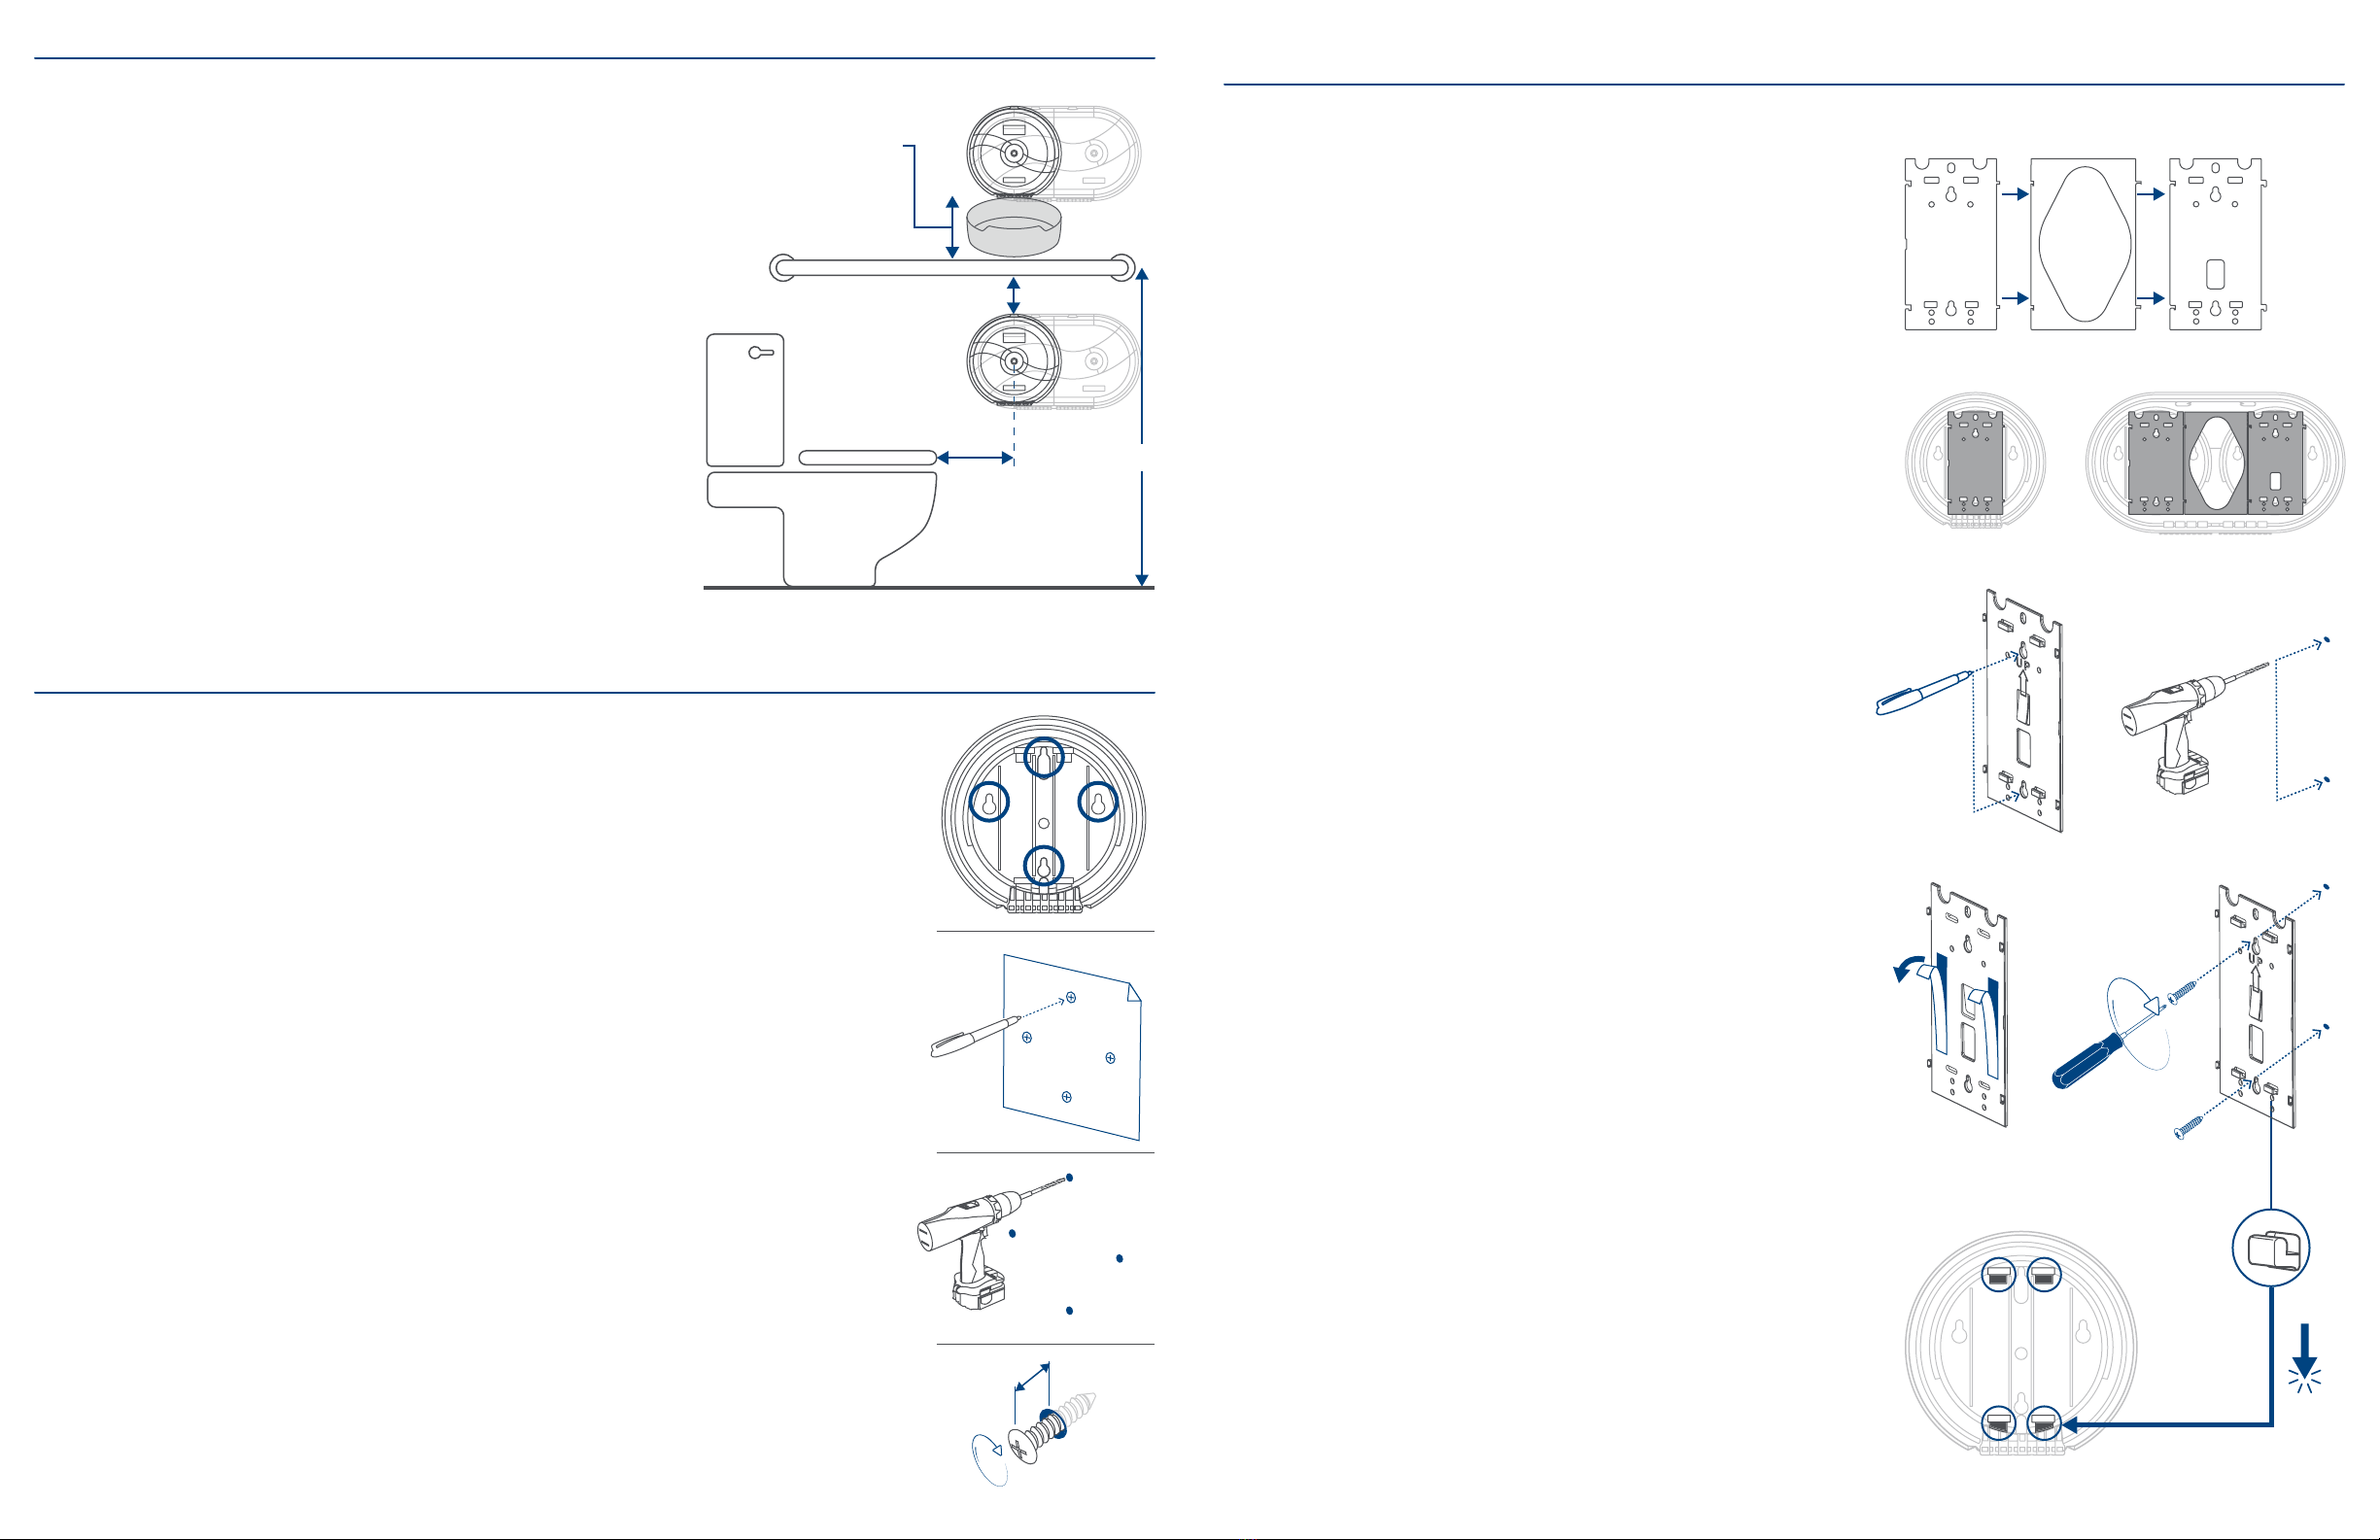
Locate the screw holes in the back plate of the dispenser. Choose the holes that will most reliably secure
the dispenser to the wall for the specific application.
Locate the dispenser template on the dispenser box. Mark the chosen screw holes on the wall using the
template.
Remove template and hold dispenser on wall to verify the hole positions are correctly marked.
Use good mounting practices to accurately pre-drill pilot holes for screws.
Fasten screws into wall, leaving approximately .25” inch between the wall and the screw head.
Align the large openings of “Keyhole slots” (on back wall of dispenser) with the screw heads and hang
dispenser on screws.
Tighten screws suciently to prevent the dispenser from moving.
If the movable plates (located on the inside of the dispenser) are removed, the five springs behind each
plate must be put back in place during installation for proper dispensing.
Busque los orificios para los tornillos en la placa posterior del dispensador. Seleccione los orificios que
mejor aseguren el dispensador a la pared para el uso específico.
Busque la plantilla del dispensador en la caja. Use la plantilla para marcar en la pared los orificios de los
tornillos que haya seleccionado.
Retire la plantilla y sostenga el dispensador sobre la pared para comprobar que las marcas coincidan.
Aplique las prácticas de instalación adecuadas para preperforar con precisión los orificios para guiar los
tornillos.
Ajuste los tornillos a la pared dejando aproximadamente 0,6 cm (0.25") entre la pared y la cabeza del
tornillo.
Alinee las aberturas grandes con forma de "ranuras de cerradura" (en la parte posterior del dispensador)
con las cabezas de los tornillos y cuelgue el dispensador en los tornillos.
Ajuste los tornillos lo suficiente como para evitar que el dispensador se mueva.
Si se retiran las placas móviles (en el interior del dispensador), los cinco resortes detrás de cada placa
deben volver a colocarse en su sitio durante la instalación para un correcto suministro de papel.
Repérez les trous de vis dans la plaque arrière du distributeur. Choisissez les trous qui permettront de
fixer le distributeur au mur de la manière la plus fiable pour l'application spécifique.
Repérez le gabarit du distributeur sur la boîte du distributeur. Marquez les trous de vis choisis sur le mur
à l'aide du gabarit.
Retirez le gabarit et tenez le doseur sur le mur pour vérifier que les emplacements des trous sont
correctement marqués.
Utilisez les bonnes pratiques de montage pour pré-percer avec précision les avant-trous pour les vis.
Fixez les vis dans le mur en laissant environ 0,25 pouce entre le mur et la tête de la vis.
Alignez les grandes ouvertures des « fentes en trou de serrure » (sur la paroi arrière du distributeur)
avec les têtes de vis et suspendez le distributeur aux vis.
Serrez les vis susamment pour empêcher le distributeur de bouger.
Si les plaques mobiles (situées à l'intérieur du distributeur) sont retirées, les cinq ressorts derrière
chaque plaque doivent être remis en place lors de l'installation pour une distribution correcte.
Vertical Position: Recommended installation is below the grab bar.
Position the top of the dispenser at least 1.5” below the grab bar Fig. A
(keeping in mind the ADA placement requirements). This will provide
clearance for inserting the key. If mounted above the grab bar Fig. B,
provide enough clearance at the bottom of the dispenser so that the
cover opens completely.
Posición vertical: la instalación recomendada es debajo de la barra de
agarre. Coloque la parte superior del dispensador al menos 3,8 cm (1.5")
debajo de la barra de agarre, Fig. A, (teniendo en cuenta los requisitos de
colocación de la ley ADA). Así, habrá espacio suficiente para insertar la
llave. Si se instala por encima de la barra de agarre, Fig. B, deje espacio
suficiente en la parte inferior del dispensador para poder abrir la tapa por
completo.
Emplacement vertical : L'installation recommandée est sous la barre
d'appui. Placez le haut du distributeur à au moins 1,5 po sous la barre
d'appui (Fig. A) (en gardant à l'esprit les exigences de placement de
l'ADA). Cela permettra de dégager l'espace nécessaire à l'insertion de
la clé. Si le distributeur est monté au-dessus de la barre d'appui (Fig.
B), prévoyez un espace susant au bas du distributeur pour que le
couvercle s'ouvre complètement.
(Step 1 for twin dispenser only) Fit the two mounting brackets and the
spacer together (SKU 54025) by aligning the spacer between the two
brackets. The spacer and the bracket tabs should slide into place.
Align mounting bracket with screw holes. Note: Do not remove adhesive
cover from mounting bracket for this step.
Mark screw locations. Drill pilot holes. Remove protective cover from tape
and apply bracket to wall. Secure bracket with screws.
Fit the dispenser on the bracket. Lock into place by gently pulling
downward. Listen for a click indicating dispenser is properly secured.
If the movable plate inside the dispenser is removed, the five springs must
be put back in place during installation for proper dispensing. The only
reason the plate would need to be removed is to “retrieve” lost screws. And
if the screws are pre-fastened to the wall, there is no reason to remove the
plate during the mounting process.
Note: To remove dispenser from mounting bracket, locate flexible tab on
center of bracket. Push tab inward and gently pull dispenser upward.
(Paso 1 solo para el dispensador doble) Ensamble los dos soportes de
montaje y el espaciador (SKU 54025); para ello, alinee el espaciador entre los
soportes. El espaciador y las lengüetas de los soportes se deben deslizar
hasta fijarse en su lugar.
Alinee el soporte de montaje con los orificios para los tornillos. Nota: no retire
la protección adhesiva del soporte de montaje en este paso.
Marque los sitios para los tornillos. Perfore los orificios guía. Retire la
protección adhesiva de la cinta y coloque el soporte sobre la pared. Fíjelo con
los tornillos.
Inserte el dispensador sobre el soporte. Presione suavemente hacia abajo
para fijarlo en su lugar. Cuando escuche un "clic", el dispensador habrá
quedado bien asegurado.
Si se quita la placa móvil del interior del dispensador, los cinco resortes
deben volver a colocarse en su sitio durante la instalación para un correcto
suministro de papel. El único motivo por el que habría que retirar la placa
sería para "recuperar" tornillos perdidos. Si los tornillos están prefijados a la
pared, no será necesario retirar la placa durante el proceso de montaje.
Nota: para sacar el dispensador del soporte de montaje, ubique la lengüeta
flexible que está en el centro del soporte. Presione la lengüeta hacia dentro y
tire ligeramente del dispensador hacia arriba.
(Étape 1 pour les distributeurs doubles uniquement) Installez les deux
supports de montage et l'entretoise ensemble (SKU 54025) en alignant
l'entretoise entre les deux supports. L'entretoise et les languettes des
supports doivent glisser en place.
Alignez le support de montage avec les trous de vis. Remarque : ne retirez
pas le couvercle adhésif du support de montage pour cette étape.
Marquez l'emplacement des vis. Percez des avant-trous. Retirez la
couverture protectrice du ruban adhésif et appliquez le support sur le mur.
Fixez le support avec les vis.
Placez le distributeur sur le support. Verrouillez en place en tirant
doucement vers le bas. Un déclic indique que le distributeur est
correctement fixé.
Si la plaque mobile à l'intérieur du distributeur est retirée, les cinq ressorts
doivent être remis en place lors de l'installation pour assurer une
distribution correcte. La seule raison pour laquelle la plaque devrait être
retirée est pour « récupérer » les vis perdues. Et si les vis sont préfixées au
mur, il n'y a aucune raison de retirer la plaque pendant le processus de
montage.
Remarque : Pour retirer le distributeur du support de montage, repérez la
languette flexible au centre du support. Poussez la languette vers l'intérieur
et tirez doucement le distributeur vers le haut.
Horizontal Position: Position the center of the nozzle 7”– 9” (max) from
the front edge of the toilet seat.
Posición horizontal: coloque el centro de la abertura a una distancia de 18 a
23 cm (7" a 9") como máximo del borde del asiento del retrete.
Emplacement horizontal : Placez le centre de la buse à une distance de 7
à 9 pouces (maximum) du bord avant du siège des toilettes.
Fig. B
Fig. A


