Gima 29613 User manual

Code 29613
LED COLPOSCOPE - 3 magnifications
User Manual
Gima S.p.A. – Via Marconi, 1 - 20060 Gessate (MI) Italy
Italia: tel 199 400 401 – fax 199 400 403 – gima@gimaitaly.com
Export: phone + 39 02 953854209/221/225 – fax + 39 02 95380056 - export@gimaitaly.com
–www.gimaitaly.com

Three-Step Colposcope
Featuring LED Light Source:
•Lasts longer
•Cool to the touch
•Gives you more of a sure color balance
Three-Step
Magnification
Knob
Now easier to move with our new Roller
Base. Plus, once in position, the platform
remains stable.
LED Bulb Cover
Diopter Knobs
Head Inclination
Adjusting Knob
Rheostat Knob
Fine Focus Handle
Gross Height
Adjustment and
Locking Knob
Clutter Reducing
Internal Power
Cables
On/Off Switch and
Power Indicator
Light
360º Motion
Roller Base

LED Bulb Cover
Three-Step
Magnification
Knobs
Green Filter Knob
mm A
A
3.75X3.5
7.5X2
B 15X 0.9
B
17
8.8
4.4
Rheostat Knob
Diopter Knobs
Fine Focus
Handle
Fuse Seat
These circles give you the millimeter
size at the tissue site according to the
magnification you’re using.
Fine Height
Adjustment
Handle
Gross Height
Adjustment and
Locking Knob
Power Plug

Indications for Use
The ALLTION brand Colposcope is a device designed to permit viewing of the tissues of the vagina and cervix by
a telescopic system located outside the vagina. A Colposcope is used to diagnose and examine abnormalities of
the vagina and cervix.
1. Features
•Hand polished optics for exceptional clarity
•Individual y adjustable binocular optics for true stereoscopic view
•Optical measuring circles for precise measurements
•Focal length: 300mm
Magnification: 15X, 7X, 3.75X
Field of View: 7.64mm, 15.5mm, 30.93mm
Depth of Field: 2mm, 4mm, 18mm
•Smooth adjustable controls for gross and fine focus
•Universal Teflon®ball joint never has to be tightened or adjusted and it
360º Motion gives you fluid 360° motion for gross focus
•A space saving small footprint: Length is 14", Width is 12"
•Clutter reducing internal power cable
•Working height: 33" –47"
•Clear, bright, long-lasting LED light source
•Light intensity:28,000 LUX
•One piece shipping that puts you in operation within minutes of
opening the box (no salesperson necessary)
•Overal magnification 3.75X, 7X, 15X
2. Contents of Box
•1 Colposcope
•1 Power Cord
•2 Fuses
•1 Plastic Dust Cover
•1 Instructions for Use
•1 Phillips Screwdriver
3. Removing the Colposcope From the Box
The Colposcope comes with a one year warranty with free repairs (shipping not included). Please keep this box
and the protective foam for at least a year; should you need to return it to ALLTION for any warranty repairs. Other-
wise there will be a nominal fee for us to send you a new box.
•During the handling and unpacking, the box must be placed in the up position according to the arrows that
are printed on the outer box.
•Remove top protective material.
•Grasp the Colposcope at the center post (A cutout in the foam for your hands is provided.) and lift the
Colposcope straight out of the protective material. Note: When removing the instrument out of the
protective foam, remove with care to prevent the instrument from being damaged.

4B.
.
4. Setting Up the Colposcope
A. Remove the power cord from the shipping box.
B. Insert the power cord into the plug located at the back end of the base.
C. Insert the other end of the power cord into the wal socket. Note: It
must be a three-hole wal socket, in order to ensure proper grounding
of the instrument.
D. Depress the power on/off button with your right foot, to turn on the
power. The power indicator light will come on at that time.
E. Important: Rotate the Rheostat Knob to turn on the Viewing Light.
F. When the instrument is ready to be shut off, simply depress the power
on/off button with your right foot. The power indicator light will go off
at that time.
4D.
5. Precautions
A. For storage, the instrument should be placed in a clean, dry environ-
ment with stable temperatures to extend the life of the components
and ensure longevity of the instrument.
B. Please cover the Colposcope with the
plastic dust cover that is included with
this instrument. This will keep the optics
and components relatively dust free.
C. When storing or carrying the instrument,
adjust the instrument to the lowest
position. This will help ensure that if it is
inadvertently hit, it will resist tipping over.
5B.

6B.
Rheostat
Knob
6. Adjustment of the Eyepieces
The interpupillary distance (IPD) is the distance in the spacing between
a person’s eyes.
To Adjust the IPD
A. Turn on power by pressing the foot-switch on the base. On/off indica-
tion light will come on.
B. Turn the black Rheostat Knob on the left to adjust the light intensity.
Light will project from upper part of the Colposcope.
C. Gently place your eyes against the black rubber eyepieces. Grasp the
tan metal housing with both hands. Gently rotate the barrels together
or apart. A singular circular image should be seen through both eye-
pieces. This adjustment is similar to adjusting the eyepieces of
binoculars.
Lenses Before Adjustment Lenses During Adjustment
Lenses Adjusted

.
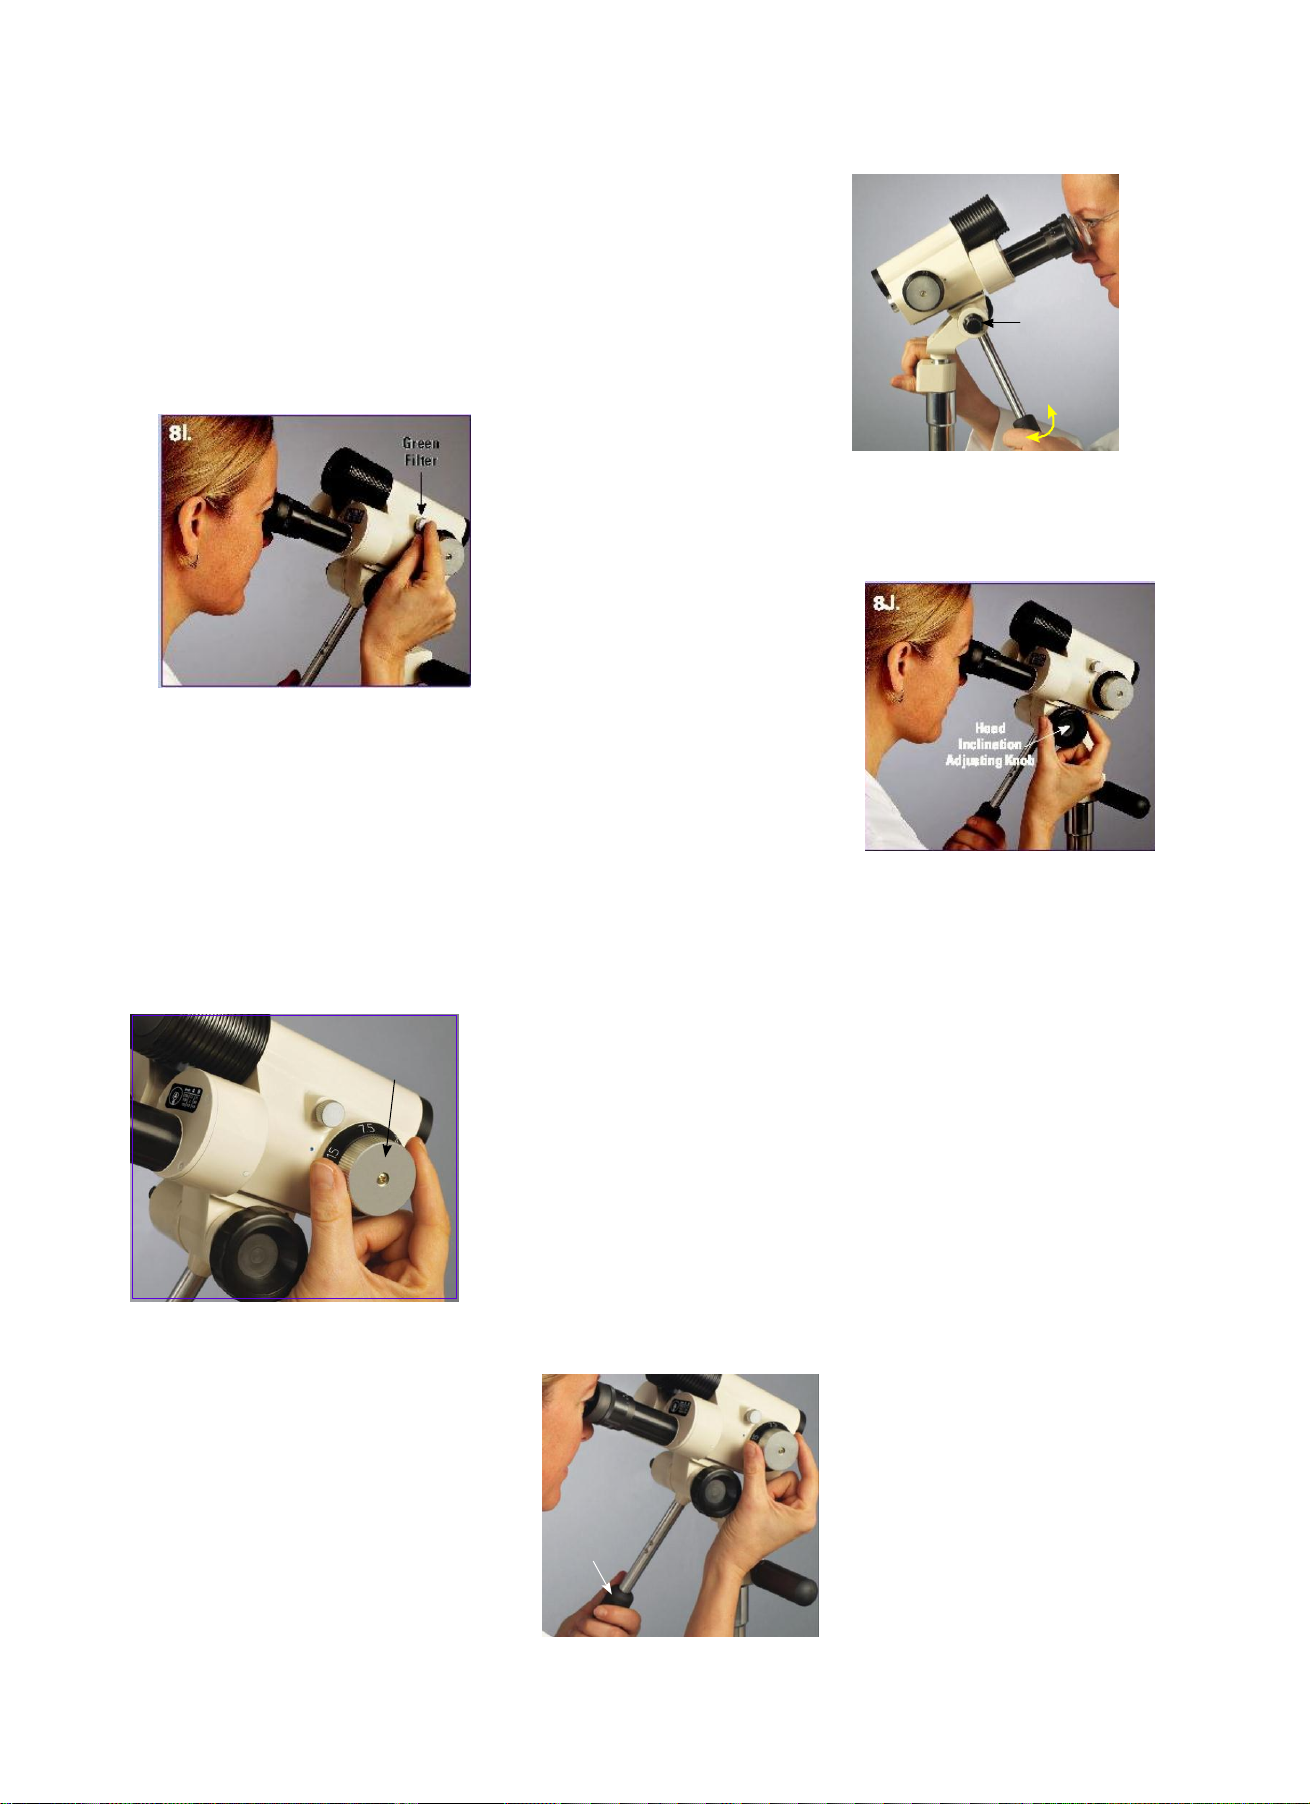
7. Adjustment of the Diopter Knobs
Focusing the Colposcope
A. Set the Diopter Knobs at zero.
B. Turn the Colposcope on, place your eyes against the eyepieces, and
focus the Colposcope on a fixed object until that object appears clear
and sharp.
C. It is recommended to focus on letters such as a book or a magazine.
D. Close your right eye. With your left hand, rotate the Diopter Knob until
the object is clear and sharp for your left eye. Note: The Diopter allows
you to adjust for plus and minus vision corrections.
E. Then close your left eye. With your right hand, rotate the diopter knob
until the object is clear and sharp for your right eye. Note: The Diopter
allows you to adjust for plus and minus vision corrections.
F. This adjustment of the diopters will put the in Colposcope focus. You
will see two measuring circles through the lens. Since your Colpo-
scope has three different magnifications, the measurement at the
tissue site will vary according to the magnifica-
tion you’re using. The reference chart gives you
the correct size per magnification change. Note:
There is a chart on the right tan metal housing.
A
B
mm A
3.75X 3.5
7.5X 2
15X 0.9
B
17
8.8
4.4
Measurement At Tissue Site 3.75X
7F.
G. It is important to keep a record of the adjustments on the Diopters for
both your left and right eyes. Since most offices have multiple people
using the Colposcope, the eyepiec-
Lens 17mm Line
3.5mm Line
es wil be different when someone
else wants to use it. By remember-
ing your diopter settings, clarity can
be achieved by simply moving the
diopters to your setting when you
are ready to use the Colposcope.
This avoids you going through steps
A–E each time.
Measurement At Tissue Site 7.5X
7F.
A Note for Eyeglass Wearers:
For best results when wearing eyeglasses, fold down the Colposcope’s
Lens 8.8mm Line
2mm Line
rubber eye cups. Then place your eyeglasses against the folded down
eye cups while using the Colposcope. When you are finished using the
Colposcope, unfold the rubber eyepieces to maintain the correct memory
in those rubber eyepieces.
Measurement At Tissue Site 15X
7F. Lens 4.4mm Line
0.9mm Line
Fold down
rubber eye cups

8A.
Gross Height
Adjustment and
Locking Knob
8. Colposcope Instructions for Use
The following briefly describes using the Colposcope with a patient. It
is recommended that you practice using the Colposcope to familiarize
yourself with all of the features it has to offer.
A. With patient in lithotomy position, your Colposcope should be placed
so that the head of the scope is 300mm from the area you wish to
view, with the post to as near vertical as possible. Rotate the Gross
Height Adjustment and Locking Knob to loosen it and move the
inner post up or down. Tighten the knob to lock the inner post in place.
8B.
B. In a sitting position, place your feet on the rubber pad part of the base.
Place your eyes against the eyepiece. Adjust for pupillary distance and
make sure that you set your correct diopter reading. Place your right
hand on the Fine Height Adjustment Handle and your left hand on
the Fine Focus Handle. Note: Do not try to focus with Fine Focus
Adjustment at this point.
8C.
Fine Height
Adjustment
Handle
Fine Focus
Handle
C. With your right hand on the Fine Height Adjustment Handle, slowly
push or pull the Colposcope, until the field comes into view.

Move Head Up & Down
8D.
Fine Height
Adjustment
Handle
Fine Focus
Handle
If patient is not centered, you can move the Colposcope head in multiple
directions to change your field of vision. See photos D–H.
Move Head Left Move Head Right
8E. 8F.
Twist the adjustment handle to
move the head up or down.
Push the Fine Height Adjustment
Handle forward and to the left
(counterclockwise).
Angle Head Up
8G.
Push the Fine Focus Handle
down and forward.
Pull the Fine Height Adjustment
Handle backward and to the right
(clockwise).
Angle Head Down
8H.
Pull the Fine Focus Handle
up and backward.

I. Adjust the Fine Focus Controls to provide clear, magnified views of the
area to be examined. Rotate your left hand on the Fine Focus Handle
which will finely move the optics towards or away from the object that
you wish to view. Also, rotate your right hand which is on the Fine
Height Adjustment Handle up or down to raise or lower the optics.
Adjust light intensity rheostat as needed by turning the black Rheostat
Knob. Turn the silver Green Filter Knob for optimum assessment of
affected area.
8I.
Rheostat
Knob
Fine Focus
Handle
Note: Both the black Rheostat
Knob and the silver Green Filter
Knob are conveniently located
on the Colposcope head, thus
al owing the user complete control
without looking up from the
eyepieces.
Head
J. The Colposcope head may be tightened or loosened according to your
preference by turning the Head Inclination Adjusting Knob.
Inclination
Adjusting Knob
9A.
Three-Step
Magnification
Knob
9. Selecting Your Preferred Level of Magnification
The AC-1310 offers you the advantage of increasing or decreasing magni-
fication during a colposcopic examination.
A. When viewing the cervix, reach up and rotate the Three-Step
Magnification Knob.
B. Rotate it to your desired magnification (3.75, 7.5, or 15).
When moving from one magnification to another, slight adjustments in
the fine focusing mechanism might be necessary.
C. Turn the Fine Focus Handle.
9C.
Fine Focus
Handle

Fine Height
Adjustment
Handle
Gross Height
Adjustment
and Locking
Knob
10. Moving the Colposcope
A. Rotate the Gross Height Adjustment and Locking Knob to move the
post to a comfortable position.
B. Tighten the Gross Height Adjustment and Locking Knob.
C. Place your foot between the wheels at the front end of the base.
D. With your hand on the Fine Height Adjustment Handle, pull forward
and rol across the floor.
11. Fuse Replacement
•Unscrew the Fuse Seat located at the back end of the base using the
Phillips screwdriver that is included with the Colposcope. Remove
the broken fuse (dispose of correctly).
•Replace with the fuse that is also included with the Colposcope. Two
fuses have been included for your convenience.
•Screw the Fuse Seat into the proper position, using a Phillips
screwdriver.
12. Troubleshooting
Viewing Light Will Not Come On
On-Off Light Indicator Burning
•Check power plug to ensure that it is secure.
•Rotate the black Rheostat Knob.
•Call ALLTION Customer Service for assistance: +86-774-2836101
On-Off Light Indicator Not Burning
•Place hand in front of Colposcope head, as light indicator bulb may be
burned out.
•Push On/Off switch.
•Check cord to see if plug is in at both the Colposcope and wal .
•Check fuse. Fuses are located on the edge of the tilt stand base.
•Check wall plug with another electrical instrument
•Call ALLTION Customer Service for assistance: +86-774-2836101
Colposcope Head Keeps Turning
•Tighten Gross Height Adjustment and Locking Knob.

The product must not be disposed of along with other domestic waste. The users must dispose of this equipment by bringing
it to a specific recycling point for electric and electronic equipment. For further information on recycling points contact
the local authorities, the local recycling center or the shop where the product was purchased. If the equipment is not
disposed of correctly, fines or penalties may be applied in accordance with the national legislation and regulations.
GIMAWARRANTY CONDITIONS
Congratulations for purchasing a GIMAproduct. This product meets high qualitative standards both as regards the material
and the production. The warranty is valid for 12 months from the date of supply of GIMA. During the period of validity
of the warranty, GIMAwill repair and/or replace free of charge all the defected parts due to production reasons. Labor
costs and personnel traveling expenses and packaging not included.All components subject to wear are not included
in the warranty. The repair or replacement performed during the warranty period shall not extend the warranty. The
warranty is void in the following cases: repairs performed by unauthorized personnel or with non-original spare parts,
defects caused by negligence or incorrect use. GIMAcannot be held responsible for malfunctioning on electronic
devices or software due to outside agents such as: voltage changes, electro-magnetic fields, radio interferences, etc.
The warranty is void if the above regulations are not observed and if the serial code (if available) has been removed,
cancelled or changed. The defected products must be returned only to the dealer the product was purchased from.
Products sent to GIMAwill be rejected.
Alltion CO., Ltd. Suite B,11F.,Lijing Tower, Cathay Plaza, No.18, Zhong Shan Road, Wuzhou, Guangxi, 543000 P.R.C.
Wellkang Tech Consulting, Suite B, 29 Harley Street, London W1G 9QR, United Kingdom
Rev. 1.08.10
Table of contents
Other Gima Medical Equipment manuals
Popular Medical Equipment manuals by other brands

C-me
C-me NIKI V4 Service manual

Care Fusion
Care Fusion Alaris Propofol-Paedfusor Directions for use

BetterLiving
BetterLiving BE9002 Setup and operation

Smith & Nephew
Smith & Nephew JOURNEY II BCS manual

Etac
Etac Molift EvoSling HighBack user manual

Atos
Atos LaryLogics Provox LaryButton When and How to Use