Godox LC500 User manual

INSTRUCTION MANUAL
LED
LED Light Stick
Made in China
:2
:0755-29609320(8062):0755-25723423:godox@godox.com
godox.com
Add: Building 2, Yaochuan Industrial Zone, Tangwei Community, Fuhai Street, Bao’an District,
Shenzhen, China Tel: +86-755-29609320(8062) Fax: +86-755-25723423
GODOX Photo Equipment Co., Ltd.
705-LC5000-00
QCPASS

LEDLC500
50
3300K5600K
516
DC
CH/GRP
MODE
LCD
-
+
-01- -02-
(
)

1.
100%2H
2.
2.5H
%
CH
K
LCD
()
-03- -04-
*1 *1 (16.8V/1.2A)*1
*1

LED
MODE5600K3300K
/CH/GRPCHGRP-
+
()
%
CH
K
%
CH
K
%
CH
K
%
CH
K
-+1%-
+10%10%-100%
%
CH
K
433MHz
6LED16
/
CH/GRP-+(A~F)
CH/GRP2-+
(1~16)
/
CH/GRP-+(A~F)
CH/GRP2-+
(1~16)
/
-+
SET1-+
-05- -06-

ON/OFFLED
SET2LED
4
:
(1)5600K
(2)3300K
(3)
LED
100%(LUX)
TLCI
CRI
()
LC500
14.8V/2600mAh
18W
5600K±300K
3300K±300K
16
6(ABCDEF)
1200(1)
95
>95
10%~100%
516
-5~50
565*56*56mm()
760g
*
-07- -08-

Foreword
Warning
Thank you for purchasing this Godox Product!
This LED Light Stick LC500 is a continuous light with double color temperature, high light
brightness and wireless adjustment. Suitable for almost all shooting occasions, which can
offer lighting for live, camping, make up, portrait shooting, video, wedding, children
photography, etc. It’s portable and easy to be operated.
Features:
● High light brightness which can be freely adjusted in wide range
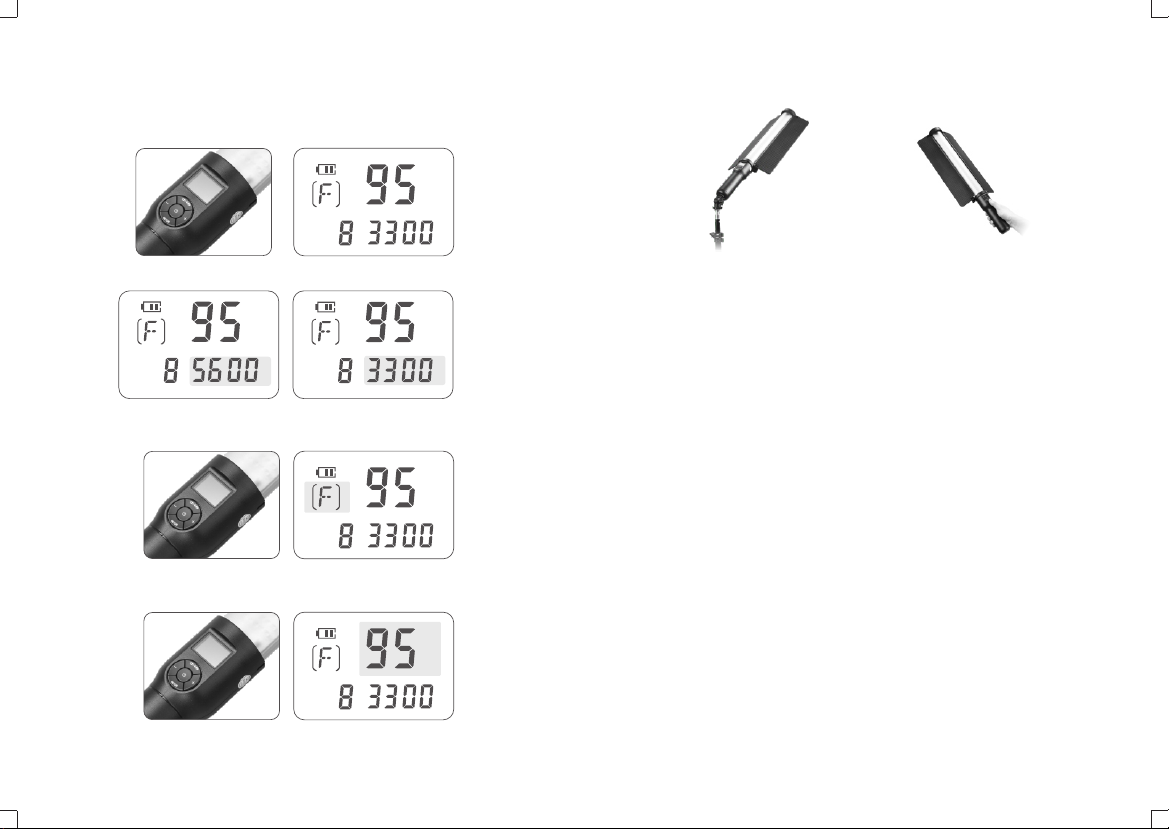
● Double color temperature: 3300K and 5600K can be switched
●Wireless adjustment
●Built-in lithium battery
●High-temperature resistance
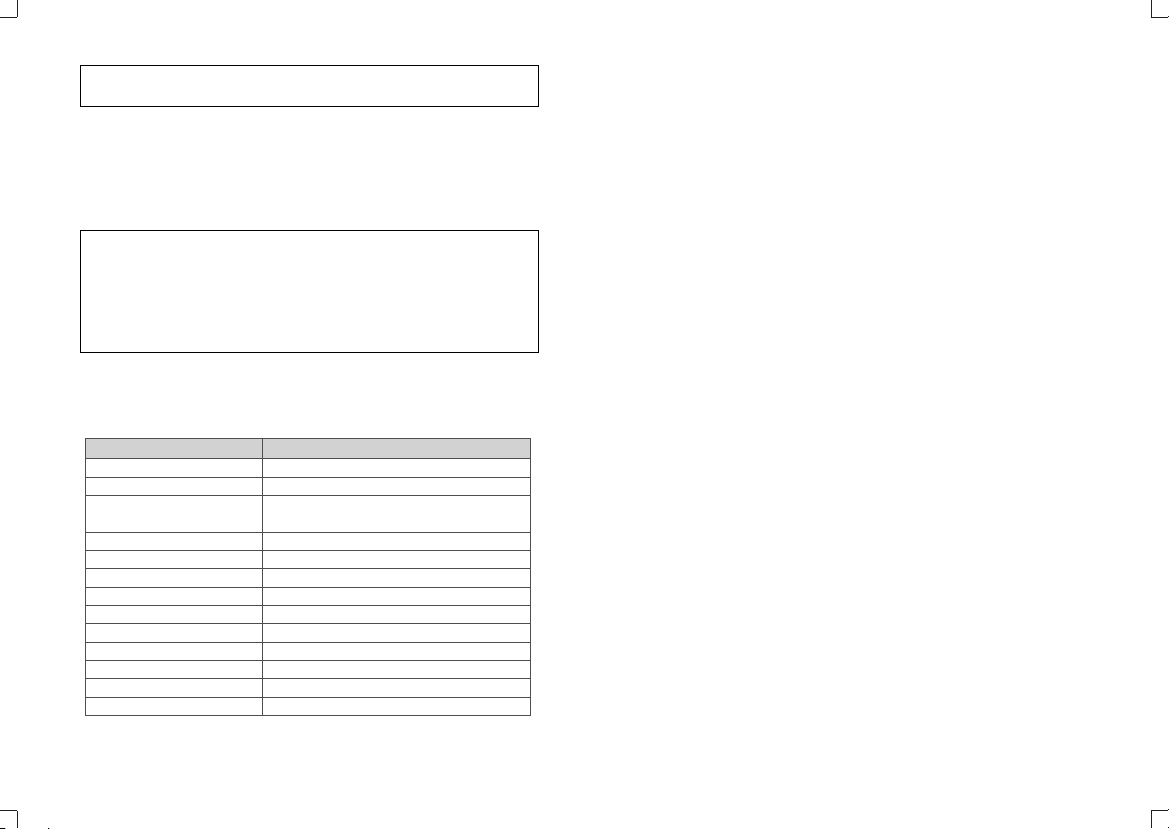
●Handle use or being fixed on the tripod
●Suitable for almost all situation
●Intellectual memory
Always keep this product dry. Do not use in rain or in damp conditions.
Do not disassemble. Should repairs become necessary, this product must be sent to
an authorized maintenance center.
Keep out of reach of children.
As this product do not have waterproof function, please take measures of waterproof
in rainy or damp environment.
Do not use the flash unit in the presence of flammable gases, chemicals and other
similar materials. In certain circumstance, these materials may be sensitive to the
strong light emitting from this flash unit and fire or electromagnetic interference may
result.
As this product has built-in lithium battery, do not disassemble, impact, squeeze or
put it into fire. If serious bulge occurs, please do not use. Do not use or store the
product if the ambient temperature reads over 50°C. Please charge the product with
specialized charger and correctly operate it within the defined voltage and working
temperate according to the instruction manual.
The light source contained in this luminaire shall only be replaced by the
manufacturer or his service agent or a similar qualified person.
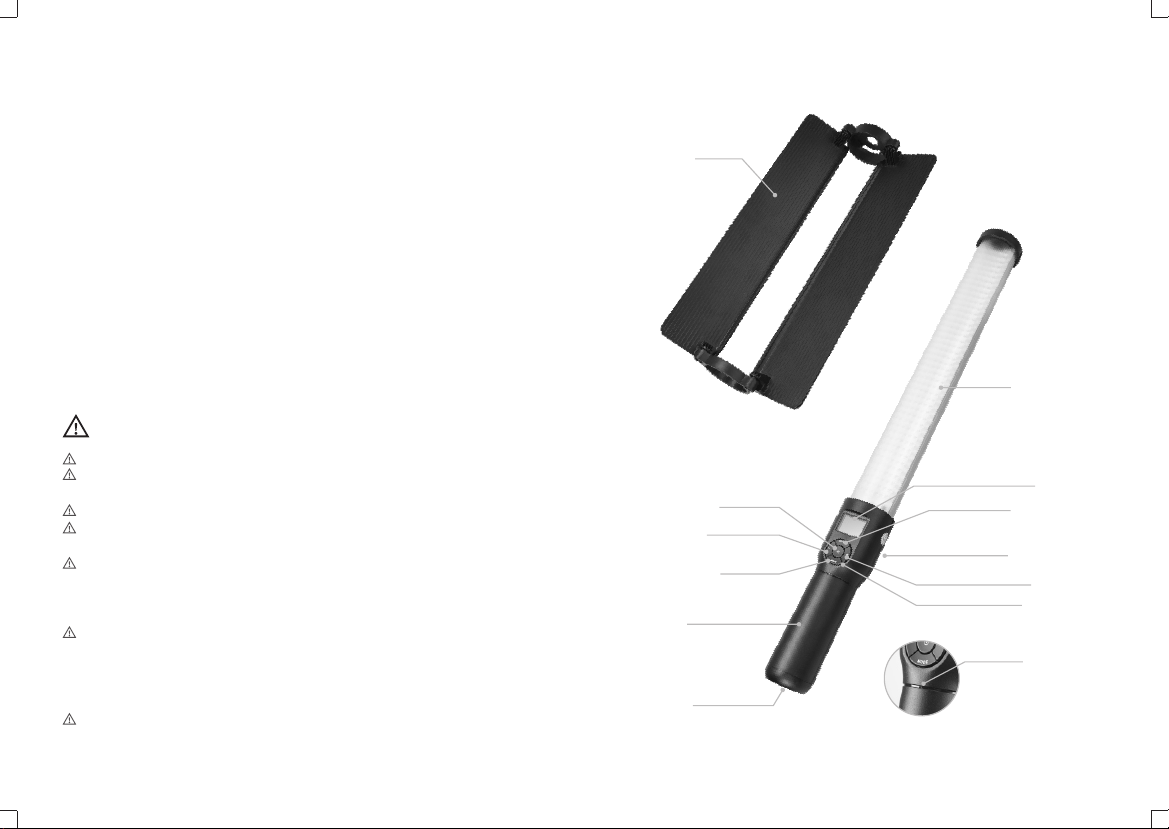
Handle
DC Power Jack
Bracket
Mounting Hole
Control Panel
Power Switch CH/GRP Button
MODE Button
Reflector
LCD Panel
“-”Button
“+”Button
Parts
● Body
516 LED Beads
- 09 - - 10 -
Reset Button
(insert a needle, and the
parameters can be
restored factory setting)

Light Brightness
%
CH
K
Battery Level Indicator
Group
Channel Color Temperature
LCD Panel
Included Items
Battery Management
● Power Supply
With built-in Li-polymer battery which can offer about 2 hours’lighting once got fully
charged.
● Charge
The whole charging time takes about 2.5 hours. The charge indicator turns to red in
charging while green once got fully charged.
Attaching Reflector
● Installation: Choose the side which needs reflector and adjust the reflector’s
direction. Match the ridge in the reflector’s handle ring with the groove on the
handle(as shown) and slip the reflector over the LED light stick and push in. Extend
the reflector for shooting.
- 11 - - 12 -
● Detachment: Hold the handle and push the reflector from the bottom up to detach.
Body *1 Reflector *1 Charger(16.8V/1.2A) *1
Portable Bag *1

Operation
● Switch: long press the power switch to power on the LED light and long press the
button again to power off.
● Mode selection: press the MODE button to switch the 5600K cold color
temperature and 3300K warm color temperature.
● Channel/group selection: press the CH/GRP button to choose the CH channel
value or GRP group value, then, pressing the “-“ or “+”button to change the channel
or group value.
● Light brightness adjustment: short press the “-” or “+” button to decrease or
increase the value in 1% while long pressing the “-” or “+”button to decrease or
increase the value in 10%. The light brightness can be adjusted from 10% to 100%.
Wireless Remote Control
With 433MHz wireless system, this product has remote grouping and control function.
Up to 6 groups of LED lights can be controlled. 16 channels are available with strong
anti-interference capability.
Please set the channels and groups of LED light stick to the same as those of remote
control before usage.
Adjusting Channel/Group of the LED Light Stick
● Press the CH/GRP button and the group icon blinks. Press the “-” or “+” button to
choose a group ID (A to F).
● Press the CH/GRP button twice and the channel icon blinks. Press the “-” or
“+” button to choose a channel ID (1 to 16).
Adjusting Channel/Group of the Remote Control
● Press the CH/GRP button and the group icon blinks. Press the “-” or “+” button
to choose a group ID (A to F).
● Press the CH/GRP button twice and the channel icon blinks. Press the “-” or
“+” button to choose a channel ID (1 to 16).
Adjusting Light Brightness/Color Temperature with the Remote Control
● Press the “-” or “+” button to adjust the light brightness.
● Press the SET button of the remote control once and the color temperature icon
blinks. Press the “-” or “+” button to adjust the color temperature.
%
CH
K
%
CH
K
%
CH
K
%
CH
K
%
CH
K
● Operation: This LED light stick can be used by handle or on the light stand,
which can be freely applied according to the user requirement.
- 13 - - 14 -
Note: Remote control purchased separately

* Product design and specifications are subject to change without notice.
Technical Data
Model
Built-in Lithium Battery
Power
Double Color Temperature
Channel
Group
100% Light Brightness(LUX)
TLCI Index
CRI Index
Light Brightness Range
LED Beads Quantity
Operation Temperature
Dimension
Net Weight (without reflector)
LC500
14.8V/2600mAh lithium battery
Max. 18W
5600K±300K
3300K±300K
16
6 (A, B, C, D, E, F)
1200 (1 m)
≥95
>95
10%~100%
516
-5~50°C
565*56*56mm (reflector is not included)
760g
Note: The wireless signal can be received only when the LED Light Stick is
power on.
Other Operation Tips
● Pressing the ON/OFF button on the remote control can turn on/off all the LED
groups.
● Pressing the “SET” button on the remote control for 2 seconds can only turn on/off
the current LED group.
● The remote control will auto power off after four hours of idle operation.
Tips of Using Remote Control:
(1) When using the cold temperature light, please set the color temperature of the
remote control as 5600K constantly.
(2) When using the warm temperature light, please set the color temperature of the
remote control as 3300K constantly.
(3) Please remove the battery if the light will not be used for an extended period of
time.
- 15 -
FCC Statement
This device complies with part 15 of the FCC Rules. Operation is subject to the
following two conditions: (1) This device may not cause harmful interference, and (2)
this device must accept any interference received, including interference that may
cause undesired operation.
Note: This equipment has been tested and found to comply with the limits for a Class
B digital device, pursuant to part 15 of the FCC Rules. These limits are designed to
provide reasonable protection against harmful interference in a residential installation.
This equipment generates uses and can radiate radio frequency energy and, if not
installed and used in accordance with the instructions, may cause harmful interference
to radio communications. However, there is no guarantee that interference will not
occur in a particular installation. If this equipment does cause harmful interference to
radio or television reception, which can be determined by turning the equipment off
and on, the user is encouraged to try to correct the interference by one or more of the
following measures:
- Reorient or relocate the receiving antenna.
- Increase the separation between the equipment and receiver.
- Connect the equipment into an outlet on a circuit different from that to which the
receiver is connected.
- Consult the dealer or an experienced radio/TV technician for help.

()
12
3
12
0755-29609320-8062
()
()

Warranty
Dear customers, as this warranty card is an important certificate to apply for our
maintenance service, please fill in the following form in coordination with the seller
and safekeep it. Thank you!
Note: This form shall be sealed by the seller.
Applicable Products
The document applies to the products listed on the Product Maintenance lnformation (see below for
further information). Other products or accessories (e.g. promotional items,giveaways and additional
accessories attached,etc.) are notincluded in this warranty scope.
Product
Information
Model Product Code Number
Name Contact Number
Address
Customer
Information
Seller
Information
Note:
Name
Contact Number
Address
Date of Sale
If maintenance service is needed, you can directly contact the product distributor or authorized service institutions. You can
also contact the Godox after-sale service call and we will offer you service. When applying for maintenance service, you
should provide valid wananty card. If you cannot provide valid warranty card, we may offer you maintenance service once
confirmed that the product or accessory is involved in the maintenance scope, but that shall not be considered as our
obligation.
The guarantee and service offered by this document are not applicable in the following cases: . The product or accessory
has expired its warranty period; . Breakage or damage caused by inappropriate usage, maintenance or preservation, such
as improper packing, improper usage, improper plugging in/out external equipment, falling off or squeezing by external
force, contacting or exposing to the improper temperature, solvent, acid, base, flooding and damp environments, etc; .
Breakage or damage caused by non-authorized institution or staff in the process of installation, maintenance, alternation,
addition and detachment; . The original identifying information of product or accessory is modified, alternated, or
removed; . No valid warranty card; . Breakage or damage caused by using illegally authorized, nonstandard or non-public
released software; . Breakage or damage caused by force majeure or accident; . Breakage or damage that could not be
attributed to the product itself. Once met these situations above, you should seek solutions from the related responsible
parties and Godox assumes no responsibility. The damage caused by parts, accessories and software that beyond the
warranty period or scope is not included in our maintenance scope. The normal discoloration, abrasion and consumption are
not the breakage within the maintenance scope.
How to Get the Maintenance Service
Inapplicable Cases
Warranty Period
The warranty period of products and accessories isimplemented according to the relevant Product Maintenancelnformation.
The warranty period is calculated from the day(purchase date) when the product is bought for the first time,And the purchase
date is considered as the date registered onthe warranty card when buying the product.
Godox After-sale Service Call 0755-29609320-8062
Maintenance and Service Support Information
The warranty period and service types of products are implemented according to
the following Product Maintenance Information:
Product Type
Parts
Other Items
Name
Circuit Board
Battery
Electrical parts e.g.battery charger,
power cord, sync cable, etc.
Flash tube, modeling lamp, lamp body,
lamp cover, lockingdevice, package, etc.
Maintenance
Period(month)
12
3
12
No
Warranty Service Type
Customer sends the
product to designated site
Without warranty
Customer sends the
product to designated site
Customer sends the
product to designated site
Other manuals for LC500
1
Table of contents
Other Godox Lighting Equipment manuals

Godox
Godox LED1000 User manual

Godox
Godox CL10 User manual

Godox
Godox AD300Pro User manual

Godox
Godox LED1000D II User manual

Godox
Godox SL150IIBi User manual

Godox
Godox FL150S User manual

Godox
Godox SZ150R User manual

Godox
Godox ES45 KIT User manual

Godox
Godox ML60Bi User manual

Godox
Godox UL150 User manual
Popular Lighting Equipment manuals by other brands

Bresser
Bresser MM-05 instruction manual

HUBBELL LIGHTING
HUBBELL LIGHTING Dual Lite EZ-2 Series Installation, operation and service instructions

GAME OF BRICKS
GAME OF BRICKS Great Pyramid of Giza 21058 instruction manual

Honeywell
Honeywell 138560.10 instruction manual

Safavieh
Safavieh TBL4232A quick start guide

INFITRONIC
INFITRONIC IN18LEDKL user manual