Goobay 55499 User manual

Betriebsanleitung
3er Set Lampenfassung E27 mit Funkfernbedienung
DE
55499
- 1 -
Goobay®
by Wentronic GmbH | Pillmannstraße 12
38112 Braunschweig | Germany
REV2018-03-21
V1.0
1 Sicherheitshinweise
1.1 Allgemein
• Betriebsanleitung vollständig und sorgfältig vor Gebrauch lesen.
Die Betriebsanleitung ist Bestandteil des Produktes und enthält wichtige
Hinweise zum korrekten Gebrauch.
• Betriebsanleitung aufbewahren.
Die Betriebsanleitung muss bei Unsicherheiten und Weitergabe des
Produktes verfügbar sein.
Stromschlaggefahr
• Öffnen Sie niemals das Gehäuse.
• Modizieren Sie Produkt und Zubehör nicht.
• Schließen Sie Anschlüsse und Schaltkreise nicht kurz.
• Benutzen Sie Produkt, Produktteile und Zubehör nur in ein-
wandfreiem Zustand.
Ein defektes Gerät darf nicht in Betrieb genommen werden, sondern
muss sofort vom Netz getrennt und gegen unbeabsichtigte Weiterbe-
nutzung gesichert werden.
• Wenden Sie sich bei Fragen, Defekten, mechanischen Beschädi-
gungen, Störungen und anderen nicht durch die Begleitdokumen-
tation behebbaren Problemen, an den Händler oder Hersteller
Zielgruppeninformationen
Nicht für Kinder geeignet.
• Sichern Sie Verpackung, Kleinteile und Dämmmaterial gegen
unbeabsichtigte Benutzung.
• Vermeiden Sie extreme Belastungen wie Hitze und Kälte,
Nässe und direkte Sonneneinstrahlung, Mikrowellen, sowie
Vibrationen und mechanischen Druck.
• Tauchen Sie das Produkt nicht in Flüssigkeiten und schützen Sie
es vor Spritzwasser.
1.3 Warnstufen
Warnung vor Gefahren, die bei Missachtung der Sicherheits-
hinweise zu Verletzungen führen können.
Warnung vor Gefahren, die bei Missachtung der Hinweise zu
Sachschäden führen können.
2 Beschreibung und Funktion
2.1 Produk t
Mit den Lampenfassungen können Sie bis zu 3 Lampen unabhängig voneinander
oder parallel zu einander bequem via Funkfernbedienung ein- und ausschalten. Ide-
al für die Beleuchtung in Abstellräumen, Dachböden, Kellern, Garagen, Fluren oder
Treppen. Funktioniert durch Türen, Glas, dünne Wände und Möbel.
2.2 Lieferumfang
3er Set Lampenfassung E27, Funkfernbedienung, Betriebsanleitung
2.3 Bedienelemente und Teile
Fig.1: Bedienelemente
1 Lampenfassung 2 Kontroll-LED
3 Funkfernbedienung 4 LED-Anzeige
5 Lampenwahl- und EIN-Schalttaster (ON) 1 - 3
6 AUS-Schalttaster (OFF) 1 - 3
2.4 Technische Daten
Artikelnummer 55499
Lampenfassungen
Betriebsspannung 220-240 @ 50 Hz V~
Sendefrequenz 433,92 MHz
Max. Leistung pro Lampenfassung:
Glühbirne
LED / Energiesparlampe 60
20 W
W
Betriebstemperaturbereich 0 ~ 35 °C
Bauart Sockel E27
Material Fassung ABS, Kupfer, PBT
Schutzklasse / Schutzart II / IP20
Maße (L x Ø) 103,2 x 54 mm
Gewicht pro Funk-Lampenfassung 73,0 g
Funkfernbedienung
Max. Reichweite 30 m
Maße (L x B x H) 81 x 36 x15 mm
Gewicht 26 g
Erforderliche Batterie für die Funkfernbedienung (nicht enthalten)
Typ
Spannung
Anzahl
Alkaline Batterie 23A
12 V
1x
Tab.1: Technische Daten
3 Bestimmungsgemäßer Gebrauch
Eine andere Verwendung als in Kapitel Beschreibung und Funktion
beschrieben, ist nicht zugelassen. Dieses Produkt darf nur in trock-
enen Innenräumen benutzt werden. Das Nichtbeachten und Nichtein-
halten dieser Bestimmungen und der Sicherheitshinweise können zu
schweren Unfällen und Schäden an Personen und Sachen führen.
4 Fernbedienung
Batteriegefahren
Die Batterie der Fernbedienung ist tauschbar.
• Entfernen Sie ausgelaufene, deformierte oder korrodierte Zellen aus
dem Produkt und entsorgen diese mittels geeigneter Schutzvorrichtun-
gen
4.1 Fernbedienung aktivieren
1. Schieben Sie das Batteriefach auf der Rückseite der Fernbedie-
nung in Pfeilrichtung auf und entfernen es.
2. Legen Sie eine geeignete Batterie, siehe hierzu auch Kapitel 2.4
"Technische Daten", unter Beachtung der Polung von Plus und
Minus in das Batteriefach ein.
2. Schieben Sie den Batteriefachdeckel wieder entgegen der Pfeil-
richtung auf die Fernbedienung.
Die Fernbedienung ist nun betriebsbereit.
4.2 Batterie wechseln
1. Tauschen Sie die leere Batterie bei Bedarf mit einer neuen glei-
chen Typs.
2. Entsorgen Sie die leere Batterie fachgerecht.
5 Anschluss
Sachschaden
• Überlasten sie die Fassung nicht mit zu starken Leuchtmitteln!.
Siehe hierzu auch Kapitel 2.4 "Technische Daten"
Die Lampenfassung ist für eine maximale Schaltleistung von
60 W ausgelegt. .
1. Vergleichen Sie die technischen Daten aller zu verwenden-
den Geräte und stellen Sie die Kompatibilität sicher.
2. Kontrollieren Sie den Lieferumfang auf Vollständigkeit und
Unversehrtheit.
3. Schalten Sie die Beleuchtung, die Sie mit der Lampenfassung
ausstatten wollen, aus.
4. Schrauben Sie die Lampenfassung (1) direkt in die Fassung
der Lampe.
5. Schrauben Sie das gewünschte Leuchtmittel in die Lampen-
fassung.
6 Ein-/Aus-Schalten
Die Lampenfassungen sind voreingestellt und können sofort ver-
wendet werden.
1. Schalten Sie die Beleuchtung ein.
Die LED-Anzeige (2) an der Lampenfassung beginnt kurz zu blinken.
Leuchtet die LED-Anzeige konstant, ist die Lampenfassung betriebs-
bereit.
2. Drücken Sie kurz den Lampenwahl- und EIN-Schalttaster "ON 1"
(5) auf der Fernbedienung um das Licht einzuschalten .
Werden mehrere Lampenfassungen verwendet, muss entsprechend
der nächste EIN-Schalttaster "ON 2" bzw. "ON 3" zum Anschalten
der jeweiligen Beleuchtung betätigt werden.
3. Schalten Sie das Licht, wenn es nicht mehr benötigt wird über die
AUS-Schalttaster (OFF) 1,2 oder 3, je nach Belegung, aus.
7 Programmierung
Mit der Funkfernbedienung können Sie gleichzeitig oder unabhängig
voneinander bis zu 3 Lampenfassungen programmieren und Ihre
Beleuchtung ein- und ausschalten.
Für eine Neuprogrammierung, gehen Sie wie folgt vor:
7.1 Neubelegung für Einzelschaltung
1. Richten Sie die Funkfernbedienung (3) auf die zu programmierende
Lampenfassung.
2. Schalten Sie nur die Beleuchtung mit der zu programmierenden
Lampenfassung ein.
Die LED-Anzeige (2) an der Lampenfassung beginnt für ca. 5 Sekunden
zu blinken.
3. Drücken und halten Sie den gewünschten Lampen-Wahltas-
ter (5) an der Funkfernbedienung ca. 3 Sekunden lang, während
die LED-Anzeige an der Lampenfassung blinkt.
Die Programmierung war erfolgreich, wenn die LED-Anzeige an der
Lampenfassung aufhört zu blinken und die ausgewählte Beleuchtung
angeht.
4. Schalten Sie die neu programmierte Lampe aus und wiederholen
Sie die Schritte 1 -3 für weitere Lampen.

Betriebsanleitung
3er Set Lampenfassung E27 mit Funkfernbedienung
DE
55499
- 2 -
Goobay®
by Wentronic GmbH | Pillmannstraße 12
38112 Braunschweig | Germany
REV2018-03-21
V1.0
7.2 Gleichzeitige Mehrfachschaltung
1. Schalten Sie alle Beleuchtungen, die mit zusätzlichen Lampenfas-
sungen bestückt sind und die parallel betrieben werden sollen, ein.
Die LED-Anzeigen (2) an den Lampenfassungen beginnen für ca. 5
Sekunden zu blinken.
2. Drücken und halten Sie den gewünschten Lampenwahltaster (5)
an der Fernbedienung ca. 3 Sekunden lang, während die LED-
Anzeigen an den Lampenfassungen blinken.
Die Programmierung war erfolgreich, wenn die LED-Anzeigen an den
Lampenfassungen aufhören zu blinken und die ausgewählten Be-
leuchtungen angehen.
7 Wartung,Pege,LagerungundTransport
Sachschäden
• Nur ein trockenes und weiches Tuch zum Reinigen verwenden.
• Keine Reinigungsmittel und Chemikalien verwenden.
• Kühl und trocken lagern.
• Produkt bei längerem Nichtgebrauch für Kinder unzugänglich und
in trockener und staubgeschützter Umgebung lagern.
• Batterien / Akkus bei längerem Nichtgebrauch entnehmen
• Originalverpackung für den Transport aufheben und verwenden.
8 Haftungshinweis
• Druckfehler und Änderungen an Produkt, Verpackung oder
Produktdokumentation behalten wir uns vor.
• Beachten Sie unsere Garantiebedingungen. Diese können Sie in
aktueller Form unter den genannten Kontaktdaten anfragen.
9 Entsorgungshinweise
Elektrische und elektronische Geräte dürfen nach der europäischen
WEEE Richtlinie nicht mit dem Hausmüll entsorgt werden. Deren
Bestandteile müssen getrennt der Wiederverwertung oder Entsorgung
zugeführt werden, weil giftige und gefährliche Bestandteile bei unsach-
gemäßer Entsorgung die Gesundheit und Umwelt nachhaltig schädigen
können.
Sie sind als Verbraucher nach dem Elektrogesetz (ElektroG) verpich-
tet, elektrische und elektronische Geräte am Ende ihrer Lebensdauer
an den Hersteller, die Verkaufsstelle oder an dafür eingerichtete,
öffentliche Sammelstellen kostenlos zurückzugeben. Einzelheiten dazu
regelt das jeweilige Landesrecht. Das Symbol auf dem Produkt, der
Betriebsanleitung oder/und der Verpackung weist auf diese Bestim-
mungen hin. Mit dieser Art der Stofftrennung, Verwertung und Entsor-
gung von Altgeräten leisten Sie einen wichtigen Beitrag zum Schutz
unserer Umwelt.
WEEE Nr.: 82898622
10 EU-Konformitätserklärung
Mit dem CE Zeichen erklärt Goobay®, eine registrierte Handelsmarke
der Wentronic GmbH, dass das Produkt die grundlegenden Anforde-
rungen und Richtlinien der europäischen Bestimmungen erfüllt.

EN
- 3 -
User Manual
Set of 3 lamp sockets E27 with radio remote control
Goobay®
by Wentronic GmbH | Pillmannstraße 12
38112 Braunschweig | Germany
REV2018-03-21
V1.0
55499
1 Safety Instructions
1.1 General
• Read the user manual completely and carefully before use.
The user manual is part of the product and contains important
information for correct use.
• Keep this user manual.
The user manual must be available for uncertainties and passing the
product.
Risk of electric shock
• Do not open the housing.
• Do not modify product and accessories.
• Do not short connectors and circuits.
• Use product, product parts and accessories only in perfect
condition.
A defective device may not be put into operation, but must be discon-
nected from mains and protected against further use.
• In case of questions, defects, mechanical damage, trouble and
other problems, non-recoverable by the documentation, contact
your dealer or producer.
Target group information
Not meant for children.
• Secure packaging, small parts and insulation against accidental
use.
• Avoid stresses such as heat and cold, moisture and direct sunlight
vibration and mechanical pressure.
• Do not immerse the product in liquids and protect it from splashing
water.
1.2 Warning levels
Warnings against hazards that may result in injuries in case of
nonobservance.
Warnings against hazards that may result in material damage
in case of non-observance.
2 Description and Function
2.1 Product
The lamp sockets allow you to switch on and off up to 3 lamps, independently of
each other or parallel to each other, conveniently via radio remote control. Ideal for
storerooms, attics, cellars, garages, hallways and stairwells . Works through doors,
glass, thin walls and furniture.
2.2 Scope of delivery
Set of 3 lamp sockets E27, radio remote control, User manual
2.3 Operating elements and product parts
Fig.2: Operating elements
1 Lamp socket E27 2 Control LED
3 Radio remote control 4 LED display
5 Selection and ON push button 1 - 3
6 OFF push button 1 - 3
2.4 Specications
Article number 55499
Lamp socket
Operating voltage 220-240 @ 50 Hz V~
Transmission frequency 433.92 MHz
Max. power per lamp socket:
Bulb
LED / Energy-saving lamp 60
20 W
W
Operating temperature range 0 ~ 35 °C
socket design E27
socket material ABS, Cooper, PBT
Protection class / Protection level II / IP20
Dimensions (L x Ø) 103.2 x 54.0 mm
Weight per lamp socket 73.0 g
Radio remote control
Max. range of radio remote control 30 m
Dimensions (l x Ø) 81 x 36 x15 mm
Weight 26 g
Required battery for radio remote control (not included)
Type
Voltage
Number
Alkaline battery 23A
12 V
1x
Tab.2: Specications
3 Intended Use
We do not permit using the device in other ways like described in chapter
Description and Function. Use the product only in dry interior rooms. Not
attending to these regulations and safety instructions might cause fatal
accidents, injuries, and damages to persons and property.
4 Remote Control
Battery hazards
The battery of the radio remote control is replaceable.
• Leave leaked, deformed or corroded batteries inside the product
and dispose it by appropriate protectives.
4.1 Activate remote control
1. Open the battery compartment on the back of the radio remote
control in the direction of the arrow.
2. Insert a suitable battery, see also chapter 2.4 "Technical data",
observing the polarity of plus and minus in the battery compart
ment.
3. Close the battery compartment by pushing it, in opposite direction
to the arrow, on the remote control.
The remote control is now ready for use.
4.2 Change battery
1. Replace the empty battery as needed with a new one of the same
type.
2. Dispose of the empty battery in a professional way.
5 Connecting
Material demage
• Do not overload the socket with lamps that are too strong!.
See also chapter 2.4 "Specications"
The wireless lamp socket is designed for a maximum switching capaci-
ty of 60W.
1. Compare the specications of all used devices to ensure compati-
bility
2. Check the scope of delivery for completeness and integrity.
3. Turn off the lamp you want to equip with the lamp socket.
4. Screw the lamp socket directly into the socket of the lamp.
5. Screw the desired light source into the lamp socket.
6 Switch on/off
The lampholders are pre-set and can be used immediately.
1. Turn on the lights.
The control LED (2) on the lamp socket starts to ash briey. If the
control LED is lit steadily, the lamp socket is ready for use.
2. Briey press the lamp selection and ON button "ON 1" (5) on the
remote control to switch on the light.
If several lamp sockets are used, the next ON button "ON 2" or "ON 3"
must be pressed to switch on the respective lighting.
3. Switch off the light when it is no longer required via the OFF switch
(OFF) 1,2 or 3, depending on the assignment
4. Turn off the newly programmed lamp and repeat steps 1 - 3 for
additional lamps.
7 Programming
With the wireless remote control, you can program up to 3 lamp
sockets at the same time or independently of each other and switch
your lighting on and off. For reprogramming, proceed as follows:
7.1 Redistribution for single switching
1. Point the radio remote control (3) to the one to be programmed
lamp socket.
2. Only switch on the lighting with the lamp socket to be programmed.
The control LED (2) on the lamp socket starts to ash for approx. 5
seconds.
3. Press and hold the desired lamp selector button (5) on the radio re
mote control for approx. 3 seconds while the control LED on the
lamp socket ashes.
Programming was successful when the control LED on the lamp
socket stops ashing and the selected illumination is on.
7.2 Simultaneous multiple switching
1. Switch on all the lights that are equipped with additional lamp
sockets and that are to be operated in parallel.
The LED indicators (2) on the lamp sockets start to ash for about 5
seconds.
2. Press and hold the desired lamp selector button (5) on the remote
control for about 3 seconds while the LED indicators on the lamp
sockets are ashing.
Programming was successful when the control LEDs on the lamp
sockets stop ashing and turn on the selected lights.

EN
- 4 -
User Manual
Set of 3 lamp sockets E27 with radio remote control
Goobay®
by Wentronic GmbH | Pillmannstraße 12
38112 Braunschweig | Germany
REV2018-03-21
V1.0
55499
7 Maintenance, Care, Storage and Transport
The products are maintenance-free.
Material damage
• Clean only with a dry, soft cloth.
• Do not use cleaning agents and chemicals.
• Store cool and dry.
• Store the product out the reach of children and in a dry and
dust-protected ambience when not in use.
• Keep and use the original packaging for transport.
8 Liability Notice
• We reserve the right to printing errors and changes to pro-
duct, packaging or product documentation.
• See our terms of warranty. These are available in their cur-
rent form under the given contact details.
9 Disposal Notes
According to the European WEEE directive, electrical and elect
ronic equipment must not be disposed with consumers waste.
Its components must be recycled or disposed apart from each
other. Otherwise contaminative and hazardous substances can
pollute our environment.
As a consumer, you are committed by law to dispose electrical
and electronic devices to the producer, the dealer, or public
collecting points at the end of the devices lifetime for free. Parti-
culars are regulated in national right. The symbol on the product,
in the user`s manual, or at the packaging alludes to these terms.
With this kind of waste separation, application, and waste dispo-
sal of used devices you achieve an important share to environ
mental protection.
WEEE No: 82898622
10 EU Declaration of Conformity
With the CE sign Goobay®, a registered trademark of the
Wentronic GmbH ensures, that the product is conformed to the
basic standards and directives.

- 5 -
Mode d‘emploi
Kit de 3 douilles de lampe E27 avec télécommande radio
FR
- 5 -
Goobay®
by Wentronic GmbH | Pillmannstraße 12
38112 Braunschweig | Germany
REV2018-03-21
V1.0
55499
1 Consignes de sécurité
1.1 En général
• Lisez le mode d‘emploi attentivement et complètement avant de
l‘utiliser.
Le mode d‘emploi fait partie intégrante du produit et comprend
d‘importantes informations pour une bonne installation et une bonne
utilisation.
• Conservez soigneusement ce mode d‘emploi.
Le mode d‘emploi doit être disponible à des incertitudes et transfert du
produit.
Risque de choc électrique:
• Ne pas ouvrir le boîtier.
• Ne modiez pas produit et les accessoires.
• Pas court-circuiter des connexions et circuits.
• Utilisez le produit, pièces et accessoires des produits uniquement
en parfait état.
Un appareil défectueux ne doit pas être mis en service. Il doit au contraire
être immédiatement mis hors tension et protégé contre toute utilisation
involontaire.
• En cas de questions, les défauts, les dommages mécaniques, des
ingérences et d‘autres problèmes, non récupérables par la
documentation, contactez votre revendeur ou le producteur
Informations sur le groupe cible:
Non destiné des enfants.
• Sécuriser l‘emballage, petites pièces et l‘isolation contre
l‘utilisation accidentelle.
• Éviter des conditions extrêmes, telles que la chaleur extrême et
froid, l‘humidité et de la lumière directe du soleil, ainsi que micro-
ondes, des vibrations et de la pression mécanique.
• Ne plongez le produit dans aucun liquide et protégez-le contre les
projections d’eau.
1.2 Niveaux d‘alerte
Mises en garde contre les dangers pouvant entraîner des
blessures en cas de non respect.
Mises en garde contre les dangers pouvant entraîner les domma-
ges matériels en.
2 Description et fonctions
2.1 Produit
Avec les douilles de lampe, vous pouvez allumer et éteindre en toute simplicité
jusqu’à trois lampes indépendamment les unes des autres ou parallèlement les unes
aux autres via la télécommande radio. Idéal pour les débarras, greniers, caves,
garages, couloirs ou escaliers. Fonctionne à travers les portes, le verre, les minces
parois et les meubles.
.
2.2 Contenu de la livraison
3 douilles de lampe E27, télécommande radio, mode d‘emploi
2.3 Eléments de commande
Fig.3: Eléments de commande et pièces
1 Douilles de lampe E27 2 DEL de contrôle
3 Télécommande radio 4 Afchage DEL
5 Sélecteur de lampe et interrupteur MARCHE (ON) 1 - 3
6 Interrupteur ARRÊT (OFF) 1 - 3
2.4 Spécications
Numéro de pièce 55499
Douilles de lampe
Tension de fonctionnement 220-240 @ 50 Hz V~
Fréquence d’émission 433,92 MHz
Puissance max. par douille de lampe:
Ampoule
Lampe DEL/à faible consommation
d’énergie
60
20 W
W
Température de fonctionnement 0 ~ 35 °C
Conception du socle E27
Matériau de la douille ABS, Cuivre, PBT
Classe de protection / Protection II / IP20
Dimensions (l x Ø) 103,2 x 54,0 mm
Poids par douille de lampe 73,0 g
Télécommande radio
Portée max. 30 m
Dimensions (L x Ø) 81 x 36 x15 mm
Poids 26 g
Piles requises pour la télécommande radio (non incluses)
Type
Tension
Nombre
Piles alcalines 23 A
12 V
1x
Tab.3: Spécications
3 Utilisation prévue
Nous n’autorisons pas l’utilisation du dispositif d’une façon différente de
celle décrite au chapitre Description et Fonctions. Utilisez le produit
uniquement en intérieur dans des pièces sèches et fermées. Ne pas
respecter ces instructions de sécurité et points de règlement est suscep-
tible de provoquer des accidents mortels, blessures et dommages à la
personne et à ses biens.
4 Télécommande radio
Risques de batterie
Les piles de la télécommande radio sont remplaçables.
• Retirer expiré, les cellules déformées ou corrodées au moyen de
dispositifs de sécurité appropriés à partir du produit et en disposer.
4.1 Activer la télécommande radio
1. Faites glisser le compartiment à piles au dos de la télécommande
radio dans le sens de la èche et retirez-le.
2. Installez une pile adaptée, voir à ce sujet aussi le chapitre 2.4
« Caractéristiques techniques », dans le compartiment à piles en
respectant les polarités.
3. Faites glisser de nouveau le couvercle du compartiment à piles
dans le sens inverse de la èche sur la télécommande radio.
La télécommande radio est à présent opérationnelle.
4.2 Remplacer la batterie
1. Remplacez la pile au besoin avec un nouveau même type.
2. Jeter la pile usagée
5 Connexion
Le dommage matériel
• Ne surchargez pas la douille avec des ampoules d’une intensité trop
élevée !
La douille de lampe est conçue pour une puissance de commutation
maximale de 60 W. Voir à ce sujet aussi le chapitre 2.4 « Spécications ».
1. Comparer les caractéristiques de tous les équipements à utiliser et
pour assurer la compatibilité.
2. Vériez le Contenu de livraison pour l'exhaustivité et l'intégrité.
3. Éteignez la lampe dans laquelle vous souhaitez insérer la douille
de lampe.
4. Vissez la douille de lampe directement dans la douille de la lampe.
5. Vissez l’ampoule souhaitée dans la douille de lampe.
6 Mise en marche/à l’arrêt
Les douilles de lampe sont préréglées et peuvent être utilisées immédi
atement.
1. Allumez la lumière.
L’afchage DEL (2) sur la douille de lampe se met à clignoter.
Si l’afchage DEL est allumé en permanence, la douille de lampe est
opérationnelle.
2. Appuyez brièvement sur le sélecteur de lampe et l’interrupteur
MARCHE « ON 1 » (5) sur la télécommande pour allumer la lumi
ère.
Si plusieurs douilles de lampe sont utilisées, appuyez sur les interrup-
teurs MARCHE « ON 2 » ou « ON 3 » suivants pour allumer la lumière
correspondante.
3. Éteignez la lumière, si vous n’en avez plus besoin, en appuyant sur
l’interrupteur ARRÊT (OFF) 1, 2 ou 3, selon l’affectation.
4. Éteignez la lampe reprogrammée et répétez les étapes 1 à 3 pour
les autres lampes.
7 Programmation
La télécommande radio vous permet de programmer simultanément ou
indépendamment l’une de l’autre jusqu’à trois douilles de lampe ainsi
que d’allumer et d’éteindre votre lumière.
Pour une reprogrammation, veuillez procéder de la manière suivante :
7.1 Nouvelle affectation pour commutation simple
1. Dirigez la télécommande radio (3) vers la douille de lampe à pro-
grammer.
2. Allumez uniquement la lumière avec la douille de lampe à pro-
grammer.
L’afchage DEL (2) sur la douille de lampe se met à clignoter pendant
env. 5 secondes.
3. Appuyez et maintenez enfoncé le sélecteur de lampe (5) souhaité
sur la télécommande radio pendant env. 3 secondes, pendant que
l’afchage DEL sur la douille de lampe clignote.

- 6 -
Mode d‘emploi
Kit de 3 douilles de lampe E27 avec télécommande radio
FR
- 6 -
Goobay®
by Wentronic GmbH | Pillmannstraße 12
38112 Braunschweig | Germany
REV2018-03-21
V1.0
55499
La programmation a été effectuée avec succès, lorsque l’afchage DEL
sur la douille de lampe s’arrête de clignoter et lorsque la lumière sélecti
onnée s’allume.
7.2 Commutation multiple simultanée
1. Allumez toutes les lumières équipées de douilles de lampe supplé-
mentaires et devant être exploitées en parallèle.
Les afchages DEL (2) sur les douilles de lampe se mettent à clignoter
pendant env. 5 secondes.
2. Appuyez et maintenez enfoncé le sélecteur de lampe (5) souhaité
sur la télécommande pendant env. 3 secondes, pendant que les
afchages DEL sur les douilles de lampe clignotent.
La programmation a été effectuée avec succès, lorsque les afchages
DEL sur les douilles de lampe s’arrêtent de clignoter et lorsque les lumi
ères sélectionnées s’allument.
5 Maintenance, entretien, stockage et transport
Les produits sont sans entretien.
Les dommages matériels
• Produit Nettoyez uniquement avec un chiffon doux et sec.
• Ne pas utiliser de produits chimiques et de nettoyage.
• Endroit frais et sec.
• Conserver le produit hors de la portée des enfants et dans une
ambiance sèche et protégé de la poussière lorsqu‘il ne est pas en
cours d‘utilisation.
• Conserver et utiliser l‘emballage d‘origine pour le transport.
6 Avis de responsabilité
• Nous nous réservons le droit des erreurs d‘impression et des
changements à produit, l‘emballage ou de la documentation du
produit.
• S‘il vous plaît voir nos conditions de garantie. Ceux-ci sont main-
tenant disponibles dans leur forme actuelle, conformément aux
coordonnées gurant.
7 Instructions pour l’élimination
S e l o n l a d i r e c t i v e e u r o p é e n n e D E E E , l a m i s e a u r e b u t d e s a p p a r e i l s é l e c t r i q u e s
et électroniques avec les déchets domestiques est strictement interdite.
Leurs composants doivent être recyclés ou éliminés de façon séparée.
Les composants toxiques et dangereux peuvent causer des dommages
durables à la santé et à l'environnement s'ils ne sont pas éliminés correc-
tement.
Vous, en tant que consommateur, êtes commis par la loi à la mise au rebut
d e s a p p a r e i l s é l e c t r i q u e s e t é l e c t r o n i q u e s a u p r è s d u f a b r i c a n t , d u d i s t r i b u t e u r ,
ou des points publics de collecte à la n de la durée de vie des dispositifs, et ce
de façon gratuite. Les détails sont réglementés dans le droit national.
Le symbole sur le produit, dans le manuel ‘utilisation, ou sur l‘emballage
fait référence à ces termes. Avec ce genre de séparation des déchets,
‘application et d‘élimination des décets d‘appareils usagés, vous réalisez
une part importante de la protection de l‘environnement.
No DEEE : 82898622
8 UE Déclaration de conformité
En utilisant le marquage CE, Goobay®, nom commercial déposé de
Wentronic GmbH, déclare que l‘appareil est conforme aux conditions et
directives de base de la réglementation européenne.

- 7 -- 7 -
Istruzioni per l‘uso
Set di 3 portalampada E27 con telecomando
IT
- 7 -
Goobay®
by Wentronic GmbH | Pillmannstraße 12
38112 Braunschweig | Germany
REV2018-03-21
V1.0
55499
1 Indicazioni di sicurezza
1.1 Generalmente
• Leggere attentamente e completamente le istruzioni prima
dell‘uso.
Le instruzioni per l‘uso è parte integrante del prodotto e contiene impor-
tanti informazioni per un uso corretto.
• Conservare questo istruzioni per l‘uso.
Le istruzioni per l‘uso essere disponibile per le incertezze e trasferimento
del prodotto.
Pericolo di scossa elettric
• Non aprire la custodia.
• Non modicare prodotti e accessori.
• Non corto do collegamenti e circuiti.
• Utilizzare il prodotto, le parti del prodotto e gli accessori solo in
perfette condizioni.
Un apparecchio difettoso non può essere messo in funzione ma deve
essere scollegato subito dalla rete elettrica e protetto dall’ulteriore
utilizzo involontario.
• In caso di domande, difetti, danni meccanici, interferenze e altri
problemi, non recuperabili per la documentazione, rivolgersi al
rivenditore o produttore
Informazioni sul gruppo di destinazione
Non è pensato per i bambini.
• Imballaggio sicuro, piccole parti e l‘isolamento contro l‘uso
accidentale.
• Evitare condizioni estreme, calore estremo e ispezionata la fred-
dezza, umidità e luce diretta del sole, così come forni a microonde,
vibrazioni e pressione meccanica
• Non immergere il prodotto in liquidi e proteggerlo dagli schizzi
d’acqua.
1.2 Livelli di allarme
Avvisi relativi a pericoli che possono tradursi in lesioni in caso
di inosservanza.
Avvisi relativi a pericoli che possono tradursi in danni
materiali in caso di inosservanza.
2 Descrizione e funzione
2.1 Prodotto
Con i portalampada è possibile accendere e spegnere comodamente no a 3 lampa-
de tramite il telecomando, in modo indipendente l’una dall’altra oppure in parallelo.
Ideale per ripostigli, softte, cantine, garage, corridoi, scale. Funziona attraverso
porte, vetri, pareti sottili e mobili.
2.2 Scopo della consegna
Set di 3 portalampada E27, telecomando, istruzioni per l‘uso
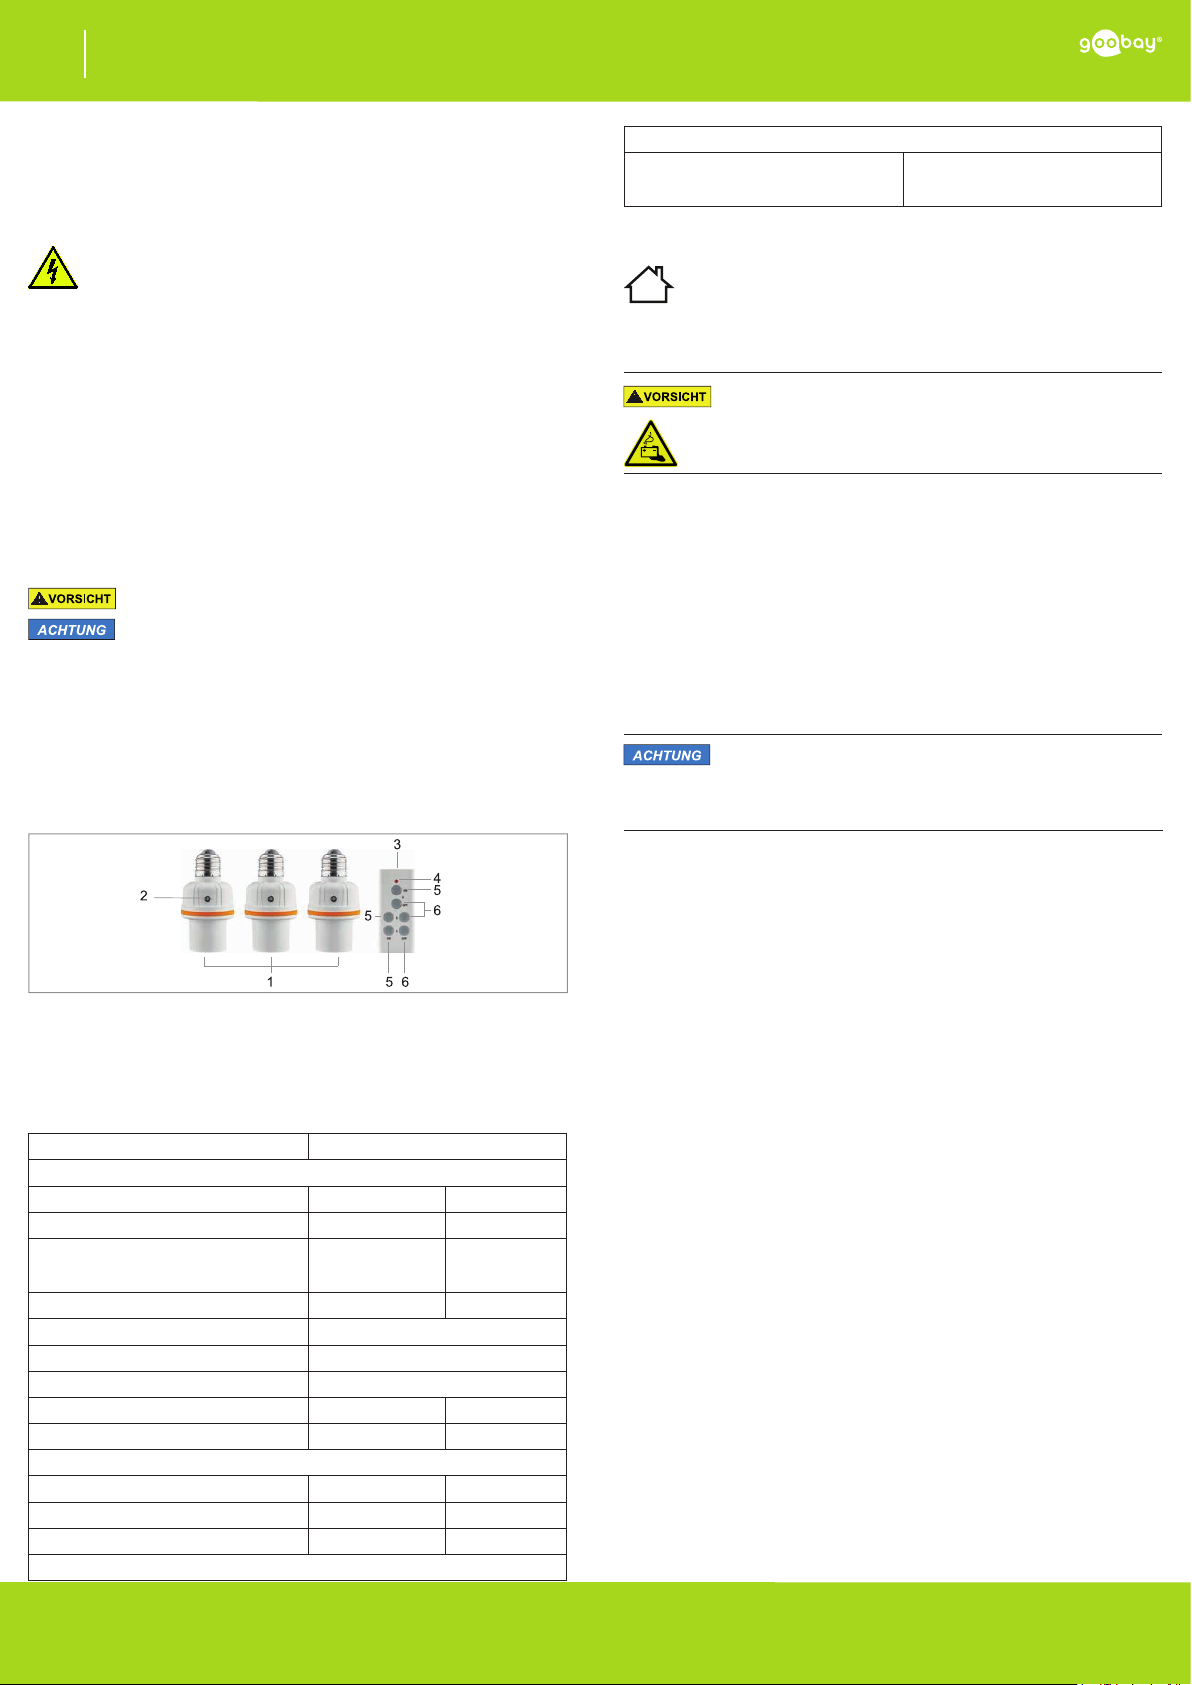
2.3 Eléments de commande e parti
Tab.4: Eléments de commande
1Portalampada 2 LED di controllo
3 Telecomando 4 Indicatore LED
5 Pulsante di selezione lampada e ACCENSIONE (ON) 1 - 3
6 Pulsante di SPEGNIMENTO (OFF) 1 - 3
2.4 Speciche
Numero di articolo 55499
Portalampada
Tensione di esercizio 220-240 @ 50 Hz V~
Frequenza di trasmissione 433,92 MHz
Potenza massima per portalampada:
Lampadina
LED / lampadina a risparmio energetico 60
20 W
W
Operativo di temperatura 0 ~ 35 °C
Struttura dell’attacco E27
Materiale della base a vite ABS, Rame, PBT
Classe di protezione / Grado di prote-
zione II / IP20
Dimensioni (L x Ø) 103,2 x 54,0 mm
Peso per portalampada 73,0 g
Telecomando
Portata max. del segnale 30 m
Dimensioni (l x Ø) 81 x 36 x15 mm
Peso 26 g
Batteria necessaria per il telecomando (non inclusa)
Tipo
Tensione
Numero
Batteria alcalina 23A
12 V
1x
Tab.5: Speciche
3 Uso previsto
Non è consentito l’uso del dispositivo in modo diverso da quello descritto
nel capitolo Descrizione e Funzione. Usare il prodotto solamente in
ambienti interni asciutti. La mancata osservanza di queste regole e
delle istruzioni per la sicurezza può provocare incidenti fatali, lesioni e
danni a persone e proprietà.
4 Telecomando
Pericoli della batteria
La batteria del telecomando può essere sostituita.
• Rimuovere le cellule scaduti, deformate o corrose mediante oppor-
tuni dispositivi di sicurezza dal prodotto e smaltire.
4.1 Attivazione del telecomando
1. Far scorrere il vano batterie sulla parte posteriore del telecomando
nella direzione della freccia e rimuoverlo.
2. Inserire nel vano una batteria adatta (vedere anche il capitolo 2.4
“Speciche”) prestando attenzione alla posizione dei poli negativo
e positivo.
3. Reinserire il vano batterie sul telecomando, facendolo scorrere in
direzione opposta a quella della freccia.
Ora il telecomando è pronto all’uso.
4.2 Sostituire la batteria
1. Sostituire la vecchia batteria, se necessario con un nuovo stesso
tipo.
2. Smaltire la batteria usata.
4 Collegamento
Danni materiali
• Non sovraccaricare il portalampada con lampadine di potenza
troppo elevata!.
Il portalampada è progettato per una potenza di commutazione massi-
ma di 60 W. Vedere anche il capitolo 2.4 “Speciche”.
1. Confrontare le speciche di tutti i dispositivi utilizzati per garantire
la compatibilità.
2. Controllare fornitura sia completa e garantire l'integrità.
3. Spegnere la lampada a cui si desidera applicare il portalampada.
4. Avvitare il portalampada direttamente sulla base a vite della lam
pada.
5. Avvitare la lampadina scelta nel portalampada.
6 Accensione / spegnimento
I portalampada sono preimpostati e possono essere utilizzati immedia-
tamente.
1. Accendere la luce.
L’indicatore LED (2) sul portalampada inizia a lampeggiare brevemen
te. Quando l’indicatore a LED smette di lampeggiare e rimane acceso,
signica che il portalampada è pronto all’uso.
2. Premere brevemente il pulsante di selezione lampada e ACCENSI-
ONE “ON 1” (5) sul telecomando per accendere la luce.
Nel caso in cui si utilizzino più portalampada, è necessario accendere
le altre luci utilizzando i relativi pulsanti di ACCENSIONE “ON 2” oppu-
re “ON 3”.
3. È possibile spegnere la luce, quando non serve più, tramite il
pulsante SPEGNIMENTO (OFF), 1, 2, o 3, in base alla congurazi-
one utilizzata.
4. Spegnere la lampada appena programmata e ripetere i passaggi
da 1 a 3 per le altre lampade.
7 Programmazione
Con il telecomando è possibile programmare no a 3 portalampada
contemporaneamente o in modo indipendente l’uno dall’altro e accen
dere e spegnere le relative luci.
Per la riprogrammazione procedere come segue:
7.1 Ricongurazionepercontrollosingolo
1. Puntare il telecomando (3) in direzione del portalampada che si
desidera programmare.
2. Accendere soltanto la lampada con il portalampada da program-
mare.
L’indicatore LED (2) del portalampada inizia a lampeggiare per circa 5
secondi.
3. Mentre l’indicatore LED sul portalampada continua a lampeggiare,
premere il pulsante di selezione lampada desiderato (5) sul teleco-
mando e mantenerlo premuto per circa 3 secondi.
La programmazione è stata eseguita correttamente se l’indicatore LED
sul portalampada smette di lampeggiare e la luce selezionata si accen-
det.

- 8 -- 8 -
Istruzioni per l‘uso
Set di 3 portalampada E27 con telecomando
IT
- 8 -
Goobay®
by Wentronic GmbH | Pillmannstraße 12
38112 Braunschweig | Germany
REV2018-03-21
V1.0
55499
7.2 Attivazione multipla contemporanea
1. Accendere tutte le lampade che sono dotate del portalampada
aggiuntivo e che si desidera controllare in parallelo.
Gli indicatori LED (2) dei portalampada iniziano a lampeggiare per circa
5 secondi.
2. Mentre gli indicatori LED sui portalampada continuano a lampeg-
giare, premere il pulsante di selezione lampada desiderato (5) sul
telecomando e mantenerlo premuto per circa 3 secondi.
La programmazione è stata eseguita correttamente se gli indicatori LED
sui portalampada smettono di lampeggiare e le luci selezionate si accen-
dono.
5 Manutenzione, cura, conservazione e trasporto
I prodotti sono esenti da manutenzione.
Danni materiali causati da umidità
• Prodotto Pulire solo con un panno asciutto, morbido.
• Non utilizzare detergenti e prodotti chimici di pulizia.
• Conservare fresco e asciutto.
• Conservare il prodotto fuori dalla portata dei bambini e in un
ambiente asciutto e protetto dalla polvere quando non in uso.
• Conservare e utilizzare l‘imballaggio originale per il trasporto.
6 Avviso di responsabilità
• Ci riserviamo il diritto di farlo d‘errori di stampa e modiche al
prodotto, imballaggio o documentazione del prodotto.
• Si prega di consultare i nostri termini di garanzia. Questi sono
ora disponibili nella loro forma attuale sotto le date informazioni di
contatto.
7 Note per lo smaltimento
In conformità alla Direttiva Europea WEEE, le attrezzature elettriche ed
elettroniche non devono essere smaltite insieme ai riuti urbani. I com-
ponenti devono essere riciclati o smaltiti separatamente. Componenti
tossici e pericolosi possono causare danni permanenti alla salute e
all'ambiente se smaltiti in modo inadeguato.
Il consumatore è obbligato per legge a portare le attrezzature elettriche ed
elettroniche presso punti di raccolta pubblici oppure presso il rivenditore o
il produttore al termine della loro durata utile. Devono anche essere
osservate tutte le leggi e le normative locali. Il simbolo apposto sul pro-
dotto, nel manual o sulla confezione richiama l’attenzione su questi
termini. Con questo tipo di raccolta differenziata e smaltimento dei pro
dotti usati si contribuisce in modo ostan ziale alla protezione
dell’ambiente.
WEEE No: 82898622
8 UE Dichiarazione di conformità
Usando il marchio CE, Goobay®, un marchio registrato della
Wentronic GmbH, dichiarache il dispositivo è conforme ai requisiti di
base ed alle linee guida delle normative Europee.
Table of contents
Languages:
Other Goobay Accessories manuals

Goobay
Goobay 59820 User manual

Goobay
Goobay PowerBank 5000 User manual

Goobay
Goobay 64558 User manual

Goobay
Goobay 42262 User manual

Goobay
Goobay 71225 User manual

Goobay
Goobay 20344 User manual

Goobay
Goobay 41268 User manual

Goobay
Goobay 63533 User manual

Goobay
Goobay 40885 User manual

Goobay
Goobay 94272 User manual