Rx Only: Federal Law (USA) restricts this device to sale by or on the
order of a physician.
Indications for Use
Gastrostomy tube feeding may be indicated for
patients needing long-term enteral support or
hydration secondary to a primary condition relating to
the head and/or neck. These conditions include stroke;
cancer; head and neck tumors, injuries, or trauma;
and neurological disorders resulting in a chewing or
swallowing abnormality.This device (sold in a kit) is
intended as an initial placement device.The device is
placed by one of two techniques, the PULL technique
and the over-the-guidewire technique (PUSH
technique).This guidance covers the PUSH technique.
Contraindications
1. Esophageal stenosis
2. Portal hypertension
Warnings
Do not reuse, reprocess, or resterilize this
medical device. Reuse, reprocessing, or
resterilization may 1) adversely aect the
known biocompatibility characteristics of the
device, 2) compromise the structural integrity of
the device, 3) lead to the device not performing
as intended, or 4) create a risk of contamination
and cause the transmission of infectious
diseases resulting in patient injury, illness, or
death.
After MIC* PEG Tube placement, proper
positioning of the internal bumper against the
gastric mucosa must be veried endoscopically.
Tension on the MIC* PEG Tube should be avoided
to minimize the risk of complications.
Failure to comply with these warnings may
result in pressure necrosis of the gastric mucosa
with subsequent erosion, perforation, and/or
leakage of gastric contents into the peritoneum.
Migration of the internal bumper into the stoma
tract or embedding into the stomach wall may
also occur over time.
Dispose of all sharps according to facility
protocol.
Caution: Verify package integrity prior to opening.
Do not use if package is damaged or sterile barrier
compromised.
Placement Procedure
1. Use a clinically approved method to prep and sedate
the patient for an endoscopic procedure.
2. Use a clinically approved procedure to perform the
gastric endoscopy.
3. With the patient in a supine position, insuate the
stomach with air and transilluminate the abdominal
wall.
Caution: Proper selection of the insertion site is
critical to the success of this procedure.
4. Select gastrostomy site.The site (typically the upper
left quadrant) should be free of major vessels,
viscera, and scar tissue.
5. Prep and drape the skin at the selected insertion site.
Locally anesthetize the insertion site.
6. Following local anesthesia, make a 1 cm
(approximate) incision through the skin with the
safety scalpel.
Note: To activate the safety scalpel blade, place thumb
on slider of the safety scalpel and push forward until
the blade locks into place. To retract the blade, place
thumb on the slider of the safety scalpel and depress.
The blade will automatically slide back into retracted
position. Blade does not permanently lock out and may
be reactivated as desired.
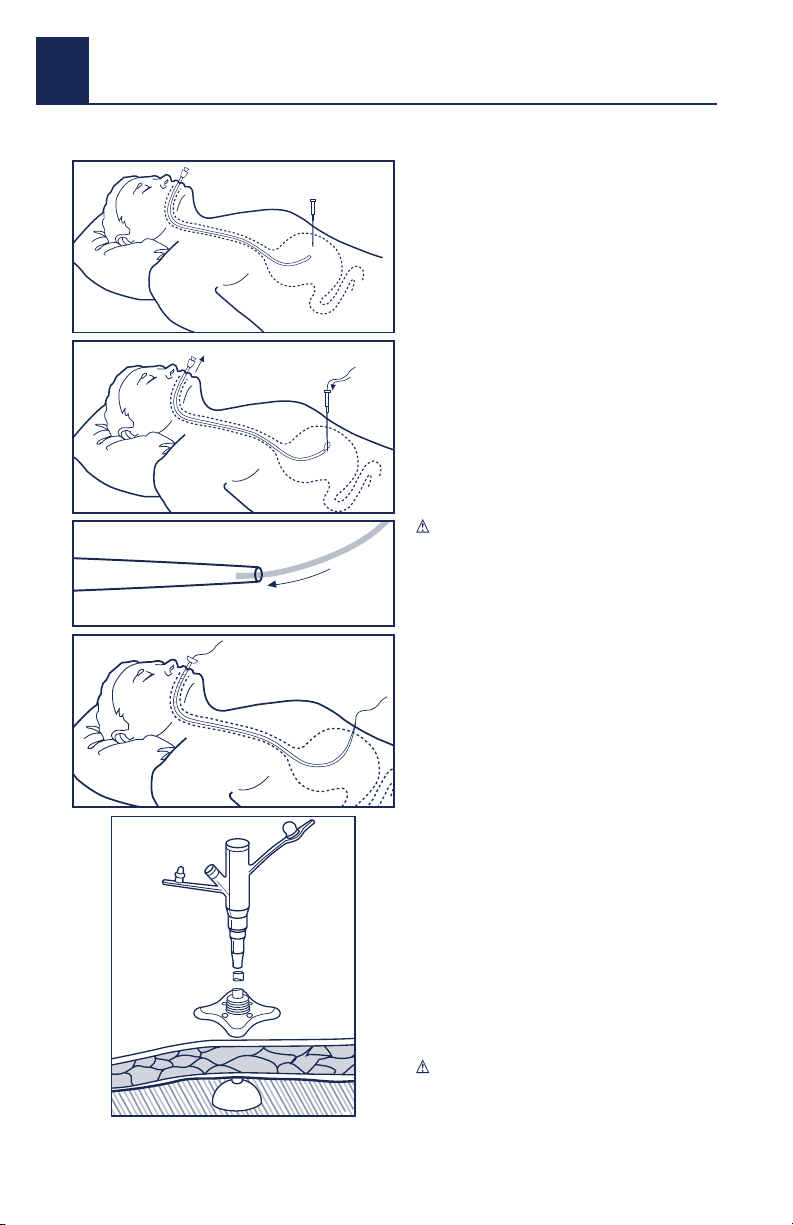
7. Insert the introducer safety needle system through
the incision, advancing through the peritoneum and
the stomach wall. Fig. 1
8. When the introducer safety needle is observed in
the stomach, remove the introducer needle from the
introducer cannula by rmly holding the cannula hub
and pulling back on the needle hub.
Note: Upon removing the introducer needle from
the introducer cannula, the introducer needle shall
be blunt. If desired, the introducer needle can be
reactivated by placing it back into the introducer
cannula.
9. Place the guidewire through the introducer cannula
into the stomach. Grasp the guidewire with a
retrieval snare. Withdraw the retrieval snare into the
endoscopic channel. Fig. 2
10. Remove the endoscope and the guidewire through
the oropharynx. Pull approximately 45 inches
(114 cm) of the guidewire from the mouth.
11. Before advancing the MIC* PEGTube into the
oropharynx, feed the tapered end of the MIC* PEG
Tube over the guidewire until the wire exits the
opposite end of the MIC* PEGTube. Fig. 3
12. Once the guidewire is approximately 45 inches
(114 cm) from the mouth, slide the introducer
cannula out of the incision site.
13. Lubricate the MIC* PEG Tube with a water-soluble
lubricant. Keep the guidewire taut and push the
MIC* PEG Tube in an antegrade method until the
tapered tip of the tube dilates the stoma tract
through the abdominal wall. Fig. 4
14. Re-enter the esophagus with the endoscope and
visually follow the gastrostomy tube as it enters the
stomach. Grasp the tapered tip of the MIC* PEGTube
as it penetrates the abdominal wall and pull the PEG
tube so that the internal bumper moves into the
stomach. Remove the guidewire.
15. Use a rotating motion to slowly work the tube up and
out until the internal bumper gently rests against the
gastric mucosa.
Note: Graduated markings on the body of the tube
will assist in determining the progress of the tube as it
exits the abdomen.
Caution: Do not use excessive force to pull the
tube into place. This could harm the patient and
damage the tube.
16. Cleanse the tube and stoma site and apply a sterile
gauze dressing.
17. Slide the external bolster over the proximal end of
the MIC* PEG Tube and push the external bolster
into place next to the sterile gauze dressing. Visually
verify that the internal bumper is properly placed.
Remove the endoscope. The external bolster should
be positioned approximately 2 mm above the skin.
Caution: Do not apply excessive tension.There
should be no compression of the gastric mucosa or
the skin. Optionally, a suture loop (not supplied)
may be tied around the external bolster to minimize
movement of the MIC* PEGTube while the stoma is
healing.
18. Cut the MIC* PEGTube at approximately 90 degrees,
leaving an appropriate length to attach a MIC*
Feeding Adapter on the proximal end of the MIC* PEG
Tube. This adapter will accept a catheter tip syringe
or a standard feeding connector. Fig. 5 Discard the
removed portion of the tubing.
Skin and Stoma Care
1. Keep the skin around the MIC* PEG Tube stoma site
clean, dry, and free of drainage.
2. The stoma and surrounding skin area should be
inspected at each feeding.Wash the area at least
HALYARD*
MIC*Safety Percutaneous Endoscopic Gastrostomy (PEG) Kit
PUSH (OTW) Technique
Fig. 2
Fig. 3
Fig. 5
Fig. 4
Fig. 1


