Hayes ACCURA External ISDN TA User manual
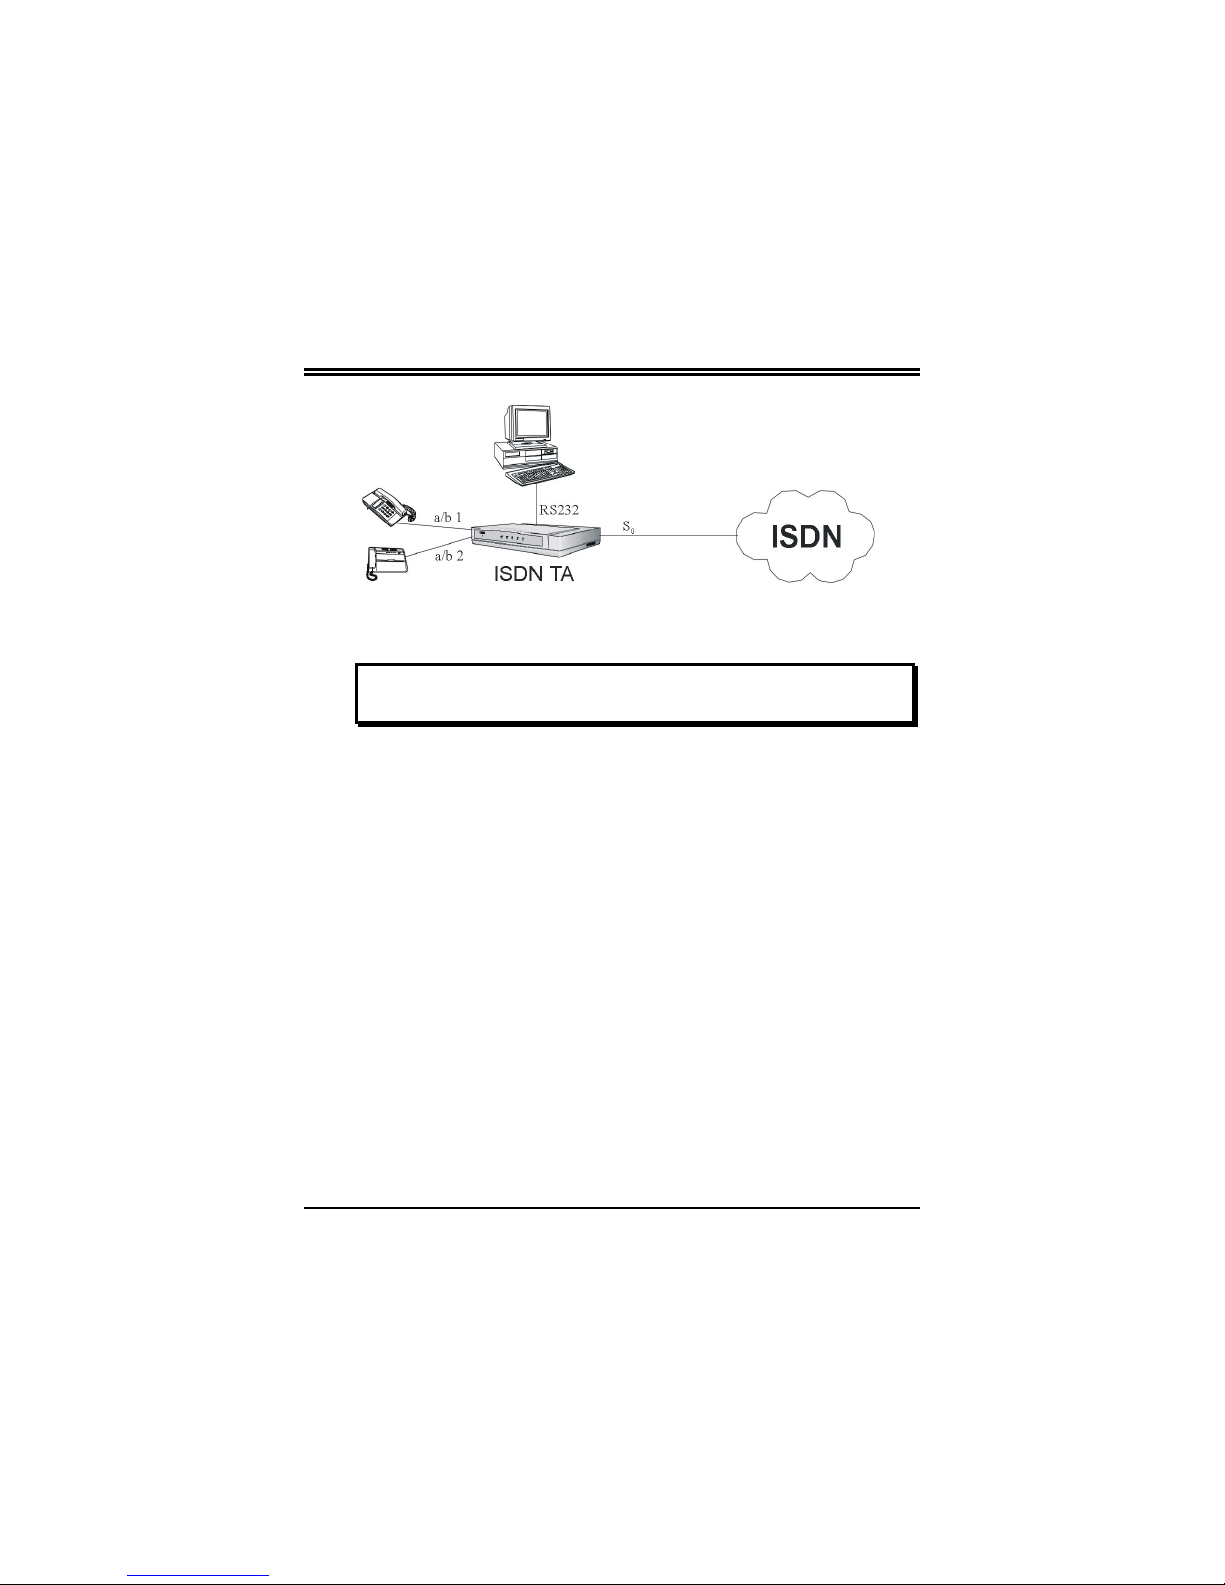
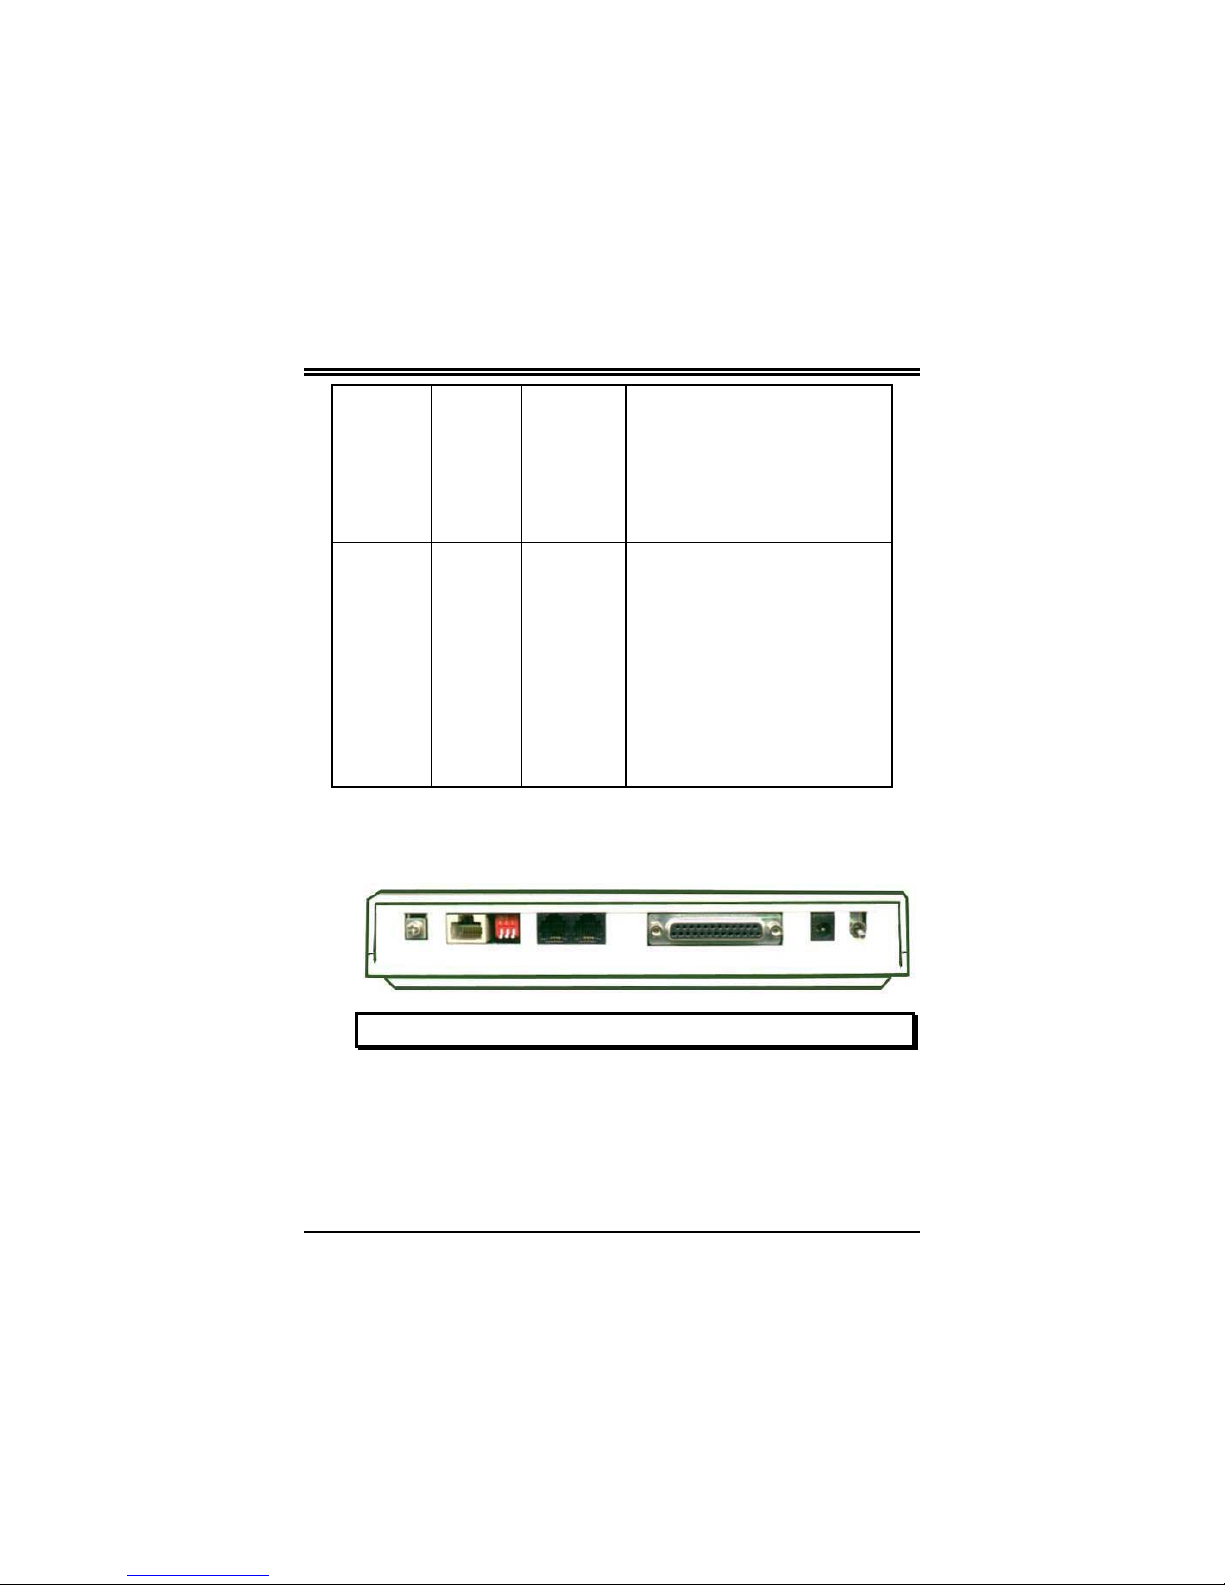
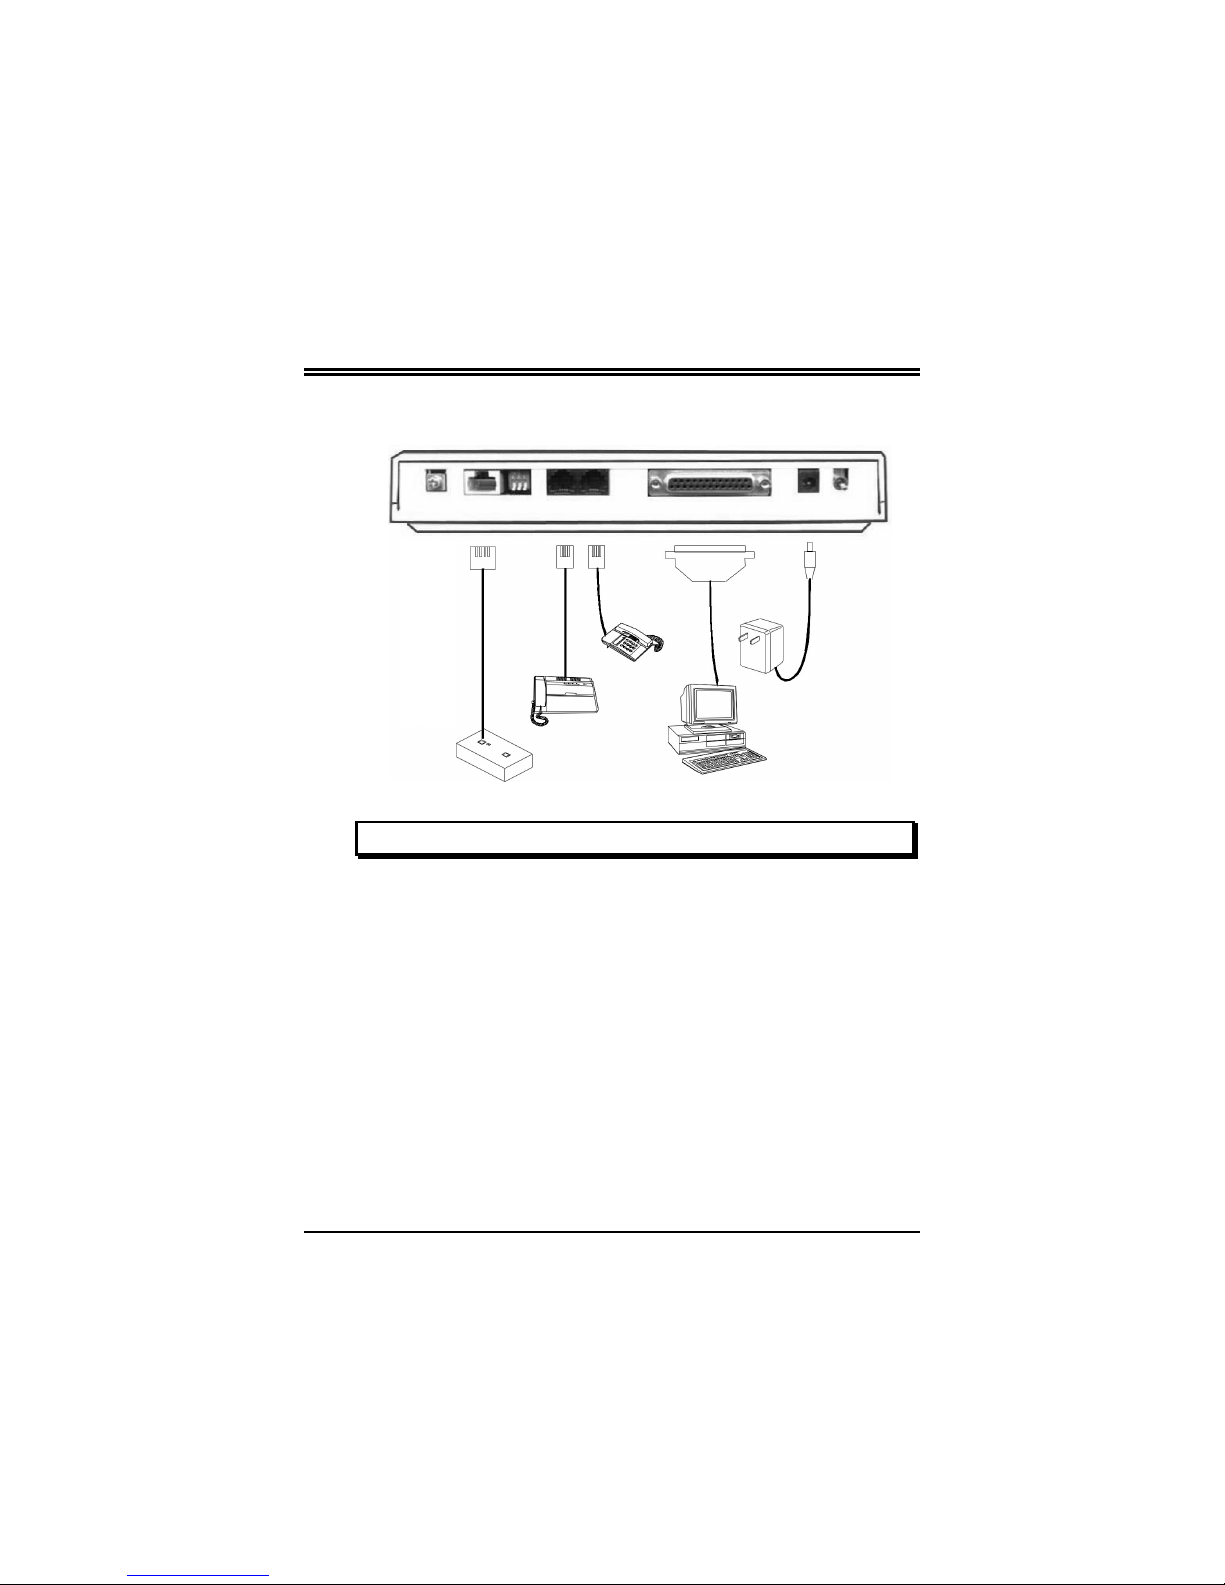
ACCURA External ISDN TA
User’s Guide

ACCURA External ISDN TA User’s Guide
ii
Preface
About this Manual
This manual is designed to assist users in installing, configuring
and troubleshooting the ACCURA External ISDN TA.
Information in this document has been carefully checked for
accuracy; however, no guarantee is given as to the correctness of
the contents. The information contained in this document is
subject to change without notice.
Edition
1st Edition, January 2001
Copyright
© Copyright 2001, Zoom Telephonics, Inc. All Rights Reserved.
This document contains proprietary information protected by
copyright. All rights are reserved. No part of this manual may be
reproduced by any mechanical, electronic, or other means, in
any form, without the prior written permission of the
manufacturer.
Trademarks
All trademarks and registered trademarks are the property of
their respective owners.

Preface
iii
Regulatory Compliance Information
Declaration of Conformity
The manufacturer declares under sole responsibility that
this equipment is compliant to Directive 1999/5/EC
(R&TTE Directive) via the following:
Standards Directives Test Reports Issued
EN 60950 73/23/EEC – Low
Voltage electrical safety
EN 50082-1 89/336/EEC – EMC EMC-immunity
EN 55022 89/336/EEC – EMC EMC-emissions
The product is CE Marked.
Additional Test Information
This product also meets the requirements of the following:
European Harmonized Standard: CTR 3
European Technical Standard: NET 3
German National Standard: BAPT 223 ZV 25
CE/EMC Restriction of Liability
The product described in this handbook was designed, produced
and approved according to the EMC regulations and is certified
to be within EMC limitations. If the product is used with an
uncertified PC, Zoom Telephonics, Inc. undertakes no warranty
in respect to the EMC limits. The product described in this
handbook was constructed, produced and certified so that the
measured values are within EMC limitations. In practice and
under special circumstances, it may be possible, that the product
may be outside of the given limits if it is used with a PC that is
not produced under EMC certification.

ACCURA External ISDN TA User’s Guide
iv
Important Safety Instructions
1. Follow all warnings and instructions marked on the product.
2. Unplug this product from the wall outlet before cleaning.
Do not use liquid or aerosol cleaners. Use a damp cloth for
cleaning.
3. Do not use this product near water.
4. Do not place this product on an unstable cart, stand, or
table. The product may fall, causing serious damage to the
product.
5. The openings should never be blocked by placing the
product on a bed, sofa, rug, or other similar surface. This
product should never be placed near or over a radiator or
heat register, or in a built-in installation unless proper
ventilation is provided.
6. This product should be operated from the type of power
indicated on the marking label. If you are not sure of the
type of power available, consult your dealer or local power
company.
7. Do not allow anything to rest on the power cord. Do not
locate this product where persons will walk on the cord.
8. If an extension cord is used, make sure that the total ampere
rating of the equipment plugged into that cord does not
exceed the extension cord ampere rating. Make sure that the
rating of all products plugged into the outlet does not
exceed 15 amperes.
9. Do not attempt to service this product yourself, as opening
or removing covers may expose you to dangerous voltage
points or other risks. Refer all servicing to qualified service
personnel.

Table of Contents
CHAPTER 1 1
Introduction 1
1.1 An Overview of the ACCURA External ISDN TA 1
1.2 Package Contents 2
CHAPTER 2 3
Using the ISDN TA 3
2.1 The Front Panel LEDs 3
2.2 The Back Panel 5
2.3 Setting the Terminating Resistor 7
2.4 Connecting the ISDN TA 8
CHAPTER 3 11
Installing the Software 11
3.1 Installing the ISDN TA under
Windows 95A Plug-and-Play 11
3.2 Installing the ISDN TA under
Windows 95B Plug-and-Play 12
3.3 Installing the ISDN TA under
Windows 98/2000 Plug-and-Play 13
3.4 Installing the ISDN TA under
Windows Me 14
3.5 Installing the ISDN TA under
Windows NT 4.0 or through the Control Panel 14
3.6 Installing the Utility under
Windows 95/98/2000/Me/NT 4.0 16
APPENDIX 17
Product Support 17


1
Chapter 1
Introduction
1.1 An Overview of the ACCURA
External ISDN TA
The ACCURA External ISDN TA is an external ISDN digital
modem (or Terminal Adapter) for connection with digital
telephone services from your local telephone company.
The ISDN TA provides high-speed access to the Internet,
corporate Intranet and online information services. It allows
data transmission at speeds of up to 128 Kbps. In addition to
the high-speed data access, the ISDN TA also supports two
analogue ports for connecting traditional analogue devices
such as a telephone, fax machine, answering device or modem
to an ISDN network.
Installation is relatively simple. You need to have ISDN
service from your phone company and an ISDN jack (S/T
interface) to plug into. Then you connect the power cable,
ISDN cable, and optional telephone equipment. Then you run
our installation software before placing your first call.

ACCURA External ISDN TA User’s Guide
2
FIGURE 1-1: THE ACCURA EXTERNAL ISDN TA
CONNECTION
1.2 Package Contents
The product package comes with the following accessories:
1. One external ISDN TA box
2. One AC-DC power adapter
3. One DB25 to DB9/DB25 serial cable
4. One RJ-45 to RJ-45 ISDN cable
5. The installation diskettes or CD
6. Communications software CD (may be on Installation
CD)
7. User’s guide.
Note: In addition, special telephone-line adapters are provided for
certain countries.
()
OPTIONAL
()
OPTIONAL

3
Chapter 2
Using the ISDN TA
2.1 The Front Panel LEDs
FIGURE 2-1: THE FRONT PANEL LEDS
LED Color Status Description
POWER Green ON/OFF ON - Power is on.
OFF - Power is OFF or no
power.
RUN Green
or
Orange
ON/OFF Provides a quick indication
of system status.
OFF - Diagnostic test fails.

ACCURA External ISDN TA User’s Guide
4
Orange ON - Passed
diagnostic test and ISDN
interface is deactivated.
Green ON - Passed
diagnostic test and ISDN
line is activated.
DATA Green
or
Orange
ON/OFF/
FLASH
Provides quick indication of
the DATA call status on the
RS-232 interface.
The LED color indicates
the number of B channels
associated with the DATA
call as follows:
GREEN - One B channel.
ORANGE - Two B
channels.
The LED status indicates
the status of the last
associated B channel as
follows:
ON - B channel is
connected.
OFF - No data calls.
FLASH - B channel is
waiting to be connected.
a/b 2 Green ON/OFF/
FLASH
Indicates the status of the
PHONE2 interface as
follows:

Chapter 2 — Using the ISDN TA
5
ON - Handset is off-hook.
OFF - Handset is on-hook
and no call exists.
FLASH - Handset is on-
hook and there is an
incoming call.
a/b 1 Green ON/OFF/
FLASH
Indicates the status of the
PHONE1 interface as
follows:
ON - Handset is off-hook.
OFF - Handset is on-hook
and no call exists.
FLASH - Handset is on-
hook and there is an
incoming call.
2.2 The Back Panel
FIGURE 2-2: THE BACK PANEL

ACCURA External ISDN TA User’s Guide
6
Feature /
Connector
Meaning
ON/OFF Turns the power on or off
Power AC-DC power adapter jack (typically 12V DC)
RS-232 Serial 25-pin female connector for connecting to
the serial port on a computer
a/b1
a/b2
RJ-11 terminating jacks for connecting to
traditional analogue devices (phones, fax
machines, etc.)
DIP Switch Sets the terminating resistor (see section 2.3
below)
ISDN S0ISDN RJ-45 terminating jack for connecting to
the ISDN NT-1 device

Chapter 2 — Using the ISDN TA
7
2.3 Setting the Terminating Resistor
There is a 3-position DIP switch located on the rear panel
for setting the terminating resistor.
You need to adjust this switch only if there is an
External ISDN TA and at least one other ISDN
modem attached to the same ISDN S0line.
Here is how to set the DIP switch:
Only One ISDN Modem
If only one ISDN modem is connected to the telephone line,
set all three DIP switches on the modem to OFF.
OFF OFF OFF

ACCURA External ISDN TA User’s Guide
8
Two or More ISDN Modems
If two or more ISDN modems are connected to the telephone
line, set all three DIP switches on the modem farthest from the
line to ON.
ON ON ON
2.4 Connecting the ISDN TA
Please refer to the following instructions and figures for
installation procedures:
1. Place the ISDN TA on a sturdy surface.
2. Connect your ISDN line to the RJ-45 jack labeled “ISDN
S0” on the back of the ISDN TA (Refer to Figure 2-3).
3. Optional: Connect analogue telephones or other analogue
devices to the RJ-11 jacks labeled “a/b 1” or “a/b 2” on
the back of the ISDN TA (Refer to Figure 2-3). Each jack
can handle one or more devices, depending on their ringer
equivalence. For each jack, the ringer equivalence should
not exceed 2 per port.

Chapter 2 — Using the ISDN TA
9
FIGURE 2-3: CONNECTING THE ISDN TA
4. Check that the power switch on the ISDN TA is turned
off. Also, make sure that the power to your computer is
turned off.
5. Connect the power cord from the AC-DC power adapter
to the jack labeled POWER on the ISDN TA. Then plug
the power adapter to a wall outlet.

ACCURA External ISDN TA User’s Guide
10
6. Connect the male end of the 25-pin serial cable to the
connector labeled “RS-232” on the ISDN TA. Connect the
other end of the serial cable to the RS-232 serial port on
your computer (Refer to Figure 2-3).
Check that the voltage rating on the wall outlet is
the right one for your power adapter.
7. Turn on the ISDN TA using its power switch. Then turn
on the power switch on your computer in order for plug
and play to establish a connection with the ISDN TA.
If everything is connected properly, the POWER and RUN
LEDs on the front panel should light up. Otherwise, check
your connections again.

11
Chapter 3
Installing the Software
This chapter contains instructions on how to install the ISDN TA
under Windows 95A, 95B, 98/2000, Me, and NT 4.0.
3.1 Installing the ISDN TA under
Windows 95A Plug-and-Play
1. Turn on the power to the ISDN TA.
2. Turn on the power to the computer.
3. Windows 95 should detect a new device for the first time
and display the New Hardware Found screen. Select the
option Driver from disk provided by hardware
manufacturer and click Next.
4. Insert the ISDN TA128 CD into the CD ROM drive and
allow it to spin up. Enter the drive letter of your CD ROM
drive, e.g., d:\. Click Next to complete the installation.
5. The ISDN TA is now installed for the COM port to which
it is connected.
6. Proceed to section 3.6, Installing the Utility, for details on
how to install the ISDN TA utility.

ACCURA External ISDN TA User’s Guide
12
3.2 Installing the ISDN TA under
Windows 95B Plug-and-Play
1. Turn on the power to the ISDN TA and then to the
computer.
2. Windows should report that it has detected an ISDN
TA128 Plug and Play device (see screen shot).
3. Insert the ISDN TA 128 CD into your CD ROM drive and
allow it a few seconds to spin up. Then click Next to let
Windows search for the correct drivers.
4. Windows reports that it has found drivers for the ISDN
TA128. Click Finish to complete the installation.
5. The ACCURA ISDN TA is now installed for the COM
port to which it is connected.

Chapter 3 — Installing the Software
13
6. Proceed to section 3.6, Installing the Utility, for details on
how to install the ISDN TA utility.
3.3 Installing the ISDN TA under
Windows 98/2000 Plug-and-Play
1. Turn on the power to the ISDN TA.
2. Turn on the power to the computer.
3. Windows should detect a new device and start the New
Hardware Wizard.Click Next.
4. Insert the ISDN TA128 Installation CD into the CD
ROM drive, select the Search for driver option, and
click Next.
5. At the next screen make sure that the CD ROM drive
box is ticked. Then click Next.
6. Windows now reports that it has found drivers for ISDN
TA 128 Plug and Play. Click Next to install.
7. Windows 98:
Click Finish to complete the installation.
Windows 2000:
Windows now reports that a digital signature has not
been found. Click Yes to confirm the installation. Then
click Finish to complete the installation.
8. Proceed to section 3.6, Installing the Utility, for details
on how to install the ISDN TA utility.

ACCURA External ISDN TA User’s Guide
14
3.4 Installing the ISDN TA under
Windows Me
1. Turn on the power to the ISDN TA.
2. Turn on the power to the computer.
3. Windows should detect a new device and start the New
Hardware Wizard.Insert the ISDN TA128 Installation
CD into the CD ROM drive, select the Automatic
Search for driver option, and click Next.
4. Click Finish to complete the installation.
5. Proceed to section 3.6, Installing the Utility, for details on
how to install the ISDN TA utility.
3.5 Installing the ISDN TA under
Windows NT 4.0 or through
the Control Panel
Follow the procedure below if you are using NT 4.0 or if you
want to install the modem manually rather than through Plug-
and-Play.
Table of contents
Other Hayes Modem manuals

Hayes
Hayes Modem User manual

Hayes
Hayes H08-15530DF User manual

Hayes
Hayes Modem User manual

Hayes
Hayes V.92 User manual

Hayes
Hayes RocketModem Manual

Hayes
Hayes H08-15531-EF User manual

Hayes
Hayes ADSL Duo Modem User manual

Hayes
Hayes Series 1057 User manual

Hayes
Hayes PC Card User manual

Hayes
Hayes V.92 User manual