Hella Gutmann CSC-Tool User manual

.
BD0053V0004EN0316S0
460 985-69 / 03.16
Operating Instructions en
CSC-Tool

Inhaltsverzei hnis CSC-Tool
Table of Contents
1 Safety Precautions ......................................................................... 3
1.1 General Safety Precautions ...........................................................3
1.2 Safety Precautions for the CSC-Tool..............................................3
1.3 Safety Precautions – Risk of Injury................................................4
1.4 Safety Precautions – aser............................................................4
2 Product Description .......................................................................5
2.1 Intended Use.................................................................................5
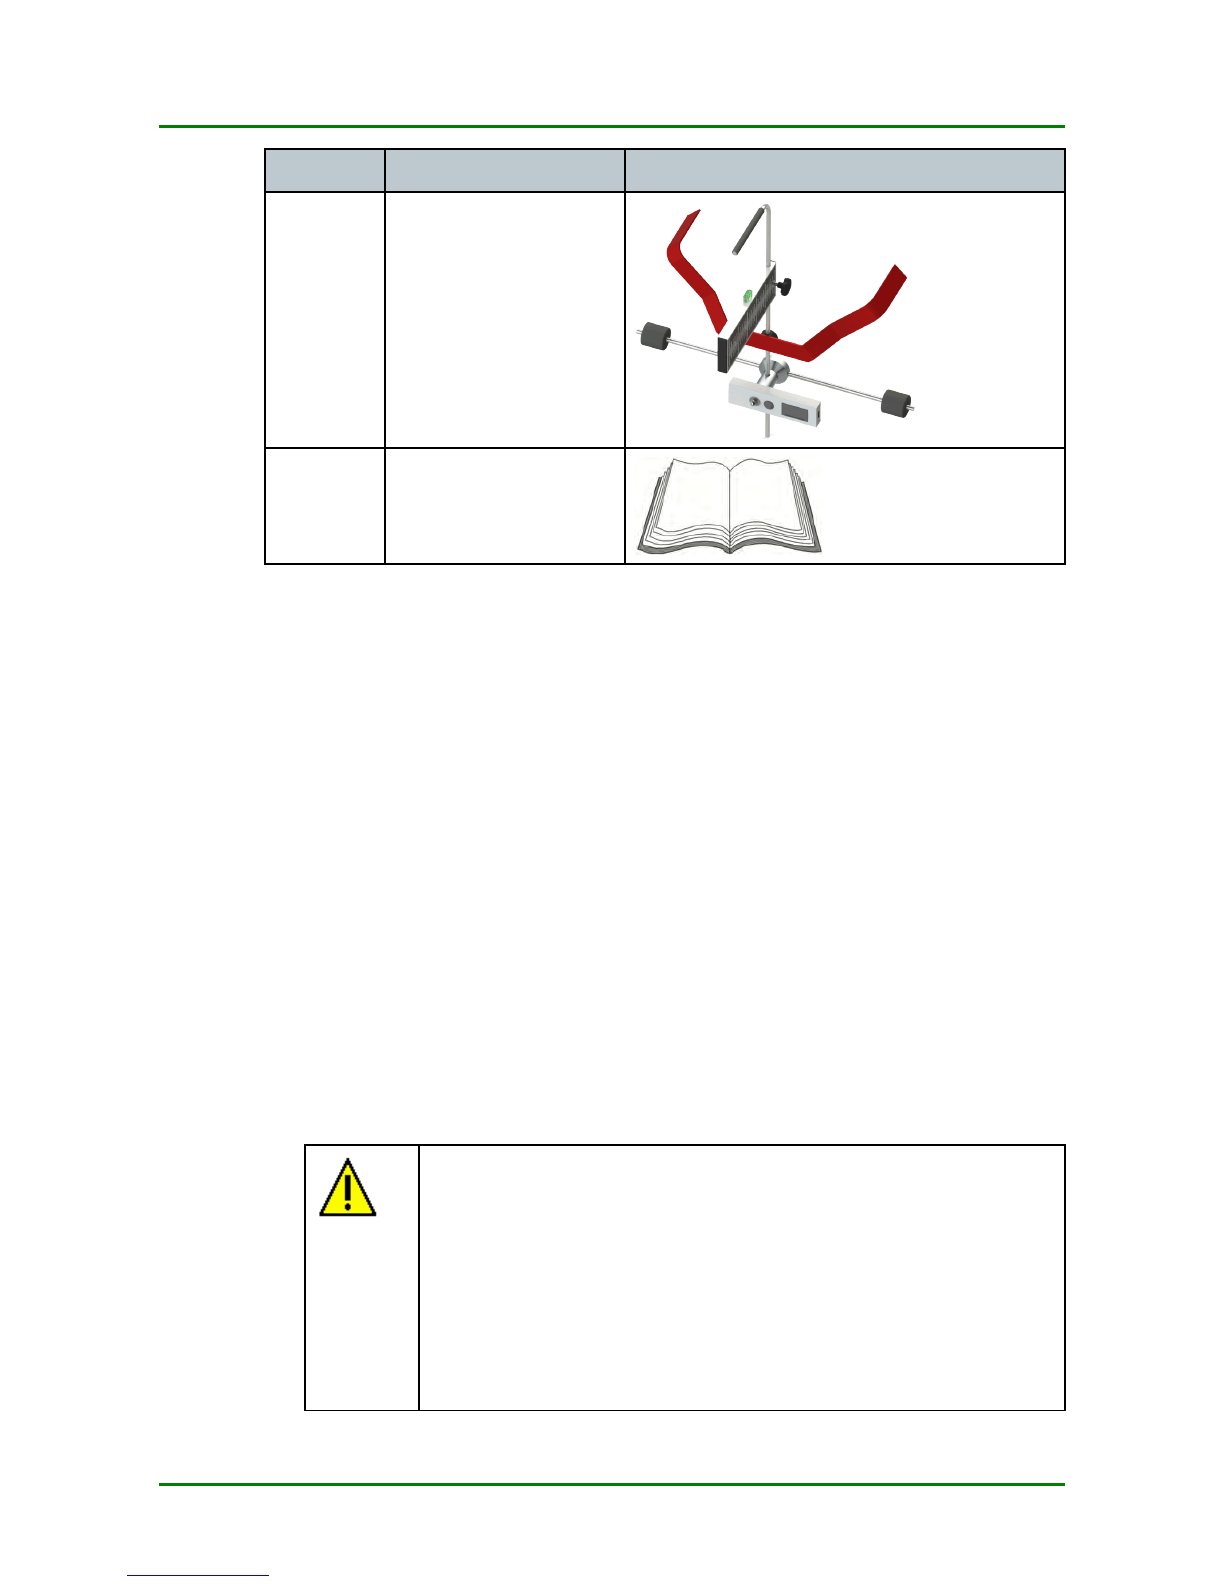
2.2 Delivery Contents..........................................................................5
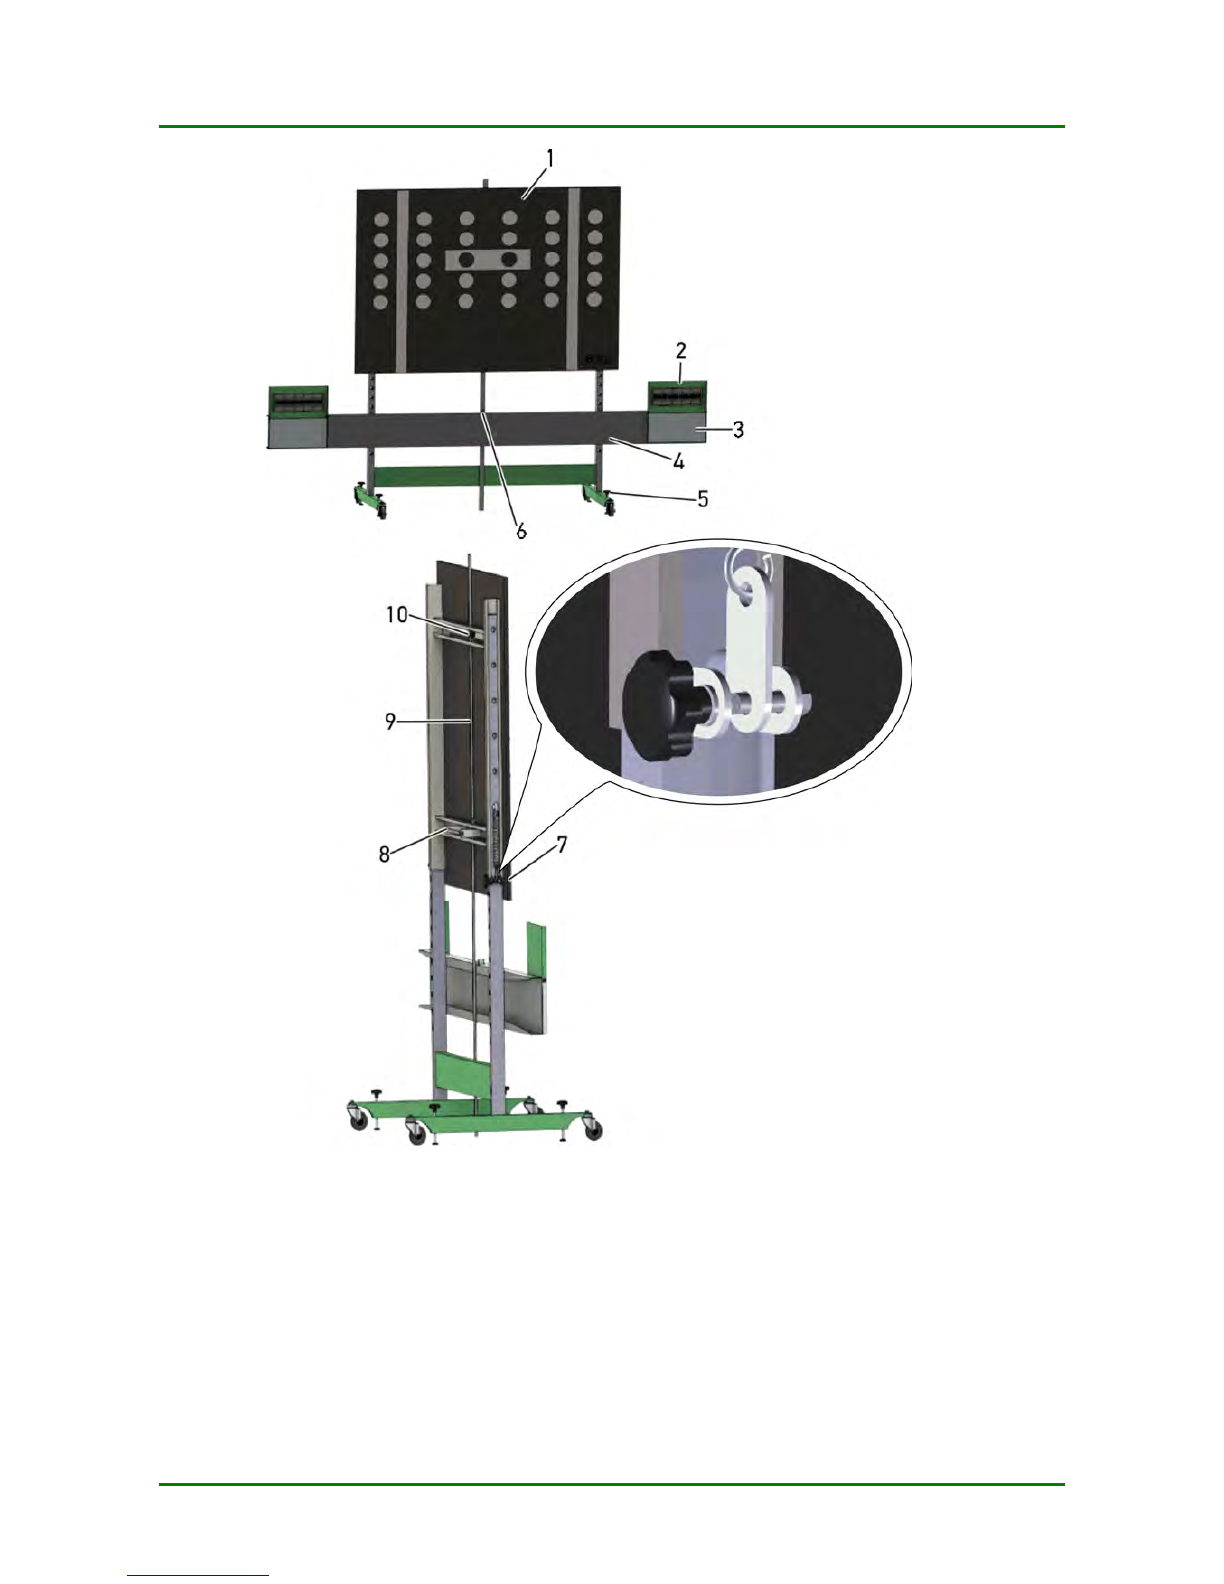
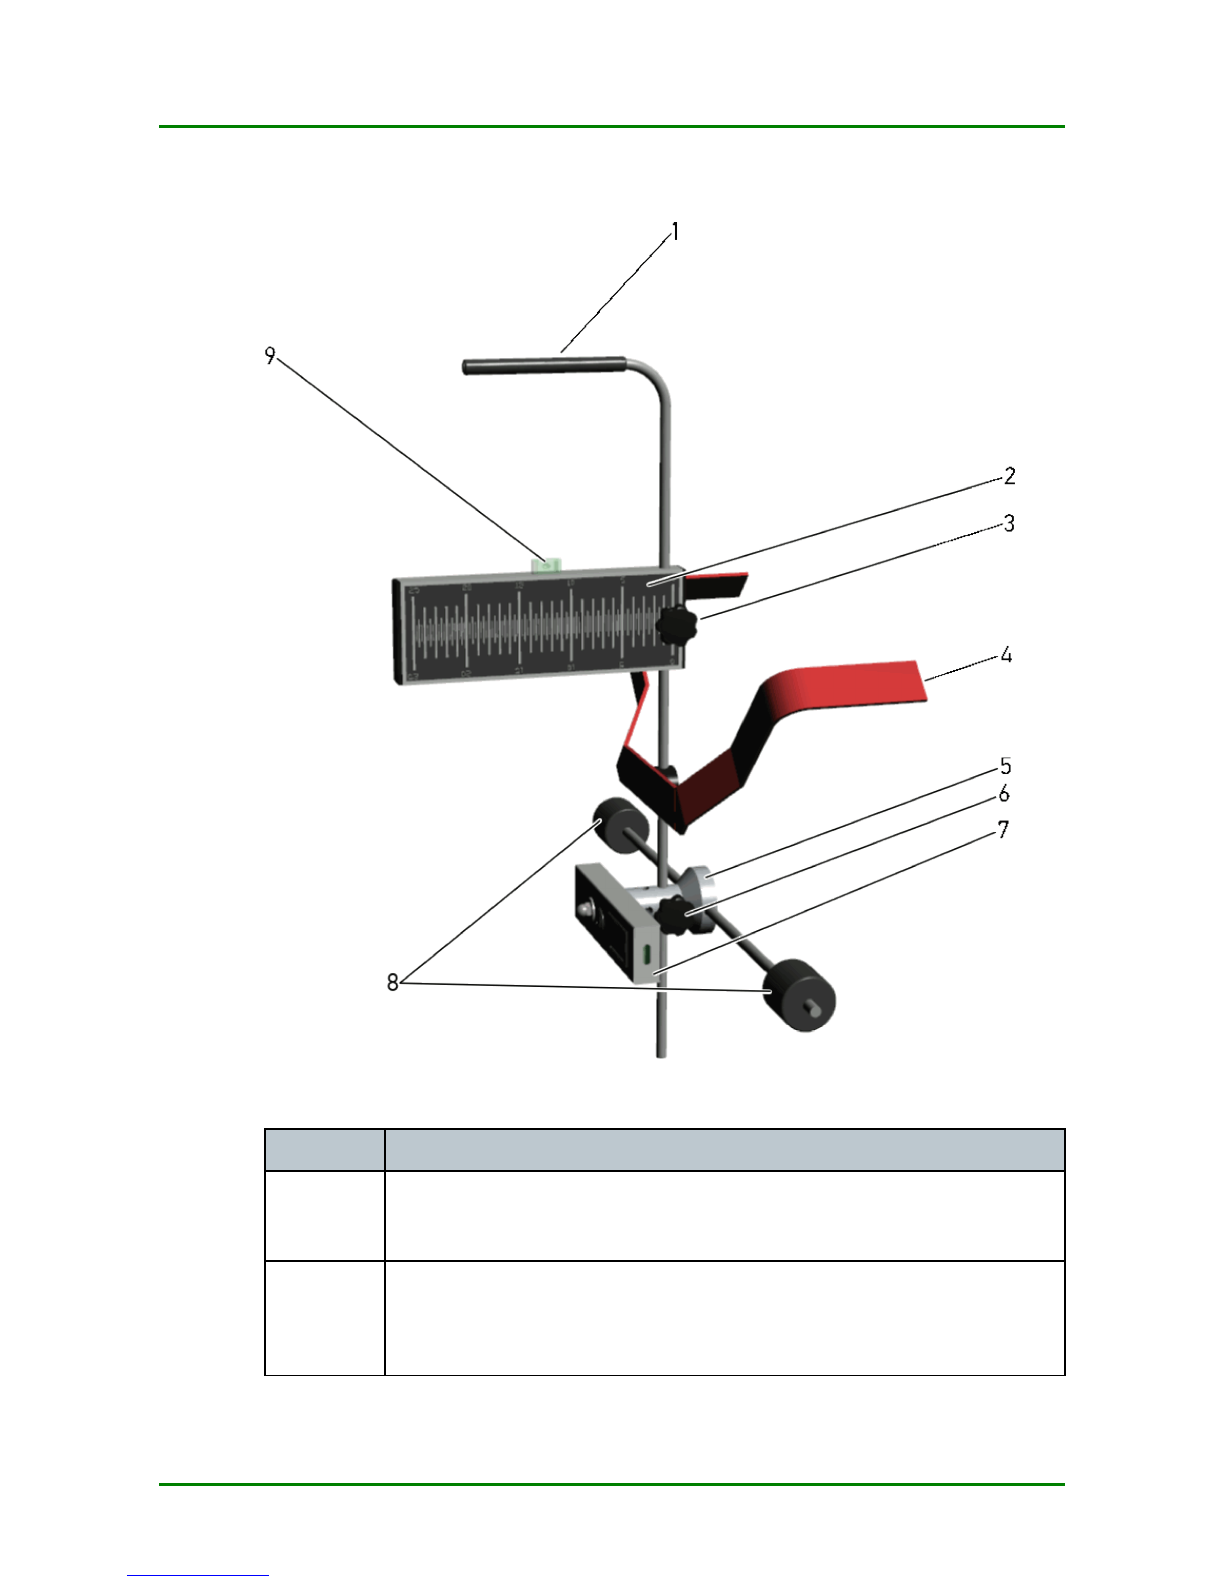
2.3 Tool Description ............................................................................7
3 Working with the CSC-Tool.......................................................14
3.1 Precondition for the Use of the CSC-Tool.....................................14
3.2 Placing the CSC Panel in Front of the Vehicle ..............................14
3.3 Placing the CSC Panel Centred in Front of the Vehicle .................17
3.4 Placing the CSC Panel Parallel to the Vehicle ..............................21
3.5 Adjusting the Height of the Reference Panel ...............................25
4 General Information.....................................................................28
4.1 Care and Maintenance.................................................................28
4.2 Disposal......................................................................................28
4.3 Technical Data for aser Module .................................................29
2

CSC-Tool Safety Pre autions
General Safety Pre autions
1 Safety Precautions
1.1 General Safety Precautions
• The CSC-Tool is ex lusively intended for use on a vehi le.
It is a pre ondition for the use of the CSC-Tool that the
user has knowledge of automotive te hnology and is
therefore aware of the sour es of danger and risks in the
repair shop and on motor vehi les.
• All notes given in the individual se tions of the operating
instru tions apply. In prin iple it is required to follow the
steps and safety pre autions stated below.
• Furthermore, pay attention to all general instru tions
from labour inspe torates, trade asso iations and vehi le
manufa turers as well as all laws, legal ordinan es and
instru tions whi h have to be ommonly obeyed by a
repair shop.
1.2 Safety Precautions for the CSC-Tool
In order to avoid in orre t handling and injury to the user or
destru tion of the CSC-Tool arising from this, pay attention to
the following:
• Only assemble the CSC-Tool a ording to the assembly
instru tions.
• Prote t the CSC-Tool from long periods of exposure to
solar radiation.
• Prote t the CSC-Tool from water (it is not waterproof).
• Prote t the CSC-Tool from strong impa ts (do not drop).
• Regularly servi e the CSC-Tool.
3

Safety Pre autions CSC-Tool
Safety Pre autions – Risk of Injury
1.3 Safety Precautions – isk of Injury
When working on the vehi le, there is a risk of injury through
inadvertent rolling of the vehi le. Therefore regard the
following:
• The park position should also be engaged in automati
vehi les.
• Prote t vehi le against rolling away.
1.4 Safety Precautions – Laser
There is a risk of injury through dazzling the eyes when
working with the laser. Therefore regard the following:
• Do not dire t the laser beam towards persons, doors or
windows.
• Never look dire tly into the laser beam.
• Ensure proper room illumination.
• Avoid trip hazards.
• Se ure me hani al parts from falling over or be oming
loose.
4

CSC-Tool Produ t Des ription
Intended Use
2 Product Description
2.1 Intended Use
The Camera & Sensor Calibration Tool (CSC-Tool) is a system for
alibrating driver assist systems suitable for all makes and models.
Optional modules enable brand-spe ifi adjustments of all kinds of
systems. Therefore, in onne tion with a diagnosti tool from Hella
Gutmann you are able to alibrate e.g. the front amera for the lane
departure warning system, the radar sensor for the ACC (Adaptive Cruise
Control) or the amera for adaptive headlights.
The CSC-Tool an be ex lusively operated in ombination with a Hella
Gutmann diagnosti tool. Diagnosti tools from other manufa turers will
not be supported.
2.2 Delivery Contents
Pieces Designation
1CSC Panel
1Cross member
1Dipsti k
2 Base support on
aster wheels
5

Produ t Des ription CSC-Tool
Delivery Contents
Pieces Designation
2HD-10 EasyTou h
in l. wall mount
1Operating and
installation
instru tions
2.2.1 Checking Delivery Contents
Please he k the delivery ontents upon re eiving your tool so that
omplaints an be issued immediately regarding potential damage or
missing parts.
Pro eed as follows to he k the delivery ontents:
1. Che k the pa kage delivered to ensure that it is not damaged.
Should you identify any damage to the pa kage, then open the pa kage
in the presen e of the delivery servi e and he k the CSC-Tool for
hidden damage. Any transport damage to the pa kage supplied and
damage to the CSC-Tool shall be registered in a damage report by the
delivery servi e.
2. Open the pa kage supplied and he k for ompleteness based on the
delivery slip.
CAUTION
Risk of injury due to heavy tool
The tool may drop down and ause injuries during
unloading.
Always unload the tool with the aid of a se ond person.
Use suitable aids as ne essary.
6

CSC-Tool Produ t Des ription
Tool Des ription
3. Remove the CSC-Tool from the pa kaging.
4. Che k the CSC-Tool for damage and ompleteness.
2.3 Tool Description
2.3.1 CSC Panel
7

Produ t Des ription CSC-Tool
Tool Des ription
8

CSC-Tool Produ t Des ription
Tool Des ription
Designation
1Reference panel
Here you will need different referen e panels depending on
the ar manufa turer. These are optionally available.
2Mirror cover/scale of cross member
Here you an he k whether the CSC Panel is pla ed entred
in front of the vehi le.
3Mirror of cross member
This is used to refle t the laser beam onto the s ale of the
HD-10 EasyTou h.
4Cross member
5Adjustment screws of the base support
Use the adjustment s rews to balan e the level gauge of the
base support.
6evel gauge
Use the level gauge to he k whether the base support is
exa tly horizontal.
7Set screw on reference panel
Use the set s rew to fix the referen e panel at the
appropriate height.
8Handle
Use this handle to move the referen e panel upwards or
downwards.
9Dipstick with set screw
Here you an read the height of the referen e panel.
10 Color marking
Here you an he k the nominal height of the referen e panel
indi ated in the diagnosti tool.
9

Produ t Des ription CSC-Tool
Tool Des ription
2.3.2 HD-10 EasyTouch
Designation
1Handle
This handle makes it easier to arry the HD-10 EasyTou h.
2Scale of the HD-10 EasyTouch
Here you an he k whether the CSC Panel is pla ed parallel
to the vehi le.
10

CSC-Tool Produ t Des ription
Tool Des ription
Designation
3Set screw on scale
Use this set s rew to adjust and fix the s ale.
4Attachment bracket for automobile
Use this atta hment bra ket to atta h the HD-10 EasyTou h
to the tyre.
5Shaft with cross connector
6Set screw on shaft with cross connector
Use this set s rew to adjust the height of the shaft with ross
onne tor.
7aser module
The a tual value an be proje ted onto the s ale of the ross
member of the CSC Panel with the help of the laser.
8Protective cylinder set
This prote ts the wheel rim from damage.
9evel gauge
Use the level gauge to he k whether the HD-10 EasyTou h
is pla ed horizontally.
2.3.3 Laser Module
11

Produ t Des ription CSC-Tool
Tool Des ription
Designation
1Output of the laser beam/laser beam
Output for laser beam.
Use the laser beam to read the a tual value at the s ales of
the ross member and at the HD-10 EasyTou h.
2Mounting bolt
Use this to adjust and se ure the laser module.
3Switch
Swit h the laser on and off.
4Battery compartment cover
2 type AA batteries an be inserted into the battery
ompartment.
2.3.4 eplacing the Batteries
eplacing the Type AA Batteries
Pro eed as follows to repla e the batteries:
1. Swit h off the laser beam (1) with the swit h (3).
2. Remove the battery ompartment over (4), tilting it from the bottom
side towards the top.
12

CSC-Tool Produ t Des ription
Tool Des ription
3. Remove the batteries individually.
NOTE
Pay attention to orre t installation dire tion/polarity
4. Reassembly in reverse order
13

Working with the CSC-Tool CSC-Tool
Pre ondition for the Use of the CSC-Tool
3 Working with the CSC-Tool
The following steps are ne essary to work with the CSC-Tool:
1. Pla e the CSC Panel in front of the vehi le.
2. Pla e the CSC Panel entred in front of the vehi le.
3. Pla e the CSC Panel parallel to the vehi le.
4. Adjust the height of the referen e panel.
The individual steps are des ribed below.
3.1 Precondition for the Use of the CSC-Tool
Regard the following in order to use the CSC-Tool:
• Vehi le system is working properly.
• No trouble odes stored in ECU memories.
• Possible vehi le-spe ifi preparations done.
• Rear axle tra k properly adjusted.
3.2 Placing the CSC Panel in Front of the Vehicle
Pro eed as follows to pla e the CSC Panel in front of the vehi le:
1. Conne t the diagnosti tool to the vehi le (see user manual).
2. Sele t >Diagnostics< in the main menu.
3. Sele t the system to be alibrated, e.g. front amera or ACC under
>Basic setting<.
A window with information and instru tions appears.
14

CSC-Tool Working with the CSC-Tool
Pla ing the CSC Panel in Front of the Vehi le
4. Regard the window with information and instru tions.
WARNING
Sharp obje t
Risk of injury/pier ing
Using the handle, always atta h the HD-10 EasyTou h to
the rim flange or tyre.
CAUTION
S rat hing of surfa es
Damage to wheel rims
Always atta h the prote tive ylinder set to the rim flange
or tyre.
NOTE
The distan e between the CSC Panel and the entre of the
wheel an be measured with a yard sti k (not in luded in
the delivery ontents) only if the HD-10 EasyTou h is
atta hed horizontally and entred to the entre of the
wheel.
5. Install one HD-10 EasyTou h on the left and right front wheel
respe tively.
15

Working with the CSC-Tool CSC-Tool
Pla ing the CSC Panel in Front of the Vehi le
6. On the HD-10 EasyTou h, loosen the set s rew of the shaft with ross
onne tor (6).
Now you an adjust the height of the shaft with ross onne tor.
7. Align the shaft with ross onne tor (5) to the wheel entre 1.
8. Align the s ales of the HD-10 EasyTou h at a right angle.
9. Use a yard sti k (not in luded in the delivery ontents) to measure
from the entre of the wheel 1to the rear edge (see marking) of the
ross member (4).
16

CSC-Tool Working with the CSC-Tool
Pla ing the CSC Panel Centred in Front of the Vehi le
10. Pla e the CSC Panel with the distan e A, indi ated in the diagnosti
tool, to the entre of the wheel 1.
11. Perform steps 6 to 10 for the se ond HD-10 EasyTou h.
Now the CSC Panel is pla ed orre tly in front of the vehi le.
3.3 Placing the CSC Panel Centred in Front of the Vehicle
Pro eed as follows to pla e the CSC Panel entred in front of the vehi le:
17

Working with the CSC-Tool CSC-Tool
Pla ing the CSC Panel Centred in Front of the Vehi le
1. Atta h one HD-10 EasyTou h on the left and right rear wheel
respe tively.
2. Align the s ales of the HD-10 EasyTou h at a right angle.
NOTE!
Ensure that the level bubbles of both HD-10 EasyTou h
devi es are entred.
18

CSC-Tool Working with the CSC-Tool
Pla ing the CSC Panel Centred in Front of the Vehi le
3. The left and right mirror overs (2) of the ross member (4) should be
tilted upwards.
The s ales of the ross member and mirrors are visible.
CAUTION
Laser radiation
Damage to/destru tion of the retina
Never look dire tly into the laser beam.
4. Swit h on the laser beam (1) of the laser module (7) with the swit h
(3).
19

Working with the CSC-Tool CSC-Tool
Pla ing the CSC Panel Centred in Front of the Vehi le
5. Align the laser module (7) by turning the mounting bolt (2) on the s ale
of the ross member (4).
The laser beam is indi ated on the s ale of the ross member.
20
Other manuals for CSC-Tool
2
Table of contents
Other Hella Gutmann Test Equipment manuals

Hella Gutmann
Hella Gutmann CSC-Kit Radar II User manual

Hella Gutmann
Hella Gutmann CSC-Tool User manual

Hella Gutmann
Hella Gutmann mega macs PC User manual

Hella Gutmann
Hella Gutmann Radar Kit III User manual

Hella Gutmann
Hella Gutmann BMA-Tool User manual

Hella Gutmann
Hella Gutmann SEG V User manual

Hella Gutmann
Hella Gutmann CSC-Tool SE User manual

Hella Gutmann
Hella Gutmann SEG IV User manual

Hella Gutmann
Hella Gutmann CSC-Kit Radar I User manual

Hella Gutmann
Hella Gutmann SEG Series Manual