manuals.online logo
Brands
  1. Home
  2. •
  3. Brands
  4. •
  5. Helvex
  6. •
  7. Bathroom Fixture
  8. •
  9. Helvex KFP-1 User manual

Helvex KFP-1 User manual

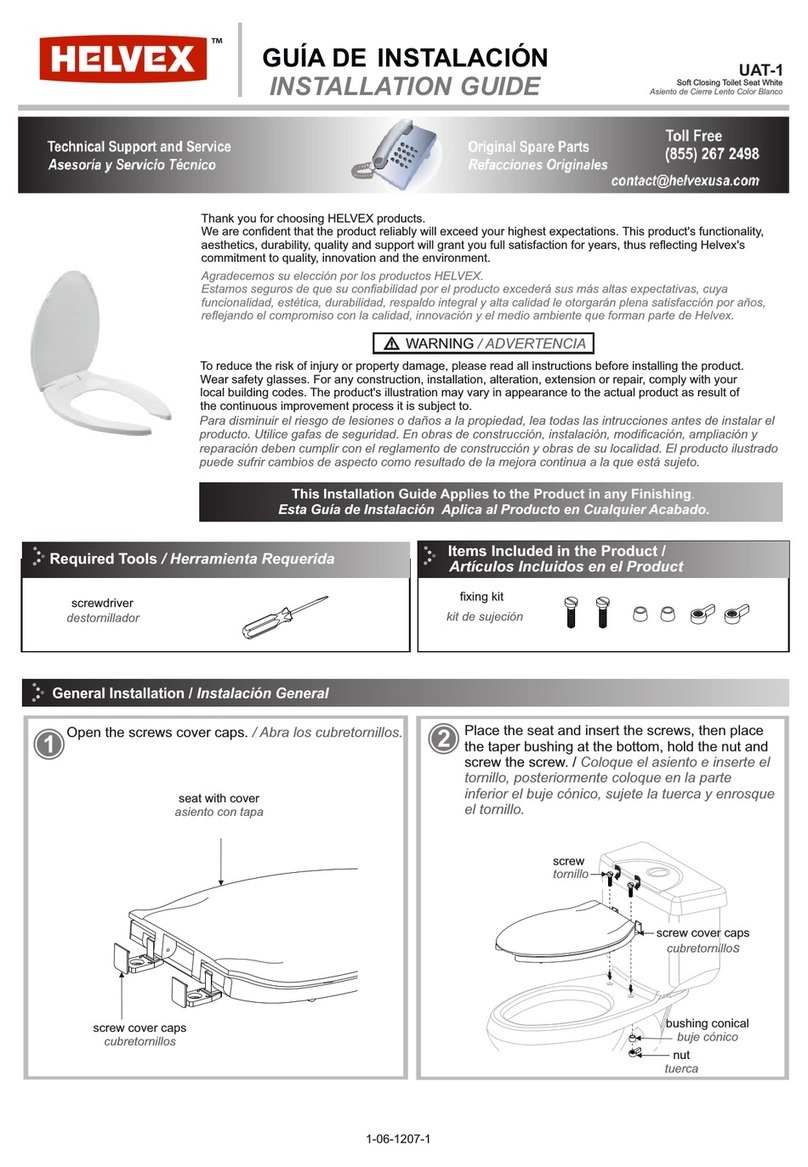
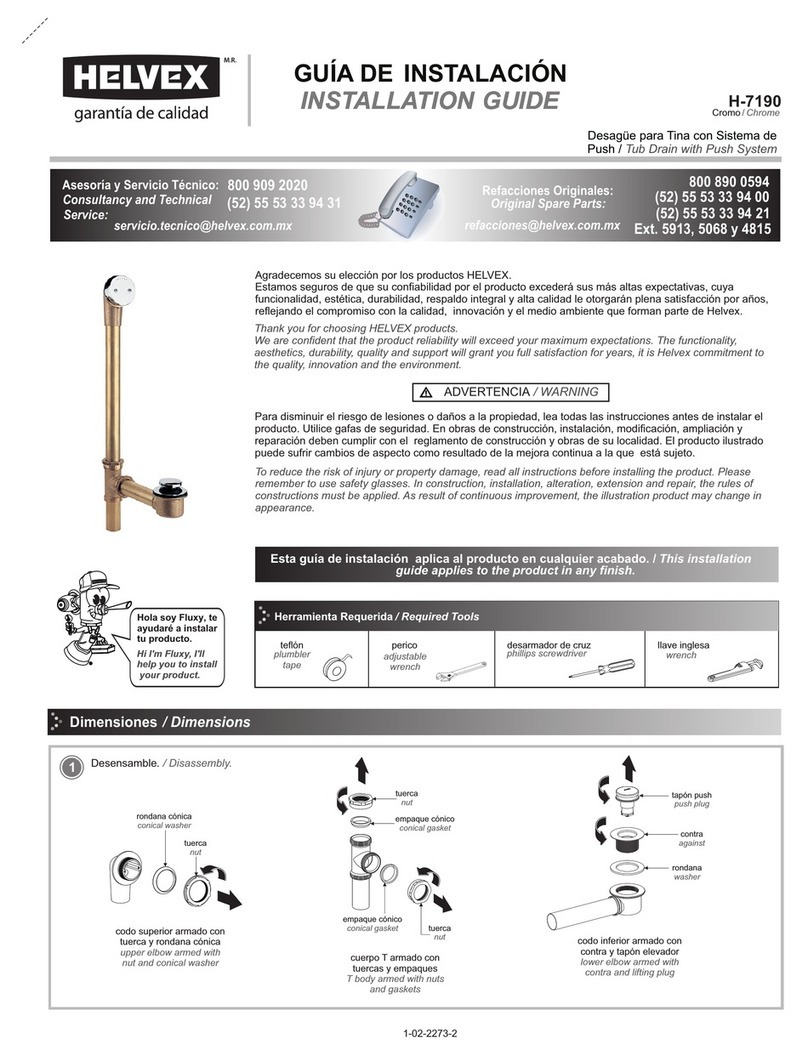
INSTALLATION GUIDE
GUÍA DE INSTALACIÓN
1-06-1174-1
Dimensiones Recomendadas para WC / WC Recommended Dimensions
1
Nota: La tubería debe ser de
Ø 32mm (Ø 1 ¼”) desde la alimentación.
Note: The pipe diameter should
be Ø 32mm (Ø1 ¼ ")from the feed.
tubería de
alimentación
Ø 32mm (Ø 1 ¼”)
(no incluida)
supply pipe Ø 32mm
(Ø 1 ¼") (not
included)
reducción campana de Ø
32 a 25,4 mm (Ø 1 ¼” - 1”)
(no incluida) reduction bell
Ø 32 a 25,4mm (1 ¼" - 1")
(not included)
adaptador
(incluido)
adapter
(included)
tubo Ø 25,4 mm (Ø 1”) (no incluido)
pipe Ø 25,4 mm (Ø 1") (not included)
cámara de aire con tubo de 32mm
(1¼”) air chamber tube 32mm (1¼”)
tubo Ø 32 mm (Ø 1 ¼”)
(no incluido)
tube Ø 32mm(Ø 1 ¼”)
(not included)
ADVERTENCIA / WARNING
Para disminuir el riesgo de lesiones o daños a la propiedad, lea todas las instrucciones antes de instalar el
producto. Utilice gafas de seguridad. En obras de construcción, instalación, modificación, ampliación y
reparación deben cumplir con el reglamento de construcción y obras de su localidad.
El producto ilustrado puede sufrir cambios de aspecto como resultado de la mejora continua a la que está
sujeto.
Agradecemos su elección por los productos HELVEX.
Estamos seguros de que su confiabilidad por el producto excederá sus más altas expectativas, cuya
funcionalidad, estética, durabilidad, respaldo integral y alta calidad le otorgarán plena satisfacción por años,
reflejando el compromiso con la calidad, innovación y el medio ambiente que forman parte de Helvex.
Thank you for choosing HELVEX products.
We are confident that the product reliability will exceed your highest expectations. The functionality,
aesthetics, durability are at its highest quality The comprehensive support will grant full satisfaction for years,
reflecting our commitment to quality, innovation and the environment as part of Helvex.
To reduce the risk of injury or property damage, read all instructions. Before installing the product, please
remember to use safety glasses. In construction, installation, alteration, extension and repair, the rules of
constructions must be applied.
As result of continuous improvement, the product illustration may change in appearance.
Esta guía de instalación aplica al producto en cualquier acabado. / This installation
guide applies to the product in any finish.
60 cm
(23,6”)
Hola soy Fluxy, te
ayudaré a instalar
tu producto.
Hi I'm Fluxy, I'll
help you to install
your product.
KFP-1
Kit para Fluxómetro de Maninija para
WC a Pedal Expuesto. / Toilet Handle
Flushometer Kit to Exposed Pedal.
Cada metro de altura de
su producto a la base
del tinaco equivalen a
(0,1 kg/cm²) [1,42 PSI].
Every meter of height of
your product to the base
of the tube is equivalent
to (0,1 kg/cm²) [1,42
PSI].
Requerimientos de Instalación
Installation Requirements
Requerimientos de Instalación
Installation Requirements
Modelo / Model Mínima / Minimum Máxima / Maximum
kg/cm² PSI kPa kg/cm² PSI kPa
Para el correcto funcionamiento de éstos productos, se recomiendan las sig. presiones:
For the correct operation of these products, the following pressures are recommended:
1,0 14,2 98,06 6,0 85,3 588,3
KFP-1
KFP-1
[email protected]
Original Spare Parts:
Consultancy and Technical
(52) 55 53 33 94 31
(52) 55 53 33 94 00
Refacciones Originales:
Asesoría y Servicio Técnico:
Ext. 5913, 5068 y 4815
Service:
(52) 55 53 33 94 21
[email protected]
www.refaccioneshelvex.com.mx
Accesorios Incluidos
/ Included Accessories
fixing kit
kit de sujeción
KFP-2
Kit para Fluxómetro de Maninija para
Mingitorio a Pedal Expuesto. / Urinal
Handle Flushometer Kit to Exposed Pedal.
KFP-2
KFP-2
desarmador
cross
screwdriver
cortador de tubo
pipe cutter
Herramienta Incluida
/ Tools
Herramienta Requerida
llave inglesa teflón
/ Required Tools
wrench plumber
tape 5/64”allen
wrench
llave allen
5/64”
taladro con
broca de Ø ¼”
drill with Ø ¼
drill bit
en su Producto
Included in your Product
lápiz
pencil
desarmador
flathead
screwdriver
cruz plano
*El producto ya cuenta con la calibración del
sistema de tensado desde fábrica en el pedal,
para su funcionamiento.
*The product already has the calibration of the
tension system from the manufacture on the
padal, for its operation.
115 -130
(4,5 - 5,1”)
43
(1,7”) Ø 38
(1,5”)
223
(8,8”)
VISTA FRONTAL
FRONT VIEW
115 -130
(4,5 - 5,1”)
43
(1,7”) Ø 38
(1,5”)
223
(8,8”)
VISTA FRONTAL
FRONT VIEW
2
Dimensiones Recomendadas para Mingitorios / Urinal Recommended Dimensions
3
No. DESCRIPCIÓN
1 Accionador Pedal
2 Tubo Armado con Resorte KFP-1
3 Tubo Armado con Resorte KFP-2
4 Porta Pedal a Piso
DESCRIPTION
Pedal Actuator
KFP-1 Spring Loaded Case
KFP-2 Spring Loaded Case
Floor Pedal Carrier
1
2
3
Instalación General / General Installation
Componentes del Producto / Product Components
4Desenrosque la palanca. / Unscrew the lever.
5
Cierre el suministro e agua y retire el tapón, posteriormente
cierre la llave de retención. / Turn off the water supply and
remove the cap, then close the check valve.
llave de
retención
stop valve
tapón
cap
palanca
lever
2
4
VISTA SUPERIOR / TOP VIEW
pared con acabado final
final finish wall
11-13 cm
(4,3-5,1”)
6cm (2,36”)
26 cm (10,3”)
pared con acabado final
wall finish
(Nivel de Piso Terminado)
(finished floor level)
VISTA LATERAL / SIDE VIEW
NPT
VISTA FRONTAL / FRONT VIEW
240
(9,5") 43
(1,7”)
266
(10,5”)
Dimensiones Recomendadas WC / WC Recommended Dimensions
6Enrosque el accionador e instale el pedal considerando la
posición del fluxómetro previamente instalado, marque los
barrenos de los soportes y el pedal y perfore. / Screw in the
actuator and install the pedal considering the position of the
previously installed flushometer, mark the holes in the brackets
and the pedal and drill.
7Inserte los taquetes incluidos y erosque las pijas para asegurar
el pedal, finalmente coloque los botónes en el pedal. / Insert the
included anchors and screw with the dowels to secure the pedal,
finally place the buttons on the pedal.
pija
dowel
taquete
anchor pedal
pedal
Instale el tubo flexible con las abrazaderas colocando los taquetes y las pijas (Incluidas). / Install the flexible tube with the clamps by placing
the anchors and the screws (Included).
8
3
NO sugerido
NOT suggested
NO sugerido
NOT suggested
Nota: NO hacer curvas
menores a 10 cm /
Note: DO NOT make
curves less than 10 cm
Nota: NO doblar resorte
a menos de 90° /
Note: DO NOT bend
spring less than 90 °
Nota: NO hacer curvas
menores a 10 cm /
Note: DO NOT make
curves less than 10 cm
Nota: NO doblar resorte
a menos de 90° /
Note: DO NOT bend
spring less than 90 °
botón
button
9Enrosque la manija en el sistema de accionamiento e instale el
pedal considerando la posición del fluxómetro previamente
instalado, marque los barrenos de los soportes y el pedal y
perfore. / Screw the handle into the actuation system and install
the pedal considering the position of the previously installed
flushometer, mark the holes of the brackets and the pedal and
drill.
10 Inserte los taquetes incluidos y enrosque las pijas para asegurar
el pedal, finalmente coloque los botónes en el pedal. / Insert the
included anchors and screw the dowels to secure the pedal,
finally place the buttons on the pedal.
botón
button
pija
dowel
taquete
anchor
pedal
pedal
Instale el tubo flexible con las abrazaderas colocando los taquetes y las pijas (Incluidas). / Secure the spring with the clamps by attaching the
anchors and the dowels (Included).
11
Dimensiones Recomendadas para Mingitorios / Urinal Recommended Dimensions
4
NO sugerido
NOT suggested
NO sugerido
NOT suggested
Nota: NO hacer curvas
menores a 10 cm /
Note: DO NOT make
curves less than 10 cm
Nota: NO doblar resorte
a menos de 90° /
Note: DO NOT bend
spring less than 90 °
Nota: NO hacer curvas
menores a 10 cm /
Note: DO NOT make
curves less than 10 cm
Nota: NO doblar resorte
a menos de 90° /
Note: DO NOT bend
spring less than 90 °
14
15 16 17
18 19 20
12 13
Abra la llave de retención para
purgar. / Open the stop valve to
purge.
Cierre la llave de retención. / Close
the stop valve.
Desenrosque la cúpula y retire la
rondana. / Unscrew the dome and
remove the washer.
Verifique que no exista basura en el
interior del cuerpo y en la cúpula. /
Check that there is not waste inside
the body and the dome.
Coloque nuevamente el émbolo, la
rondana y enrosque la cúpula,
apretando firmemente. / Place the
piston, washer and screw the dome,
tighten firmly.
Abra completamente la llave de
retención, coloque la cúpula y
accione 3 veces para estabilizar el
funcionamiento, permitiendo el ciclo
completo entre la descarga por cada
accionamiento. / Fully open the stop
valve, place the cap and do 3
complete flushes to stabilize the
operation.
llave de
retención
stop valve
llave de
retención
stop valve cúpula
dome
rondana
washer
cúpula
dome
basura
garbage
cúpula
dome
rondana
washer
émbolo
piston
llave de
retención
stop valve
tapón
cap
5
Abra el suministro general de agua. /
Open the general water supply.
Desenrosque la cúpula y retire la
rondana y el émbolo. / Unscrew and
remove the dome washer and piston
Coloque la rondana y la cúpula. / Place
the washer and the dome.
émbolo
piston
válvulas angular
(no incluida)
angle valve
(not included)
cúpula
dome
rondana
washer
cúpula
dome
rondana
washer
Para obtener una descarga de su fluxómetro accione el pedal
una sola vez. Su fluxómetro descargará un volumen de agua
según el modelo. / To obtain a flush from your flushometer,
operate the foot pedal only once. Your flushometer will discharge
a volume of water according to the
21
Operación / Operation
Verifique que el empaque cónico y la rondana no estén
desgastados, límpielos o cámbielos si es necesario. Arme
nuevamente. / Check the tapered gasket and washer for wear,
clean or replace if necessary. Reassemble
24
Retire el tapón y cierre la llave de retención. / Remove the cap and
close the stop valve.
22
23
Mantenimiento Accionador / Actuator Maintenance
Desenrosque el accionador. / Unscrew the actuator.
rondana
washer
empaque
cónico
tapered gasket
Es muy importante seguir las siguientes instrucciones para conservar los
acabados de los productos HELVEX, con brillo y en perfecto estado:
1. Utilice únicamente agua y un paño limpio.
2. No utilice fibras, polvos, abrasivos, ni productos químicos.
3. No utilice objetos punzo-cortantes para limpiar los acabados.
4. Se recomienda realizar la limpieza de su producto diariamente.
Nota: Vea nuestros tips en la pag. www.helvex.com.mx
It is very important to follow the instructions below to preserve HELVEX products
finishes, shiny and in perfect condition:
1. Use only water and a clean cloth.
2. Do not use fibers, powders, abrasives, or chemicals.
3. Do not use sharp objects to clean the finish.
4. It is recommended to clean your product daily.
Note: See our tips on: www.helvex.com.mx
Recomendaciones de Limpieza / Cleaning Recommendations
In Guadalajara:
Contact:
Enter our free
training courses.
In Monterrey:
En la Ciudad de México:
In Mexico City:
En Monterrey:
En Guadalajara:
01 55 53 33 94 00
Ext. 5804, 5805 y 5806 (0133) 36 19 01 13
Comunícate:
Participa en nuestros
cursos gratuitos
de capacitación.
(0181) 83 33 57 67
(0181) 83 33 61 78
HELVEX, S. A. DE C. V. Calzada Coltongo # 293, Col. Industrial Vallejo, Alcaldía Azcapotzalco, C. P. 02300, Ciudad de México.
Posibles Causas y Soluciones / Troubleshooting
Las conexiones no están apretadas. /
The connections are not tight.
Apriete firmemente. /
Tighten.
Las rondanas están torcidas o mal colocadas. /
The washers are bent or misplaced.
Verifique que las rondanas estén colocadas correctamente.
/ Verify that the washers are positioned
correctly.
Hay fuga en las
conexiones. / There are
leaks in the connections.
llave de retención
stop valve
tapón
button
accionador
actuator
No existe flujo de agua al
accionar el pedal.
/ There is no water flow when
the pedal is operated..
El pedal no presenta tensión. /
The pedal has no tension.
ajustar hacia la condición máxima
para control de tensión de chicote
adjust to maximum condition to
control the whip cable tension
El pedal presenta sensación de sobre tensado. /
The pedal has an over-stressed feeling.
Existe flujo de agua sin
accionar el pedal.
/ There is water flow without
pressing the pedal.
ajustar hacia la condición mínima
para control de tensión de chicote
adjust to minimum condition to
control the whip cable tension

This manual suits for next models

1

Other Helvex Bathroom Fixture manuals

Helvex H-3007 User manual

Helvex

Helvex H-3007 User manual

Helvex UAT-1 User manual

Helvex

Helvex UAT-1 User manual

Helvex 410-32 User manual

Helvex

Helvex 410-32 User manual

Helvex Kubica 14104 User manual

Helvex

Helvex Kubica 14104 User manual

Helvex TR-012-S User manual

Helvex

Helvex TR-012-S User manual

Helvex 312-32 User manual

Helvex

Helvex 312-32 User manual

Helvex TAZF NAO I PARED S-TZF-P User manual

Helvex

Helvex TAZF NAO I PARED S-TZF-P User manual

Helvex H-106-S User manual

Helvex

Helvex H-106-S User manual

Helvex Nautilia M-1006 User manual

Helvex

Helvex Nautilia M-1006 User manual

Helvex Futura II RM-17 User manual

Helvex

Helvex Futura II RM-17 User manual

Helvex Premier H-3005 User manual

Helvex

Helvex Premier H-3005 User manual

Helvex E-710 User manual

Helvex

Helvex E-710 User manual

Helvex H-3003 User manual

Helvex

Helvex H-3003 User manual

Helvex Vertika E-3007 User manual

Helvex

Helvex Vertika E-3007 User manual

Helvex 110-38-4.8-AHOSP User manual

Helvex

Helvex 110-38-4.8-AHOSP User manual

Helvex RMB-30 User manual

Helvex

Helvex RMB-30 User manual

Helvex H-900 User manual

Helvex

Helvex H-900 User manual

Helvex UTR-038 User manual

Helvex

Helvex UTR-038 User manual

Helvex Clasica II 205 User manual

Helvex

Helvex Clasica II 205 User manual

Helvex 310-38-3.5 User manual

Helvex

Helvex 310-38-3.5 User manual

Helvex TR-035 User manual

Helvex

Helvex TR-035 User manual

Helvex RM-14-SD User manual

Helvex

Helvex RM-14-SD User manual

Helvex VCG-2 User manual

Helvex

Helvex VCG-2 User manual

Helvex ES-001 User manual

Helvex

Helvex ES-001 User manual

Popular Bathroom Fixture manuals by other brands

agape LIMON ELIM436D Series Assembly instructions

agape

agape LIMON ELIM436D Series Assembly instructions

Hans Grohe Raindance Select S 240 2jet Showerpipe 27129... Instructions for use/assembly instructions

Hans Grohe

Hans Grohe Raindance Select S 240 2jet Showerpipe 27129... Instructions for use/assembly instructions

Hans Grohe Croma Select S 280 1jet Showerpipe 26790... Instructions for use/assembly instructions

Hans Grohe

Hans Grohe Croma Select S 280 1jet Showerpipe 26790... Instructions for use/assembly instructions

Mora INXX II Installation and maintenance  instruction

Mora

Mora INXX II Installation and maintenance instruction

LIVARNO home 365179 2101 Assembly and safety instructions

LIVARNO home

LIVARNO home 365179 2101 Assembly and safety instructions

KEUCO Axess 35015 0101 Series Mounting instruction

KEUCO

KEUCO Axess 35015 0101 Series Mounting instruction

Sloan Optima EBF-415 Parts & Accessories

Sloan

Sloan Optima EBF-415 Parts & Accessories

LIVARNO home 384414-2107 Assembly and Safety Advice

LIVARNO home

LIVARNO home 384414-2107 Assembly and Safety Advice

Bradley S19-310UU Installation

Bradley

Bradley S19-310UU Installation

CAHABA ELLIS CA101008 quick start guide

CAHABA

CAHABA ELLIS CA101008 quick start guide

Kohler K-419 installation guide

Kohler

Kohler K-419 installation guide

Geberit DuoFresh user manual

Geberit

Geberit DuoFresh user manual

Bradley CBSHWR9000KD installation guide

Bradley

Bradley CBSHWR9000KD installation guide

Lakes SS120 Installation & maintenance instructions

Lakes

Lakes SS120 Installation & maintenance instructions

STEIN WINDSOR SHOWER UNIT SQUARE & ALCOVE Assembling instructions

STEIN

STEIN WINDSOR SHOWER UNIT SQUARE & ALCOVE Assembling instructions

Akw TF75 Installation and user care instructions

Akw

Akw TF75 Installation and user care instructions

Kohler K-142 installation guide

Kohler

Kohler K-142 installation guide

NOSAG INEOLINE PLUS LD0.0008 Operating and assembly instructions

NOSAG

NOSAG INEOLINE PLUS LD0.0008 Operating and assembly instructions

manuals.online logo
manuals.online logoBrands
  • About & Mission
  • Contact us
  • Privacy Policy
  • Terms and Conditions

Copyright 2025 Manuals.Online. All Rights Reserved.