manuals.online logo
Brands
  1. Home
  2. •
  3. Brands
  4. •
  5. Helvex
  6. •
  7. Bathroom Fixture
  8. •
  9. Helvex Novus E-34 User manual

Helvex Novus E-34 User manual

Monomando para Fregadero /
Single-lever for Sink
E-34
Instalación General
1-02-0387-5
/ General Installation
1Cierre el suministro de agua. / Close the water supply.
Ubique y cierre las válvulas de suministro de agua.
Generalmente se encuentran debajo del lavabo. Si se trata de un
reemplazo de grifo, quite el grifo viejo y limpie completamente la
superficie del lavabo.
Locate and close the water supply valves.
Usually found under the sink. If it is a replacement faucet, remove
the old faucet and clean the entire surface of the sink.
Herramienta Requerida
perico teflón
/ Required Tools
plumber tape
adjustable
wrench
1 1/4” hexagonal wrench
Herramienta Incluida en su Producto
/ Tools Included in your Product
llave hexagonal 1 1/4”
5/64” allen wrench
llave allen 5/64”
Hola soy Fluxy, te
ayudaré a instalar
tu producto.
Hi I'm Fluxy, I'll
help you to install
your product.
INSTALLATION GUIDE
GUÍA DE INSTALACIÓN
[email protected]
Original Parts:
Consultancy and Technical
01(55)53339431
01800 909 2020 01 (55) 53 33 94 00
Refacciones Originales:
Asesoría y Servicio Técnico:
Ext. 5068, 5815 y 5913
Service:
53 33 94 21
01 800 890 0594
[email protected]
ADVERTENCIA / WARNING
Cada metro de altura de
su producto a la base
del tinaco equivalen a
(0,1 kg/cm²) [1,42 PSI].
Every meter of height of
your product to the
base of the water tank
(0,1 kg/cm²) [1,42 PSI]
equivals.
Para disminuir el riesgo de lesiones o daños a la propiedad, lea todas las instrucciones antes de instalar el
producto. Utilice gafas de seguridad. En obras de construcción, instalación, modificación, ampliación y
reparación deben cumplir con el reglamento de construcción y obras de su localidad. El producto ilustrado
puede sufrir cambios de aspecto como resultado de la mejora continua a la que está sujeto.
Agradecemos su elección por los productos HELVEX.
Estamos seguros de que su confiabilidad por el producto excederá sus más altas expectativas, cuya
funcionalidad, estética, durabilidad, respaldo integral y alta calidad le otorgarán plena satisfacción por años,
reflejando el compromiso con la calidad, innovación y el medio ambiente que forman parte de Helvex.
Thank you for choosing HELVEX products.
We are confident that the product reliability will exceed your maximum expectations. The functionality,
aesthetics, durability, quality and support will grant you full satisfaction for years, it is Helvex commitment to
the quality, innovation and the environment.
To reduce the risk of injury or property damage, read all instructions. Before installing the product, please
remember to use safety glasses. Apply building normative for any construction, installation, alteration,
extension or repair. As result of continuous improvement, the product illustration may change in appearance.
Esta guía de instalación aplica al producto en cualquier acabado. / This installation
guide applies to the product in any finish.
Requerimientos de Instalación
Installation Requirements
E-34 0,25 3,5 24,5
Requerimientos de Instalación
Installation Requirements
Modelo / Model
Mínima / Minimum Máxima / Maximum
kg/cm² PSI kPa kg/cm² PSI kPa
6,0 85,3 588,3
Para el correcto funcionamiento de éstos productos, se
recomiendan las siguientes presiones:
For the correct operation of these products, the following
pressures are recommended:
hot
cold
Caliente
Fría
*55 cm
(21,6”)
*20,3 cm
shutt off valves
(not included)
válvulas angulares
(no incluidas)
NPT
(8”)
*Recommended dimesions
*Medidas Recomendadas
(Nivel de Piso Terminado)
(Finished Floor Level) FFL
Novus
Cromo / Chrome
Instalación Salida /
2
Installation Faucet
Si la tarja cuenta con 3 barrenos (taladros) se recomienda instalar el
chapetón para cubrirlos y si es de un barreno no se recomienda colocar el
chapetón. / If the sink has 3 holes (holes) is recommended to install the
escutcheon to cover and if a hole is not recommended to place the
escutcheon.
2
Desenrosque la tuerca mariposa del chapetón y retire el ancla de
sujeción. / Unscrew the wing nut and remove the escutcheon
anchor bracket.
Inserte el chapetón en la tarja, coloque el ancla de sujeción y
enrosque la tuerca mariposa. / Insert the escutcheon in the sink,
place the anchor fastener and screw the .butterfly nut
3
chapetón
escutcheon
Apriete las tuercas.
Thighten the nuts.
4Retire la tuerca y el empaque. / Remove the nut and gasket.
Limpie la superficie.
Clean the surface.
5
Inserte la salida en el lavabo y verifique que se coloque el
empaque. / Inssert the output in the sink and check that the
gasket.
Coloque la rondana y enrosque la tuerca espárrago para sujetar
la salida./ Place the washer and tighten the nut aspragus to hold
the output.
Instalación de las Mangueras
/ Installation of Hoses
6 7
tuerca mariposa
butterfly nut
ancla de sujeción
clamping anchor
chapetón
escutcheon
tuerca mariposa
butterfly nut
ancla de sujeción
clamping anchor
empaque
gasket
empaque
gasket
tuerca
nut
empaque
gasket
empaque
gasket tuerca
nut
Ø 3,8 cm
1,5"
20,3 cm
8"
6,3 cm
2,4"
Tarja de Acero Inoxidable / Sink Stainless Steel
Espesor máximo de
placa 5 cm. / Maximum
plate thickness 2".
Recommended dimesions
Medidas Recomendadas
La tarja debe cumplir las dimensiones que se muestran en la
figura. / The sink must meet the dimensions shown in the figure.
Dimensiones Generales
/ General Dimensions
Abra el suministro de agua./ Open the water supply.
Revise que no existan fugas
encima y debajo del lavabo.
Check for leaks up and
down the lavatory.
Operación / Operation
3
12 14
13
caliente
fría
hot
cold
10 11
+ fría
+ caliente
hot
cold
abrir
open
La salida es giratoria. /
The output is rotating.
Retire y desarme el aireador. / Remove
and disassemble the aerator.
Limpie a chorro de agua. / Blast clean
water.
Arme nuevamente el aireador y
coloquelo en la salida. / Reassemble
the aerator and place it in the output
again.
aireador
aerator
empaque
gasket
aireador
aerator
empaque
gasket
Mantenimiento del Aireador / Maintenance Aerator
Apriete firmemente./
Tighten
Para abrir, levante la palanca del maneral y para regular la
temperatura gire a la derecha para el agua fría o a la izquierda
para más caliente. / To open, raise the lever of the handle and to
regulate the temperature turn to the right for cold water or to the left
for hotter.
Instalación de las Mangueras
/ Installation of Hoses
8 9
Abra el suministro de agua y purgue la línea de alimentación. /
Open the water supply and purgue the lines fedding.
Enrosque las mangueras (incluidas) a la línea de alimentación. /
Screw the hoses (included) to the power line.
línea de
alimentación
mangueras
½” NPS X 3/8” unf X 24”
(incluidas)
hoses
½” NPS X 3/8” unf X 24”
(included)
Revise que no existan fugas
encima y debajo de la tarja.
Check for leaks up and
down the lavatory.
líneas de
alimentación
feeding
lines
agua caliente
hot water
agua fría
cold water
feeding lines
Recomendaciones de Limpieza / Cleaning Recommendations
In Guadalajara:
Contact:
Enter our free
training courses.
In Monterrey:
En la Ciudad de México:
In Mexico City:
En Monterrey:
En Guadalajara:
01 55 53 33 94 00
Ext. 5804, 5805 y 5806 (0133) 36 19 01 13
Comunícate:
Participa en nuestros
cursos gratuitos
de capacitación.
(0181) 83 33 57 67
(0181) 83 33 61 78
4
Posibles Causas y Soluciones / Troubleshooting
Problema / Problem Causa / Cause Solución / Solution
Existe poco flujo de agua. /
There is some water flow.
La presión de operación no es la adecuada.
/ The operating pressure is not adequate.
Verifique que la presión mínima de operación sea 0,25 kg/cm².
/ Verify that the minimum operating pressure is 3,5 PSI.
Las válvulas angulares no están totalmente abiertas.
/ The shutoff valves are not totally open
Abrir totalmente las válvulas angulares. (Pag. 3, paso 10)
Instalación general. / Fully open shutoff valves. (Page 3 step 10)
General installation.
Filtración en la parte inferior.
/ Filtration at the bottom.
Chapetón o salida no hace sello. /
Escutcheon or exit does not seal.
Verificar la sujeción (Pag. 2, paso 7).
/ Check the fixing (Pag. 2, step 7).
El monomando está flojo. /
The faucet is loose.
La tuerca espárrago no está apretada.
/ The shank nut is tight.
Apriete firmemente la tuerca espárrago (Pag. 2, paso 7).
/ Tighten the shank nut (Page 2, step 7).
Aireador obstruído. / Clogged aerator. Retire el aireador y límpielo. (Pag. 3, paso 12, 13 y 14)
/ Remove the aerator and clean (Page 3, step 12, 13 and 14)
HELVEX, S. A. DE C. V. Calzada Coltongo # 293, Col. Industrial Vallejo, Del. Azcapotzalco, C. P. 02300, Ciudad de México.
Mantenimiento del Cartucho / Maintenance Cartridge
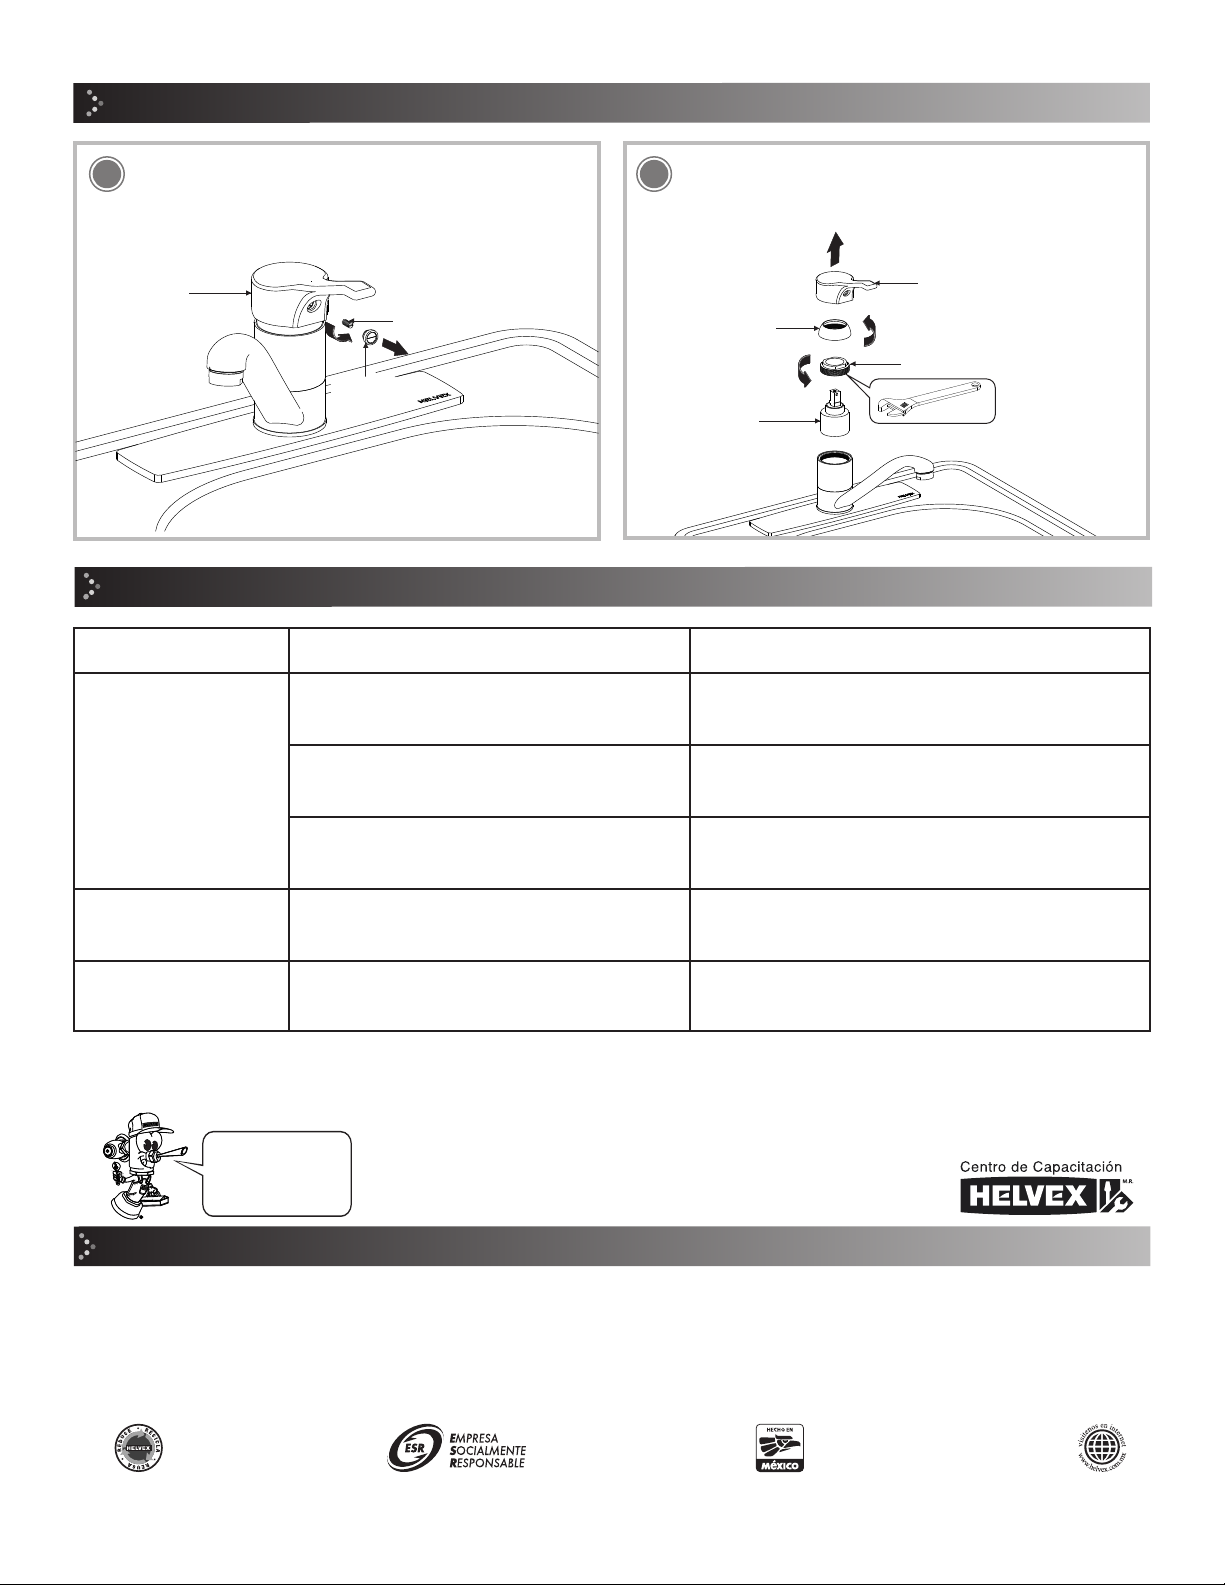
Retire el botón del maneral y desenrosque el opresor interno. /
Remove the button handle and unscrew the internal set screw.
15 Retire el maneral, desenrosque el chapetón y tuerca de sujeción,
posteriormente retire el cartucho. / Remove the handle, unscrew
the escutcheon and lock nut, then remove the cartridge.
16
button
botón
handle
maneral
set screw
opresor
handle
maneral
escutcheon
chapetón
tuerca de sujeción
locknut
cartucho
cartridge
Es muy importante seguir las siguientes instrucciones para conservar los
acabados de los productos HELVEX, con brillo y en perfecto estado:
1. Utilice únicamente agua y un paño limpio.
2. No utilice fibras, polvos, abrasivos, ni productos químicos.
3. No utilice objetos punzo-cortantes para limpiar los acabados.
4. Se recomienda realizar la limpieza de su producto diariamente.
Visite nuestras páginas www.helvex.com.mx para México y www.helvex.com
para el mercado Internacional
It is very important to follow the instructions below to preserve HELVEX products
finishes, shiny and in perfect condition:
1. Use only water and a clean cloth.
2. Do not use fibers, powders, abrasives, or chemicals.
3. Do not use sharp objects to clean the finish.
4. It is recommended to clean your product daily.
Visit our pages www.helvex.com.mx for Mexico and www.helvex.com
for the International market.

Other Helvex Bathroom Fixture manuals

Helvex UH-3301-WA User manual

Helvex

Helvex UH-3301-WA User manual

Helvex Vertika 16104 User manual

Helvex

Helvex Vertika 16104 User manual

Helvex RM-14 User manual

Helvex

Helvex RM-14 User manual

Helvex RM-12 User manual

Helvex

Helvex RM-12 User manual

Helvex H-3012 User manual

Helvex

Helvex H-3012 User manual

Helvex E-922 User manual

Helvex

Helvex E-922 User manual

Helvex TR-012-S User manual

Helvex

Helvex TR-012-S User manual

Helvex Vertika H-904 User manual

Helvex

Helvex Vertika H-904 User manual

Helvex REJ-03 User manual

Helvex

Helvex REJ-03 User manual

Helvex MG MOJAVE User manual

Helvex

Helvex MG MOJAVE User manual

Helvex Konos 2107 User manual

Helvex

Helvex Konos 2107 User manual

Helvex H-600 User manual

Helvex

Helvex H-600 User manual

Helvex Maxima E-712 User manual

Helvex

Helvex Maxima E-712 User manual

Helvex RM-13 User manual

Helvex

Helvex RM-13 User manual

Helvex Explora H-201 User manual

Helvex

Helvex Explora H-201 User manual

Helvex UH-3008-WOA User manual

Helvex

Helvex UH-3008-WOA User manual

Helvex E-309 User manual

Helvex

Helvex E-309 User manual

Helvex PIURA PIU-05 User manual

Helvex

Helvex PIURA PIU-05 User manual

Helvex H-3012 User manual

Helvex

Helvex H-3012 User manual

Helvex Vertika MR-1001 User manual

Helvex

Helvex Vertika MR-1001 User manual

Helvex H-3003 User manual

Helvex

Helvex H-3003 User manual

Helvex Antares C-44 User manual

Helvex

Helvex Antares C-44 User manual

Helvex 122 User manual

Helvex

Helvex 122 User manual

Helvex H-900 User manual

Helvex

Helvex H-900 User manual

Popular Bathroom Fixture manuals by other brands

Watermark Edge 35-2-ED1-PC quick start guide

Watermark

Watermark Edge 35-2-ED1-PC quick start guide

Glacier bay DORIND HD67110W-6001 Installation and care guide

Glacier bay

Glacier bay DORIND HD67110W-6001 Installation and care guide

Dornbracht 36 607 705-FF installation instructions

Dornbracht

Dornbracht 36 607 705-FF installation instructions

MERLYN 6 Series Fitting instructions

MERLYN

MERLYN 6 Series Fitting instructions

Gessi Venti20 65152 manual

Gessi

Gessi Venti20 65152 manual

Reginox Ohio REG-OHIO-L-50X40T-SS-CNFP user manual

Reginox

Reginox Ohio REG-OHIO-L-50X40T-SS-CNFP user manual

Hans Grohe Punto 14060000 manual

Hans Grohe

Hans Grohe Punto 14060000 manual

Hans Grohe Fina 14867000 manual

Hans Grohe

Hans Grohe Fina 14867000 manual

Hans Grohe Rainmaker Select 460 3jet Showerpipe... Instructions for use/assembly instructions

Hans Grohe

Hans Grohe Rainmaker Select 460 3jet Showerpipe... Instructions for use/assembly instructions

DURAVIT SensoWash Mounting instructions

DURAVIT

DURAVIT SensoWash Mounting instructions

squatty potty INVISIBRUSH manual

squatty potty

squatty potty INVISIBRUSH manual

Hewi System 162 Mounting instructions

Hewi

Hewi System 162 Mounting instructions

INOLAV IS203-1-1 owner's manual

INOLAV

INOLAV IS203-1-1 owner's manual

Axor Citterio Showerpipe 180 1jet 39671009 Instructions for use

Axor

Axor Citterio Showerpipe 180 1jet 39671009 Instructions for use

Signature Hardware PROVINCETOWN 948641 quick start guide

Signature Hardware

Signature Hardware PROVINCETOWN 948641 quick start guide

Milano Wetroom Screen installation guide

Milano

Milano Wetroom Screen installation guide

miseno MNOSA216CP manual

miseno

miseno MNOSA216CP manual

Relax LAGO Assembly instructions

Relax

Relax LAGO Assembly instructions

manuals.online logo
manuals.online logoBrands
  • About & Mission
  • Contact us
  • Privacy Policy
  • Terms and Conditions

Copyright 2025 Manuals.Online. All Rights Reserved.