manuals.online logo
Brands
  1. Home
  2. •
  3. Brands
  4. •
  5. Helvex
  6. •
  7. Bathroom Fixture
  8. •
  9. Helvex MG MOJAVE TDS2 User manual

Helvex MG MOJAVE TDS2 User manual

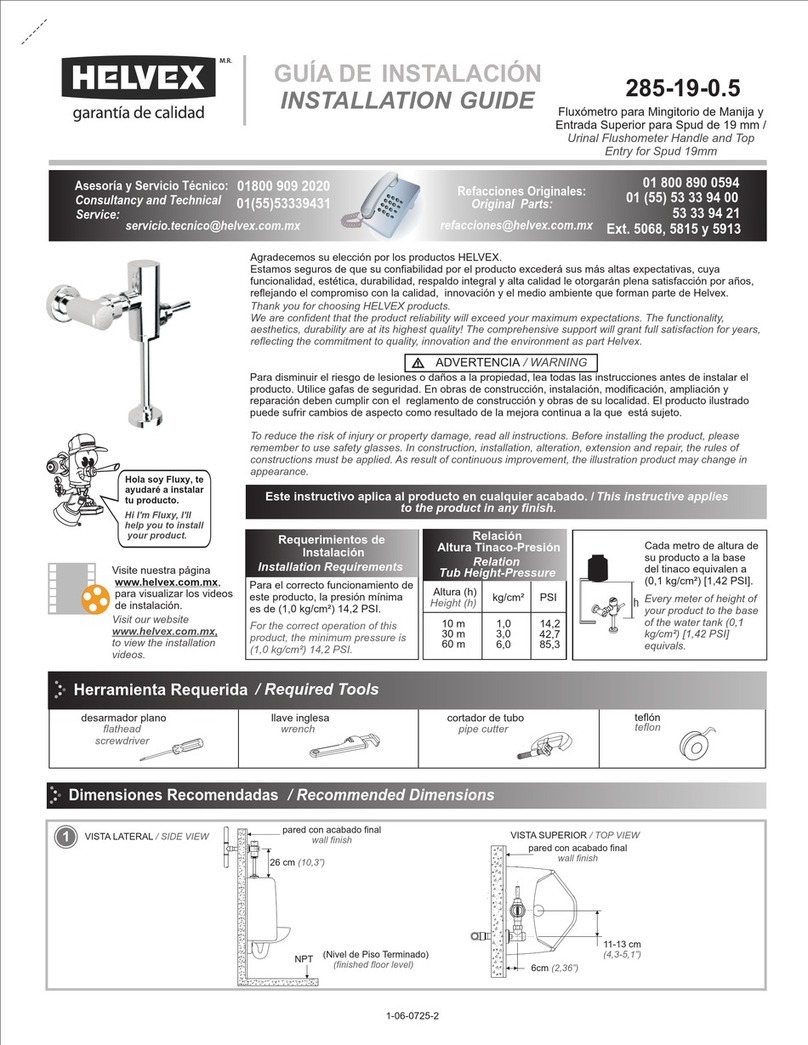
Hola soy Fluxy, te
ayudaré a instalar
tu producto.
Hi I'm Fluxy, I'll
help you to install
your product.
2
Dimensiones / Dimensions
1
INSTALLATION GUIDE
GUÍA DE INSTALACIÓN
ADVERTENCIA / WARNING
Para disminuir el riesgo de lesiones o daños a la propiedad, lea todas las instrucciones antes de instalar el
producto. Utilice gafas de seguridad. En obras de construcción, instalación, modificación, ampliación y
reparación deben cumplir con el reglamento de construcción y obras de su localidad. El producto ilustrado
puede sufrir cambios de aspecto como resultado de la mejora continua a la que está sujeto.
To reduce the risk of injury or property damage, read all instructions before installing the product. Use safety
glasses. In construction, installation, alteration, extension and repair must comply with the rules of
construction an your local. The illustrated product may change in appearance as a result of continuous
improvement to which it is subject.
Agradecemos su elección por los productos HELVEX.
Estamos seguros de que su confiabilidad por el producto excederá sus más altas expectativas, cuya
funcionalidad, estética, durabilidad, respaldo integral y alta calidad le otorgarán plena satisfacción por años,
reflejando el compromiso con la calidad, innovación y el medio ambiente que forman parte de Helvex.
Thank you for choosing HELVEX products.
We are confident that the product reliability will exceed your highest expectations, whose functionality,
aesthetics, durability, high quality and comprehensive support grant him full satisfaction for years, reflecting
the commitment to quality, innovation and the environment as part Helvex.
Esta Guía de Instalación Aplica al Producto en Cualquier Acabado. / This Installation
Guide Applies to the Product in Any Finish.
MG MOJAVE TDS2
Mingitorio Seco Mojave con Sistema TDS2 (Tecnología
® ®
Drena y Sella) / Mojave Waterlees Urinal with TDS2 (Drains
® ®
and Seals Technology)
Marque el centro de la ranura, colocando el ancla, a las distancias
recomendadas. Se recomienda que la tubería del desagüe sea de
PVC. / Mark the center of the slot, placing the anchor, at the
recommended distances. It is recommended that the drain pipe
be PVC.
Barrene en la marca con broca de Ø 5/16” para concreto (no
incluida). / Drill in mark with Ø 5/16" drill bit for concrete (not
included).
2
Instalación General / General Installation
Herramienta Requerida / Required Tools Herramienta
Included
screwdriver
desarmador
pencil
lápiz
taladro con broca
de Ø 5/16”
drill with bit Ø 5/16“
Accesorios Incluidos /
connector
Ø1 ½"-2”
conector
Ø1 ½"-2” wall bracket
ancla
kit de fijación
fixing kit
adjustable
wrench
perico
device key
llave para
Accessories Included Incluida / Tool
dispositivo
tube
tubo
MG GOBI TDS2
Mingitorio Seco Gobi con Sistema TDS2 (Tecnología Drena
® ®
y Sella) / Gobi Waterlees Urinal with TDS2 (Drains and Seals
® ®
Technology) MG NEGEV TDS2
Mingitorio Seco Negev con Sistema TDS2 (Tecnología
® ®
Drena y Sella) / Negev Waterlees Urinal with TDS2 (Drains
® ®
and Seals Technology)
ancla
wall
bracket
*tubería de
desagüe
ø2”
pipe drain
ø2”
NPT
FFL
(Nivel de Piso Terminado)
(Finish Floor Level)
90°
* Medidas Recomendadas
*Recommended Dimensions
Modelo / Model
MG Gobi TDS2
MG Negev TDS2
AB
43 cm (16,9”)
42 cm (16,5”)
42 cm (16,5”)
A
B
52 cm (20,4”)
MG Mojave TDS2 47 cm (18,5”) 42 cm (16,5”)
MG NEGEV TDS2
MG GOBI TDS2 MG MOJAVE TDS2
[email protected]
Original Spare Parts:
Consultancy and Technical
(52) 55 53 33 94 31
(52) 55 53 33 94 00
Refacciones Originales:
Asesoría y Servicio Técnico:
Ext. 5913, 5068 y 4815
Service:
(52) 55 53 33 94 21
[email protected]
www.refaccioneshelvex.com.mx
2
Instalación General / General Installation
5
9
8
Desmonte el mingitorio. / Remove the urinal. 10 Marque los barrenos faltantes y retire el
ancla. / Mark the missing holes and remove
the wall bracket.
11
3
taquete
anchor
Inserte el taquete (incluido) . / Insert the
anchor (included). 4
pija
lag screw
ancla
wall bracket
Fije el ancla colocando la rondana y la pija
(incluidas). / Attach the wall bracket by
placing the washer and the lag screw
(included).
Inserte el conector ó adaptador (incluido), en el
tubo de desagüe a tope. / Insert the trap
connector or adapter (included) into the drain
pipe butt.
conector ó adaptador
para tubo Ø 1 ½"-2”
(incluido) / trap
connector or adapter
for Ø 1 ½"-2 "pipe
(included) El tubo del desagüe
debe estar rígido y fijo
al muro. / The drain
pipe must be rigid and
fixed to the wall.
tubería del
desagüe Ø 2” /
drain pipe Ø 2 "
NOTA / NOTE:
Si la tubería del desagüe es de un Ø diferente se recomienda
comprar un acoplamiento sanitario o adaptador a la medida
requerida.
If the drain pipe is of a different diameter it is recommended to
purchase a sanitary coupling or adapter as required.
7
Inserte el tubo (incluido) al desagüe. / Insert
the tube (included) into the drain.
Corte el tubo si es
necesario. / Cut the
tubo if necessary.
Enrosque la tuerca al dispositivo, verificando
que la inclinación del tubo sea la adecuada
para evitar estancamientos y regreso de malos
olores. / Screw the nut to the device, verifying
that the bend of the tube is adequate to avoid
stagnation and return of bad odors.
Si NO cumple con éstas condiciones,
proceda con el Ajuste de Instalación
(ver pag. 3).
If you DO NOT comply with these
conditions, proceed with the
Installation Adjustment (see page 3).
Si la tuerca del tubo SÍ enroscó correctamente con el dispositivo y la inclinación del tubo es la adecuada, continúe con el siguiente paso.
If the tube nut YES screwed correctly with the device and the tube tilt is appropriate, proceed to the next step.
ancla
wall
bracket
mingitorio
urinal
Barrene en la marca con broca de Ø 5/16”
para concreto (no incluida). / Drill in mark with
Ø 5/16" drill bit for concrete (not included).
Monte el mingitorio en el ancla. / Mount the
urinal at the wall bracket.
6
ancla
wall
bracket
mingitorio
urinal
conector ó adaptador para tubo Ø 2” / trap
connector or adapter for Ø 2 "pipe
tuerca / nut
inclinación
inclination
dispositivo
device
tubo
tube
tuerca
nut
Ø1 1/2”
Ø1 1/2”
3
Inserte los taquetes en los barrenos. / Insert
the anchors into the holes.
/ Drain Installation
Instalación General / General Installation
Ajuste de Instalación / Installation Adjustment
Desmonte el mingitorio del ancla. / Remove
the urinal of the wall bracket.
16
Fije nuevamente el ancla. / Set wall bracket
again.
ancla
wall
bracket
mingitorio
urinal
19
18
Si las ranuras de fijación SÍ coincidieron con los barrenos de la brida, continúe con el paso 15. Si NO coincidieron proceda con el Ajuste de Instalación.
If the securing slots YES coincided with the holes in the flange, continue with step 15. If NOT agreed to proceed with the Adjustment Installation.
12 Coloque el ancla y enrosque las pijas. /
Attach the wall bracket and tighten the lag
screws.
13 Monte el mingitorio en el ancla. / Mount the
urinal on the wall bracket.
14
taquete
anchor
ancla
wall bracket
pija
lag screw
ancla
wall
bracket
mingitorio
urinal
ancla
wall
bracket
17 Afloje la pija y recorra el ancla hacia arriba o
hacia abajo según se requiera. / Loosen the lag
screw and scroll wall bracket up or down as
required.
Monte el mingitorio en el ancla, si la tuerca enroscó correctamente en el dispositivo y el tubo cuenta con la
inclinación suficiente para el desalojo, continúe con los pasos 9 al 15 de la Instalación General. / Mount the
urinal at the wall bracket, if the nut screwed correctly on the device and the tube has enough inclination for
the eviction, continue with steps 9 through 15 of the General Installation.
Verifique que la tuerca enrosque
libremente así como el codo cuente con
la inclinación necesaria para el desalojo.
/ Verify that the nut threads freely as the
elbow has the necessary tilt for eviction.
mingitorio
urinal
ancla
wall
bracket
conector ó
adaptador para
tubo / trap
connector or
adapter
conector ó adaptador para tubo Ø 2” / trap
connector or adapter for Ø 2 "pipe
tuerca / nut
inclinación
inclination
dispositivo
device
15 Enrosque la tuerca al dispositivo, verificando
que la inclinación del tubo sea la adecuada
para evitar estancamientos y regreso de malos
olores. / Screw the nut to the device, verifying
that the bend of the tube is adequate to avoid
stagnation and return of bad odors.
conector ó adaptador para
tubo Ø 2” / trap connector or
adapter for Ø 2 "pipe
tuerca / nut
inclinación
inclination
dispositivo
device
Posibles Causas y Soluciones / Troubleshooting
Realice la limpieza como acostumbra con
agua, jabón cloro, etc. / Perform cleaning as
usual with water, chlorine soap, etc.
Limpieza / Cleaning
20 Desenrosque y retire el cartucho con la ayuda
de la llave para dispositivo. / Unscrew and
remove the cartridge with the help of the
device key.
21 Desenrosque la camara inferior y retire la
espera pequeña, desenrosque el portaesfera
y retire la esfera grande. Limpie todos los
componentes con agua y jabón, arme
nuevamente. / Unscrew the lower chamber
and remove the small sphere, unscrew the
sphere holder and remove the large sphere.
Clean all components with soap and water,
assemble again.
22
Utilice fibras suaves
para evitar rayar
la cerámica del mueble. / Use
soft fibers to avoid scratching
the furniture's ceramics.
llave para dispositivo
device key
cartucho
cartridge
En caso de incrustaciones acumuladas,
utilice una fibra suave, evitando rallar la
superficie. / In case of accumulated
incrustations, use a soft fiber, avoiding
grating the surface.
Problema / Problem Solución / Solution
Causa / Cause
Mal olor. / Bad Smell.
Los líquidos se quedan
estancados.
/ Liquids get stuck.
Las esferas del cartucho no están sellando. /
The cartridge spheres are not sealing.
No colocó el conector o está mal instalado.
/ Did not fit the connector or is incorrectly installed.
No se encuentra la esfera dentro del cartucho. /
The sphere can not be found inside the cartridge.
Acumulación de sedimentos u objetos en el dispositivo
y/o en la tubería. / Accumulation of sediments or
objects in the device and / or in the pipeline.
La inclinación del codo no es la adecuada para el
desalojo de líquidos. / The inclination of the elbow
is not adequate for the liquid evacuation.
Retire el cartucho y lave sus componentes (pag. 4, paso 21, 22). /
Remove the cartridge and wash its components (page 4, step 21, 22).
Coloque el conector (pag. 2, paso 5) ó verifique la correcta
instalación. / Insert the connector (page 2, step 5)
or check the correct installation.
Coloque la esfera dentro del cartucho (pag. 4, paso 21, 22 ).
/ Place the sphere into the cartridge (page 4, step 21, 22).
Retire el dispositivo, lave sus componentes y vierta sarricida para
destapar la tubería (pag. 4) o realice un mantenimiento mecánico
a la tubería. / Remove the device, wash its components and pour it
to remove the pipe (page 4) or perform mechanical maintenance
on the pipe.
Desinstale el mingitorio y presente nuevamente, (Ajuste de
Instalación pag. 3). / Uninstall the urinal and present again,
(Installation Adjustment page 3).
Mantenimiento / Maintenance
cartucho
cartridge
esfera grande
large sphere
porta esfera
sphere holder
cámara inferior
lower camera
esfera pequeña
small sphere
Recomendaciones de Limpieza / Cleaning Recommendations
In Guadalajara:
Contact:
Enter our free
training courses.
In Monterrey:
En la Ciudad de México:
In Mexico City:
En Monterrey:
En Guadalajara:
01 55 53 33 94 00
Ext. 5804, 5805 y 5806 (0133) 36 19 01 13
Comunícate:
Participa en nuestros
cursos gratuitos
de capacitación.
(0181) 83 33 57 67
(0181) 83 33 61 78
Es muy importante seguir las siguientes instrucciones para conservar los
acabados de los productos HELVEX, con brillo y en perfecto estado:
1. Utilice únicamente agua y un paño limpio.
2. No utilice fibras, polvos, abrasivos, ni productos químicos.
3. No utilice objetos punzo-cortantes para limpiar los acabados.
4. Se recomienda realizar la limpieza de su producto diariamente.
Visite nuestras páginas www.helvex.com.mx para México y www.helvex.com
para el mercado Internacional
It is very important to follow the instructions below to preserve HELVEX products
finishes, shiny and in perfect condition:
1. Use only water and a clean cloth.
2. Do not use fibers, powders, abrasives, or chemicals.
3. Do not use sharp objects to clean the finish.
4. It is recommended to clean your product daily.
Visit our pages www.helvex.com.mx for Mexico and www.helvex.com
for the International market.
HELVEX, S. A. DE C. V. Calzada Coltongo # 293, Col. Industrial Vallejo, Alcaldía Azcapotzalco, C. P. 02300, Ciudad de México.
This manual suits for next models

6

Other Helvex Bathroom Fixture manuals

Helvex H-3300 User manual

Helvex

Helvex H-3300 User manual

Helvex H-3008 User manual

Helvex

Helvex H-3008 User manual

Helvex TR-038-S User manual

Helvex

Helvex TR-038-S User manual

Helvex TV-201 User manual

Helvex

Helvex TV-201 User manual

Helvex H-3010 User manual

Helvex

Helvex H-3010 User manual

Helvex ES-001 User manual

Helvex

Helvex ES-001 User manual

Helvex 9104 User manual

Helvex

Helvex 9104 User manual

Helvex Elite MI-01-S/C User manual

Helvex

Helvex Elite MI-01-S/C User manual

Helvex PIAZZA PIA-200 User manual

Helvex

Helvex PIAZZA PIA-200 User manual

Helvex Konos 2107 User manual

Helvex

Helvex Konos 2107 User manual

Helvex LV MARCUS BC User manual

Helvex

Helvex LV MARCUS BC User manual

Helvex PREMIER H3005-TR035-EB User manual

Helvex

Helvex PREMIER H3005-TR035-EB User manual

Helvex RMB-30 User manual

Helvex

Helvex RMB-30 User manual

Helvex RM-14-SD User manual

Helvex

Helvex RM-14-SD User manual

Helvex H-105 User manual

Helvex

Helvex H-105 User manual

Helvex H-500 User manual

Helvex

Helvex H-500 User manual

Helvex Kubica MEP-2114 User manual

Helvex

Helvex Kubica MEP-2114 User manual

Helvex H-106-S User manual

Helvex

Helvex H-106-S User manual

Helvex H-600 User manual

Helvex

Helvex H-600 User manual

Helvex LV STALA User manual

Helvex

Helvex LV STALA User manual

Helvex H-3004 User manual

Helvex

Helvex H-3004 User manual

Helvex 210-32 User manual

Helvex

Helvex 210-32 User manual

Helvex Kúbica E-48 User manual

Helvex

Helvex Kúbica E-48 User manual

Helvex 210-32 User manual

Helvex

Helvex 210-32 User manual

Popular Bathroom Fixture manuals by other brands

Pressalit R8482 Mounting instruction

Pressalit

Pressalit R8482 Mounting instruction

Hans Grohe Logis Classic 71323 1 Series Installation/User Instructions/Warranty

Hans Grohe

Hans Grohe Logis Classic 71323 1 Series Installation/User Instructions/Warranty

CWS Paradise Paper Slim Installation and operating instructions

CWS

CWS Paradise Paper Slim Installation and operating instructions

Hans Grohe Croma Select S 180 Showerpipe 27351400 Instructions for use/assembly instructions

Hans Grohe

Hans Grohe Croma Select S 180 Showerpipe 27351400 Instructions for use/assembly instructions

HEIRLOOM NEXUS manual

HEIRLOOM

HEIRLOOM NEXUS manual

Triton SALSA Installation and operating instructions

Triton

Triton SALSA Installation and operating instructions

Porcelanosa SYSTEMPOOL TINA MONOMANDO PRE-INSTALLATION AND INSTALLATION MANUAL

Porcelanosa

Porcelanosa SYSTEMPOOL TINA MONOMANDO PRE-INSTALLATION AND INSTALLATION MANUAL

iDo Porsgrund 0708935 Operating and maintenance instructions

iDo

iDo Porsgrund 0708935 Operating and maintenance instructions

Grohe EUROSMART COSMOPOLITAN E 36325001 manual

Grohe

Grohe EUROSMART COSMOPOLITAN E 36325001 manual

RAVAK SABINA 80 installation instructions

RAVAK

RAVAK SABINA 80 installation instructions

Herdegen Contact Plus 500250 installation instructions

Herdegen

Herdegen Contact Plus 500250 installation instructions

Kohler ARICA K-705230 installation instructions

Kohler

Kohler ARICA K-705230 installation instructions

Victorian Plumbing Aurora Pearlstone installation instructions

Victorian Plumbing

Victorian Plumbing Aurora Pearlstone installation instructions

BELLOSTA Noel 1511/5A Installation instruction

BELLOSTA

BELLOSTA Noel 1511/5A Installation instruction

KEUCO Plan Care 35901 Mounting instruction

KEUCO

KEUCO Plan Care 35901 Mounting instruction

Hewi 805 Classic Series installation instructions

Hewi

Hewi 805 Classic Series installation instructions

Fantini Rubinetti Icona Classic R504WU instructions

Fantini Rubinetti

Fantini Rubinetti Icona Classic R504WU instructions

Grohe KENSINGTON 20 124 manual

Grohe

Grohe KENSINGTON 20 124 manual

manuals.online logo
manuals.online logoBrands
  • About & Mission
  • Contact us
  • Privacy Policy
  • Terms and Conditions

Copyright 2025 Manuals.Online. All Rights Reserved.