manuals.online logo
Brands
  1. Home
  2. •
  3. Brands
  4. •
  5. Home Styles
  6. •
  7. Indoor Furnishing
  8. •
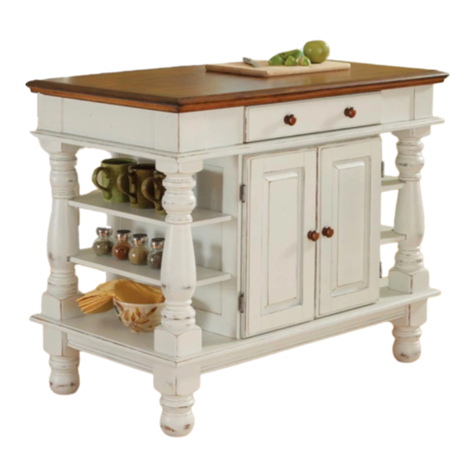
  9. Home Styles Grand Torino Kitchen Island 88 5012 941 User manual

Home Styles Grand Torino Kitchen Island 88 5012 941 User manual

Part List
For assembly see instructions in carton 88 5012 942
Tools required for assembly : Tools recommended for assembly :Phillips screwdriver Level
IMPORTANT NOTE
Carefully remove all the parts from the carton and put
them individually on a soft cloth to prevent scratches
or other damages occuring to the wood parts.
We have taken great care in the design of this
product and request that you carefully and strictly
follow our assembly instructions to ensure a
completed product as it was designed.
Home Styles Consumer Assistance: www.homestyles-furniture.com,
[email protected], 888-680-7460, 877-831-0319
88 5012 941
Grand Torino
Kitchen Island
A.
Top Unit
1 pc.
Part List
Hardware List
Cam Lock Screw
4 pcs.(+1 extra)
Also need Part in carton 88 5012 941
Head Cap Bolt (long)
8 pcs. (+1 extra)
Hex Wrench
1 pc.
Small
Hex Wrench
1 pc.
Tools required for assembly : Tools recommended for assembly :Phillips screwdriver Level
Home Styles Consumer Assistance: www.homestyles-furniture.com,
[email protected], 888-680-7460, 877-831-0319
O.
Side Rack
1 pc.
Knob
8 pcs.
Head Cap Bolt (short)
13 pcs. (+1 extra)
Machine Screw
8 pcs.
Magnet
4 pcs.
Cam Lock
4 pcs.(+1 extra)
IMPORTANT NOTE
Carefully remove all the parts from the carton and put
them individually on a soft cloth to prevent scratches
or other damages occuring to the wood parts.
We have taken great care in the design of this
product and request that you carefully and strictly
follow our assembly instructions to ensure a
completed product as it was designed.
88 5012 942
Grand Torino
Kitchen Island
B.
Side Frame
1 pc.
C.
Side Frame
1 pc.
D.
Side Panel
1 pc.
E.
Side Panel
1 pc.
F.
Side Panel
1 pc.
G.
Shelf
1 pc.
R.
Post
2 pcs.
J.
Wine Grid
1 pc.
I.
Bottom
1 pc.
L.
Door
2 pcs.
M.
Door
2 pcs.
K.
Wine Grid
5 pcs.
P.
Pipe
1 pc.
Q.
Base Rack
1 pc.
H.
Shelf
2 pcs.
N.
Side Rack
1 pc.
Adjustable Pin
4 pcs. (+1 extra)
Spring Washerl
2 pcs. (+1 extra)
Wood Dowel
1 pcs. (+1 extra)
Flat Washer
2 pcs. (+1 extra)
WoodScrew
8 pcs. (+1 extra)
Cross Dowel
8 pcs. (+1 extra)
Assembly Instructions 2/5
IMPORTANT
* Do not tighten up all the screws until each part is properly assembled.
* You should keep Hex Wrench in a safe place as you may need to tighten up the Head Cap Bolts in the future.
* After assembly, item must be level to work properly. Use the included adjustable levelers to level.
* Use a soft cloth between these parts and the floor.
Figure 1
STEP 1
Place Top Unit (A) upside down on a soft cloth.
Remove the drawers in Top Unit (A).
Attach Magnets to Top unit (A) using Wood
Screws. (see Figure 1)
Insert Cam Lock Screws into the pre-drilled
holes of Top Unit (A) and Bottom (I).
(see Figure 2)
STEP 2
Attach Wine Grid (K) to Side Panel (D) and (E).
A
I
D
E
K
K
K
K
K
Wood Screw
Cam Lock
Cam Lock Magnet
Figure 2
Assembly Instructions 3/5
Figure 5Figure 3
I
F
FC
F
Q
P
N
STEP 4
Attach Base Rack (Q) and Pipe (P) to Side
Rack (N) and (O).
Attach rack unit to Side Frame (C) with Head
Cap Bolts (short). (see Figure 5)
Figure 4
Head Cap Bolt
(long)
STEP 3
Attach unit from Step 2 to Top Unit
(A) using Cam Locks, Head Cap
Bolts (long) and Cross Dowels.
(see Figure 3), (see Figure 4)
Attach Side Panel (F) to unit with
Head Cap Bolts (long) and Cross
Dowels.
Attach Bottom (I) to the unit using
Cam Locks, Head Cap Bolts (long)
and Cross Dowels.
Head Cap Bolt
(short)
A
O
Assembly Instructions 4/5
R
H
R
B
H
STEP 5
STEP 6
Wood Dowel
Wood Dowel
Attach Shelves (H) to unit.
Attach unit from Step 4 to
unit with Head Cap Bolts
(short).
Attach Posts (R) to unit.
Slide out sub-top and wood
runner from unit.
Attach Side Frame (B) to
the unit with Flat Washers,
Spring Washers and Head
Cap Bolts (short).
(see Figure 6)
Figure 6
Flat Washer
J
Head Cap Bolt (short)
Spring Washer
Figure 7
Turn the unit to its’ upright position.
Slide Wine Grid (J) into unit and
lock it in position by inserting
Wood Dowel into the hole located
in the rail directly above it.
(see Figure 7)
Assembly Instructions 5/5
Adjustable Pin
To use top extension, pull out side
frame from the unit.
STEP 8
LM
G
Figure 8 Figure 9 Figure 10
Note : Unit must be level to work
properly
Assemble Pull Handles to drawers
and Doors (L), (M) with Machine
Screws. (see Figure 8)
Slide Drawers into position.
Attach Doors (L) and (M) by inserting
the lower spring pin into the hole until
it clicks and then do the same for the
upper spring pin. (see Figure 9)
Insert Adjustable Pins into side panels
at the desired level. Place Shelf (G)
into position.
To level the unit, adjust the adjustable
levelers on the stationary frame legs
and the posts. (see Figure 10)
STEP 7

Other Home Styles Indoor Furnishing manuals
Home Styles 88 5089 95C User manual

Home Styles

Home Styles 88 5089 95C User manual

Home Styles 20 05022 0941 User manual

Home Styles

Home Styles 20 05022 0941 User manual

Home Styles 88 9100 004CN User manual

Home Styles

Home Styles 88 9100 004CN User manual

Home Styles 88 5538 101 User manual

Home Styles

Home Styles 88 5538 101 User manual

Home Styles 50 942 User manual

Home Styles

Home Styles 50 942 User manual

Home Styles Monarch User manual

Home Styles

Home Styles Monarch User manual

Home Styles Bedford 88 5531 49 User manual

Home Styles

Home Styles Bedford 88 5531 49 User manual

Home Styles Geometric HS-8100-21 User manual

Home Styles

Home Styles Geometric HS-8100-21 User manual

Home Styles 88 5300 006 User manual

Home Styles

Home Styles 88 5300 006 User manual

Home Styles Storage Island 88 5530 942 User manual

Home Styles

Home Styles Storage Island 88 5530 942 User manual

Home Styles 88 5053 22 User manual

Home Styles

Home Styles 88 5053 22 User manual

Home Styles 88 500 941 Series User manual

Home Styles

Home Styles 88 500 941 Series User manual

Home Styles 88 5020 3071 User manual

Home Styles

Home Styles 88 5020 3071 User manual

Home Styles 88 5180 15 User manual

Home Styles

Home Styles 88 5180 15 User manual

Home Styles Modern Craftsman 88 5050 16 User manual

Home Styles

Home Styles Modern Craftsman 88 5050 16 User manual

Home Styles 88 5523 942 User manual

Home Styles

Home Styles 88 5523 942 User manual

Home Styles 88 5170 692 User manual

Home Styles

Home Styles 88 5170 692 User manual

Home Styles 20 05618 0080 User manual

Home Styles

Home Styles 20 05618 0080 User manual

Home Styles 20 05507 0403 User manual

Home Styles

Home Styles 20 05507 0403 User manual

Home Styles 20 08000 0101 User manual

Home Styles

Home Styles 20 08000 0101 User manual

Home Styles 20 05530 0565 User manual

Home Styles

Home Styles 20 05530 0565 User manual

Home Styles 20 05420 94Q1 User manual

Home Styles

Home Styles 20 05420 94Q1 User manual

Home Styles 88 5022 65 User manual

Home Styles

Home Styles 88 5022 65 User manual

Home Styles 88 5053 21 User manual

Home Styles

Home Styles 88 5053 21 User manual

Popular Indoor Furnishing manuals by other brands

Furinno FNAJ-11042 Assembly instruction

Furinno

Furinno FNAJ-11042 Assembly instruction

OVE BERKELEY 24 installation manual

OVE

OVE BERKELEY 24 installation manual

Walker Edison W60C73BL Assembly instructions

Walker Edison

Walker Edison W60C73BL Assembly instructions

HOMCOM 839-057 Assembly instructions

HOMCOM

HOMCOM 839-057 Assembly instructions

Sedus of course Instructions for use

Sedus

Sedus of course Instructions for use

Diamond FRESHFIT 20RVWC25 manual

Diamond

Diamond FRESHFIT 20RVWC25 manual

Coaster 102723 Assembly instructions

Coaster

Coaster 102723 Assembly instructions

Sibel Barburys Malone 019023515 quick start guide

Sibel

Sibel Barburys Malone 019023515 quick start guide

Office Star Avenue Six DAVIS DVS52 Assembly instructions

Office Star

Office Star Avenue Six DAVIS DVS52 Assembly instructions

Furniture of America CM3224SV Assembly instructions

Furniture of America

Furniture of America CM3224SV Assembly instructions

modway EEI-5856 Assembly instructions

modway

modway EEI-5856 Assembly instructions

Lifa Living TOULOUSE HET.XX.0152.023.XX Assembly instructions

Lifa Living

Lifa Living TOULOUSE HET.XX.0152.023.XX Assembly instructions

Rauch M1354 Assembly instructions

Rauch

Rauch M1354 Assembly instructions

Rauch M1742 Assembly instructions

Rauch

Rauch M1742 Assembly instructions

Living Spaces 51031067T Assembly instructions

Living Spaces

Living Spaces 51031067T Assembly instructions

meubar KENT WB9 Assembly instruction

meubar

meubar KENT WB9 Assembly instruction

Whittier Wood Furniture McKenzie Queen 1316AFGACf quick start guide

Whittier Wood Furniture

Whittier Wood Furniture McKenzie Queen 1316AFGACf quick start guide

2K Furniture Designs 813 instruction manual

2K Furniture Designs

2K Furniture Designs 813 instruction manual

manuals.online logo
manuals.online logoBrands
  • About & Mission
  • Contact us
  • Privacy Policy
  • Terms and Conditions

Copyright 2025 Manuals.Online. All Rights Reserved.