HYGIPLAS Catertherm User manual

1
NL
PT
Catertherm
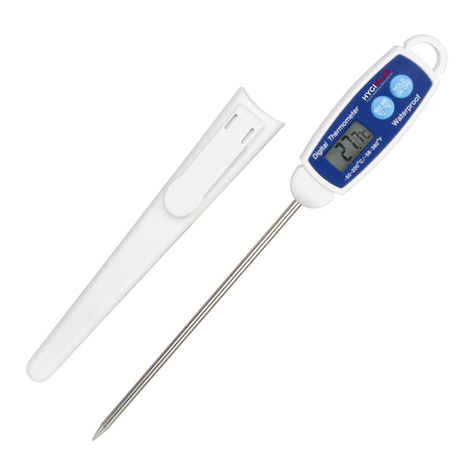
Thermometer
Catertherm Thermometer Termómetro Catertherm
Thermomètre Catertherm Catertherm Thermometer
Termometro Catherterm Termómetro Catertherm
FR
DE
FR
IT
ES
Model • Modèle • Modell • Modello • Modelo • Malli:
GG748

2
FEATURES
Selectable temperature units, °C or °F.
Data hold function
Maximum and minimum reading memory
Stainless steel probe
High/low alarm temperature limit setting
Low battery indication
SPECIFICATION
Temperature Range
-50°C to 300°C / -58°F to 572°F
Display Accuracy
±1°C between -20°C to 120°C / ±1.8°F between -4°F to
248°F
±3°C between 200°C to 300°C/±5.4°F between 392°F to
572°F
Display Resolution
0.1° over a full range
Automatic power off
After idle for 10 minutes
Battery
1.5volt, 2 x AAA or equivalent (included)
Probe size
3.5 (Ø) x 135(L)mm
Display size
41(W) x 30(H)mm
Dimensions
62(W) x 165(H) x 19(D)mm excluding probe
INSTALLATION
1. Unpack the thermometer with care.
2. Connect probe to the thermometer.
3. Open the battery cover and insert batteries.
4. Close t he battery cover.
5. The display will show the current temperature reading.
OPERATION
Power ON/OFF
1. Press [ON/OFF} to switch on thermometer
2. The thermometer will perform a self test with all display segments switched on for 2 seconds, and
then display the temperature as normal
3. Insert the probe by 25mm/1” into object and obtain reading when it becomes stable.
Select the temperature unit
Press and hold [°C/°F] for 3 seconds and release to change the temperature unit.
Data Hold
1. Press the [HOLD] button once will retain the display reading and the “Hold” icon will be flashing.
2. Press the button again will release the hold function and return to normal display.
UK

3
Maximum/Minimum reading memory
1. Press the [MAX/MIN] button to display the maximum reading, and the “Max” icon will be flashing.
2. Press the button again will show the minimum reading and the “Min” icon will be flashing
3. Press the button once more to return to normal display
High/Low temperature alarm setting
1. Press [SET] and the high (HI) limit value will flash
2. Press [UP] or [DOWN] to set high limit. *
3. Press [SET] again and the low (LO) limit value will flash
4. Press [UP] or [DOWN] to set low limit. *
5. Press [SET] to finish setting
*During setting the limit value, holding down the [UP} or {DOWN] will increase/decrease the value
automatically. Press [ON/OFF] with turn the alarm off or on.
When the reading is out of set limit the alarm will be on for 10 seconds and off for 5 seconds.
Press any key to stop the alarm but the HI or LO icon still flashes until the reading is within the limit.
BATTERY REPLACEMENT
1. Open the battery cover on the back case
2. Replace the battery with the same type and close battery cover.
NOTE
1. Clean the probe after each measurement to avoid cross contamination
2. Reset reading memory to current value before taking maximum/minimum reading
3. Do not expose thermometer to temperatures over 50°C/122°F or use in ovens.
4. The thermometer cannot be switched off when the hold function is activated or the
maximum/minimum reading is being displayed.
SYMBOLS
Symbol
Description
Action required
X
Low battery voltage
Replace the batteries
LLLL
1) Sensor open circuit
2)
The reading is out of low range (-50 C)
1) Return the thermometer for repair
2) Keep the measurement above low
range
HHHH
1) Sensor short circuit
2)
The reading is out of high range (300 C)
1) Return the thermometer for repair
2) Keep the measurement below high
range

4
KENMERKEN
Selecteerbare temperatuureenheid, °C of °F.
Vasthoudfunctie voor gegevens
Geheugen van maximum en minimum
Roestvrijstalen sonde
Alarminstelling voor hoge/lage temperatuur
Batterij-indicatie
SPECIFICATIE
Temperatuurbereik
-50°C tot 300°C / -58°F tot 572°F
Nauwkeurigheid van
weergave
±1°C tussen -20°C en 120°C / ±1,8°F tussen -4°F en
248°F
±3°C tussen -200°C en 300°C / ±5,4°F tussen -392°F en
572°F
Resolutie van
weergave
0,1° over heel bereik
Automatische
uitschakeling
indien 10 minuten ongebruikt
Batterij
1,5 volt, 2 x AAA of equivalent (inbegrepen)
Maat van sonde
3,5 (Ø) x 135(L)mm
Beeldformaat
41(B) x 30(H)mm
Afmetingen
62(B) x 165(H) x 19(D)mm exclusief sonde
INSTALLATIE
1. Pak de thermometer voorzichtig uit.
2. Verbind de sonde met de thermometer.
3. Open het batterijkapje en stop de batterijen er in.
4. Sluit het batterijkapje.
5. Het scherm geeft de huidige temperatuur aan.
BEDIENING
Aan-/uitschakelaar
1. Druk op [ON/OFF} om de thermometer aan te zetten
2. De thermometer doorloopt nu een zelftest waarbij alle segmenten van het scherm 2 seconden aan
gaan. Daarna wordt de temperatuur normaal weergegeven
3. Stop de sonde 25mm/1” in het voorwerp en wacht tot de uitlezing is gestabiliseerd.
Selecteer de temperatuureenheid
Houd [°C/°F] 3 seconden ingedrukt en laat dan los om de temperatuureenheid te veranderen.
Gegevens vasthouden
1. Als de [HOLD] knop eenmaal wordt ingedrukt, wordt de uitlezing vastgehouden en knippert het
“Hold” teken.
2. Als de knop nogmaals wordt ingedrukt, gaat het scherm weer over op de normale weergave.
NL

(300 C)
5
Geheugen van maximum en minimum
1. Druk op de [MAX/MIN] knop om de maximummeting weer te geven, waarbij het “Max” teken gaat
knipperen.
2. Druk nogmaals op de knop om de minimummeting weer te geven, waarbij het “Min” teken gaat
knipperen
3. Druk nogmaals op de knop om weer op de normale weergave over te gaan
Alarminstelling voor hoge/lage temperatuur
1. Druk op [SET] waarop (HI) gaat knipperen
2. Druk op [UP] of [DOWN] om de bovengrenswaarde in te stellen. *
3. Druk nogmaals op [SET] waarop (LO) gaat knipperen
4. Druk op [UP] of [DOWN] om de ondergrenswaarde in te stellen. *
5. Druk op [SET] om de instelling te voltooien
*Als tijdens het instellen van de grenswaarde [UP] of [DOWN] wordt vastgehouden, wordt de waarde
automatisch verhoogd/verlaagd. Druk op [ON/OFF] om het alarm aan of uit te zetten.
Wanneer de uitlezing buiten de grenswaarden valt, klinkt het alarm steeds 10 seconden met
tussenpozen van 5 seconden.
Druk op een willekeurige toets om het alarm uit te zetten, maar het teken voor HOOG of LAAG blijft
knipperen totdat de uitlezing binnen de grenswaarden komt.
BATTERIJEN VERVANGEN
1. Open het batterijkapje in de achterkant
2. Vervang de batterij met hetzelfde type en sluit het batterijkapje.
NB
1. Reinig de sonde na elke meting om onderlinge vervuiling te vermijden
2. Zet het geheugen op de huidige waarde voordat een nieuwe maximum-/minimummeting wordt
genomen
3. Stel de thermometer niet bloot aan temperaturen boven 50°C/122°F en gebruik hem niet in de oven.
4. De thermometer kan niet worden uitgeschakeld wanneer de vasthoudfunctie is geactiveerd of als de
maximum/minimummeting wordt weergegeven.
TEKENS
Teken
Beschrijving
Nodige actie
X
Batterij bijna leeg
Vervang de batterijen
LLLL
1) Open circuit van sensor
2)
De uitlezing ligt onder het bereik (-50 C)
1) De thermometer moet worden
gerepareerd
2) Houd de uitlezing boven de onderste
grens
HHHH
1) Kortsluiting in sensor
2)
De uitlezing ligt boven het bereik
1) De thermometer moet worden
gerepareerd
2) Houd de uitlezing onder de bovenste
grens

6
CARACTÉRISTIQUES
Sélection de l'unité de température (°C ou °F)
Fonction d'enregistrement des données
Mémoire des relevés maximum et minimum
Sonde en acier inoxydable
Alarme de limites maxi/mini de température
Indication de pile faible
SPÉCIFICATION
Limites de
températures
-50°C à 300°C (-58°F à 572°F)
Précision de
l'affichage
±1°C entre -20°C et 120°C (±1,8°F entre -4°F et 248°F)
±3°C entre 200°C et 300°C (±-5,4°F entre 392°F et
572°F)
Résolution de l'écran
0,1° sur toute la plage
Mise hors tension
automatique
Après 10 minutes d'inactivité
Pile
2 piles AAA de 1,5 V ou équivalent (fournies)
Taille de la sonde
3,5 (Ø) x 135 (L) mm
Dimensions de l'écran
41 (l) x 30 (H) mm
Dimensions
62 (l) x 165 (H) x 19 (P) mm, sans la sonde
INSTALLATION
1. Déballer le thermomètre avec précaution.
2. Brancher la sonde sur le thermomètre.
3. Ouvrir le compartiment des piles et insérer les piles.
4. Refermer le compartiment des piles.
5. La température ambiante s'affiche à l'écran.
FONCTIONNEMENT
Marche / Arrêt
1. Appuyer sur le bouton [ON/OFF] du thermomètre.
2. Le thermomètre effectue un test automatique où tous les segments de l'affichage sont allumés
pendant 2 secondes avant de revenir à l'affichage normal de la température.
3. Insérer la sonde dans l'objet sur 25 mm pour obtenir un relevé de la température, une fois stabilisé.
Sélection de l'unité de température
Appuyer sur le bouton [°C/°F] pendant 3 secondes avant de le relâcher pour changer d'unité de
température.
Enregistrement des données
1. Appuyer une fois sur le bouton [HOLD] pour enregistrer le relevé à l'écran. L'icône Hold clignote.
2. Appuyer à nouveau sur le bouton pour annuler la fonction d'enregistrement et revenir à l'affichage
normal.
FR

7
Mémoire des relevés maximum / minimum
1. Appuyer sur le bouton [MAX/MIN] pour afficher le relevé maximum. L'icône Max clignote.
2. Appuyer à nouveau sur le bouton pour afficher le relevé minimum. L'icône Min clignote.
3. Appuyer encore une fois sur le bouton pour revenir à l'affichage normal.
Alarme de limites maxi/mini de température
1. Appuyer sur [SET] pour que la valeur limite supérieure (HI) clignote.
2. Appuyer sur [UP] ou [DOWN] pour paramétrer la limite supérieure.*
3. Appuyer à nouveau sur [SET] pour que la valeur limite inférieure (LO) clignote.
4. Appuyer sur [UP] ou [DOWN] pour paramétrer la limite inférieure.*
5. Appuyer sur [SET] pour terminer le réglage des limites.
*Lors du réglage des valeurs limites, maintenir le bouton [UP] ou [DOWN] enfoncé pour
augmenter/diminuer automatiquement la valeur. Appuyer sur [ON/OFF] pour activer ou désactiver
l'alarme.
Lorsque le relevé se trouve hors des limites ainsi configurées, l'alarme retentit pendant 10 secondes
avec un intervalle de 5 secondes.
Appuyer sur n'importe quel bouton pour arrêter l'alarme, mais l'icône HI ou LO continuera de
clignoter jusqu'à ce que le relevé revienne dans les limites configurées.
CHANGEMENT DES PILES
1. Ouvrir le compartiment des piles situé à l'arrière de l'appareil.
2. Remplacer la pile par une pile du même type et refermer le compartiment.
REMARQUE :
1. Nettoyer la sonde après chaque mesure afin d'éviter toute contamination croisée.
2. Réinitialiser la mémoire avec la valeur affichée avant d'effectuer un relevé maximum/minimum.
3. Ne pas exposer le thermomètre à des températures supérieures à 50°C (122°F) et ne pas l'utiliser
dans un four.
4. Il n'est pas possible d'éteindre le thermomètre lorsque la fonction d'enregistrement est activée ou
lors de l'affichage du relevé maximum/minimum.
SYMBOLES
Symbole
Description
Action requise
X
Faible tension de la pile
Changer la pile
LLLL
1) Circuit de capteur ouvert
2) Le relevé se trouve hors de la plage
inférieure (-50 C).
1) Renvoyer le thermomètre pour
réparation
2) Maintenir la mesure au-dessus de la
température la plus basse
HHHH
1) Court-circuit du capteur
2) Le relevé se trouve hors de la plage
supérieure (300 C).
1) Renvoyer le thermomètre pour
réparation
2) Maintenir la mesure en dessous de la
température la plus élevée

8
CARATTERISTICHE
Unità di misura della temperatura selezionabili, °C or °F.
Memorizzazione della temperatura
Memoria di lettura massima e minima
Sonda in acciaio inox
Impostazione limite di temperatura allarme alto/basso
Indicazione di basso livello batteria
SPECIFICHE
Intervallo di
temperatura
da -50°C a 300°C (da -58°F a 572°F)
Accuratezza display
±1°C da -20°C a 120°C (±1,8°F da -4°F a 248°F)
±3°C da 200°C a 300°C (±5.4°F da 392°F a 572°F)
Risoluzione display
0,1° a intervallo completo
Spegnimento
automatico
Dopo un'inattività di 10 minuti
Batteria
1,5 V, AAA o equivalente (inclusa), 2x
Dimensioni sonda
3,5 (Ø) x 135 (L) mm
Dimensioni del
display
41 (L) x 30 (H) mm
Dimensioni
62(L) x 165(H) x 19(P) mm sonda esclusa
IMPOSTAZIONE
1. Rimuovere con attenzione il termometro dall'imballaggio.
2. Collegare la sonda al termometro.
3. Aprire il coperchio delle batterie e inserire le batterie.
4. Chiudere il coperchio delle batterie.
5. Il display indica la lettura della temperatura corrente.
FUNZIONAMENTO
ACCENSIONE/SPEGNIMENTO
1. Premere [ON/OFF] per accendere il termometro.
2. Il termometro esegue una autodiagnosi con tutti i segmenti del display accesi per 2 secondi e quindi
mostra la temperatura.
3. Inserire la sonda da 25 mm (1 pollice) nell'oggetto e attendere che la lettura si stabilizzi.
Selezione dell'unità di misura della temperatura
Premere [°C/°F] per 3 secondi e rilasciare per cambiare l'unità di misura della temperatura.
Memorizzazione della temperatura
1. Premere il tasto [HOLD] una volta per memorizzare la lettura sul display; l'icona "Hold" lampeggia.
2. Premere di nuovo il tasto per rilasciare la funzione di memorizzazione e ritornare alla visualizzazione
display normale.
IT

9
Lettura di memoria massima/minima
1. Premere il tasto the [MAX/MIN] per visualizzare la lettura massima; l'icona "Max" lampeggia.
2. Premere nuovamente il tasto per visualizzare la lettura minima; l'icona "Min" lampeggia.
3. Premere nuovamente il tasto per tornare al display normale.
Impostazione allarme di temperatura alta/bassa
1. Premere [SET], il valore limite alto (HI) lampeggia
2. Premere [UP] o [DOWN] per impostare il limite alto. *
3. Premere nuovamente [SET], il valore limite basso (LO) lampeggia.
4. Premere [UP] o [DOWN] per impostare il limite basso. *
5. Premere [SET] per terminare l'impostazione.
*Durante l'impostazione del valore limite, tenere premuto il tasto [UP} o {DOWN] per
aumentare/diminuire automaticamente il valore. Premere [ON/OFF] per attivare o disattivare l'allarme.
Quando la lettura è al di fuori del limite impostato, l'allarme sarà inserito per 10 secondi e disinserito
per 5 secondi.
Premere un tasto qualsiasi per interrompere l'allarme; l'icona HI o LO continua a lampeggiare fino a
quando la lettura non rientra nel limite.
SOSTITUZIONE DELLA BATTERIA
1. Aprire il coperchio della batteria sul lato posteriore dell'apparecchio.
2. Sostituire la batteria con una dello stesso tipo e chiudere il coperchio della batteria.
NOTA
1. Pulire la sonda dopo ogni misurazione per impedire contaminazioni.
2. Reimpostare la memoria di lettura sul valore corrente prima di prendere la lettura massima/minima.
3. Non esporre il termometro a temperature superiori a 50°C (122°F) e non utilizzarlo nei forni.
4. Non è possibile spegnere il termometro quando la funzione di memorizzazione è attivata o è
visualizzata la lettura massima/minima.
SIMBOLI
Simbolo
Descrizione
Azione richiesta
X
Bassa tensione della batteria
Sostituire le batterie
LLLL
1) Circuito sensore aperto
2)
Lettura fuori intervallo basso (-50 C)
1) Restituire il termometro per la
riparazione
2) Mantenere la misurazione al di sopra
dell'intervallo basso
HHHH
1) Cortocircuito sensore
2)
Lettura fuori intervallo alto (300 C)
1) Restituire il termometro per la
riparazione
2) Mantenere la misurazione al di sotto
dell'intervallo basso

10
CARACTERÍSTICAS
Unidades de temperatura selecionáveis, °C ou °F.
Função de armazenamento de dados
Leitura máxima e mínima da memória
Sonda em aço inoxidável
Definição do limite superior/inferior da temperatura de alarme
Indicação de pilha fraca
ESPECIFICAÇÕES
Intervalo de
temperaturas
-50° C a 300° C / -58° F a 572° F
Precisão do visor
±1° C entre -20° C a 120° C / ±1,8° F entre -4° F a 248° F
±3° C entre 200° C a 300° C/± 5,4° F entre 392° F a 572° F
Resolução do visor
0,1° num intervalo completo
Desligamento
automático
Após inatividade durante 10 minutos
Pilha
1,5 volts, 2 xAAA ou equivalente (incluídas)
Tamanho da sonda
3,5 (Ø) x 135 (C) mm
Tamanho do visor
41 (L) x 30 (A) mm
Dimensões
62 (L) x 165 (A) x 19 (P) mm excluindo a sonda
INSTALAÇÃO
1. Retire o termómetro com cuidado da caixa.
2. Ligue a sonda ao termómetro.
3. Abra o compartimento das pilhas e introduza as pilhas.
4. Feche o compartimento das pilhas.
5. O visor irá apresentar a leitura atual da temperatura.
FUNCIONAMENTO
LIGAR/DESLIGAR
1. Prima [ON/OFF] (LIGAR/DESLIGAR) para ligar o termómetro
2. O termómetro irá efetuar um teste automático com todos os segmentos do visor ligados durante 2
segundos e depois irá apresentar a temperatura normalmente.
3. Introduza a sonda 25 mm/1” no objeto e obtenha a leitura quando a mesma se tornar estável.
Selecionar a unidade de temperatura
Prima e mantenha premido [°C/°F] durante 3 segundos e solte-o para alterar a unidade de temperatura.
Armazenamento de dados
1. Prima o botão [HOLD] (Armazenar) uma vez para reter a leitura do visor e o ícone “Hold” ficará
intermitente.
2. Prima o botão novamente para sair da função de armazenamento e voltar à visualização normal.
PT

11
Leitura máxima/mínima da memória
1. Prima o botão [MAX/MIN] para visualizar a leitura máxima e o ícone “Max” ficará intermitente.
2. Prima o botão novamente para visualizar a leitura mínima e o ícone “Min” ficará intermitente.
3. Prima o botão mais uma vez para voltar à visualização normal.
Definição do limite superior/inferior da temperatura de alarme
1. Prima [SET] (Definir) e o valor limite superior (HI) ficará intermitente.
2. Prima [UP] (Para cima) ou [DOWN] (Para baixo) para definir o limite superior. *
3. Prima [SET] (Definir) novamente e o valor limite inferior (LO) ficará intermitente.
4. Prima [UP] (Para cima) ou [DOWN] (Para baixo) para definir o limite inferior. *
5. Prima [SET] (Definir) para concluir a definição.
*Durante a definição do valor limite, manter premidos os botões [UP] (Para cima) ou [DOWN] (Para
baixo) aumenta/diminui o valor automaticamente. Prima [ON/OFF] (LIGAR/DESLIGAR) para ligar ou
desligar o alarme.
Quando a leitura estiver fora do limite definido, o alarme ficará ligado durante 10 segundos e
desligado durante 5 segundos.
Prima qualquer tecla para parar o alarme mas os ícones HI ou LO continuarão intermitentes até que
a leitura esteja dentro do limite.
SUBSTITUIÇÃO DAS PILHAS
1. Abra o compartimento das pilhas na cobertura posterior.
2. Substitua as pilhas por pilhas do mesmo tipo e feche o compartimento das pilhas.
NOTA
1. Limpe a sonda após cada medição para evitar a contaminação cruzada.
2. Reponha a leitura da memória para o valor atual antes de efetuar a leitura máxima/mínima.
3. Não exponha o termómetro a temperaturas superiores a 50° C/122 °F nem o utilize em fornos.
4. O termómetro não pode ser desligado quando a função de armazenamento de dados estiver ativa
ou estiver a ser apresentada a leitura máxima/mínima.
SÍMBOLOS
Símbolo
Descrição
Ação necessária
X
Voltagem baixa da pilha
Substitua as pilhas
LLLL
1)Circuito aberto no sensor
2) A leitura está fora do intervalo inferior
(-50 C)
1) Devolva o termómetro para reparação
2) Mantenha a medição acima do
intervalo inferior
HHHH
1) Curto-circuito no sensor
2) A leitura está fora do intervalo superior
(300 C)
1) Devolva o termómetro para reparação
2) Mantenha a medição abaixo do
intervalo superior

12
FUNKTIONEN
Wählbare Temperatureinheiten (°C oder °F).
Datensicherung
Speicher für höchsten und niedrigsten Wert
Edelstahlsonde
Alarmeinstellung für Hoch- und Niedrigtemperatur
Batteriestandsanzeige
SPEZIFIKATION
Temperature Range
-50°C bis 300°C / -58°F bis 572°F
Displaypräzision
±1°C zwischen -20°C und 120°C / ±1,8°F zwischen -4°F und 248°F
±3℃zwischen 200℃und 300℃/ ±5,4Fzwischen -4Fund 248°F
Display-Auflösung
0,1° über den vollständigen Bereich
Automatische
Ausschaltung
Nach 10 Minuten Ruhe
Batterie
1,5 V, 2 AAA oder vergleichbare Batterien (im Lieferumfang)
Sondengröße
3,5(Ø) x 135(L) mm
Anzeigegröße
41 (B) x 30 (H) mm
Abmessungen
62(B) x 165(H) x 19(T) mm ohne Sonde
EINRICHTUNG
1. Thermometer vorsichtig auspacken.
2. Sonde an Thermometer anschließen.
3. Batteriefach öffnen und Batterien einlegen.
4. Batteriefach schließen.
5. Das Display zeigt die aktuelle Temperatur an.
BETRIEB
Gerät EIN/AUS
1. Zum Einschalten des Thermometers [ON/OFF} drücken
2. Das Thermometer führt einen Selbsttest durch.Alle Displaybereiche sind 2 Sekunden lang
eingeschaltet, dann wird die Temperatur wie gewohnt angezeigt
3. Die Sonde 25 mm / 1” in den Gegenstand einführen und die Temperatur ablesen, sobald sie sich
stabilisiert hat
Temperatureinheit auswählen
[°C/°F] 3 Sekunden lang gedrückt halten und dann loslassen, um zwischen °C und °F zu wechseln
Daten sichern (Hold)
1. Einmal [HOLD] drücken, um die Displayanzeige zu speichern. Das Symbol „Hold” blinkt
2. Durch erneutes Drücken der Taste wird die Hold-Funktion beendet und das normale Display wieder
aufgerufen.
DE

13
Speicher für Höchst-/Tiefsttemperatur
1. Die Taste [MAX/MIN] drücken, um den Höchstwert anzuzeigen. Das “Max“-Symbol blinkt.
2. Die Taste erneut drücken, um den kleinsten Messwert anzuzeigen. Das „Min“-Symbol blinkt
3. Die Taste erneut drücken, um zum normalen Display zurückzukehren
Alarmeinstellung bei zu hoher / zu tiefer Temperatur
1. [SET] drücken. Der zulässige Höchstwert (HI) blinkt
2. [UP] oder [DOWN] drücken, um den oberen Grenzwert einzustellen *
3. [SET] erneut drücken. Der zulässige Tiefstwert (LO) blinkt
4. [UP] oder [DOWN] drücken, um den unteren Grenzwert einzustellen *
5. [SET] drücken, um die Einstellung zu beenden.
*Beim Einstellen des Grenzwerts wird der Wert automatisch erhöht oder gesenkt, wenn Sie die Taste
[UP] oder [DOWN] gedrückt halten. Drücken von [ON/OFF] schaltet den Alarm aus oder ein.
Wenn der angezeigte Wert außerhalb des zulässigen Grenzwerts liegt, ertönt der Alarm 10
Sekunden und ist dann 5 Sekunden lang aus.
Eine beliebige Taste drücken, um den Alarm auszuschalten. Das HI- bzw. LO-Symbol blinkt weiter
auf, bis der abgelesene Wert innerhalb der Grenzwerte liegt.
BATTERIE AUSWECHSELN
1. Das Batteriefach auf der Rückseite öffnen
2. Die Batterie durch eine andere Batterie des gleichen Typs auswechseln und die Abdeckung des
Batteriefachs wieder anbringen.
HINWEIS
1. Die Sonde nach jeder Messung reinigen, um eine Verunreinigung durch andere Stoffe zu vermeiden
2. Den Wert im Speicher auf den aktuellen Wert zurücksetzen, bevor Sie den Höchst-/Tiefstwert
ablesen
3. Das Thermometer nicht Temperaturen über 50°C aussetzen und es nicht in Öfen verwenden.
4. Das Thermometer kann nicht ausgeschaltet werden, wenn die „Hold“-Funktion aktiviert ist oder der
Höchst-/Tiefstwert angezeigt wird.
SYMBOLE
Symbol
Beschreibung
Maßnahme
X
Niedrige Batteriespannung
Batterien auswechseln
LLLL
1) Sensor meldet offenen Schaltkreis
2) Gemessener Wert liegt außerhalb des
unteren Messbereichs (-50 C)
1) Das Thermometer zur Reparatur
zurücksenden
2) Die Messung über dem unteren
Bereich halten
HHHH
1) Sensor-Kurzschluss
2) Gemessener Wert liegt außerhalb des
oberen Messbereichs (300 C)
1) Das Thermometer zur Reparatur
zurücksenden
2) Die Messung über dem oberen
Bereich halten

14
CARACTERÍSTICAS
Unidades de temperatura seleccionable, ºC o ºF.
Función retención de datos
Memoria de lecturas máxima y mínima
Sonda de acero inoxidable
Configuración de límite de alarma por alta/baja temperatura
Indicación de bajo nivel de pila
ESPECIFICACIÓN
Rango de
temperaturas
-50℃a 300℃/-58℃a 527℃
Precisión de pantalla
±1°C entre -20°C a 120°C/±1,8°F entre -4°F a 248°F
±3°C entre 200°C a 300°C/±5,4°F entre 392°F a 572°F
Resolución de
pantalla
0,1° por encima del rango completo
Apagado automático
Después de 10 minutos de inactividad
Pila
1,5 voltios, 2 x AAA o equivalente (incluidas)
Tamaño de la sonda
3,5(Ø) x 135 (largo) mm
Tamaño de pantalla
41(anchura) x 30 (alto) mm
Dimensiones
62 (anchura) x 165( alto) x 19 (fondo) mm excluida la sonda
INSTALACIÓN
1. Desembale el termómetro con cuidado.
2. Conecte la sonda al termómetro.
3. Abra la tapa de la pila e inserte las pilas.
4. Cierre la tapa de las pilas.
5. La pantalla mostrará la lectura actual de temperatura.
FUNCIONAMIENTO
ON/OFF (Encendido/apagado)
1. Pulse [ON/OFF} (encendido/apagado) para encender el termómetro
2. El termómetro realizará una prueba automática con todos los segmentos de pantalla encendidos
durante 2 segundos y luego mostrará la temperatura como si fuese normal.
3. Inserte la sonda 25mm/1” en el objeto para obtener la lectura cuando se estabilice.
Seleccione la unidad de temperatura
Pulse y mantenga [°C/°F] durante 3 segundos y luego suelte para cambiar la unidad de temperatura.
Retención de datos (Data hold)
1. Al pulsar el botón [HOLD] (retener) una vez se retendrá la lectura de pantalla y el ícono “Hold”
(retener) parpadeará.
2. Al pulsar el botón nuevamente se liberará la función retención y se volverá a la pantalla normal.
ES

15
Memoria de lecturas máxima/mínima
1. Pulse el botón [MAX/MIN] (máxima/mínima) para visualizar la lectura máxima; el ícono “Max”
(máxima) parpadeará.
2. Pulse el botón otra vez y aparecerá la lectura mínima; el ícono “Min” (mínima) parpadeará.
3. Pulse el botón una vez más para volver a la pantalla normal.
Configuración de alarma por temperatura alta/baja
1. Pulse el botón [SET] (fijar) y el valor del límite alto (H) parpadeará.
2. Pulse [UP] (arriba) o [DOWN] (abajo) para fijar el límite alto. *
3. Pulse el botón [SET] (fijar) otra vez y el valor del límite bajo (LO) parpadeará.
4. Pulse [UP] (arriba) o [DOWN] (abajo) para fijar el límite bajo. *
5. Pulse [SET] para finalizar la configuración.
*Durante la configuración del valor límite, al pulsar [UP} (arriba) o {DOWN] (abajo) el valor
aumenta/disminuye automáticamente. Al pulsar [ON/OFF] (encendido/apagado) la alarma se apaga o
enciende.
Cuando la lectura se encuentre fuera del límite fijado la alarma se encenderá durante 10 segundos y
se apagará durante 5 segundos.
Pulse cualquier tecla para detener la alarma; sin embargo el ícono HI (alta) o LO (baja) sigue
parpadeando hasta que la lectura se encuentre dentro del límite.
CAMBIO DE PILAS
1. Abra la tapa de pilas que está en la parte trasera
2. Cambie la pila por el mismo tipo de pila y cierre la tapa.
NOTA
1. Limpie la sonda después de cada medición para evitar la contaminación cruzada
2. Vuelva a fijar la memoria de lectura en el valor actual antes de tomar la lectura máxima/mínima
3. No exponga el termómetro a temperaturas superiores a 50ºC/122ºF ni lo use en hornos.
4. El termómetro no se puede apagar cuando se encuentra activada la función de retención o cuando
se visualiza la lectura máxima/mínima.
SÍMBOLOS
Símbolo
Descripción
Acción requerida
X
Nivel bajo de pila
Cambie las pilas
LLLL
1) Circuito abierto en sensor
2) La lectura está fuera del rango inferior
(-50ºC)
1) Devuelva el termómetro para su
reparación
2) Mantenga la medición por encima del
rango inferior
HHHH
1) Cortocircuito en sensor
2) La lectura está fuera del rango
superior (300ºC)
1) Devuelva el termómetro para su
reparación
2) Mantenga la medición por debajo del
rango superior

16
DECLARATION OF CONFORMITY
•Conformiteitsverklaring • Déclaration de conformité • Konformitätserklärung • Dichiarazione di conformità •
•Declaración de conformidad • Declaração de conformidade
Equipment Type • Uitrustingstype • Type d'équipement • Gerätetyp •
Tipo di apparecchiatura • Tipo de equipo • Tipo de equipamento
Probe Thermometer
Model • Modèle • Modell • Modello • Modelo • Malli
GG748
Application of Council Directives(s)
Toepassing van Europese Richtlijn(en) • Application de la/des directive(s) du
Conseil • Anwendbare EU-Richtlinie(n) • Applicazione delle Direttive • Aplicación
de la(s) directiva(s) del consejo • Aplicação de directiva(s) do Conselho
1935/2004 (EC) Materials
and Articles in contact with
Food.
2004/108/EC EMC
2011/65/EU RoHs
Producer Name • Naam fabrikant • Nom du producteur • Name des Herstellers •
Nome del produttore • Nombre del fabricante • Nome do fabricante
Hygiplas
Producer Address • Adres fabrikant • Adresse du producteur • Anschrift des
Herstellers • Indirizzo del produttore • Dirección del fabricante • Endereço do
fabricante
Fourth Way,
Avonmouth,
Bristol,
BS11 8TB
United Kingdom
I, the undersigned, hereby declare that the equipment specified above conforms to the above Directive(s) and Standard(s).
Ik, de ondergetekende, verklaar hierbij dat de hierboven gespecificeerde uitrusting goedgekeurd is volgens de bovenstaande Richtlijn(en) en
Standaard(en).
Je soussigné, confirme la conformité de l'équipement cité dans la présente à la / aux Directive(s) et Norme(s) ci-dessus
Ich, der/die Unterzeichnende, erkläre hiermit, dass das oben angegebene Gerät der/den oben angeführten Richtlinie(n) und Norm(en)
entspricht.
Il sottoscritto dichiara che l'apparecchiatura di sopra specificata è conforme alle Direttive e agli Standard sopra riportati.
El abajo firmante declara por la presente que el equipo arriba especificado está en conformidad con la(s) directiva(s) y estándar(es) arriba
mencionadas.
Eu, o abaixo-assinado, declaro que o equipamento anteriormente especificado está em conformidade com a(s) anterior(es) Directiva(s) e
Norma(s)
Date • Data • Date • Datum • Data • Fecha • Data
25th June 2013
Signature • Handtekening • Signature • Unterschrift
Firma • Firma • Assinatura
Full Name • Volledige naam • Nom et prénom • Vollständiger Name •
Nome completo • Nombre completo • Nome por extenso
Richard Cromwell
Position • Functie • Fonction • Position • Qualifica • Posición • Função
Commercial Director

GG748_ML_CUSTOM_v1
This manual suits for next models
1
Table of contents
Languages:
Other HYGIPLAS Thermometer manuals

HYGIPLAS
HYGIPLAS GH628 User manual

HYGIPLAS
HYGIPLAS J242 User manual

HYGIPLAS
HYGIPLAS GH628 User manual

HYGIPLAS
HYGIPLAS GG748 User manual

HYGIPLAS
HYGIPLAS GG749 User manual

HYGIPLAS
HYGIPLAS Easytemp FX146 User manual

HYGIPLAS
HYGIPLAS F338 User manual

HYGIPLAS
HYGIPLAS F306 User manual

HYGIPLAS
HYGIPLAS F343 User manual

HYGIPLAS
HYGIPLAS F343 User manual