NOTE: DIAGRAMS & ILLUSTRATIONS NOT TO SCALE.
Re-Installing the Glass Door, Barrier, and Trim
1. Retrieve the glass door. Visually inspect the gasket on the backside
of the frame. Gasket surface must be clean, free of irregularities
and seated firmly.
2. Position the door in front of the firebox opening with the top of the
door held away from the fireplace at a 45° angle. Hook the bottom
flange of the door frame over the bottom of the firebox frame.
NOTE: Ensure the glass door is centered—with even spacing on
each side.
3. Let the top of the glass door swing gently in towards the fireplace
ensuring that the gasket seatsevenly as the door drawsshut. Securely
fasten the four (4) latches on firebox top to secure door in place.
4. Install the barrier by sliding in into the top channel with the flat side
toward the fireplace, then swinging the base of the barrier into the
bottom channel and lowering it into place.
5. Install the trim assembly (If removed) to the front of the fireplace.
NOTE: Operate the fireplace for 30 minutes after the installation to check
for significant flame impingement orsooting. Readjust the logsto minimize
impingement if sooting is noticed on the logs.
IHP.us.com
Innovative Hearth Products reserves the right to make changes at any time, without notice, in
design, materials, specifications, prices and also to discontinue colors, styles and products.
Consult your local distributor for fireplace code information.
Printed in U.S.A. © 2018 Innovative Hearth Products LLC
P/N 900932-00 Rev. NC 11/2018 1769 East Lawrence Street • Russellville, AL 35654
18-1/4” 23-1/2”
19-1/2”
33” 40-1/4” 56-3/4”
35”
33-1/4” 54-1/2”
12
77
8
2
4
66
55
4
5-2
3
1
23-1/4”15”
18”
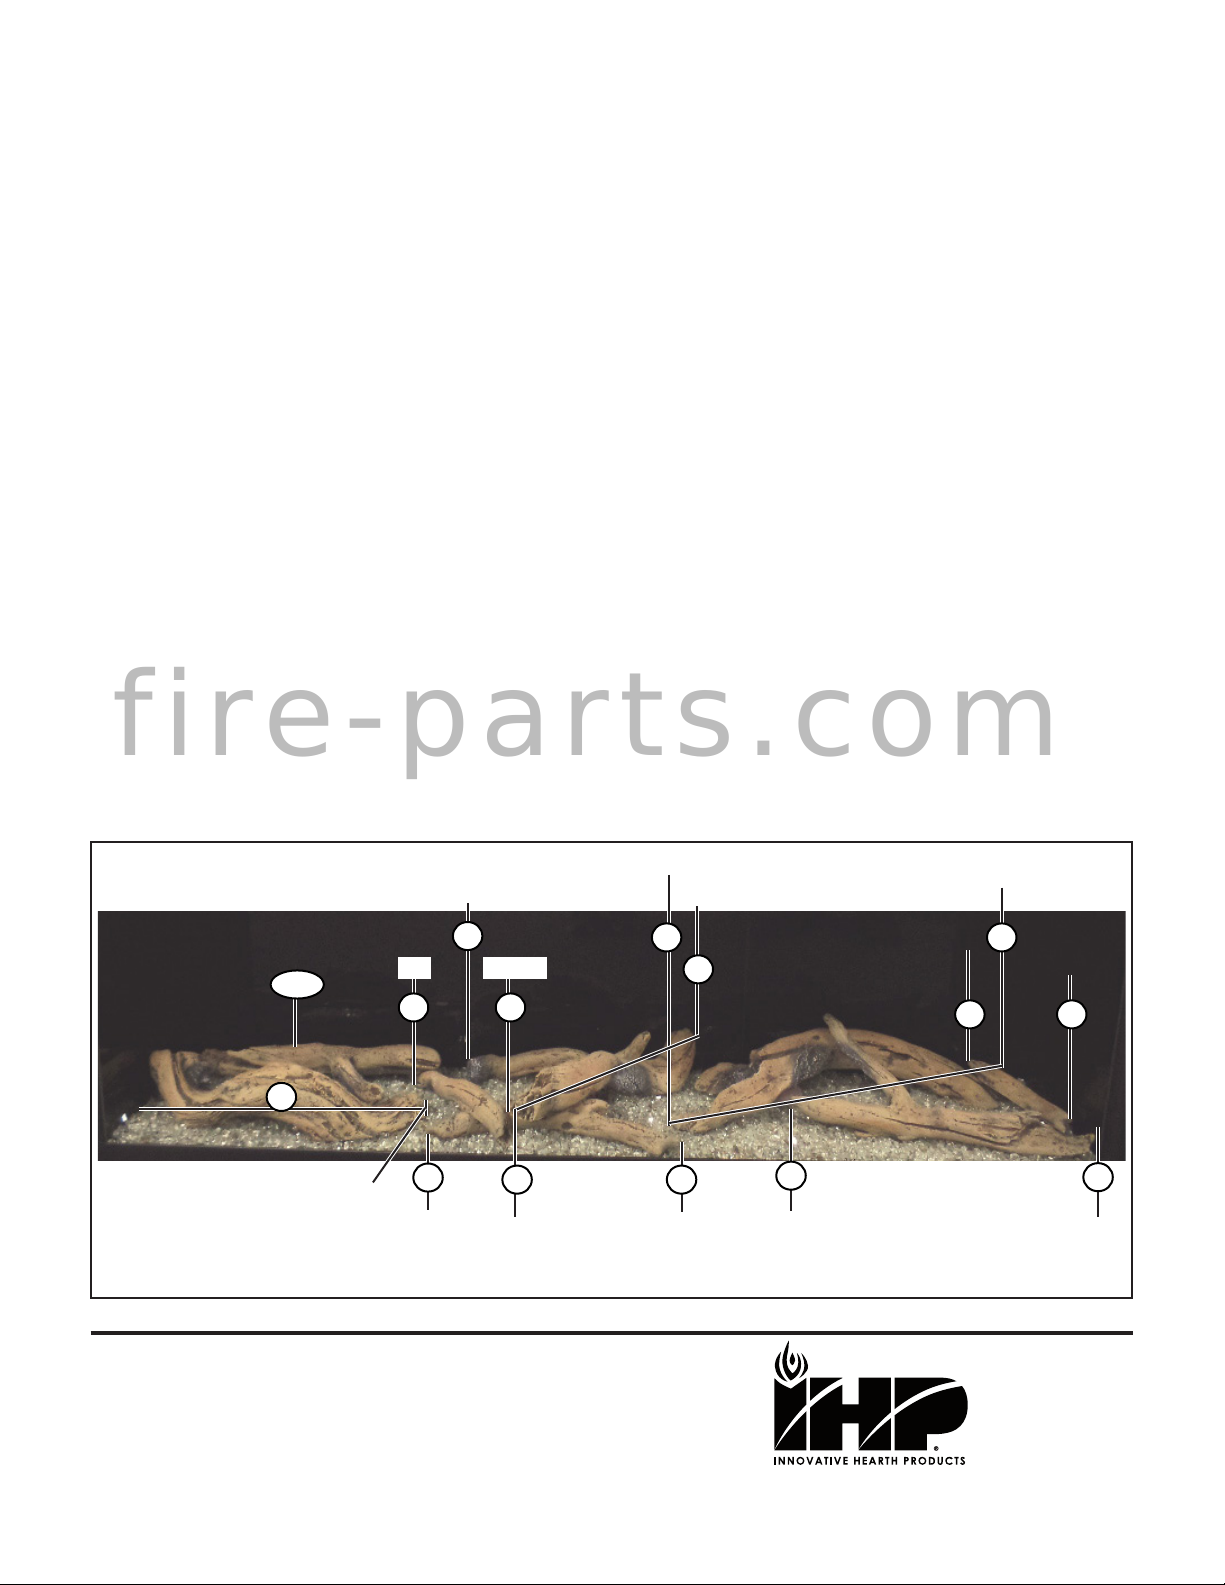
INSTALLING KIT (DRFTWD-LOG60)
Install Driftwood Logs
IMPORTANT: Reflective glass panels (if applicable) should be installed
before any of the media are installed.
NOTE: Glass media is required. Logs cannot be installed without glass
media installed.
NOTE: The area for installing the logs measures 57” x 9-1/2”, measure-
ments are taken from Left to right.
NOTE: Refer to Figure 1 for placing Driftwood logs.
1. Install log #1 at 18-1/4” ending at 33” towards the front.
2. Install log #2 across and over the pilot cover at 23-1/2” on the front
and ending at 35” towards the back.
3. Install log #3 at 19-1/2” towards the back and resting slanted over
log #2.
4. Install log #4 at 33-1/4” towards the front and just behind log #1,
the ending tip of the log is at 54-1/2”.
5. Install one of the logs #5 (“Y” shape log) at 40-1/4” ending at 56-
3/4” and resting over log #4.
6. Install log#6 by resting it over log #4 and log #5 towards the front.
7. Install log #7 angled and over log #1 at 23-1/4” on the front and at
15” towards the back.
8. Install log #8 over the left front ending at 18”.
9. Install the second log #5 (“Y” shape log) starting on the left back
corner and resting over logs #7 and #8.
10. The installation is now complete
NOTE: When installing Driftwood Log Set, take care to NOT mound
glass media.
IMPORTANT: Be sure that neither Driftwood media nor glass media
impinge on the pilot shield cover.
Figure 1 - Placing Driftwood Logs
fire-parts.com


