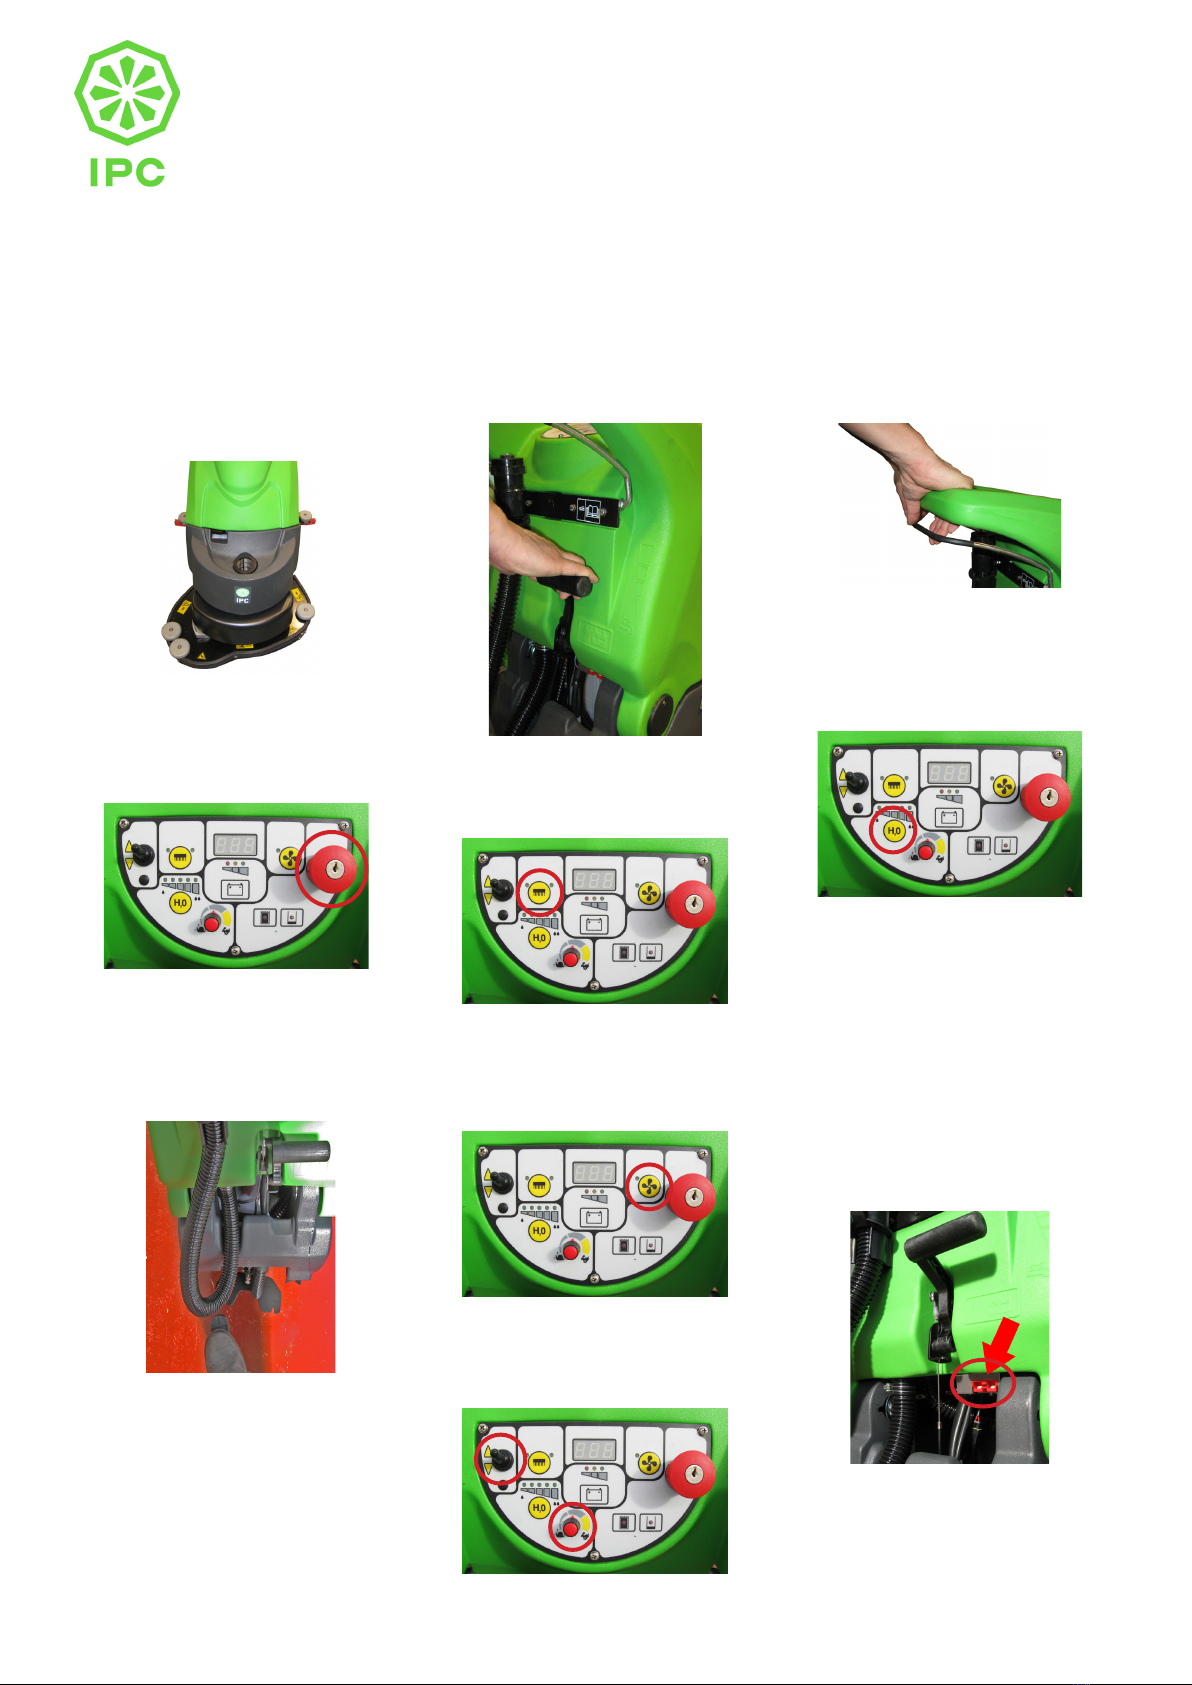
IPC CT 90 BT User manual

1
PLDC01849_ITALY
CT90 BT guida rapida all’utilizzo
La seguente documentazione non vuole sostituire il manuale uso e manutenzione , ma vuole essere un documento
per la consultazione rapida.
Prima di utilizzare la macchina leggere attentamente il manuale uso e manutenzione , contenuto nell’imballo della
macchina ,e rispettare rigorosamente tutte le prescrizioni contenute in esso.
PREPARAZIONE/FUNZIONAMENTO
Riempire il serbatoio soluzione
Abbassare la testata spazzola attraverso il
pedale (premere verso il basso e contempora-
neamente a sinistra)
Abbassare il tergipavimento attraverso la leva
Premere il pulsante spazzola, si abilita la rota-
zione della spazzola e l’accensione dell’aspi-
ratore
Premere il pulsante aspiratore per disattivare
l’aspirazione, qualora si volesse procedere con
il prelavaggio della supercie.
Azionare la leva trazione
Iniziare il lavoro.
A lavoro ultimato procedere in questo modo:
Spegnere il motore spazzola.
Spegnere il motore aspirazione.
Premere il pulsante di emergenza.
Sollevare la testata spazzola.
Sollevare il tergipavimento.
Nel caso ci fosse necessità ricaricare le batte-
rie.
Tenendo premuto per almeno 2 secondi il
pulsante “H2O”, si abilita l’erogazione del
detergente, premendo il pulsante ad impulso si
varia la quantità erogata
Accendere la macchina sbloccando il pulsante
di emergenza
Selezionare la direzione di marcia spostando il
selettore di direzione, ruotare il potenziometro
per stabilire la velocià di lavoro.

2
PLDC01849_ITALY
MANUTENZIONE GIORNALIERA
Vuotare il serbatoio recupero, attraverso il tubo
si svuotamento
Pulire il serbatoio recupero
Vericare che il ltro aspirazione sia integro e
pulito
Vericare che il ltro riempimento serbatoio
detergente sia integro e pulito
Vericare che il ltro di uscita detergente sia
integro e pulito
Pulire la spazzola
Vericare che il tergipavimento sia pulito e che
le lame di asciugatura non siano danneggiate
Vericare lo stato di carica delle batterie
Per la ricarica inserire il connettore del carica-
batteria all’interno del connettore posto a anco
della leva sollevamento tergipavimento
SOSTITUZIONE LAME DI ASCIUGATURA TERGIPAVIMENTO
sganciare l’apposita chiusura a gancio;
slare i due premi-lama spingendoli prima verso l’esterno del corpo tergipavimento e quindi estraendoli;
rimuovere la lama di asciugatura;
rimontare la stessa lama invertendo lo spigolo a contatto con il pavimento no a consumare tutti e quattro gli spigoli oppure una nuova lama incastrandola nelle viti del
corpo tergipavimento;
riposizionare i due premi-lama centrando la parte più larga delle asole sulle viti di ssaggio del corpo tergipavimento e quindi spingendo i premi-lama verso l’interno dello
stesso;
riagganciare l’apposita chiusura a gancio;
AGGANCIO AUTOMATICO SPAZZOLE
Montaggio spazzole, QUESTA OPERAZIONE DEVE ESSERE FATTA A MACCHINA SPENTA: posizionare le spazzole sotto il disco trascinatore della testata, sollevare
la spazzola destra con le mani e ruotarla in “senso orario” bloccandola sul trascinatore , sollevare la spazzola sinistra con le mani e ruotarla in “senso antiorario” bloc-
candola sul trascinatore.
Smontaggio spazzole, QUESTA OPERAZIONE DEVE ESSERE FATTA A MACCHINA SPENTA, effettuare la seguente manovra: alzare la testata della macchina spin-
gendo in basso e quindi a destra il pedale sollevamento testata ruotare in “senso antiorario” la spazzola destra sbloccandola dal trascinatore, ruotare in “senso orario” la
spazzola sinistra sbloccandola dal trascinatore
LA MACCHINA NON SI ACCENDE/AVVIA VERIFICARE CHE IL PULSANTE DI EMERGENZA NON SIA PREMUTO
VERIFICARE LO STATO DI CARICA DELLE BATTERIE
IL MOTORE ASPIRAZIONE NON FUNZIONA VERIFICARE CHE IL SERBATOIO RECUPERO NON SIA PIENO
VERIFICARE CHE IL SENSORE LIVELLO SERBATOIO RECUPERO NON SIA BLOCCATO/GUASTO
LA MACCHINA LASCIA IL PAVIMENTO BAGNATO VERIFICARE LO STATO DI USURA DELLE LAME DI ASCIUGATURA
VERIFICARE CHE NON CI SIANO DETRITI TRA LE DUE LAME DI ASCIUGATURA
VERIFICARE CHE NON CI SIANO DETRITI ALL’INTERNO DEL TUBO DI ASPIRAZIONE
VERIFICARE CHE IL FILTRO ASPIRAZIONE SIA INTEGRO E PULITO
VERIFICARE CHE IL COPERCHIO SERBATOIO RECUPERO SIA SERRATO CORRETTAMENTE
VERIFICARE CHE IL TUBO ASPIRAZIONE SIA INNESTATO CORRETTAMENTE SUL TERGIPAVIMENTO
LA MACCHINA LASCIA IL PAVIMENTO SPORCO VERIFICARE CHE IL TIPO DI SPAZZOLA/PAD CHE SI STA UTILIZZANDO SIA ADEGUATO AL TIPO DI SPORCO
E AL PAVIMENTO
LA MACCHINA LASCIA IL PAVIMENTO BAGNATO A “STRISCE” VERIFICARE CHE IL PAVIEMENTO SIA STATO SPAZZATO PRIMA DELL’UTILIZZO DELLA MACCHINA
VERIFICARE CHE NON CI SIANO DETRITI TRA LE DUE LAME DI ASCIUGATURA
VERIFICARE LO STATO DI USURA DELLE LAME DI ASCIUGATURA
VERIFICARE LA CORRETTA REGOLAZIONE DEL TERGIPAVIMENTO

1
PLDC01849_ENGLISH
CT90 BT Quick Guide
This Guide is intended for quick consultation only and does not replace the Use and Maintenance Manual.
Before using the machine, read the Use and Maintenance Manual contained in the machine packaging thoroughly and
rigorously respect all the instructions.
PREPARATION/OPERATION
Fill the detergent tank
Lower the machine head by pressing the pedal
downwards and to the left
Lower the squeegee using the lever
Press the brush button to enable brush rotation
and turn the suction motor on
Press the suction motor button to disable suc-
tion if you want to prewash the surface
Operate the drive lever
Begin working
When you have nished cleaning, proceed as
follows:
Turn the brush motor off.
Turn the suction motor off.
Press the emergency button.
Raise the machine head.
Raise the squeegee.
If necessary, charge the batteries.
Press the “H2O” button for at least 2 seconds
to enable detergent ow. Press the button repe-
atedly to vary the quantity delivered
Release the emergency button to turn the
machine on
Choose the direction of movement by moving
the direction selector, turn the potentiometer to
set the work speed

2
PLDC01849_ENGLISH
DAILY MAINTENANCE
Empty the dirty water drum through the drain
hose
Clean the dirty water drum
Check the suction lter is undamaged and
clean
Check the detergent tank ll lter is undama-
ged and clean
Check the detergent output lter is undamaged
and clean
Clean the brush/es
Check the squeegee is clean and the blades
are not damaged
Check the battery charge
To charge, insert the battery charger connector
into the connector alongside the squeegee
lifting lever.
REPLACING THE SQUEEGEE BLADES
release the clip;
remove the two blade retainers by pushing them towards the outside of the squeegee then extracting them;
remove the blade;
reuse the same blade by reversing the edge in contact with the oor until all four edges are worn out, or replace with a new blade, tting it onto the screws on the body of
the squeegee;
reposition the two blade retainers by centring the widest part of the slots over the xing screws on the squeegee body, then pushing the blade retainers inwards;
fasten the clip.
AUTOMATIC BRUSH ATTACHMENT
Attaching the brushes, THIS MUST BE DONE WITH THE MACHINE OFF: position the brushes under the head drive disk. Lift the right brush with your hands and turn it
clockwise, locking it in position on the drive disk. Lift the left brush with your hands and turn it anticlockwise, locking it in position on the drive disk.
Removing the brushes THIS MUST BE DONE WITH THE MACHINE OFF: raise the machine head by pushing the head lift pedal down and to the right. Turn the right
brush anticlockwise, releasing it from the drive disk. Turn the left brush clockwise, releasing it from the drive disk.
THE MACHINE DOES NOT COME ON/START UP CHECK THE EMERGENCY BUTTON IS NOT PRESSED
CHECK THE BATTERY CHARGE
THE SUCTION MOTOR DOES NOT WORK CHECK THE DIRTY WATER DRUM IS NOT FULL
CHECK THE DIRTY WATER DRUM LEVEL SENSOR IS NOT BLOCKED/MALFUNCTIONING
THE MACHINE LEAVES THE FLOOR WET CHECK THE SQUEEGEE BLADES ARE NOT WORN
CHECK THERE IS NO DEBRIS BETWEEN THE TWO SQUEEGEE BLADES
CHECK THERE IS NO DEBRIS IN THE SUCTION HOSE
CHECK THE SUCTION FILTER IS UNDAMAGED AND CLEAN
CHECK THE DETERGENT TANK LID IS CLOSED CORRECTLY
CHECK THE SUCTION HOSE IS CORRECTLY ATTACHED TO THE SQUEEGEE
THE MACHINE LEAVES THE FLOOR DIRTY CHECK THE TYPE OF BRUSH/PAD IN USE IS SUITABLE FOR THE TYPE OF DIRT AND FLOOR
THE MACHINE LEAVES STRIPES OF WET FLOOR CHECK THE FLOOR HAS BEEN BRUSHED BEFORE USING THE MACHINE
CHECK THERE IS NO DEBRIS BETWEEN THE TWO SQUEEGEE BLADES
CHECK THE SQUEEGEE BLADES ARE NOT WORN
CHECK THE SQUEEGEE IS CORRECTLY ADJUSTED

1
PLDC01849_FRENCH
CT90 BT guide rapide d’utilisation
Ce document ne remplace pas la notice d’utilisation et d’entretien, c’est un guide de consultation rapide destiné aux
utilisateurs.
Avant d’utiliser la machine lire attentivement la notice d’utilisation et d’entretien, contenue dans l’emballage de la ma-
chine et respecter rigoureusement toutes les recommandations qui y sont données.
PRÉPARATION /FONCTIONNEMENT
Remplir le réservoir solution
Abaisser la tête brosse(s) à l’aide de la pédale
(pousser la pédale vers le bas et la déplacer
vers la gauche)
Abaisser le suceur à l’aide du levier
Appuyer sur le bouton brosse pour activer la
rotation de la brosse et mettre l’aspirateur en
marche
Appuyer sur le bouton aspirateur pour
désactiver l’aspiration si on veut procéder au
prélavage du sol
Actionner le levier traction
Commencer le travail
Lorsque le travail est terminé:
Arrêter le moteur brosse(s).
Arrêter le moteur aspiration.
Appuyer sur le bouton d’urgence.
Relever la tête brosse(s).
Relever le suceur.
Si nécessaire recharger les batteries.
Appuyer sur la touche “H2O” pendant au
moins 2 secondes pour activer l’écoulement du
détergent; régler le débit par impulsions sur la
touche
Mettre la machine en marche en débloquant le
bouton d’urgence
Sélectionner le sens de marche à l’aide du
sélecteur de direction, tourner le potentiomètre
pour régler la vitesse de travail

2
PLDC01849_FRENCH
ENTRETIEN QUOTIDIEN
Vider le réservoir de récupération, à l’aide du
tuyau de vidange
Nettoyer le réservoir de récupération
Vérier que le ltre aspiration est en bon état
et propre
Vérier que le ltre remplissage réservoir déter-
gent est en bon état et propre
Vérier que le ltre de sortie réservoir détergent
est en bon état et propre
Nettoyer la(les) brosse(s)
Vérier que le suceur est propre et que les
lames de séchage ne sont pas abîmées
Vérier l’état de charge des batteries
Pour la recharge brancher le connecteur du
chargeur de batteries sur le connecteur placé à
côté du levier de relevage suceur
REMPLACEMENT LAMES DE SÉCHAGE SUCEUR
décrocher la fermeture;
pousser les deux serre-lames vers l’extérieur du corps suceur et les retirer.
retirer la lame de séchage;
remonter la même lame en inversant la face en contact avec le sol (cette opération peut être répétée jusqu’à ce que les quatre faces soient usées) ou poser une nouvel-
le lame en l’encastrant dans les vis du corps de suceur;
remettre les deux serre-lames en place en centrant la partie la plus large des fentes sur les vis de xation du corps suceur puis en poussant les serre-lames vers
l’intérieur du suceur;
reclipser la fermeture;
FIXATION AUTOMATIQUE BROSSES
Montage brosses CETTE OPÉRATION DOIT ÊTRE FAIRE MACHINE ÉTEINTE: placer les brosses sous le plateau entraîneur de la tête, soulever la brosse droite avec
les mains et la tourner dans le sens des aiguilles d’une montre pour la bloquer sur le plateau entraîneur, soulever la brosse gauche avec les mains et la tourner dans le
sens inverse des aiguilles d’une montre pour la bloquer sur le plateau.
Démontage brosses CETTE OPÉRATION DOIT ÊTRE FAITE MACHINE ÉTEINTE: relever la tête de la machine en poussant vers le bas et en déplaçant vers la droite
la pédale de relevage tête et tourner dans le sens inverse des aiguilles d’une montre la brosse droite pour la débloquer, tourner dans le sens des aiguilles d’une montre
la brosse gauche pour la débloquer.
LA MACHINE NE S'ALLUME/DÉMARRE PAS VÉRIFIER QUE LE BOUTON D’URGENCE EST RELÂCHÉ
VÉRIFIER L’ÉTAT DE CHARGE DES BATTERIES
LE MOTEUR ASPIRATION NE FONCTIONNE PAS VÉRIFIER QUE LE RÉSERVOIR RÉCUPÉRATION NE SOIT PAS PLEIN
VÉRIFIER QUE LE CAPTEUR DE NIVEAU RÉSERVOIR DE RÉCUPÉRATION NE SOIT PAS BLOQUE/EN PANNE
LE SOL RESTE MOUILLE VÉRIFIER L’ÉTAT D’USURE DES LAMES DE SÉCHAGE
VÉRIFIER QU’AUCUN DÉCHET N’EST COINCE ENTRE LES DEUX LAMES DE SÉCHAGE
VÉRIFIER QU’AUCUN DÉCHET N’EST COINCE DANS LE TUBE D’ASPIRATION
VÉRIFIER QUE LE FILTRE ASPIRATION EST EN BON ÉTAT ET PROPRE
VÉRIFIER QUE LE COUVERCLE RÉSERVOIR DE RÉCUPÉRATION EST BIEN FERME
VÉRIFIER QUE LE TUBE D’ASPIRATION EST BIEN EMBOITE SUR LE SUCEUR
IL RESTE DE LA SALETÉ SUR LE SOL VÉRIFIER QUE LE TYPE DE BROSSE/PAD UTILISE EST ADAPTE AU TYPE DE SALETÉ ET AU SOL
LA MACHINE LAISSE DES TRAINÉES SUR LE SOL VÉRIFIER QUE LE SOL A ÉTÉ BALAYE AVANT D’UTILISER LA MACHINE
VÉRIFIER QU’AUCUN DÉCHET N’EST COINCE ENTRE LES DEUX LAMES DE SÉCHAGE
VÉRIFIER L’ÉTAT D’USURE DES LAMES DE SÉCHAGE
VÉRIFIER LE RÉGLAGE DU SUCEUR

1
PLDC01849_SPAIN
CT90 BT guía rápida para el uso
La siguiente documentación no reemplaza el manual de uso y mantenimiento, sino que es un documento de consulta-
ción rápida.
Antes de utilizar la máquina, lea detenidamente el manual de uso y mantenimiento que se encuentra en el embalaje
de la máquina y respete rigurosamente todas las indicaciones allí dadas.
PREPARACIÓN/FUNCIONAMIENTO
Llene el depósito de la solución
Baje el cabezal del cepillo(s) con el pedal
(apriételo simultáneamente hacia abajo y hacia
la izquierda)
Baje el secador de suelos con la palanca
Pulsando el botón cepillo, se habilita la rotación
del cepillo y el encendido del aspirador
Pulse el botón aspirador para desactivar la
aspiración, en caso que deseara realizar el
prelavado de la supercie
Accione la palanca de tracción
Comience a trabajar
Al concluir el trabajo, siga estos pasos:
Apague el motor del cepillo(s).
Apague el motor de la aspiración.
Pulse el botón de emergencia.
Levante el cabezal del cepillo(s).
Levante el secador de suelos.
Si fuera necesario, recargue las baterías.
Manteniendo pulsado durante al menos 2 se-
gundos el botón “H2O” se habilita la salida de
detergente; manteniéndolo pulsando se puede
variar la cantidad suministrada
Encienda la máquina desbloqueando el botón
de emergencia
Seleccione la dirección de marcha moviendo
el selector de dirección, gire el potenciómetro
para establecer la velocidad de trabajo

2
PLDC01849_SPAIN
MANTENIMIENTO DIARIO
Vacíe el depósito de agua sucia a través del
tubo de vaciado
Limpie el depósito de agua sucia
Controle que el ltro de aspiración esté íntegro
y limpio
Controle que el ltro de llenado del depósito de
detergente esté íntegro y limpio
Controle que el ltro de salida del depósito de
detergente esté íntegro y limpio
Limpie el(los) cepillo(s)
Controle que el secador de suelos esté limpio y
que los labios no estén dañados
Controle la carga de las baterías
Para recargarlas, conecte el conector del car-
gador de baterías en el conector situado al lado
de la palanca de levantamiento del secador de
suelos.
SUSTITUCIÓN DE LOS LABIOS DEL SECADOR DE SUELOS
desenganche el enganche respectivo;
extraiga los dos prensadores de los labios empujándolos primero hacia fuera del cuerpo del secador y después extrayéndolos;
quite el labio de secado;
reinstale el labio, invirtiendo el canto en contacto con el suelo, hasta que se desgasten los cuatro cantos, o monte un nuevo labio encastrándolo en los tornillos del
cuerpo del secador;
monte nuevamente los dos prensadores de los labios, centrando la parte más ancha de los agujeros en los tornillos de jación del cuerpo del secador y empujando los
prensadores de los labios hacia adentro;
enganche de nuevo el enganche.
ENGANCHE AUTOMÁTICO DE LOS CEPILLOS
Montaje de los cepillos, ESTA OPERACIÓN DEBE HACERSE CON LA MÁQUINA APAGADA: coloque los cepillos debajo del disco de arrastre del cabezal, levante el
cepillo derecho con las manos y gírelo en el “sentido horario”, bloqueándolo en el disco de arrastre; levante el cepillo izquierdo con las manos y gírelo en el “sentido
antihorario”, bloqueándolo en el disco de arrastre.
Desmontaje de los cepillos, ESTA OPERACIÓN DEBE HACERSE CON LA MÁQUINA APAGADA, siga estos pasos: levante el cabezal de la máquina empujando hacia
abajo y luego hacia la derecha el pedal de levantamiento del cabezal; gire en el “sentido antihorario” el cepillo derecho desbloqueándolo del disco de arrastre, gire en el
“sentido horario” el cepillo izquierdo desbloqueándolo del disco de arrastre.
LA MÁQUINA NO SE ENCIENDE/ARRANCA CONTROLE QUE EL BOTÓN DE EMERGENCIA NO ESTÉ PULSADO
CONTROLE LA CARGA DE LAS BATERÍAS
EL MOTOR DE ASPIRACIÓN NO FUNCIONA CONTROLE QUE EL DEPÓSITO DE AGUA SUCIA NO ESTÉ LLENO
CONTROLE QUE EL SENSOR DE NIVEL DEL DEPÓSITO DE AGUA SUCIA NO ESTÉ BLOQUEADO/AVERIADO
LA MÁQUINA DEJA EL SUELO MOJADO CONTROLE EL DESGASTE DE LOS LABIOS DEL SECADOR
CONTROLE QUE NO HAYA RESIDUOS ENTRE LOS DOS LABIOS DEL SECADOR
CONTROLE QUE NO HAYA RESIDUOS DENTRO DEL TUBO DE ASPIRACIÓN
CONTROLE QUE EL FILTRO DE ASPIRACIÓN ESTÉ ÍNTEGRO Y LIMPIO
CONTROLE QUE LA TAPA DEL DEPÓSITO DE AGUA SUCIA ESTÉ APRETADA CORRECTAMENTE
CONTROLE QUE EL TUBO DE ASPIRACIÓN ESTÉ BIEN ENGANCHADO EN EL SECADOR DE SUELOS
LA MÁQUINA DEJA EL SUELO SUCIO CONTROLE QUE EL TIPO DE CEPILLO/PAD UTILIZADO SEA ADECUADO PARA EL TIPO DE SUCIEDAD Y
SUELO
LA MÁQUINA DEJA EL SUELO MOJADO EN “FRANJAS” CONTROLE QUE EL SUELO HAYA SIDO BARRIDO ANTES DE UTILIZAR LA MÁQUINA
CONTROLE QUE NO HAYA RESIDUOS ENTRE LOS DOS LABIOS DEL SECADOR
CONTROLE EL DESGASTE DE LOS LABIOS DEL SECADOR
CONTROLE QUE EL SECADOR DE SUELOS ESTÉ BIEN REGULADO

1
PLDC01849_GERMAN
CT90 BT Kurzanleitung zum Gebrauch
Die folgenden Unterlagen sind kein Ersatz für das Betriebs- und Wartungshandbuch, sondern dienen nur zum schnel-
len Nachschlagen.
Lesen Sie vor dem Betrieb der Maschine das im Lieferumfang der Maschine enthaltene Betriebs- und War-
tungshandbuch aufmerksam durch und beachten Sie strikt alle darin enthaltenen Angaben.
VORBEREITUNG/BETRIEB
Den Laugentank befüllen
Den Bürstenkopf mit dem Pedal absenken
(nach unten und gleichzeitig nach links drü-
cken)
Den Saugfuß mit dem Hebel absenken
Bei Drücken der Bürstentaste schalten sich die
Bürsten und die Absaugung ein
Die Saugtaste drücken, um die Absaugung
auszuschalten, falls die Fläche vorgereinigt
werden soll
Den Fahrhebel bedienen
Mit der Arbeit beginnen
Nach Beendigung der Arbeit wie folgt vor-
gehen:
Den Bürstenmotor ausschalten.
Den Saugmotor ausschalten.
Die Not-Aus-Taste drücken.
Den Bürstenkopf anheben.
Den Saugfuß anheben.
Erforderlichenfalls die Batterien auaden.
Wenn die Taste “H2O” für mindestens 2 Sekun-
den anhaltend gedrückt wird, erfolgt die Reini-
gungsmittelabgabe, bei wiederholtem Drücken
der Taste ändert sich die abgegebene Menge
Die Maschine durch Entriegeln der Not-Aus-
Taste einschalten
Über den Fahrtrichtungsschalter die Fahr-
trichtung wählen und das Potentiometer
drehen, um die Arbeitsgeschwindigkeit festzu-
legen

2
PLDC01849_GERMAN
TÄGLICHE WARTUNG
Den Schmutzwassertank über den
Abussschlauch entleeren
Den Schmutzwassertank reinigen
Den Sauglter auf einwandfreien Zustand und
Sauberkeit prüfen
Den Einfülllter am Reinigungsmitteltank auf
einwandfreien Zustand und Sauberkeit prüfen
Den Filter am Austritt des Reinigungsmittel-
tanks auf einwandfreien Zustand und Sauber-
keit prüfen.
Die Bürste/n reinigen
Den Saugfuß auf Sauberkeit und die Sauglip-
pen auf Beschädigungen prüfen
Den Ladezustand der Batterien prüfen
Zum Auaden den Steckverbinder des Batteri-
eladegeräts in den Steckverbinder neben dem
Hebel zum Anheben des Saugfußes stecken
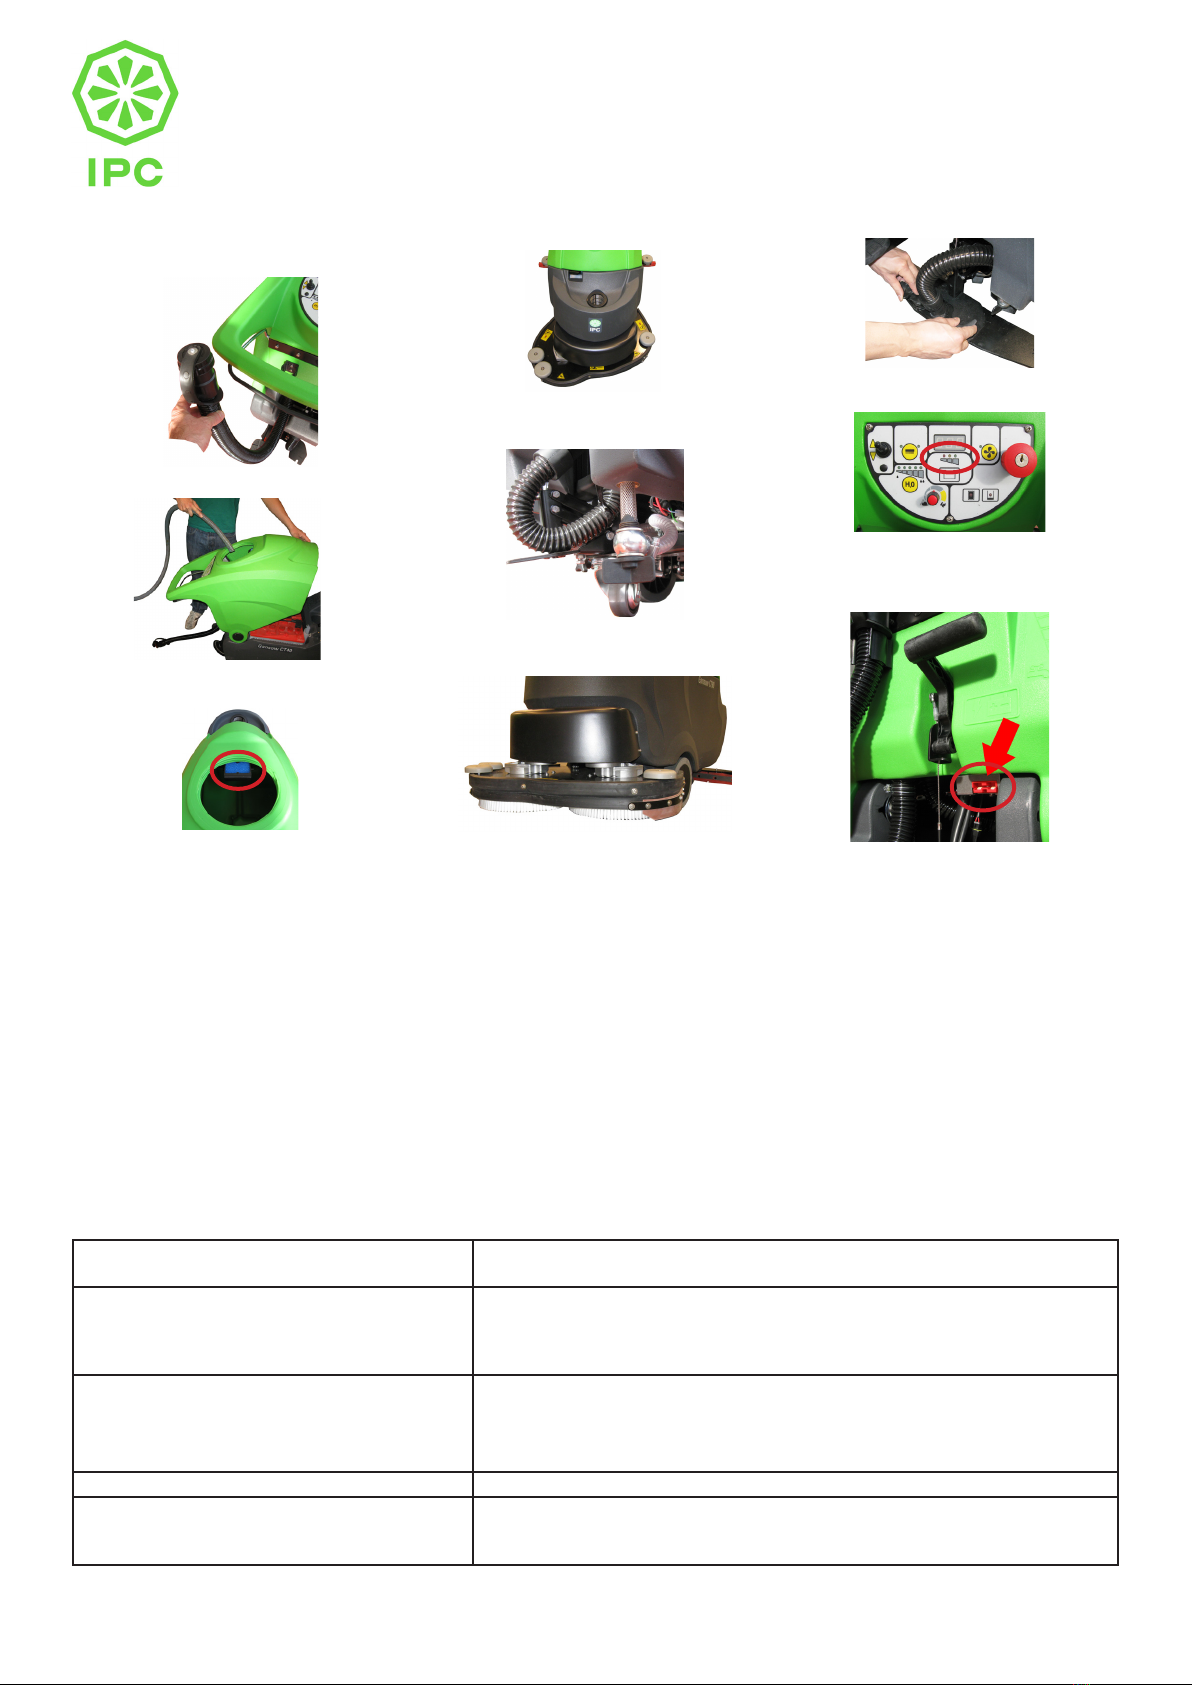
AUSWECHSELN DER SAUGLIPPEN DES SAUGFUSSES
den entsprechenden Einhakverschluss loshaken;
die beiden Sauglippenhalter zur Außenseite des Saugfußkörpers schieben und dann herausziehen;
die Sauglippe entfernen;
die gleiche Sauglippe wieder einbauen, dabei aber die Kante, die mit dem Fußboden in Berührung kommt, umkehren, bis alle vier Kanten abgenutzt sind, oder eine neue
Sauglippe in die Schrauben des Saugfußkörpers einspannen;
die beiden Sauglippenhalter wieder anbringen, dabei den breiteren Teil der Schlitze auf die Feststellschrauben des Saugfußkörpers ausrichten, dann die Sauglippenhal-
ter gegen die Innenseite des Saugfußkörpers schieben;
den entsprechenden Einhakverschluss festhaken;
AUTOMATISCHES EINHAKEN DER BÜRSTEN
Einbau der Bürsten, DIESER VORGANG MUSS BEI AUSGESCHALTETER MASCHINE ERFOLGEN: die Bürsten unter den Treibteller des Bürstenkopfs legen, die
rechte Bürste mit den Händen anheben und “im Uhrzeigersinn” drehen, wodurch sie am Treibteller einrastet, die linke Bürste mit den Händen anheben und “entgegen
dem Uhrzeigersinn” drehen, wodurch sie am Treibteller einrastet.
Ausbau der Bürsten, DIESER VORGANG MUSS BEI AUSGESCHALTETER MASCHINE ERFOLGEN, hierbei wie folgt vorgehen: den Bürstenkopf der Maschine
anheben, indem das Pedal zum Anheben des Bürstenkopfs nach unten und dann nach rechts gedrückt wird, die rechte Bürste “entgegen dem Uhrzeigersinn” drehen,
wodurch sie sich vom Treibteller loshakt, die linke Bürste “im Uhrzeigersinn” drehen, wodurch sie sich vom Treibteller loshakt.
DIE MASCHINE SCHALTET SICH NICHT EIN/STARTET NICHT PRÜFEN, DASS DIE NOT-AUS-TASTE NICHT GEDRÜCKT IST
DEN LADEZUSTAND DER BATTERIEN PRÜFEN
DER SAUGMOTOR FUNKTIONIERT NICHT PRÜFEN, DASS DER SCHMUTZWASSERTANK NICHT VOLL IST
PRÜFEN, DASS DER NIVEAUSENSOR DES SCHMUTZWASSERTANKS NICHT BLOCKIERT/DEFEKT IST
DIE MASCHINE HINTERLÄSST WASSER AUF DEM BODEN DEN VERSCHLEISSZUSTAND DER SAUGLIPPEN PRÜFEN
PRÜFEN, DASS SICH KEINE ABFÄLLE ZWISCHEN DEN SAUGLIPPEN BEFINDEN
PRÜFEN, DASS SICH KEINE ABFÄLLE IM SAUGSCHLAUCH BEFINDEN
DEN SAUGFILTER AUF EINWANDFREIEN ZUSTAND UND SAUBERKEIT PRÜFEN
PRÜFEN, DASS DER DECKEL DES SCHMUTZWASSERTANKS RICHTIG GESCHLOSSEN IST
PRÜFEN, DASS DER SAUGSCHLAUCH RICHTIG IM SAUGFUSS STECKT
DIE MASCHINE HINTERLÄSST SCHMUTZ AUF DEM BODEN PRÜFEN, DASS DIE VERWENDETE QUALITÄT VON BÜRSTE/PAD FÜR DIE
VERSCHMUTZUNGSART UND DEN FUSSBODEN GEEIGNET IST
DIE MASCHINE HINTERLÄSST NASSE STREIFEN AUF DEM BODEN PRÜFEN, DASS DER FUSSBODEN VOR DEM GEBRAUCH DER MASCHINE GEKEHRT WURDE
PRÜFEN, DASS SICH KEINE ABFÄLLE ZWISCHEN DEN SAUGLIPPEN BEFINDEN
DEN VERSCHLEISSZUSTAND DER SAUGLIPPEN PRÜFEN
DEN SAUGFUSS AUF RICHTIGE EINSTELLUNG PRÜFEN
This manual suits for next models
6
Table of contents
Languages:
Other IPC Scrubber manuals
Popular Scrubber manuals by other brands

Numatic
Numatic TGB 8572/200T Owner's instructions

Nilfisk-Advance
Nilfisk-Advance FLOORTEC R 670 P Instructions for use

Windsor
Windsor Walk Behind Scrubber 10052250 operating instructions

Minuteman
Minuteman ERide 21 Service manual

Festool
Festool CTH 26 E/a Original instructions

Blue Star
Blue Star 607047 Operator and parts manual

Tennant
Tennant 9021147 Operator's manual

Rossle
Rossle BISAM 44 BURSTE operating instructions

Polivac
Polivac GAZDA42 OPERATIONS MANUAL & TROUBLE SHOOTING GUIDE

Mytee
Mytee Spyder HP60 instructions

KENT
KENT C4-100A Maintenance & Repair Manual

American-Lincoln
American-Lincoln Alto SR7770HC Operator's manual, instruction book and parts list