IWILL DP6NS User manual

1
EC Declaration of Conformity
We
Iwill Corp.
No. 9-1, Kong 6th RD.,
Lin Kou 2nd Industrial
Park, Taipei, Taiwan R.O.C.
declare under sole responsibility that the
DP6NS motherboard
meets the intent of Directive 89/336/ECC for Electromagnetic Compatibility.
Compliance was demonstrated to the following specifications as listed in the
official Journal of the European Communities:
EN 50081-1 Emissions:
EN 55022 Radiated, Class B
EN 55022 Conducted, Class B
EN 60555-2 Power Harmonics
EN 50082-1 Immunity:
IEC 801-2 Electrostatic Discharge
IEC 801-3 RF Radiat
IEC 801-4 Fast Transient

2
About This Manual
This manual will guide both of experienced / beginner users in quick / detail
installation the system. There are six chapters in this manualand step by step
description will clearly guides you how to install the system.
User who is experienced in assembling system may refer to chapter 0 for quick
installation. Start from chapter one for detail description and engineer design
concept if you feel you are not qualified.
This manual is subject to change without notice.
This manual contains information protected by copyright law. All rights are
reserved. No any part of this document may be used or reproduced in any forms
or by any means, or stored in a database or retrieval system, without prior written
permission.
Trademark
Intel / Pentium is trade mark of Intel Corporationand all other product namesaretrademarksand
registered trademarksof their respective owners.
Contents
Chapter O - Quick lnstallation P4

3
Chapter 1- Overview
1.1 Features P14
1.2 Specifications P17
Chapter 2- Quick Installation P18
Chapter 3- Hardware Installation P19
3.1 Preparation and Inspection P19
3.2 Placement P20
3.3 CPU group P22
3.4 D-RAM Configuration P24
3.5 SCSI Interface P26
3.6 RAIDBUS P31
3.7 IDE Interface P31
3.8 USB P32
3.9 Enhanced Multi-IO P34
3.10 Other P36
Chapter 4- ATX Form-Factor Overview P39
Chapter 5- Award BIOS Setup P42
5.1 Main Menu P45
5.2 Standard CMOS Setup P49
5.3 BIOS Features Setup P53
5.4 Chipset Feature Setup P58
5.5 Power Management Setup P65
5.6 PNP/PCI Configuration setup P69
5.7 Integrated Peripherals P72
5.8 Load Setup Defaults P75
5.9 Supervisor/User Password setting P76
5.10 IDE HDD Auto Detection P77
5.11 HDD Low Level Format P77
5.12 Save & Exit Setup P77
5.13 ExitWithout Saving P77
Chapter 6- SCSI BIOS Setup
6.1 When to Use the SCSI Select Utility P78
6.2 SCSI Select Utility option P79
6.3 Configure / View Host AdapterSettings P80

4
CHAPTER0
Quick Installation
Several easy installation steps will be described in this chapter to help the
experienced users for quick installation. If you are new user and need to know
more about this motherboard, please start from Chapter 1.
RAID
W. SCSI
U. SCSI
Socket 8
Socket 8
JP7
ISA
USB
PCI
SIMM
S2
S1
LPT
KB
PS2
FAN
FAN
CPU
CPU
FDD
P. IDE
S. IDE
P. Control
BIOS
JP15
PW
J9
J10
J11
J12
J13
J14
Figure 1:Connectors for DP6NS

5
Socket 8
Socket 8
JP9
1
1
JP11
JP4
1
JP7
JP23
Figure 2 : Jumpers location

6
Connector Function Description
PW 20 pin Standard ATX power input connector
BIOS BIOS (Basic Input Output System)
CPU Two 387 pin Socket 8 CPU socket
FDD 34 pin Floppy Disk Drive with key protect connector
FAN Two Fan Power connector
LPT 25 pin Parallel D-Sub connector
ISA 4 x ISA(Industrial Standard Architecture) 98 pin expansion slot
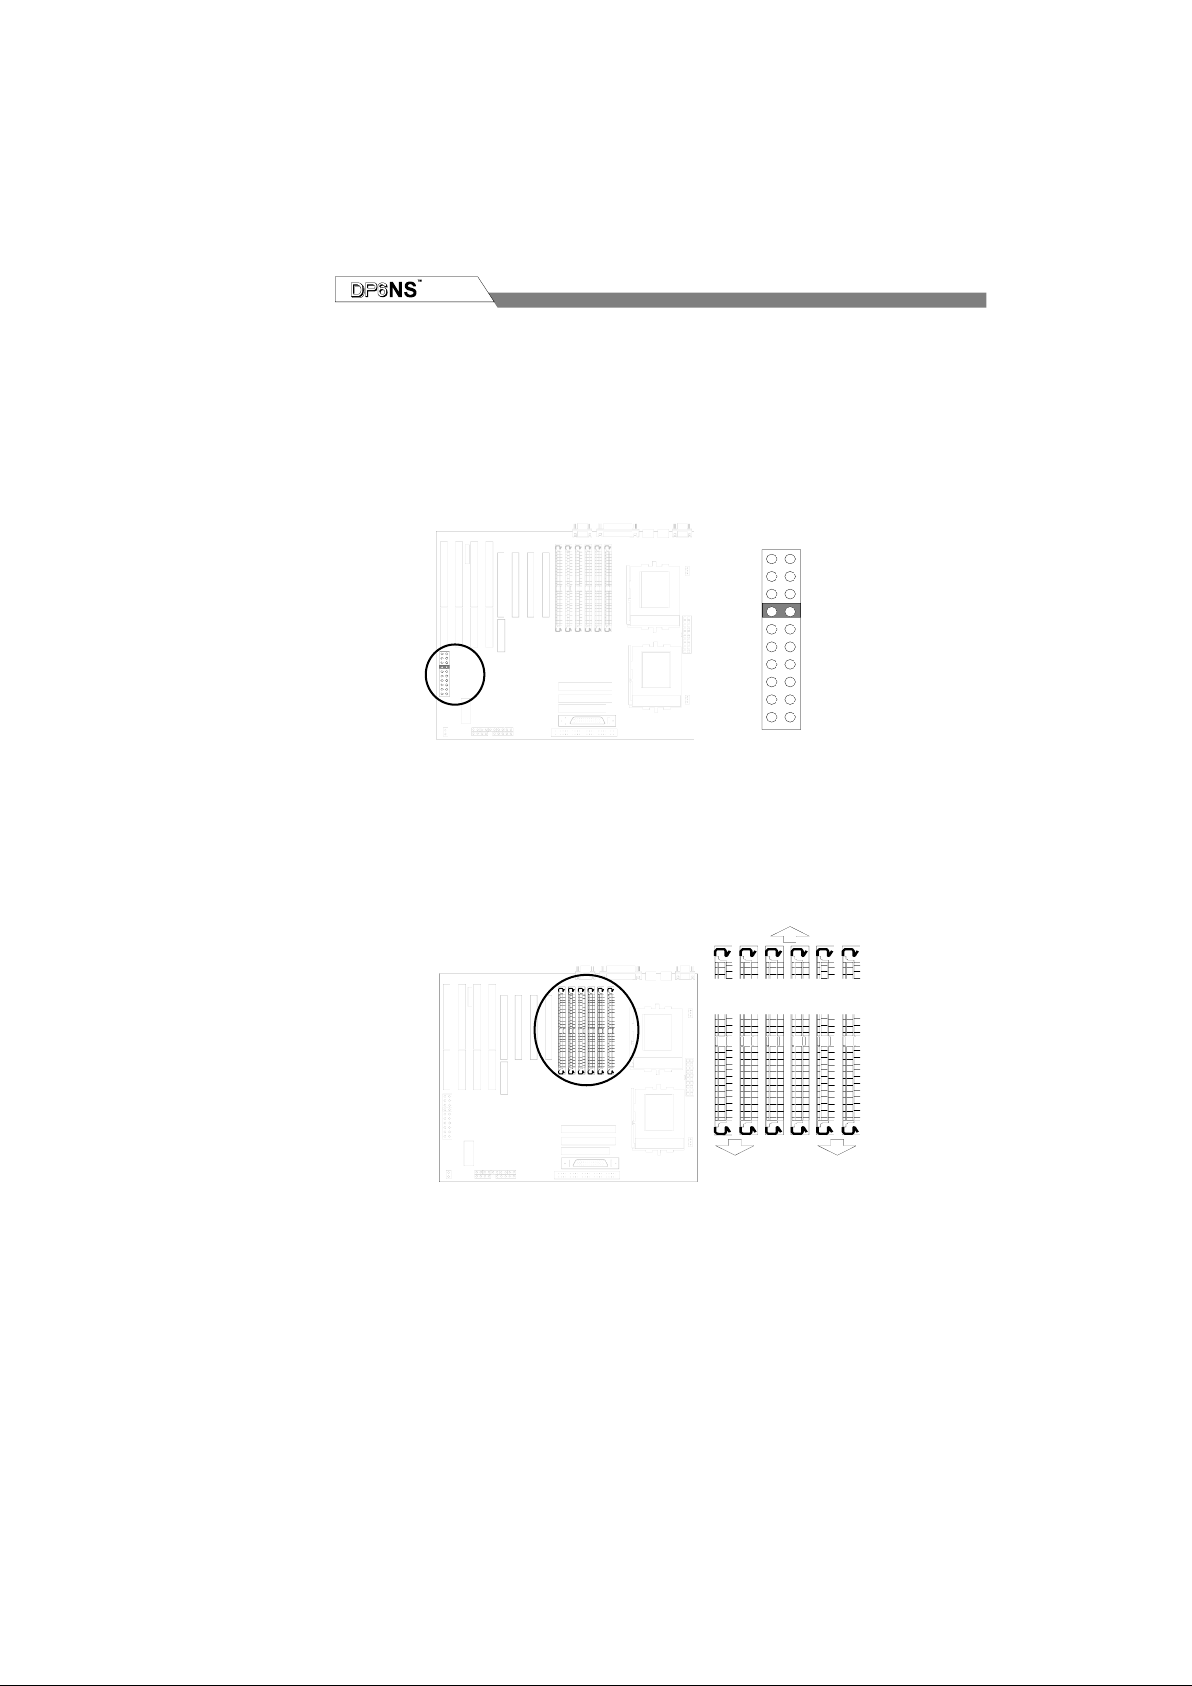
SIMM SIMM Socket
J9 SIMM Socket(Single In-line Memory Module ) Bank 0
J10 SIMM Socket(Single In-line Memory Module ) Bank 0
J11 SIMM Socket(Single In-line Memory Module ) Bank 1
J12 SIMM Socket(Single In-line Memory Module ) Bank 1
J13 SIMM Socket(Single In-line Memory Module ) Bank 2
J14 SIMM Socket(Single In-line Memory Module ) Bank 2
JP15 2 pin power switch connector for ATX power supply
KB 6 pin PS2 keyboard Mini-DIN connector
P. IDE40 pin Primary IDE with key protect connector
S. IDE 40 pin Secondary IDE with key protect connector
PCI 3 x PCI version 2.1 compliance 120 pin PCI (Peripheral
Component Interface)expansion slot
RAID 60 pin extension slot for working with RAIDBUS 1130 adapter
P. Control Front panel signal control connector
RST—Reset Switch
SCSI—SCSI detect LED
IDE—IDE detect LED
SMI—System Management Interface switch
LED—Power-on LED
Speaker—Speaker connector
Keylock—Keylock switch connector
PS2 6 pin PS2 mouse Mini-DIN connector
S1 9 pin Serial 1 D-Sub connector
S2 9 pin Serial 2 D-Sub connector
U. SCSI 50 pin Ultra SCSI with key protect connector
USB 20 pin Universal Serial Bus connector
W. SCSI 68 pin Wide SCSI with key protect connector

7
Jumper Setting
JP2 3.3V Power Source Select
JP4 SCSI Chip Select
JP7 CPU Frequency Select
JP9 CMOS Clear Jumper
JP11 Flash EPROM Jumper Setting
JP12 Power-on switch type select
JP15 System On/Off Switch
JP23 Auto SCSI Terminator Control Function
Quick Installation
Step 1. Install Pentium Pro CPU
Pull up theCPU handlebar, place the CPU into the socket in
gentle/ horizontalway then pull down the handle barback to
its original place. There is no first or seond CPU socket if only
single Pentium Pro CPU is installed, you can insert the single
Pentium Pro CPU in either socket 8.

8
U. SCSI
Socket 8
Socket 8
U. SCSI
Socket 8
Socket 8
Socket 8
JP1
Socket 8
JP12

9
CPU
2
3
1
4
Step 2. Install Pentium Pro CPU Cooler
Hook the CPU Cooler’s metal la tch one side to the CPU
socket’s peg, then press the meta l latch again to fit into
anotherside.
Warning: Care mustbe taken when the CPU Cooler was installed, if not
a suitable force might scrach this motherboardwhile you
install the cooler.
JP2 & JP12
+12V
GND
Control

10
Step 3. Adjust the CPU frequency
With the special patented design on this motherboard.Only
one jumperneeded to set this Pentium Pro CPU frequency.
Simply insert the jumper cap to the CPU frequency as it was
marked on top of the Pentium Pro CPU.Once the jumpercap
was inserted, it will automatically caculate the Internal/
External Clock and CLKMUL (Clock Multiplier).
U. SCSI
Socket 8
Socket 8
JP7
210
233
240
266
150
166
180
200
270
300
JP7
210
233
240
266
150
166
180
200
270
300
.
Step 4. Install the Memory Module
For at least two pieces of Fast Page Mode or EDO RAM with
72 pin SIMM (Single In-line Memory Module) must inserted
in this 64 bit Pentium Pro basemotherboard.TheJ9 to J14
were combined as Bank0,Bank1 and Bank2 in pair.
U. SCSI
Socket 8
Socket 8
BANK0
J9
J10
J11
J12
J13
J14
BANK2
BANK1
Step 5. Install the Internal Peripherals
The internal peripherals meansdevices that in the computer
chassis like the Floppy Disk Drive, HardDisk Drive, CD ROM

11
Drive …etc. With this motherboard package, there are 34, 40, 50 and 68
pin flat cable. Use these cables to connect the motherboard and internal
devices. All flat cable’s connector housing have thekey protect, this will
guide you the correct direction when you insert.
Socket 8
Socket 8
Step 6. Install the External Peripherals
The externaldevice meansdevicesthat outsidethe computer
chassis like the Serial mouse,Printer, PS/2 Mouse, External
Modem…etc. With this motherboa rd’s package there are two
10 pin cables convertto 9 and 25 pin D-Sub maleconnector
cable are for Serial port, one26 pin convert to 25 pin D-Sub
female connectorcableis for Parallel port, one 5 pin housing
but 4 wires into a 6 pin Mini-DIN is for the PS/2 mouse.
Step 7. Install the SMI(System Management Interrupt)
Some computerchassis provides a SMI switch to front pannel
control. Use thechassis provides a 2 pin housing and connect
to this SMI switch(any direction can function this).
U. SCSI
Socket 8
Socket 8
RST
SCSI
IDE
SMI
LED
SPEAKER KEYLOCK
1
1
1

12
Step 8. Install the Reset switch
Most computerchassis provides a reset switch to front pannel
control. Use thechassis provides a 2 pin housing and connect
to this reset switch(any direction can function this). This will
provides the system a hardwarereset once the system was hang.
Step 9. Install the Keylock
Most computerchassis will provides a keylock switch.
Normally connect the marked keylock connectorto the
motherboard keylock.This will cause the keyboard out of
function once you switch the keylock to “Lock”. This will
prevent any un-authorized keyin.
Step 10. Install the Speaker
Connect the speaker to the motherboard’s speaker connector.
(normally the red cableis +5V power) Or follow the Chapter-0
Quick Installation Step 2, if you use the P55TV/TVS CPU
cooler or reference to the CPU Cooler’s operation manual)
Step 11. Install the Power LED
Some computerchassis provides a power LED for identify if
the system is on or off. Connect the power LED to the
motherboard’s TB LED connector. (normally the red cable is
+5V power)
Step 12. Install the Devices LED
U. SCSI
Socket 8
Socket 8
RST
SCSI
IDE
SMI
LED
SPEAKER KEYLOCK
1
1
1
Some computerchassis provides a device LED(Like HDD LED)
for identify if the device is under working or not. Connect the
device LED to the motherboard’s IDE/ SCSI LED connector.
(normally the red cableis +5V power)
Step 13. Install the Power Input

13
This SCSI motherboard provides the ATX type of power input.
Plug ATX power provides one set 20 pin cable for
motherboard’s power input. Once the ATX was placed on this
system, the JP15 (front panel power on/off switch) is necessory
to be connected.
Step 14. Install the Keyboard
Follow the keyboard cable’s key direction and connect to this
motherboard.
Step 15. Install the Display Card
Finally, follow the display card you have and insert in
horizontaldirection into the PCI/ISA expansion slot.
Step 16. Power on the system
Once the system was power on, on the lower left corner of the
screen will show ”Press DEL to enter SETUP, ESC to skip
memory test”. Then press “DEL” to enter BIOS setup for the
first time power on and choose the “LOAD SETUP
DEFAULTS” then BIOS will responds “Loa d SETUP
defa ult(Y/N)?”, press “Y” and “Enter”. Final choose “SAVE to
CMOS and EXIT (Y/N)?” by pressing “Y” and “Enter”.
Step 17. Enjoy this powerfulDual Pentium Pro SCSI
Motherboard
After these steps of installation, the system should prepared
and can run most software.And you can follow the Operation
System and Application softwareinstall procedule to run.
Reference to the following Chapterforany un-normalon this
system or more information.

14
CHAPTER1
Overview
Thank you for purchasing this DP6NS SCSI Motherboard. This operation
manual will guide you to proper configure and install. It has an overview of the
engineer design and feature of this board. Also, this manual provides useful
information for your later upgrade or change the configuration. Keep this for your
future need.
1.1 Featuress
This DP6NS SCSI Motherboard is the newest ATX form factorbased member to
our SCSI Motherboard families. It incorporated with Intel new generation
82440FX Chipset with I/O Advanced Programmable Interrupt Controller that
supports for Dual Intel Pentim Pro Processor and Adaptec new PCI Ultra and
Ultra Wide SCSI using AdaptecAIC-7880 which is equivlent to AHA-2940UW .
This DP6NS motherboard supports minimum of 8 Mbyte and mxaimum of 768
Mbyte while Level-2 Cache/ Controller included in PentiumPro Processor. In
order to support fully plug and play I/O, an 160 pin Ultra I/O chip that contain
floppy , two of the high speed serial ports, one ECP / EPP printer port, keyboard
and real time clock is used for users to enjoy the plug and play function. This
SCSI motherboard hasdesigned with ATX form factorto improve the easy access
memory module, long add-on card support and some of the new features that
traditional AT form factor can not achieved.
The onboard RAIDBUS ( Redundant Array of Inexpensive Disks ) slot connector
can allow this SCSI motherboardto be hardware assist RAID system by simply
add the RAIDBUS 1130 adapterinto the RAIDBUS slot.
The PentiumPro Processor was used theDynamicExecution that is combination
of improved barnch predition, speculative execution and data flow analysis that
enables the Pentium Pro Processor to deliver its superior performance from CPU
architecture.Run with fast/reliableand use one single jumpercap to adjust the CPU
speed is very important function that this SCSI Motherboard support. It supports
superpipelined dual PentiumPro Processor for high speed clock from 150MHz
to 200MHz.
The PentiumPro Processor is a 64 bit processor with the RISC technology. More
and more32 bit applicationsrequireto optimize their capabilitiesand performances.
The PentiumPro Processor delivers best value for business moving to the 32 bit

15
operation systems and applications. Especially, this SCSI motherboard provides
dualPentiumPro Processor, this will perform much higher performance compare
a single processor.
◼CPU:
Two CPU socket (socket 8) supportsthe flexibility of different type of
current and futureIntel Pentium Pro Processor. One easy jumper design,
while choosing your CPU speed from 150 to 300MHz.
◼BIOS:
2 Mega Bit BIOS, on-screen "Plug & Play" setup forAdaptecSCSI,
Enhanced IDE, and Ultra Multi-IO. Support Flash ROM ( This ROM
provides better upgrade ability for user to updatetheir BIOS data on the
system board,user can down-load/ update newer version BIOS from
Internet or diskette file.
Support SCSI device boot before IDE
Support Bootable CD-ROM ( SCSI or IDE )
DMI
◼Memories:
6 X 72-pin SIMM(Single In Line Memory Module)
Support up to 768MB (minimum of 8MB ) on board.for both the Fast
Page Mode and Extended Data Output (EDO) module.
◼Ultra Wide SCSIinterface:
DP6NS uses Adaptec AIC-7880 chips that support both Ultra
and Ultra Wide SCSI which is equilevent to Adaptec AHA-
2940UW PCI SCSI controller. The data transfer rate up to
20MB/Sec. while using Ultra SCSI and can up to 40MB/Sec.
when using Ultra Wide SCSI devices.
Support the Adaptec / IWILL RAIDBUS slot.
Complete software driver from Adaptec Inc., include EZ-SCSI
forDOS/Windows, Netware, Windows NT , OS/2 , SCO Unix ,
Unixware.

16
◼Expansion slots:
4 X 16-bits ISA slots, 4 X 32-bits PCI slots and 1 X RAIDBUS slot.
(PCI Rev 2.1)
◼IDE functions:
Built in dualPCI Bus EIDE Channels.
Support ATAPI (AT Attachment Packet Interface)
◼USB interface (Universal Serial Bus):
Plug and Play devices outside the computerbox
Up to 12Mbit
2 USB heads
◼In-Put power:
Support theATX power supply connector
On-board 3.3V regulator
Support the remote On/Off switch
◼Floppy Interface:
Support both 3 1/2"and 5 1/4" floppy disk drives and Tape Drive
(360K / 720K/ 1.2M / 1.44M / 2.88MB)
Enabled/Disable selectable from system BIOS
Non-Burst ModeDMA Option,16 Byte Data FIFO
3 Mode Driver (optionalfor Japanese users)
◼Serial Port:
Two high speed 16550 UART serial port
IRQ selectable from BIOS.
Address changeableform system BIOS
NS16C550 compatible,Programmable Baud Rate Generator
◼Parallel Port
IRQ selectable for IRQ5(278h), IRQ7(378h) from system BIOS.
Standard mode--Compatiblewith IBM PC/AT Printer port
EPP Mode --Enhanced Parallel Port compatible(EPP) compatible
IEEE 1284
ECP Mode --Microsoft & Hewlett Packard Extended Capabilities
Port (ECP) Compatible
IncorporatesChiProtect Circuit for protection against damage due to
printer power-on

17
1.2 Specifications
◼Physical Dimensions:Length: 305mm / Width: 265mm
◼Environmental Requirements:
Temperature0-55 degrees C (operating or storage)
5% to 95% non-condensingrelative humidity

18
CHAPTER2
Quick Installation
This SCSIMotherboard isshippedwith
manufacturepresetat :
1. CPU Clock at 200 MHz
2. Adaptec SCSIChip Enabled
3. AutoSCSI Terminator Enabled
4. Printer ECP Mode at DMA3
5. Printer at IRQ7, Address at 378h
6. Serial 1 at IRQ4, Serial 2 at IRQ3
7. PS/2 MOUSE at IRQ 12
Referenceto the Chapter 3 & Chapter 4, if you
havedevices conflictwith themanufacturedefault.
CHAPTER3

19
HardwareInstallation
3.1 Preparation and Inspection
This DP6NS SCSI Motherboard,like all electronic equipmentis static sensitive.
Please take the proper precautionswhen handling this board.You should avoid
static up. If possible, You should ground yourself by touching a metaltable or
your computerframe.Keep the board in its conductive wrapping until it is
configured and ready to be installed in your system.
For installation, you may need some or all of the following tools:
‧SCSI HDD drive/devices manual(s).
‧IDE HDD drive/devices and floppy drive manual(s).
‧Peripherals that connect to yoursystem's manual(s).
‧MS DOS diskettes with FDISK and FORMAT programs.
‧Medium size flat blade screwdriver.
‧Medium sized Phillips head screwdriver.
‧A 3/16 inch nut driver or wrench.
You should find the Following components when open the box :
1. DP6NS SCSI Motherboard.
2. This Operation Manual
3. Adaptec softwaredriver Diskette (EZ-SCSI).
4. Adaptec 7800 Family ManagerSet software driver diskettes.
5. Adaptec EZ-SCSI Manual( OEM ).
6. Adaptec 7800 Family ManagerSet Manual.
7. RAIDBUS 1130 adapterwith 4 Mbyte RAM (optional).
8. RAIDBUS 1130 Manual(optional).
9. RAIDBUS 1130 softwaredriver diskettes (optional).
10. 68 pins Wide SCSI signal flat cable.
11. 50 pins internal SCSI signal flat cable.
12. 40 pins internal IDE signal cable.
13. 34 pins internal Floppy Disk Drive signal cable.
14. USB Riser Card (optional)
15. External SCSI-2 port expansion kit (optional).
16. External Wide SCSI port expansion kit (optional).
17. High speed printer port software driver (optional).

20
3.2 Placement
RAID
W. SCSI
U. SCSI
Socket 8
Socket 8
JP7
ISA
USB
PCI
SIMM
S2
S1
LPT
KB
PS2
FAN
FAN
CPU
CPU
FDD
P. IDE
S. IDE
P. Control
BIOS
JP15
PW
Figure 1 : Placement for DP6NS
Table of contents
Other IWILL Motherboard manuals

IWILL
IWILL VD133 User manual

IWILL
IWILL P4E Series User manual

IWILL
IWILL P4SE Series User manual

IWILL
IWILL DH800 User manual

IWILL
IWILL KK266 User manual

IWILL
IWILL KK400 Series User manual

IWILL
IWILL dca200 User manual

IWILL
IWILL IWILL P4D-N User manual

IWILL
IWILL DK8S User manual

IWILL
IWILL P4SE2 User manual

IWILL
IWILL mP4G2 Series User manual

IWILL
IWILL XA100 Ultra ATA-2 User manual

IWILL
IWILL DPIILS2 User manual

IWILL
IWILL PIINS User manual

IWILL
IWILL VD133 User manual

IWILL
IWILL P55TV User manual

IWILL
IWILL KD266 User manual

IWILL
IWILL Motherboard DJ800 User manual

IWILL
IWILL KK266Plus User manual

IWILL
IWILL KK266plus-R Original operating instructions