JABLOTRON ALARMS a.s.
Pod Skalkou 4567/33 46601 Jablonec n. Nisou
Czech Republic www.jablotron.com
||
|
JA-150P PET Wireless PIR motion detector with basic pet immunity
JA-150P PET Wireless PIR motion detector with basic pet immunity 1 / 2 MMB56101
The JA-150P PET is a wireless device of the JABLOTRON 100
system. It is used to detect movement of persons in interiors
of buildings. Unlike the standard PIR motion detectors form
the JABLOTRON 100 series, this detector has a modified detection
characteristic and it is equipped with basic pet immunity. The detector
eliminates the effect of the movement of small animals on the floor
(animals with a weight of up to approx. 25 kg and a maximum height
of 40 cm). The detector has a pulse reaction and it takes one position
in the system. The detector should be installed by a trained technician
with a valid certificate issued by an authorized distributor.
Installation
The detector can be installed onto a wall or in a corner of a room.
Bear in mind that the detector’s field of vision should not include any
objects which quickly change temperature (electrical heaters, gas
appliances, etc.) or which move (curtains hanging above a radiator,
robotic vacuum cleaner, etc.). Although the detector is very resistant
to false alarms, it is not recommended to install the detector in places
with intense air circulation (close to ventilators, air conditioning, vents,
unsealed doors etc.). There should not be any obstacles
in the detector’s field of vision that would obstruct its view into
the guarded area.
The recommended detector installation height is 2 m, maximum
height 2.2 m.
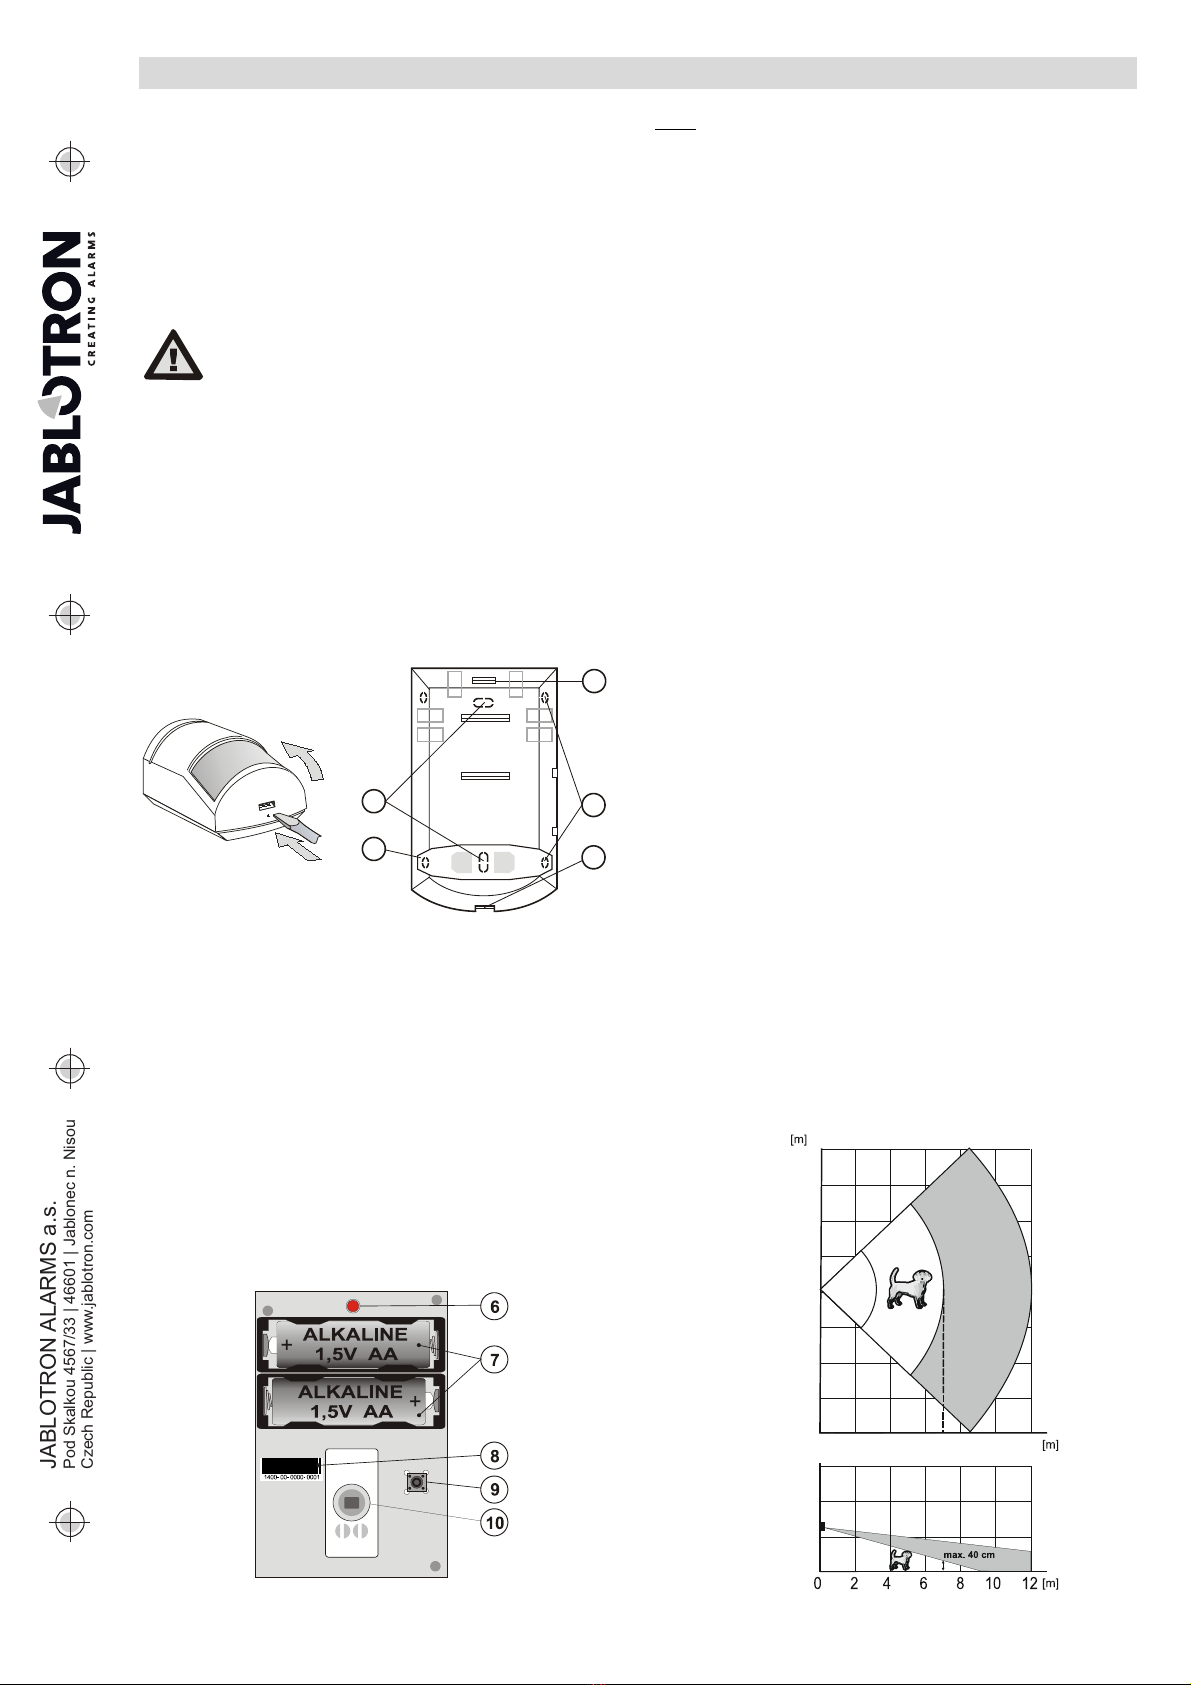
Figure 1.: 1 – holes for installing on a flat wall; 2, 4 – holes for installing at an angle
(in a corner); 3 – PCB tab; 5 – cover tab
1. Open the detector cover by pressing the cover tab (5). Avoid
touching the PIR sensor inside (10) – you could damage it.
2. Take out the PCB – it is held by a tab (3).
3. Punch through the holes for screws in the plastic base and attach
it to the wall. The rec ommended detector installation height is 2 m
above the floor.
4. Insert the PCB back and proceed by following the control panel
installation manual. Basic instructions:
a. Open the F-Link software, select an unused position
in the Devices tab and click on the Enroll button to enter
the Enrollment mode.
b. Insert both batteries into the detector (mind the correct
polarity). After the second battery is inserted into the detector
the enrollment signal is transmitted to the control panel and
the detector is enrolled to the selected position. This is followed
by up to a three-minute detector stabilization phase indicated
with a flashing LED.
5. Close the detector cover and test the detector’s function.
Figure 2.: 6 – red activation LED; 7 – batteries; 8 – production code; 9 – cover tamper
sensor; 10 – PIR sensor
Notes:
- The detector can also be enrolled into the system by entering its
production code in the F-Link software. You can find the production
code on the sticker (8) placed on the detector board. All numbers
under the bar code must be entered (1400-00-0000-0001).
- If you want to remove the device from the system, erase it from its
position in the F-Link software.
- Should you enroll the detector into the control panel after
the batteries have been inserted, first take them out, then press and
release the tamper sensor (9) to consume the residual energy and
after that enroll the detector to the control panel.
- To meet the EN 50131-3 standard it is necessary to secure
the cover tab (5) with the supplied screw.
Detector function modes
The detector can work in two modes that are indicated with one
or two flashes when inserting the batteries.
To change the mode, during battery insertion, press and hold the
tamper sensor (9). After inserting the second battery hold the tamper
sensor for approx. 3 s before releasing. The detector then flashes either
once or twice to indicate the currently selected mode. The default
setting is Smartwatch.
One flash indicates Smartwatch mode that is intended for
the permanent monitoring of movement in the guarded area.
If permanent movement is detected, three reports are sent every 20 s.
The next report is then sent after 2 minutes. If the detector does not
detect any movem ent for 10 minutes, the mode with three reports every
20 s is used again.
Two flashes indicate one-minute interval m ode. W hen a movem ent
is detected, it sends a report and goes into standby mode for 1 minute.
When the time is over, the detector wakes up and rem ains active until
the next detection of movem ent.
Detector testing
For a period of 15 minutes after closing the detector cover, the LED
(6) indicates all movement and reports it to the control panel. After this
time the detector switches to the mode selected during battery insertion.
Individual activations of the detector can also be monitored
in the Diagnostics tab in the F-Link software.
Battery replacement
The system automatically reports a low battery status.
W e recommend replacing the batteries within two weeks from the low
battery report. It is done by a service technician in service mode.
Always replace both batteries at the same time!
Before inserting new batteries, it is necessary to wait for 10 s
or to press the tamper sensor (9) to consume the residual energy.
Detection characteristics
The detector is fitted with a lens covering 90° / 12 m as standard, see
the following figure. In the white part of the diagram the detector
eliminates the effects of m ovem ent of small animals with a weight
of up to approx. 25 kg and a maximum height of 40 cm, in the grey part
of the diagram there is standard detection.
2m
max 2,2m
90°
0
2
4
6
2
4
6
8
80 2 4 6 8 10 12
7
Figure 3.: Detection characteristics
The detector eliminates only the effects
of movement of animals on the floor according
to the detection characteristics.
It is not suitable for guarding areas where
animals can move freely at height!


