Jay Fusion Configuration guide

SECTION
FUSION CUSHION
O w n e r ’ s M a n u a l
S u p p l e m e n t
AIR INSERT
IMPORTANT CONSUMER INFORMATION
NOTICE: This manual contains important instructions that must be passed on to the user of this product. Please
do not remove this manual before delivery to the end user.
SUPPLIER: This manual must be given to the user of this product.
USER:Before using this product, read this entire manual and save for future reference.
M a n u a l
C m p l e m e n t a r i
S u p p l é m e n t a u m a n u e l
d e l ’ u t i l i s a t e u r
INSERTO DE AIRE
INFORMACIÓN IMPORTANTE PARA EL CONSUMIDOR
AVISO: Este manual contiene instrucciones importantes que deben ser entregadas al usuario de este
producto. Por favor no retire este manual antes de la entrega al usuario.
DISTRIBUIDOR: Este manual debe ser entregado al usuario de este producto.
USUARIO: Antes de usar este producto, lea este manual en su totalidad y guárdelo para futura referencia.
INSERTION D'AIR
INFORMATIONS IMPORTANTES DESTINÉES AU CONSOMMATEUR
AVIS : Ce manuel contient des instructions importantes qui doivent être communiquées à l’utilisateur
de ce produit. Prière de ne pas le retirer avant livraison.
FOURNISSEUR : Ce manuel doit être remis à l'utilisateur de ce produit.
UTILISATEUR : Avant d'utiliser ce produit, lisez entièrement ce manuel et conservez-le pour
référence ultérieure.

124610 Rev. B2
NOTICE:This owner’s manual is a supplement to the JAY Fusion cushion
Owner’s Manual. The JAY Fusion cushion owner’s manual
should be referenced in conjunction with this supplement prior
to the installation, set-up or use of this product.
NOTICE:This supplement contains important instructions that must be
passed on to the user of this product. Please do not remove this
supplement before delivery to the end-user.
SUPPLIER: This supplement must be given to the user of this product
USER: Before using this product, read this supplement, and the
JAY Fusion cushion manual. Save these instructions for
future reference.
GENERAL WARNINGS
WARNING
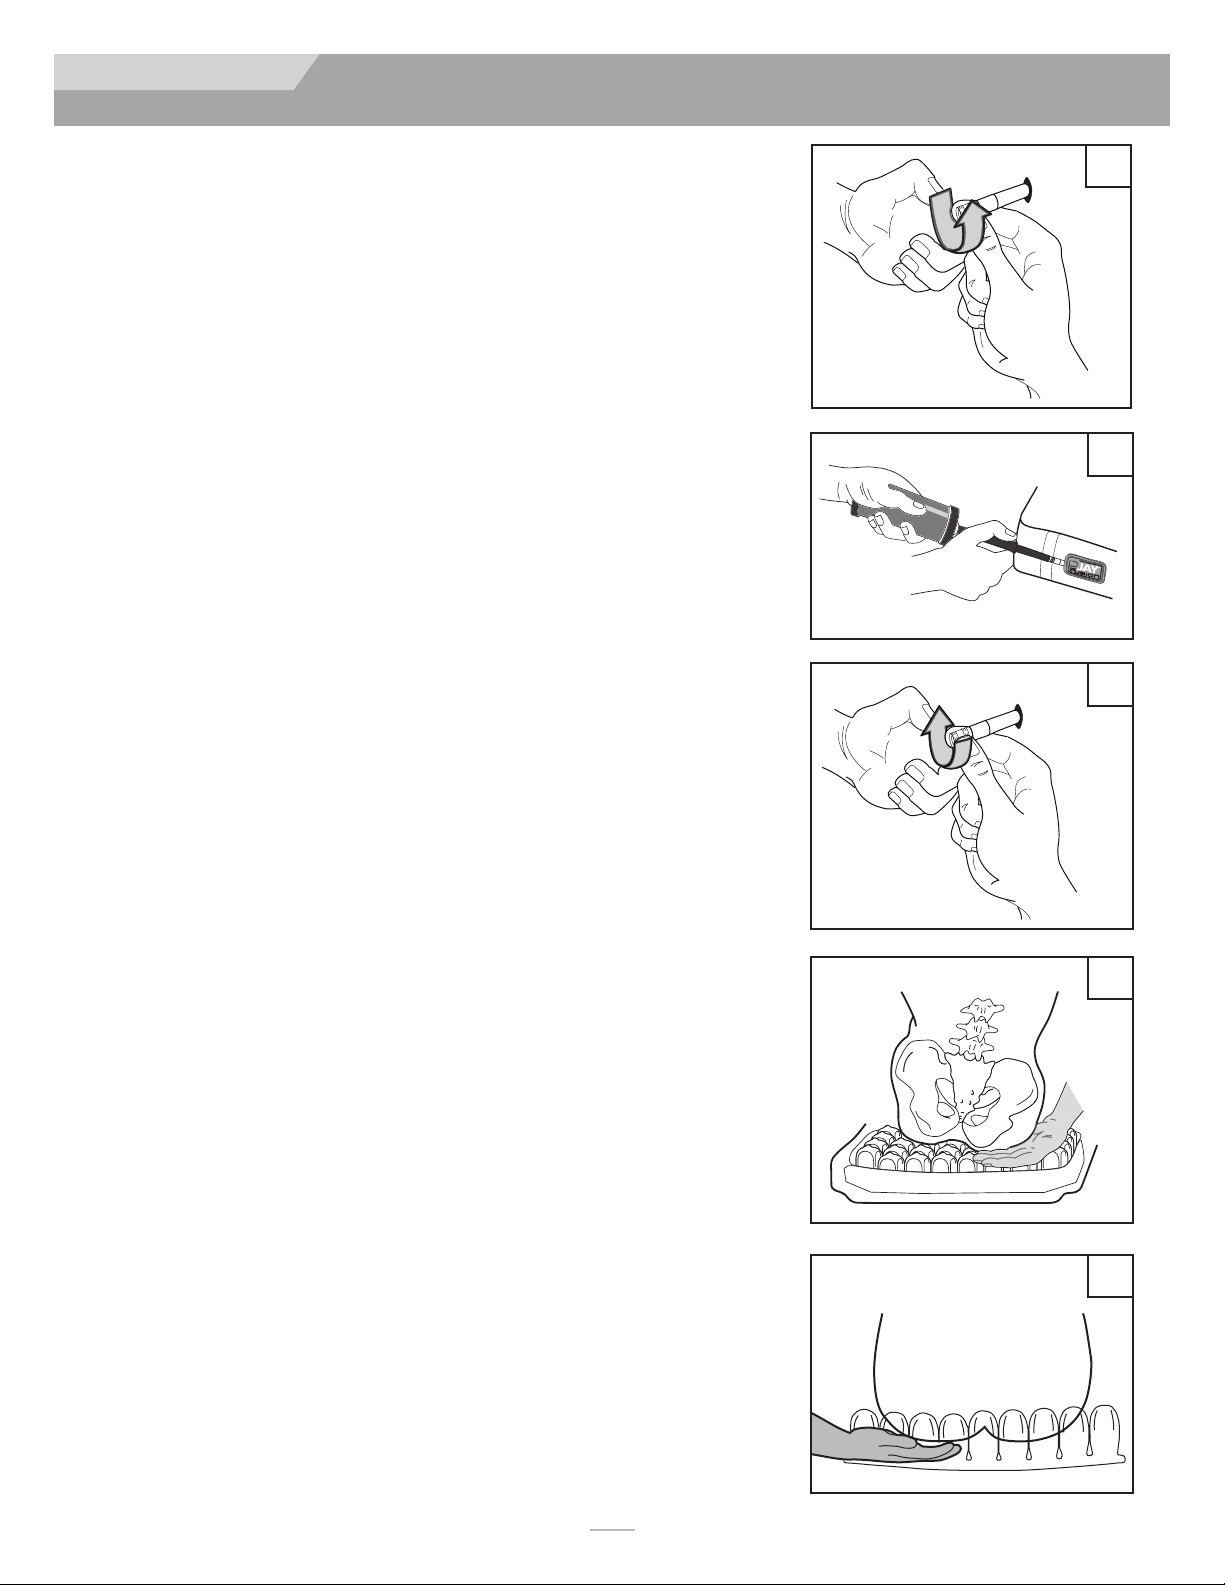
CHEC INFLATION AT LEAST ONCE A DAY!
WARNING
UNDER-INFLATION: DO NOT use an under-inflated cush-
ion. Using a cushion that is under-inflated reduces or elimi-
nates the cushion’s benefits, increasing risk to the skin and
other soft tissue. If your cushion appears under-inflated or
does not appear to be holding air, check to make sure that all
valve(s) are closed by turning the inflation valve(s) clockwise.
If your cushion is still not holding air, contact your clinical
caregiver and/or supplier immediately.
WARNING
OVER-INFLATION: DO NOT use an over-inflated cushion.
Using an over-inflated cushion will not allow you to sink into
the cushion and will reduce or eliminate the cushion’s bene-
fits increasing risk to skin and other soft tissue.
WARNING
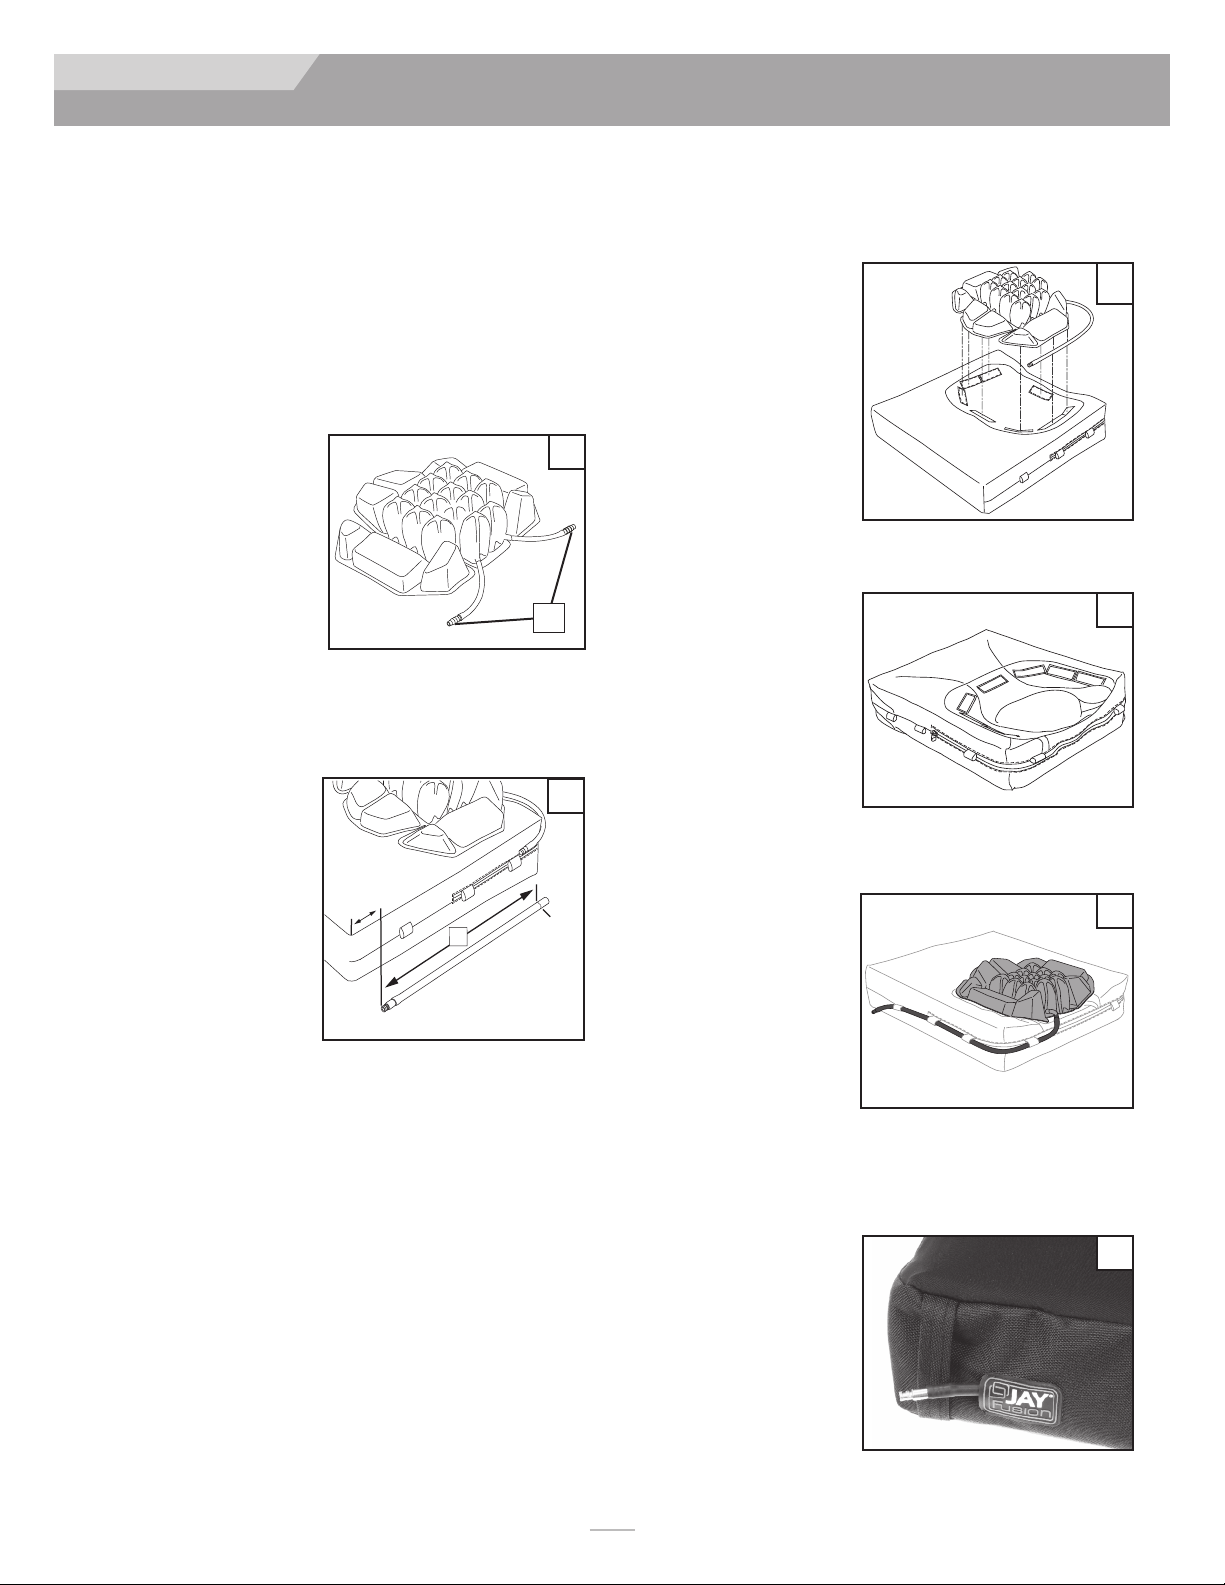
CUSHION AND COVER ORIENTATION: Product must be
used with the air cells facing up.
WARNING
PRESSURE: Changes in altitude may require adjustment to
your cushion. Check your cushion when changing altitude of
1,000 feet (300 meters) or greater.
WARNING
PUNCTURE: eep your cushion away from sharp objects
which may puncture the air cells and cause it to deflate.
WARNING
HEAT/FLAME: DO NOT expose your cushion to high heat,
open flames, or hot ashes.
WARNING
CLIMATE: If a cushion has been in temperatures less than
32°F / 0°C and experiences unusual stiffness, allow the cush-
ion to warm to room temperature, then open air valve. Roll
up the cushion and then unroll it until the neoprene is soft
and pliable again. Then repeat proper adjustment instructions
before using.
WARNING
DO NOT use on top or in conjunction with another cushion-
ing product other than the JAY Fusion Cushion with which it
was supplied.
WARNING
OBSTRUCTIONS: DO NOT place any obstructions between
the user and the cushion, as it will reduce product effective-
ness.
WARNING
HANDLING: DO NOT use any valve as a handle for carrying
or pulling the cushion.
WARNING
PRODUCT USE: DO NOT use your cushion as a water
floatation device (e.g., a Life Preserver).
CAUTION– SOLUTIONS: DO NOT ALLOW OIL-BASED LOTIONS OR
LANOLIN TO COME IN CONTACT WITH YOUR CUSH-
ION, AS THEY MAY DEGRADE THE MATERIAL.
CAUTION– OZONE GENERATORS: THE US ENVIRONMENTAL
PROTECTION AGENCY, HEALTH CANADA AND OTHER
GOVERNMENT AGENCIES HAVE ISSUED WARNINGS
REGARDING THE USE OF OZONE GENERATORS.
PROLONGED EXPOSURE TO OZONE WILL DEGRADE RUB-
BER, FABRICS AND OTHER MATERIALS USED IN THE MAN-
UFACTURE OF THE AIR INSERT PRODUCT AND MAY
AFFECT THE PERFORMANCE OF THE PRODUCT AND
VOID THE PRODUCT WARRANTY.
CAUTION– DO NOT USE A PUMP OR REPAIR IT OTHER THAN
THOSE PROVIDED BY SUNRISE MEDICAL. DOING SO MAY
VOID YOUR PRODUCT’S WAR-RANTY.
ENGLISH
WARNINGS

124610 Rev. B
3
ENGLISH
INSTALLATION
NOTICE: Please reference the JAY Fusion Cushion Owner’s
Manual for set-up and adjustment of the cushion. The
following instructions pertain to the installation and
adjustment of the Air Insert only.
A. INSTALLATION OF THE INFLATION TUBE(S)
Some configurations of the JAY Fusion Cushion with the Air
Insert come with the inflation tube(s) un-installed. If this is the
case, you will have received the following parts:
A second tube will be included
if the air insert was a dual
chamber insert. A coupling
connector (A) will have already
been installed in the truncated
inflation tubes.
• Figure 1 shows a Dual chambered Air Insert ready to have
the tube length attached by following the steps below.
To install the inflation tube(s)
1. Install the Air Insert
into the JAY Fusion foam
base with inner cover as
outlined in the instruc-
tions below.
2. Measure the length of
inflation tube required
for your specific cushion
size (Figure 2). Do this by threading the tube through the
loops on the inner cover to the front edge. Measure about
1/2” (13mm) from the front edge of the cushion, and run it
the distance (L) until the open end matches up with the tube
valve coming out of the Insert.
3. Cut the length of inflation tube as measured using a sharp
pair of scissors.
4. Insert the coupling connector into the cut length of each infla-
tion tube, 6. Insert the valve
through the slot in
the outer cover
behind the JAY
Fusion logo. The
valve is intended to
protrude through
the slot and be
secured by the side
band on the JAY
Fusion cover. (Figure 6)
CUTCUT
13mm13mm
LL
6
2. With the Air Insert installed, the inflation tube(s) need to
be secured to the inner cover. Your Air Insert may have one
or two inflation tubes
depending if it is a
single chamber insert
or a dual chamber
insert. Use the fabric
loops on either side of
the inner cover to
route the inflation
tube(s).
(Figures 4 and 5)
3. Thread the inflation tube through the loops starting at the
rear of the inner cover and inserting the tube through
each loop, working your way around to the
front of the product.
4. If the Air Insert is dual
chambered, do the
same for the second
inflation tube on
the opposite side.
5. Re-install the outer cover by sliding it over the base and
inner cover assembly. It is best to hold the inflation valve
in place with your hand as you slide the cover over the
assem-bly.
1. Air Insert.
2. 1 or 2 lengths of tube with one end terminated by an infla-
tion valve, the other end 1
open.
2
A
B. INSTALLATION OF THE AIR INSERT INTO CUSHION
1. With the outer cover removed from the JAY Fusion
foam base, install the Air Insert into the Well. Ensure
that the Air Insert is aligned with the well and that the
inflation tubes are to the rear of the cushion. (See Figure 3).
Ensure the Velcro
attached to the Air
Insert is aligned with
the matching Velcro
adhered to the inner
cover.
4
5
3

124610 Rev. B4
ENGLISH
ADJUSTMENT
A. ADJUSTMENT
1. Open the air valve by twisting it counterclockwise. If your cushion comes with two
valves, open both valves using the same technique. (Figure 7)
2. Attach the rubber hose on the Air Insert Pump to the end of the valve. Inflate the
cushion insert with the pump until just before the cushion begins to arch. (Figure 8)
3. Remove the pump hose from the valve and close it by twisting it clockwise. (Figure 9)
4. Sit on the JAY Fusion Cushion, with the Air Insert installed, in your normal sitting
position with armrests and footrests properly positioned.
5. Slide your hand beneath your buttocks to locate your lowest bony prominence, usual-
ly the ischial tuberosites. If necessary, your clinician or caregiver should assist you.
(Figure 10)
6. Leaving one hand in place beneath the lowest bony prominence, use the other hand to
open the valve. As air is released from the cushion insert, you will begin to sink into it.
When your fingertips touch its base, close the valve. Approximately 1/2” (13
mm) of air should be between your lowest bony prominence and the base of the
cushion. (Figure 11)
B. IMPORTANT ADJUSTMENT NOTES
• Your JAY Fusion Cushion with Air Insert may have been ordered with two valves, one
on each side of the cushion. If you have two valves, steps 1-6 above should be
repeated for each valve. Two valves indicate that your cushion insert is divided in the
middle. You, your clinician or caregiver should locate the lowest bony prominence on
the same side as the air valve used to adjust the cush-ion.
• You, and your clinicians or caregivers should check the cushion insert daily to ensure
that you have not bottomed out (ie. lost air and are now sitting on the base of the
cushion). If you have bottomed out, the protective value of the cushion insert is lost.
You should also check to be sure the cushion insert is not over-filled with air. The
cushion insert will work best with approximately 1/2” (13mm) of air between you and
its base.
• The Air Insert may be affected by changes in altitude. You may have to repeat steps
1-6 above as you change altitudes.
10
7
8
9
11

124610 Rev. B
5
ENGLISH
CLEANING AND MAINTENANCE
A.CLEANING AND DISINFECTING YOUR AIR INSERT
Cleaning and disinfecting are two separate processes. Cleaning
must precede disinfection.
CLEANING THE AIR INSERT
To clean the Air Insert, gently pull it out of the recess in the foam
base, taking care to gently pull the valve through the foam. Deflate
the cushion, close the valve(s) and place in a large sink. Gently
scrub the air cells and the spaces between them with a soft plastic
bristle brush, sponge or wash-cloth. Liquid dishwashing or laundry
detergent or other general-purpose cleaning product is suggested.
For institutional cleaning, a general housekeeping disinfectant
cleaner may be used.
DISINFECTING THE AIR INSERT
To disinfect the Air Insert, use a germi-cidal product that meets
infection control needs. A disinfectant with tuberculocidal
properties is recommended. Follow the manu-facturer’s dilution
directions. For home disinfection, use solutions of approximately
1/2 cup liquid household bleach per quart of water (125 ml bleach
to 1 liter of water). eep the clean cushion wet with bleach
solution for 10 minutes. Rinse thoroughly and dry.
WARNING
Disinfectants are not effective on porous surfaces, such as
foam, if the cushion becomes soiled or contaminated. DO
NOT use with multiple users.
CAUTION– DO NOT USE OIL-BASED LOTIONS OR LANOLIN ON
YOUR CUSHION AS THEY MAY COMPROMISE THE
INTEGRITY OF THE NEOPRENE RUBBER.
B. REPAIRS
Each JAY Fusion Cushion with a Air Insert is shipped complete
with a repair kit and instructions for minor repairs. The
following information can be used if repair instructions have
been lost or misplaced.
IF A LEA OCCURS:
1. Place your cushion cells down and over-inflate until all four
corners touch.
2. Immerse the over-inflated cushion in water to locate the
leak.
3. Once the leak has been located, mark the leak by inserting a
toothpick into the hole.
4. Allow the cushion to dry thoroughly.
5. Remove the toothpick, and clean the area around the hole
with the alcohol wipe provided. Let the surface dry.
6. Peel the backing from the patch provided, and centering the
patch, place it over the hole.
7. Press the patch down firmly until a good seal is achieved.
8. The cushion is now ready for use. Adjust the cushion for
proper inflation following the instructions in this manual.
Although patches do not change the performance of the cushion,
they should be monitored periodically to ensure effectiveness in
addressing the leak. If the patch is not successful in addressing the
problem, or if more extensive damage is present, please contact
your supplier immediately.
Replacing Valves
1. Firmly grip the rubber valve stem and remove the old infla-
tion valve by using pliers.
CAUTION– DO NOT REMOVE AN INFLATION VALVE BY HOLDING
THE CUSHION AND PULLING THE VALVE, DOING SO
MAY TEAR THE CUSHION.
2. Moisten the ribbed end of the replacement valve and insert it
into the valve stem until the rubber is snug to the body of
the valve.

124610 Rev. B6
ENGLISH
NOTES

124610 Rev. B
7
ENGLISH
NOTES

©2019 Sunrise Medical (US) LLC
12.19 124610 Rev. B
Customer Service: 800.333.4000
www.SunriseMedical.com
Sunrise Medical • 2842 Business Park Ave. • Fresno, CA 93727 • USA
In Canada (800) 263-3390
Other manuals for Fusion
2
Table of contents
Other Jay Wheelchair manuals

Jay
Jay SPEX Instruction Manual

Jay
Jay FIT 2U BACK User manual

Jay
Jay Fusion User manual

Jay
Jay J2 Plus Installation and operation manual

Jay
Jay XTREME ACTIVE User manual

Jay
Jay Care Back User manual

Jay
Jay GO BACK User manual

Jay
Jay Shape Back User manual

Jay
Jay FULL FOOTBOX Assembly instructions

Jay
Jay WHITMYER PRO User manual